When I was a kid learning photography, my dad owned a photo lab and let me come to work with him in the summers. That’s where I learned how to manually process black & white and color film. I also learned how important the post-shoot processing of an image is to its success—something that, at the time, many photographers overlooked.
Getting it right in the camera is critical; postproduction should be a time for refinements, not rescuing images from technical errors.
In our current state of technology, photographers are required to learn more, do more, and be more than ever before. It’s no longer enough to take great pictures and drop the film off at the lab—that would be too easy. Today, we have to offer extensive, high-quality retouching and production, plus different output for galleries, commercial print clients, and web-based outlets. We are being pulled in so many directions that it is easy to get lost. While it all expands our knowledge of the industry, I honestly feel it isn’t the best for us. Think of it this way: a CEO understands his whole business—but while he knows the value and importance of each job, that doesn’t mean he will personally do each job. He entrusts those tasks to other professionals. As a photographer, trying to do everything can turns you into a Jack-of-all-trades . . . and, in many cases, a master of none. I believe photographers should master one thing: photography. We should try to do that one thing better than anyone else. If you are going to do something, I think you should do it as well and as close to perfection as you possibly can. So, while I am going to cover basic postproduction techniques, I urge you to remember that there are a ton of great professional retouchers and postproduction experts out there. If it makes sense to do so, consider being more like the CEO and outsourcing some tasks.
Adobe Photoshop. Adobe Photoshop is the industry-standard software for photographers—and for good reason. It is the flagship of the Adobe line and has changed photography. Photoshop also happens to be expensive; a single-user license will currently set you back $699. For most people, that’s a lot of money. Adobe also upgrades Photoshop at about 18-month intervals, and you’ll have to pay those upgrade costs each time if you want to keep your software up to date.
Fortunately, there are some new options. Recently, Adobe has introduced month-to-month and annual rental plans that will fit into most budgets. The current month-to-month cost for Adobe Photoshop is $29.99, with no long-term commitment (you can cancel anytime). At about $7 per week, this is a very cost-effective way to pay for Photoshop. You’ll can also opt to pay $240 up front for a year-long rental. This will save you $120 over the course of the year (compared to the month-by-month rental price).
If this is still more than you want to invest in postproduction software, consider looking into non-Adobe options.
Adobe has a site (www.labs.adobe.com) where you can download time-limited developer/test versions of their software for free. This is often a great place to get software to use for a few months and learn about it for free.
Canon and Nikon Camera Software. If you shoot with a Canon or Nikon camera, your camera probably came with image-editing software. Photographers often overlook this software—and, frankly, in the past it wasn’t very good. In recent years, though, the Canon and Nikon postproduction software has improved dramatically. It still doesn’t have all the features that Photoshop has, but it can do about 80 percent of what Photoshop can do—and can do it for free.
Online Software (Free or Cheap). Once you have a clean JPEG image, there are lots of free, online resources to make it more eye-catching. When using online services in processing your nude photography, be aware that some sites may find it objectionable. Recently, I was testing a new web-hosting company—and out of the clear blue sky they deleted my test layout. I e-mailed them to ask why and was told that the images were considered unsuitable for their “family-safe workplace.” These were not nude images (just models in bras and panties), but their policy excluded anything past PG-13. Every company has a different policy, and it can take a while to figure out which ones are “adult friendly.”
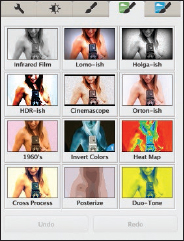
Pixlr.com. Pixlr.com allows you to add effects to your images, working via their web site or apps for the Google Chrome browser, iPhone, or Android. I am not a big fan of making your images look all crazy, but out of all the stylizing programs, I think that Pixlr is the best one. It is easy to use, it is fast, and it can create great-looking images. Best of all, it’s free. (When it comes to styling, keep in mind that looks are seasonal; what is cool or trendy now will be old and outdated soon. I prefer to keep my images as simple as possible, but some models really like stylized images, so it’s an important service to offer.) Of the three editors they offer, Pixlr-o-matic is my favorite.
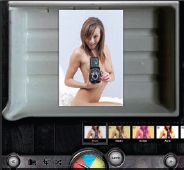
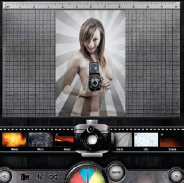
Working with Pixlr, it’s a snap (and free!) to add some good-looking effects to your images.
Picasa.Google.com. Picasa offers a web interface and a desktop application that you can run on Mac OS X or Microsoft Windows computers. This is nice if you don’t have Photoshop—or don’t have it installed on every computer you use. For example, I use Picasa on my laptop because I don’t do much heavy editing on that machine. Both the desktop and the web versions of Picasa can do basic edits like cropping and color correction. Picasa also has some stylizing effects you can try.
To do some basic image editing, Picasa is a good option. It also provides some stylizing options.
Camera Bag is inexpensive, but so efficient and easy to use that we rely on it for many day-to-day processing tasks.
Camera Bag. Camera Bag (http://nevercenter.com/camera-bag/desktop/) is a stand-alone program that just does effects, but there are a couple of reasons I love it. First, Camera Bag works on either a Mac or a PC. I work on a Mac and my wife works on a PC, so having a cross-platform program is important to us. Second, it runs locally, so I can batch-process a large number of images at one time. (Pixlr, in contrast, is great for one or two images—but if you have fifty images, it is almost impossible to upload, process, and download them all.) Camera Bag also processes images faster than any other program I have tested and works with really large files (I have tested 18MP images and it worked just fine). This is an area where many other editors fall short. It is also a really simple program to work with. There are a couple of YouTube videos that show you how to work the program, and that’s all you need—no War and Peace-sized instruction manual. The controls in the program feel natural and simple. Best of all, you get all this for the very fair price of $29.
As noted, Adobe Photoshop is the industry standard for postproduction. So, when it comes to discussing techniques, it’s the closest thing we have to a common denominator. If you choose to use an image-editing program other than Photoshop, you will probably be able to do many of the same operations, but they might have different names. I don’t want to dwell on postproduction too much, but the following are the most common things I do in postproduction using Photoshop.
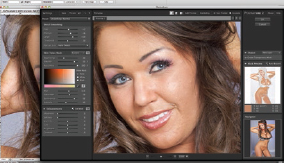
Adjustments in Camera Raw. Camera Raw is the program within Photoshop that converts your RAW images into JPG or DNG images that can be shared and edited. While you can make an astounding number of adjustments in Camera Raw, don’t be fooled into thinking it can make up for shooting poor-quality files to begin with. (As the saying goes, “Garbage in, garbage out.”) The main settings I usually nudge are as follows.
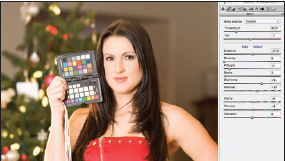
Adjusting the temperature and tint according to the color checker.
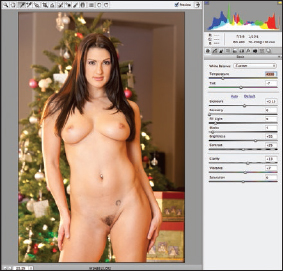
The Fill Light slider helps restore detail in the shadow areas.
Temperature and Tint. I use a Whi-Bal or X-Rite Passport Color Checker to make sure my colors start off perfect. Occasionally I will warm up the images, but normally I do that after I am done processing the RAW files.
Exposure. If you’re careful with your exposures, you shouldn’t need to adjust this setting by more than a small fraction of a stop. It’s important to learn how to nail the exposure in-camera, but sometimes lights change, models move, and life happens, so it’s good to have this tool at your disposal.
Fill Light. A very common problem I see is the lack of proper fill light levels, resulting in blacks and dark browns with no detail. With insufficient fill, a dark-haired model can look like she’s wearing a large, dark blob on her head. With proper lighting and post-processing, the hair should retain detail or highlights; it should look shiny and movable. In Camera Raw, the Fill Light setting lightens the darkest areas of your images, helping to restore any lost detail.
Recovery. The Recovery slider is something I use less frequently, but it allows you (to some degree) to recover lost detail in the highlights. With high-contrast images (like those shot outside or in window light with no fill), this can help recover details in the brightest areas of the image.
Blacks. The Blacks setting adjusts the point at which more black is added to the shadows. This reduces detail but increases contrast. I try to keep the Black slider between 0 and 5, then set Fill Light slider at two to three times the amount of black (so, between 1 and 15).
Clarity. The Clarity slider works well to boost the local and midtone contrast in one operation. The Contrast slider, on the other hand, works best on overall contrast. I know it sounds complex, but if I need to increase the contrast of an image, I will go to the Clarity slider first.
Vibrance. What the heck is the difference between the Vibrance and Saturation sliders? The Saturation slider changes everything blindly—all the tones get shinier and more intense. Unfortunately, this means the tones that were already bright and saturated can get too shiny and lose detail. The Vibrance slider, on the other hand, adjusts the lower-saturation tones in the image first. This can give any muddy areas some pop without affecting the brighter areas of an image that are already perfect. Also, the Vibrance adjustment is designed to protect the skin tones from excessive saturation increases. An excessive boost in the skin-tone saturation will make them look orange (like an Oompa Loompa from Willy Wonka and the Chocolate Factory).
Photographers often ask me why don’t I shoot in black & white from the camera or convert the image to black & white in Camera Raw. The answer is there are better ways to make an image black & white. I feel it is always better to capture as much data as possible (by shooting RAW files) and then process the images to black & white after exporting them from Camera Raw to Photoshop.
Other Common Adjustments. Some of the other important settings are Tone Curve, Sharpening, Lens Correction, Camera Calibration, and Presets/Snapshots. These operations are covered in Photoshop books or you can learn them easily by playing with the settings.
Puppet Warp/Liquify. No one—not even models—likes everything about their body, and the appearance of the body can change dramatically (for the better or worse) when shooting at different angles and in different poses. There are two tools in Photoshop that can make all the difference in the world.
I use the Puppet Warp tool in Photoshop to move large areas of the body (the arms, legs, chin) as well as to pull in the model’s stomach (when she didn’t suck her breath in all the way). When you use Puppet Warp you lock down control points that will remain in place and add control points that will move, allowing you to implement the needed adjustments. Simple.
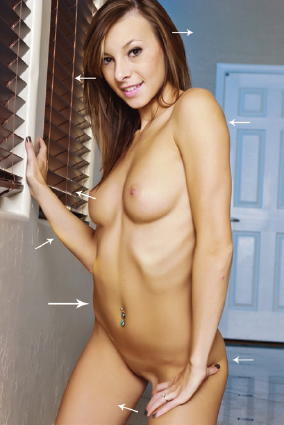
The Liquify filter, which lets you manually push and pull (or expand and contract) discrete areas of the image, is best reserved for adjustments to smaller areas. I use the Liquify filter to enlarge the hair, eyes, and lips; to enlarge or reduce the breasts (or areolae); to slim the waist; to tuck in the chin area (removing any hint of a double chin); and to reshape the body in general. (I’ve listed these from most-common to least-common operations.)
I do not, however, tell the model, “Hey, I’m going to make your hair, eyes, lips, and breasts bigger—and take 10 pounds of fat off you!” The model would freak out! Instead, I create the image I think looks the best, then send it to the model. I have never had even one model tell me, “Oh my God—my lips (eyes, hair, breasts) are too big!” Never once.
I create the image I think looks the best, then send it to the model.
Even if you are good at Liquify, there is no need to do it all the time. However, for images that are going to be displayed publicly or require your best production value, you should spend some time and make them perfect. Whether your subject is a professional model or an everyday housewife, a bit of Liquify will make the image look a million times better. Just remember not to go overboard.
Spot Healing Brush. The next tool I use is the Spot Healing Brush, which makes it easy to remove tattoos, moles, and other small imperfections. Using it, you can easily remove crow’s feet, stretch marks, and smile lines (deep nasal-labial lines). Again, try not to overdo it; you are aiming for a natural look. Every photographer should know how to use this tool.

Before (left) and after (right) with Puppet Warp. The subtle slimming gives the model a better look.

Using the Liquify tool, I slightly slimmed the stomach area and enhanced the model’s breasts. I also boosted the volume of her hair, lifted her bottom, and slimmed her right thigh.
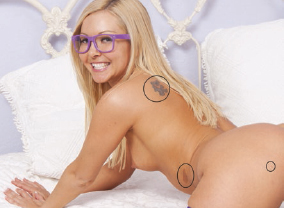

Marks on the skin are easy to remove with the Spot Healing Brush.
Actions. Actions are the unsung heroes of Photoshop—even in Photoshop books it is hard to find good information about them, yet I use them all the time. Actions let you automate many of the repetitive tasks you already do in Photoshop so you can do these operations automatically.
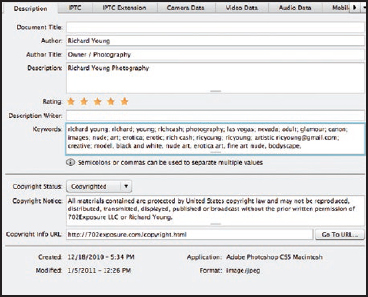
Let me give you a great example. When I complete work on an image, I always need to flatten it and convert it to the desired color space. I also like to add my contact information to the EXIF data (the automatically recorded info the camera attaches to each file, telling how and when it was shot). To do those three steps in a flash, I created an action and assigned it a hot key (a one-key shortcut to trigger it). Now, all I have to do is push f/5 and—boom!—the file is flattened, converted to the correct color space, amended with my contact information and saved. All with just one keystroke!
To create an action, open an image file. Then, go to View>Actions. From the top-right of the palette, select “New Action.” In the pop-up window, name it and (if you wish) assign it a function key. Then, hit Record. From this point, Photoshop will record what you do. Let’s create an action that will add information to the EXIF data, then save and close the file. First, go to File>File Information and add whatever information you like. When you’re done, hit OK. To finish, go to File>Save and then File>Close. At this, hit the stop button (the black square) at the bottom of the Actions menu. Now, you can run this action at any time simply by hitting the function key you assigned! It’s a way to work smarter, not harder.

Naming the action and assigning a function key.
Recording additions to the EXIF data.
Filters and Plug-Ins. I have a love/hate relationship with filters. I would be lost without some of the filters I use daily in Photoshop. However, sometimes filters can make things more complex, expensive, and time-consuming. Therefore, I’m only going to cover the products I use the most.
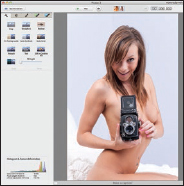
Imagenomic: Portraiture. The first few times I used Portraiture, I have to confess: I hated it. It made everything look fake, plastic, and unreal. After some research and practice, however, I’ve found that I can easily fade the effect to get a more realistic look. I simply have the filter generate a new layer, then reduce that layer’s opacity. It works like a dream and makes the skin look amazing.
Imagenomic provides a free trial of this software. If you choose to buy it, the cost is $199.95. The manufacturer also offers great training videos to help you learn to use the software. Additionally, you have access to some downloadable actions.
Alien Skin: Exposure. In my opinion, digital images straight out of the camera lack something that makes them look real. My parents owned a photo lab, so I grew up with film and remember going every week to drop off my film and then pick up my slides or prints. I want my digital images to have the same feel and look as those images I remember as a kid. Today’s digital files may have the “correct” and “mathematically perfect” color balance, but that doesn’t mean it’s the most pleasing looking color in the world. This is where Alien Skin comes in: I use it to mimic the look of film—in my case, Kodachrome film and black & white film.
Processing an image with Imagenomic’s Portraiture filter.
From the original image (left), Alien Skin’s Exposure filter helped me get the color right where I wanted it (center). Adding some softening with Imagenomic’s Portraiture filter completed the image (right).
I also use Alien Skin to convert from color (top right) to black & white (bottom right). Again, Imagenomic’s Portraiture filter was used to complete the image (below).