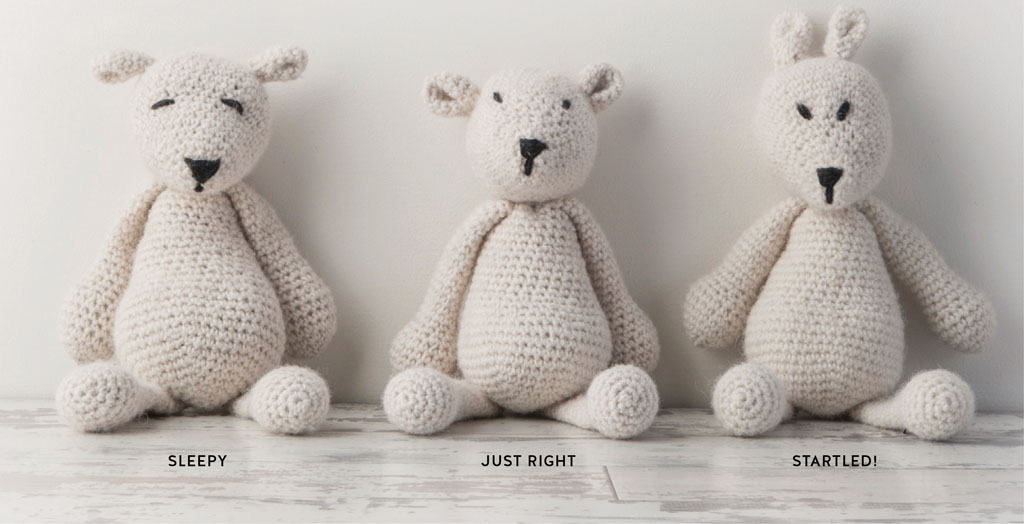
Sewing on the face details is when your animal’s personality really begins to emerge. Take your time to get this right; don’t be afraid to cut it all off and start again (I do this frequently when working on a new animal).
Unless otherwise detailed in the individual pattern instructions, you will need to pinch together the bottom of an ear and sew a couple of stitches through before stitching it in place on the head.
When sewing the eyes I have used a simple method of two wraps of yarn running vertically through the same stitches across two rows. Using more wraps to create bigger eyes will make the animal look cuter and younger. Using small wraps over only one row of stitches will potentially make the animal look a bit evil! Sewing the eyes close together will give a different style than if they are set far apart. My advice would be to play with the positioning to find the way that you prefer the eyes, but in general split the face into thirds to position them.
The position of the ears can portray the mood of the animal. Placing them to the side of the head and pointing forwards and down will give a sad and sleepy appearance. Conversely, placing them high on the top of the head will suggest that the animal is surprised or alert, so there is often a balance somewhere in between the two. The most important factor is to get the two ears evenly placed, so mark the central stitch at the top of the head and count out from there along the same row.

The noses vary significantly from animal to animal. Some just have simple nostrils; others have large triangular noses with the suggestion of a mouth, and others have none at all. You could use the same overdyed black thread that you are using for the eyes, although using a lighter shade of yarn can often give the animal ‘softness’; this is used to great effect in certain animals such as Emma the Bunny.
When making nostrils, vertically oversew around one stitch. The distance you choose to separate the nostrils will help shape the character of your animal. In the case of animals with dark faces you may want to use a lighter yarn to add detail.

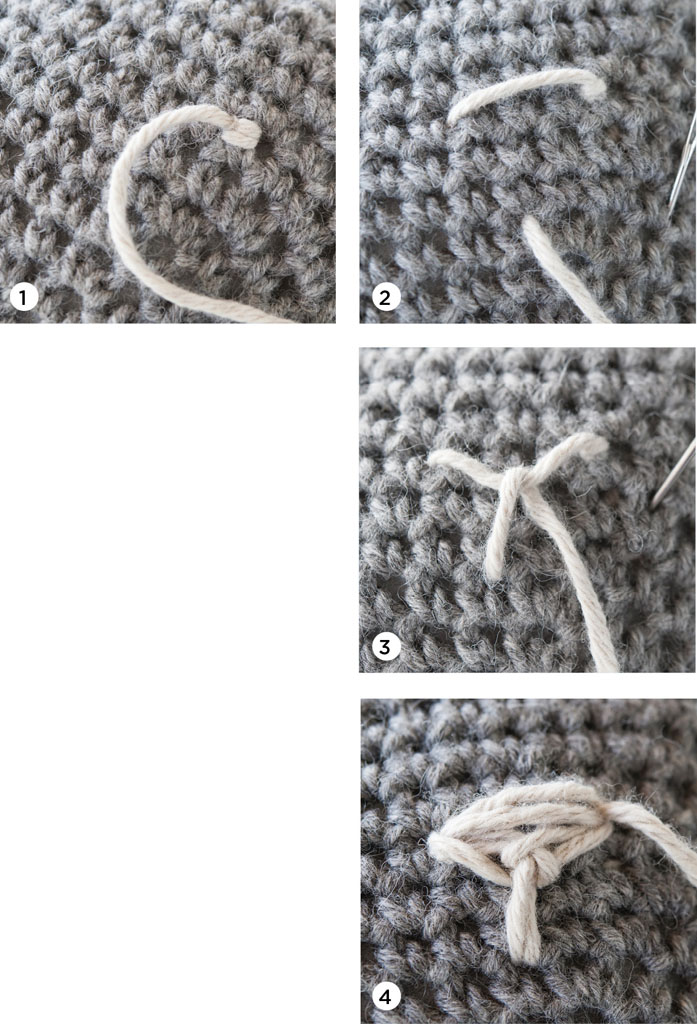
1. Secure the yarn in the top right position for the nose.
2. Sew across three stitches horizontally from right to left and then beneath the fabric three rows down.
3. Loop the yarn over the horizontal stitch and sew back into the bottom stitch.
4. Add further wraps following a similar pattern to increase the size as desired.
If made in natural yarn and stuffed with synthetic stuffing material, the animals can either be washed by hand or on a gentle cold machine cycle. Please be aware that if you opt to use beans, pellets or sand in your toys this may make them unwashable; you would need to sponge the surface clean.
Your animal will only be as safe as you make it, so don’t skimp on the stitches when sewing up. With ears and legs, I oversew all the way around the edges – you really can’t sew them too much! I have also only used yarn to sew on eyes. You could use beads or buttons as an alternative. Never use toy safety eyes, beads or buttons on an animal intended for a child under three years old; you should embroider the details instead.