Spring Web MVC is a framework for building web services or web applications and is often shortened to Spring MVC or just MVC. MVC stands for Model-View-Controller and is one of the common design patterns in OO (object-oriented) programming.
Core Concepts
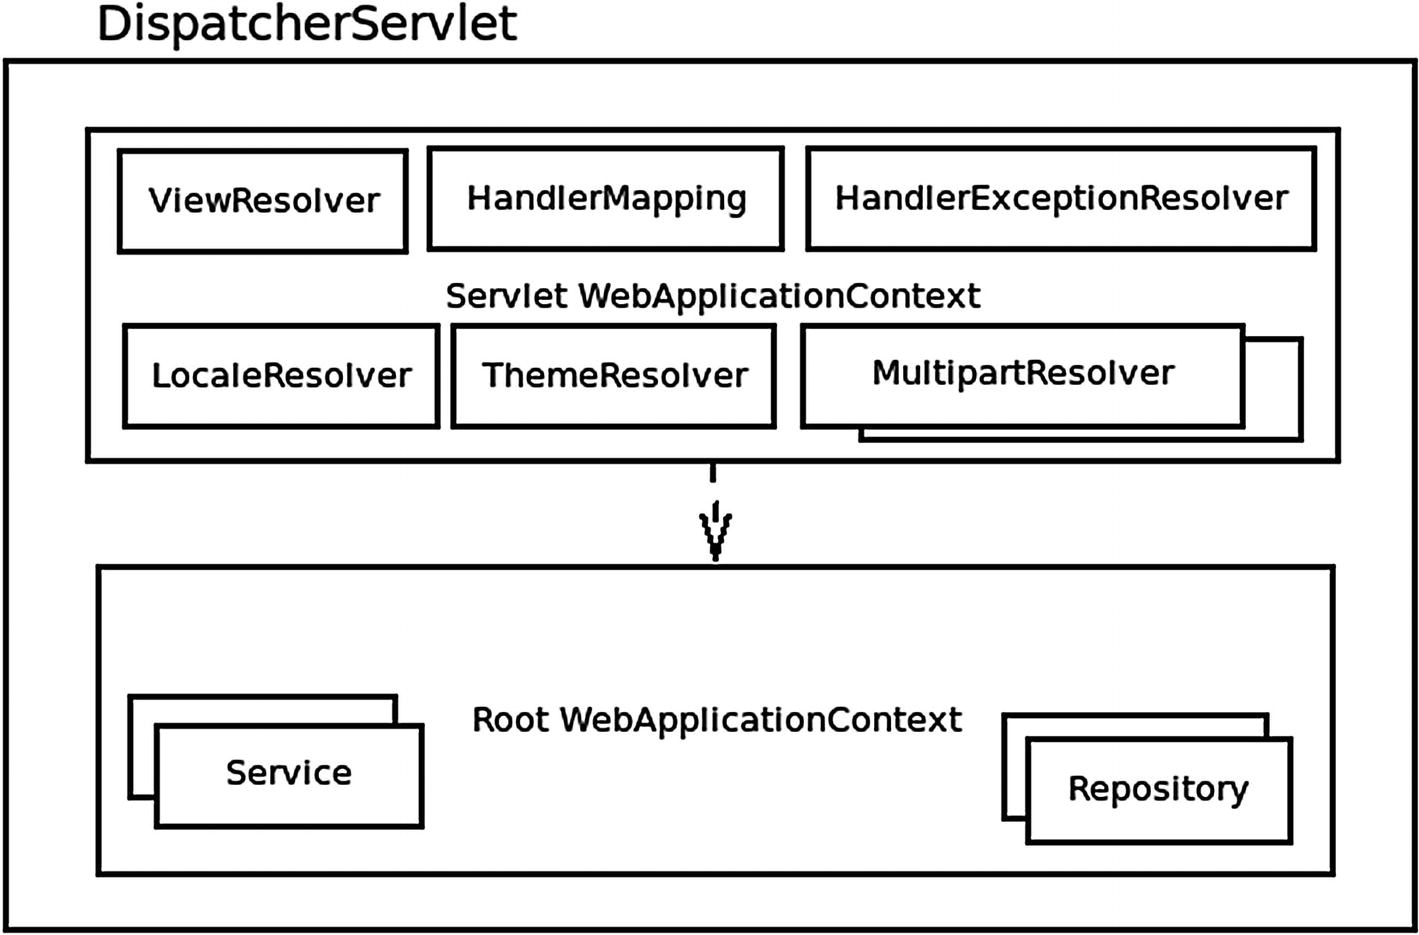
Spring MVC is designed with the open-closed principle in mind (open for extension, closed for modification). The DispatchServlet is the core of Spring MVC, and it contains a Servlet WebApplicationContext (containing the controllers, ViewResolver, HandlerMapping, and other resolvers) which delegates to a Root WebApplicationContext (which contains the service and repository beans of the application).
It detects the following types of beans and uses them if found; otherwise, defaults are used: HandlerMapping, HandlerAdapter, HandlerExceptionResolver, ViewResolver, LocaleResolver, ThemeResolver, MultipartResolver, and FlashMapManager.
DispatcherServlet
Getting Started
First, add the dependency to your project.
WebConfig.java
Also make sure to use @ComponentScan or @Bean or XML bean definitions to define your Spring Beans. In a typical application, you might also have services and repositories, but for this chapter, we will focus only on the Spring Web MVC components.
Controllers
Annotate a class with the @Controller annotation to mark it as a controller. Using @RestController is similar but is used for RESTful web service controllers – it assumes the returned value of every method is converted to a return value, such as JSON (similar to when the method is annotated with @ResponseBody). Using either of these annotations will allow your class to be picked up by component scanning.
You can also annotate the class with @RequestMapping to set a URL prefix that will apply to every method in the class. For example, annotating a controller class with @RequestMapping("/api/v1/") will add the “/api/v1/” prefix to the URL mapping of every method within the controller.
Request Mappings
Annotate a method with @RequestMapping or one of the corresponding HTTP method type annotations, such as @GetMapping. Each method request mapping should match a specific incoming request. If more than one method would match the same HTTP request, Spring will throw an error upon initializing the controller (typically at start-up time).
@RequestMapping – You need to set the HTTP method and path properties, for example, @RequestMapping(method = RequestMethod.PUT, path = "/courses/{id}").
@GetMapping("/path") – Maps to HTTP GET.
@PostMapping("/path") – Maps to HTTP POST.
@DeleteMapping("/path") – Maps to HTTP DELETE.
@PutMapping("/path") – Maps to HTTP PUT.
@PatchMapping("/path") – Maps to HTTP PATCH.
Example get-mapping using path variable and produces
In this example, the given OutputStream parameter can be used to provide the output data (image in this case). You can use produces to set the Content-Type of the response (“image/jpeg” in this case).
Create POST Mapping with custom response status
You can also specify request parameters or header values to make a request mapping even more specific. For example, @PostMapping(value = "/courses", params = "lang=java", headers = "X-custom-header") would only match POST requests with a query parameter named “lang” with the value of “java” and a header named X-custom-header present.
Path Regular Expressions
Get Course by Id mapping
Mapping Method Parameters
@RequestParam – A query parameter.
@PathVariable – A part of the path.
@MatrixVariable – These variables can appear in any part of the path, and the character equals (“=”) is used for giving values and the semicolon(“;”) for delimiting each matrix variable. On the same path, we can also repeat the same variable name or separate different values using the character comma (“ , ”).
@RequestHeader – An HTTP header from the request.
@CookieValue – A value from a cookie.
@RequestPart – Annotation that can be used to associate the part of a “multipart/form-data” request with a method argument. Supported method argument types include MultipartFile in conjunction with Spring's MultipartResolver abstraction and javax.servlet.http.Part in conjunction with Servlet 3.0 multipart requests, or otherwise for any other method argument, the content of the part is passed through an HttpMessageConverter taking into consideration the “Content-Type” header of the request part.
@ModelAttribute – Can be used to get access to an object from the Model. For example, public String handleCustomer(@ModelAttribute("customer") Customer customer) would get the Customer object using the key "customer".
@SessionAttribute – Attribute of the session.
@RequestAttribute – Attribute of the request.
 Although Java does not keep parameter names by default in the compiled bytecode, you can achieve this through a setting – Spring Boot does this by default without any intervention needed, allowing you to freely use parameter-name-linked path variables and similar.
Response Body
Annotate a method with @ResponseBody to tell Spring to use the method’s return value as the body of the HTTP response.
Alternatively, if you annotate the class with @RestController, this implies the response body is the return value for every method.
Spring will automatically convert the response to the proper value using implementations of HttpMessageConverter. Spring MVC comes with built-in converters.
HttpEntity
ResponseEntity<T> – Contains both an entity to be serialized by Spring’s conversion logic and HTTP values such as an HTTP status
HttpHeaders
String (name of the view to resolve)
View
Map or Model
ModelAndView
DeferredResult<V> , Callable<V>, ListenableFuture<V>, or CompletableFuture<V> – Asynchronous results
ResponseBodyEmitter
SseEmitter
StreamingResponseBody
Reactive types like Flux
Views
Spring Web MVC includes support for several different view renderers such as JSP, FreeMarker, Groovy templates, and Velocity. Based on which view technology is chosen, the selected ViewResolver will expose the model, session, and request attributes appropriately.
Spring MVC also includes a JSP tag library to assist in building JSP pages.

Spring Web MVC request/response
View Resolvers
ViewResolver | Description |
|---|---|
AbstractCachingViewResolver | Abstract view resolver that caches views. Often views need preparation before they can be used; extending this view resolver provides caching. |
XmlViewResolver | Implementation of ViewResolver that accepts a configuration file written in XML with the same DTD as Spring’s XML bean factories. The default configuration file is /WEB-INF/views.xml. |
ResourceBundleViewResolver | Implementation of ViewResolver that uses bean definitions in a ResourceBundle, specified by the bundle base name. Typically, you define the bundle in a properties file, located in the classpath. The default file name is views.properties. |
UrlBasedViewResolver | Simple implementation of the ViewResolver interface that effects the direct resolution of logical view names to URLs, without an explicit mapping definition. This is appropriate if your logical names match the names of your view resources in a straightforward manner, without the need for arbitrary mappings. |
InternalResourceViewResolver | Convenient subclass of UrlBasedViewResolver that supports InternalResourceView (in effect, Servlets and JSPs) and subclasses such as JstlView and TilesView. You can specify the view class for all views generated by this resolver by using setViewClass(..). |
VelocityViewResolver/FreeMarkerViewResolver/GroovyMarkupViewResolver | Convenient subclasses of AbstractTemplateViewResolver that supports VelocityView (in effect, Velocity templates), FreeMarkerView, or GroovyMarkupView, respectively, and custom subclasses of them. |
ContentNegotiatingViewResolver | Implementation of the ViewResolver interface that resolves a view based on the request file name or Accept header. |
WebConfig.java
This sets up a web application with the InternalResourceViewResolver that looks for files under the “/WEB-INF” directory with “.jsp” file extensions.
Error Handling
You can declare a custom error handler method using the @ExceptionHandler annotation. Spring calls this method when a request handler method throws any of the specified exceptions.
Custom handleArgException method
Custom handleArgException method which returns a DTO
To handle Exceptions throughout all of the controllers in your application, you can use a class annotated with @ControllerAdvice and put all of your methods marked with @ExceptionHandler there.
Web Scopes
“application” – The application scope creates the bean instance for the life cycle of a ServletContext, which could span multiple servlet-based applications.
“request” – The request scope creates a bean instance for a single HTTP request.
“session” – The session scope creates a bean for an HTTP Session.
Testing
Spring typically provides test support for all of its projects. Since everything is a POJO, it is straightforward to write unit tests. For Spring MVC, Spring Boot provides the @WebMvcTest annotation to put on a test class and MvcMock type that helps test controllers without too much performance overhead.
build.gradle
ControllerTest.java
- 1.
Using @ExtendWith with SpringExtension enables Spring’s testing helper to scan for things like the @MockBean annotation which creates a bean which is a (mockito) mock instance.
- 2.
Using @WebMvcTest causes Spring to auto-configure only the MVC layer of the application, including controllers.
- 3.
Calling perform on the instance of MockMvc invokes the HandlerMapping logic and has a fluent interface for validating the response. In this case, we use “.andDo(print())” to print it out and then expect the HTTP status to be OK (200) and use “content().string(containsString(String))” to validate that the response string has the expected result.