Poppy operates her custom-built vending machine.
Spending some time every day with your chickens should be a pleasure, not a prison sentence. Even the best henkeepers will enjoy having some time away from the coop — especially if that time away is spelled r-o-a-d t-r-i-p. The options outlined in this chapter allow chicken-keepers to enjoy two-week vacations without coming home to filthy feeders or a famished flock.
Poppy operates her custom-built vending machine.
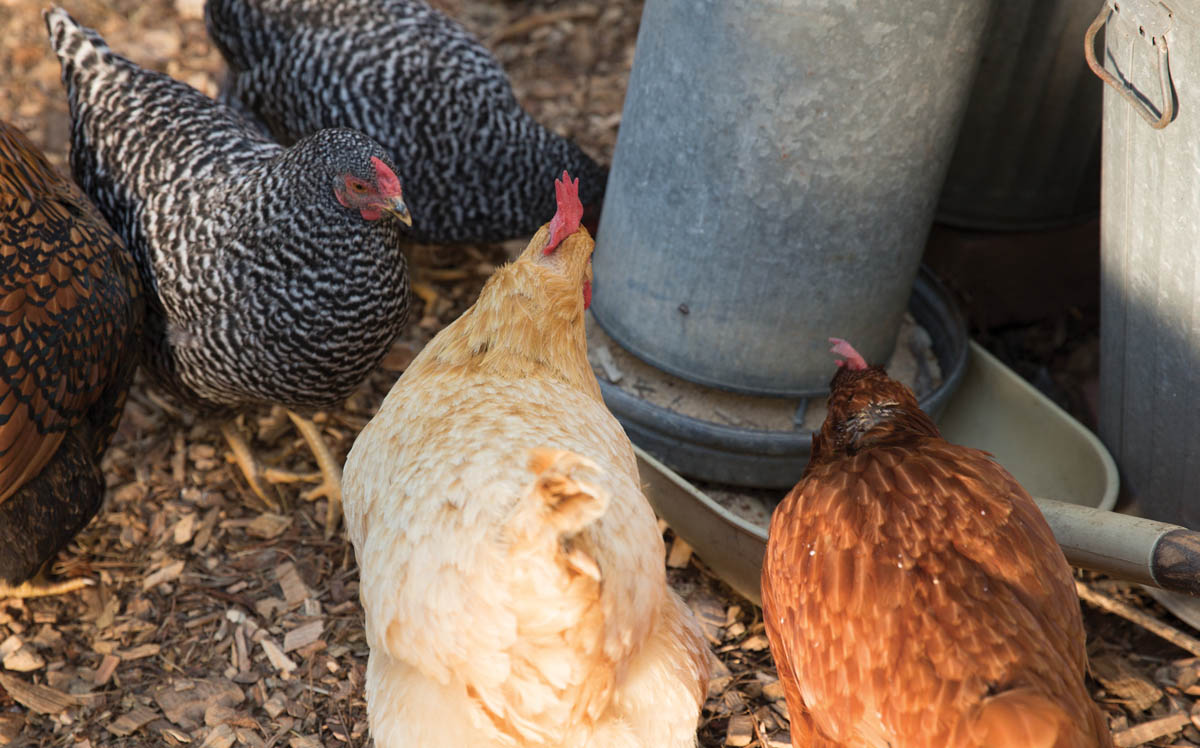
Laying hens need to eat about a quarter of a pound of feed every day, varying of course with their age, activity, the number of eggs they are laying, the amount of free-ranging they do, and the season. The colder it is, the more they eat to keep their body temperature up. As they get older, they lay fewer eggs and need fewer calories. These kinds of factors aside, though, 1⁄4 pound per day, per bird, is a good year-round average for figuring out how much feed to buy.
For example, our three older hens are just past the prime of their egg-laying lives, yet they are still productive. The four young hens are at their peak of egg laying. For us, a 50-pound bag of organic layer feed lasts about a month in warm weather and a little less in cold.
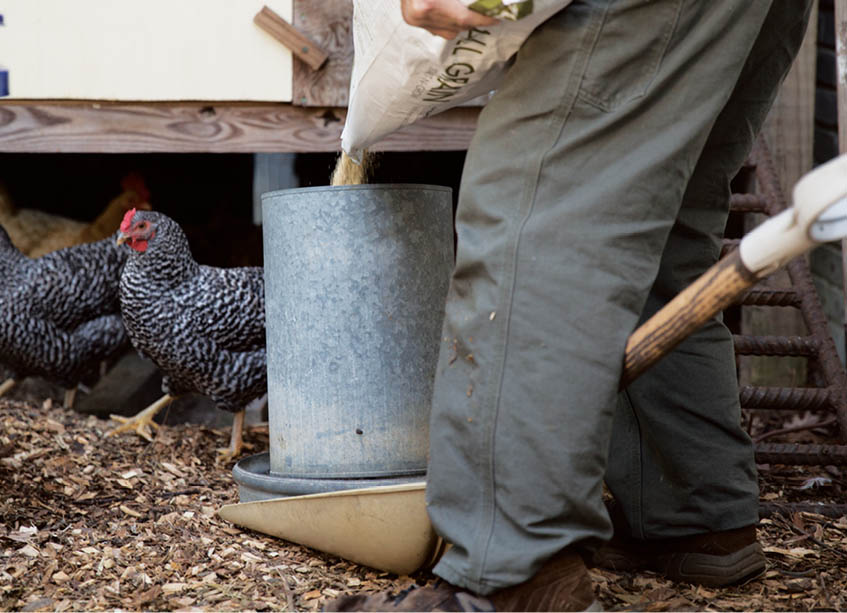
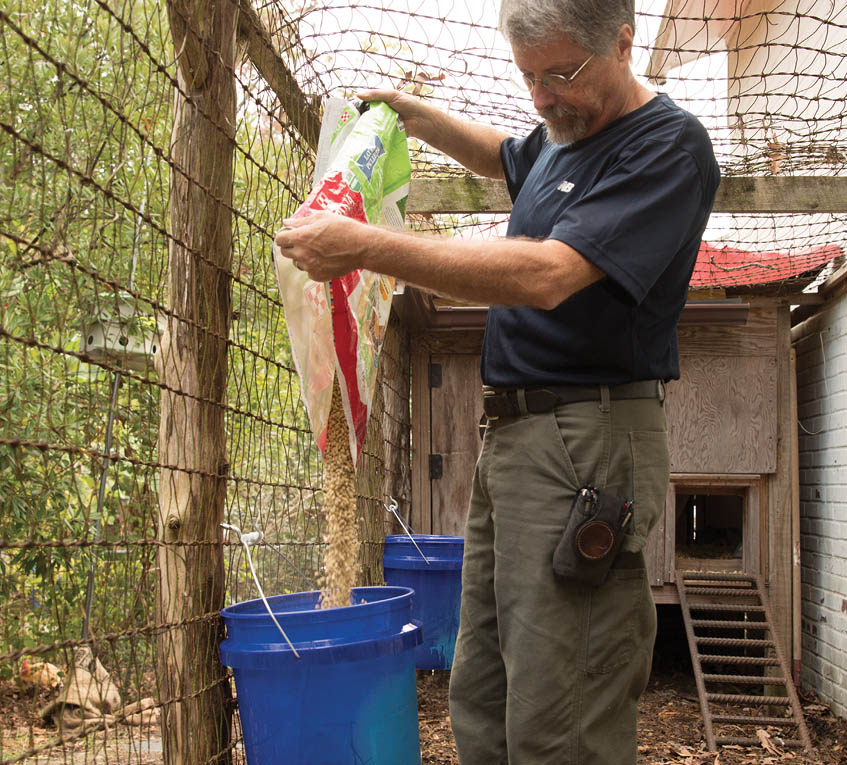
The important thing is that we don’t have to feed them very often. We use a vintage galvanized gravity feeder we bought for $5 at a junk-tique shop. It’s big enough to hold about 25 pounds of feed, so I have to top it up only every couple of weeks. The remainder of the bag stays in a small watertight and verminproof galvanized garbage can next to the coop.
If you have many more birds than this, you can set up multiple gravity feeders.
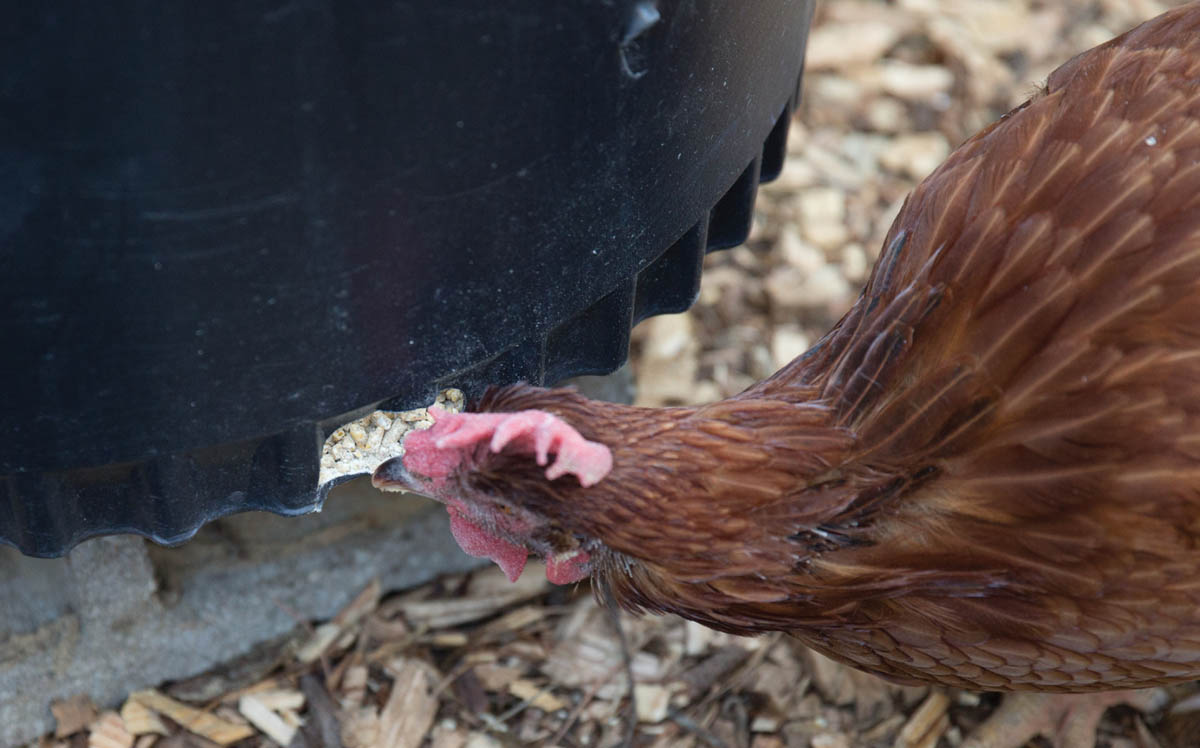
My friend Katie Ford had been feeding her two dozen chickens with three small gravity feeders that needed topping up every couple of days. When I showed up one day with a stack of 25-gallon black plastic nursery pots, she sized them up right away as ready-made gravity feeders and said, “I need one of those.” She quickly put one in the run and dumped in a 25-pound bag of pellets. The chickens went right to work.
Katie realized the new feeder would hold enough feed for a week or two. That’s a big time-saver for a first-grade teacher trying to expand her backyard homestead.
These nursery pots have a lot of advantages for chicken-keepers who want to use them as gravity feeders:
Katie positioned the pot in the run on her feeding station: a pallet set on bricks, where the three small feeders had been parked. The bricks keep the pallet off the ground so it won’t rot. With the feeders raised off the ground, the chickens can’t scratch debris into them. A piece of metal roofing mounted overhead keeps the rain off the feeders and the pallet.
Being handy, Katie immediately went to work customizing her new gravity feeder. Realizing that the drainage holes needed to be bigger to allow more pellets to flow, she took a knife and widened each hole to about twice its original size. Though the plastic is sturdy, it easily yields to most knives, or even pruners. Next, she cut down an old baby pool to function as a saucer to hold the pellets.
And then she went to place an order for more feed.
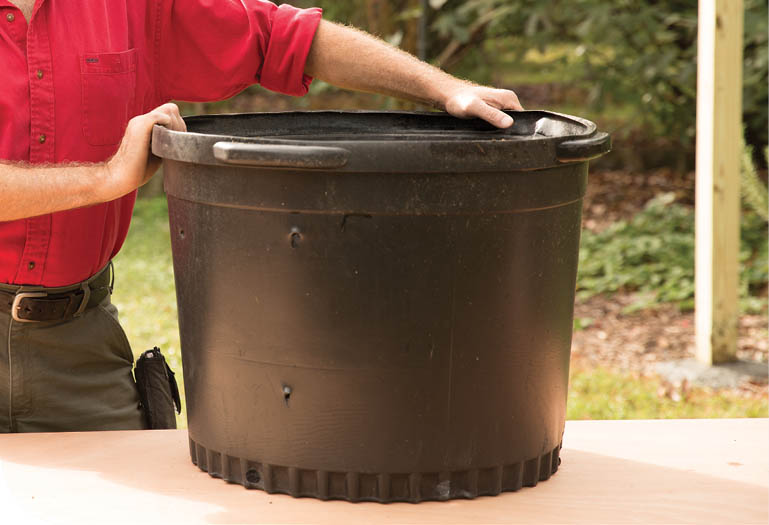
Park the nursery pot under a roof and on a dry surface onto which the feed pellets can gently spill out.
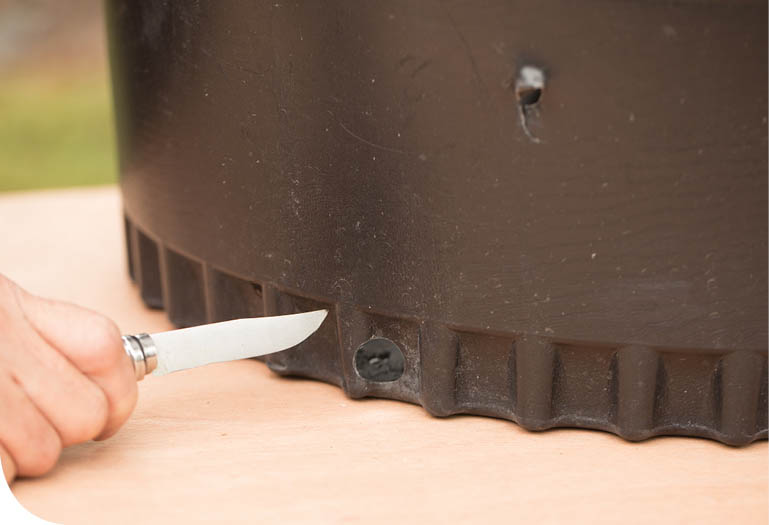
The drainage holes are about one inch wide. Use a knife to cut them to about two inches wide.
Gravity will keep pellets coming down through the holes.
A gravity feeder is, basically, a metal tube mounted over a metal saucer. As the chickens eat from the saucer, gravity pulls more feed from the tube. The saucer refills automatically until the tube is empty. Who needs robots when you’ve got gravity?
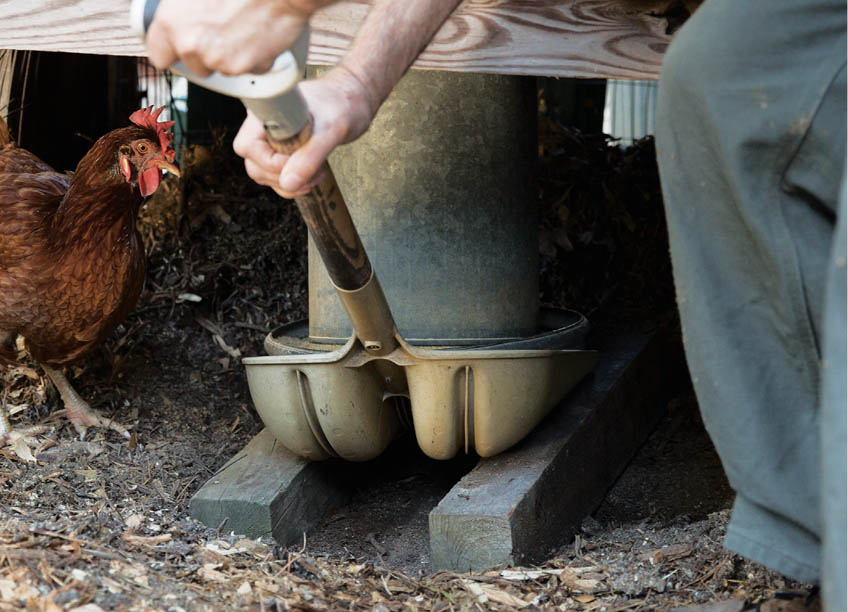
Mounting a gravity feeder on a grain scoop with some stiff wire or a couple of screws is an easy improvement that saves a lot of time and hassle.
The three challenges with gravity feeders are:
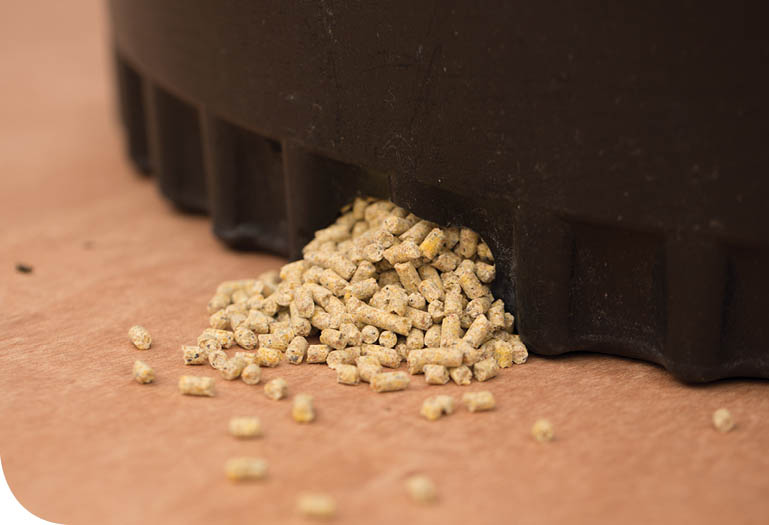
We like having a run that’s open to the weather, so we can’t keep a feeder in the pen; it would get soaked. We solved the poop and rain problems by parking our 18-inch-high gravity feeder under the coop in the space I call the Moat. The Moat, which is a barrier for vermin, also creates shelter from the rain for the hens and the feeder. And without enough headroom to roost on the feeder, they can’t poop in it either.
To keep a chicken from scratching debris into the feeder, it’s smart to raise the saucer up to chest-high on the birds. We do that with a couple of scrap pieces of 4×4 lumber.
But that setup can introduce a fourth challenge. Once it’s empty, how do you retrieve, refill, and return the feeder to its spot under the coop without skinning your knees, straining your back, or banging your head on the coop?
The hens’ food stayed dry, poop-free, and accessible for weeks while we went on vacation.
As I puzzled out this design issue, I felt as though I needed something like a kitchen drawer, so I could pull the feeder out from under the coop and then slide it back into place without bending over. In my garage I found a short-handled grain scoop I had bought at a yard sale for a couple of bucks. I parked the gravity feeder on the blade of the grain scoop, fastened them together into one unit, and I was in business. No knee-skinning, back-straining, or head-banging required. The hens’ food stayed dry, poop-free, and accessible for weeks — while we went on vacation.
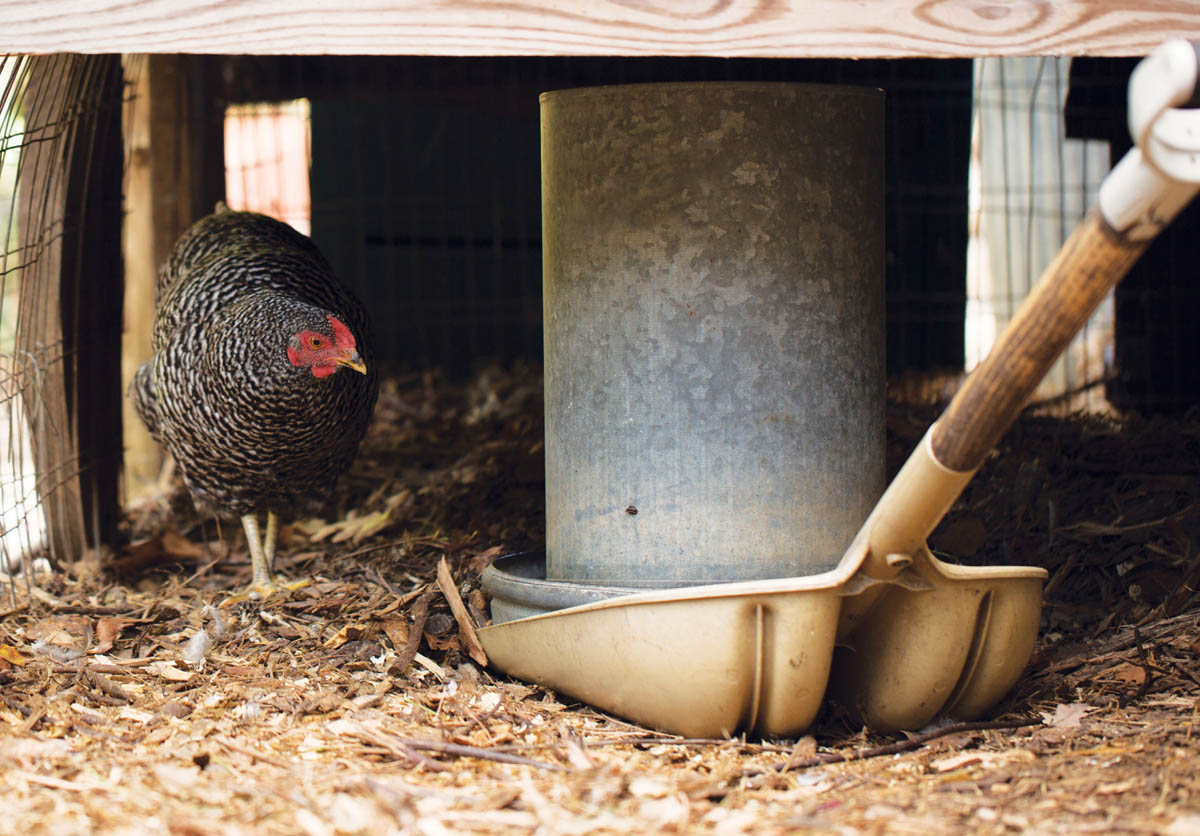
Storing a gravity feeder under the coop keeps out rain and poop. Attaching the feeder to the grain scoop makes it easy to retrieve, refill, and replace.
When the food drawer is properly in place, only the end of the handle protrudes from under the coop. When the saucer looks low on food, you can pull the food drawer out and refill it, then slide it back in. A nursery pot would also work as a gravity feeder mounted on a scoop.

A good chicken feeder should work smoothly every day, like a well-stocked vending machine. It should also be easy to keep clean, should keep the food dry and should be off-limits to feral critters that refuse to pay their rent with fresh eggs.

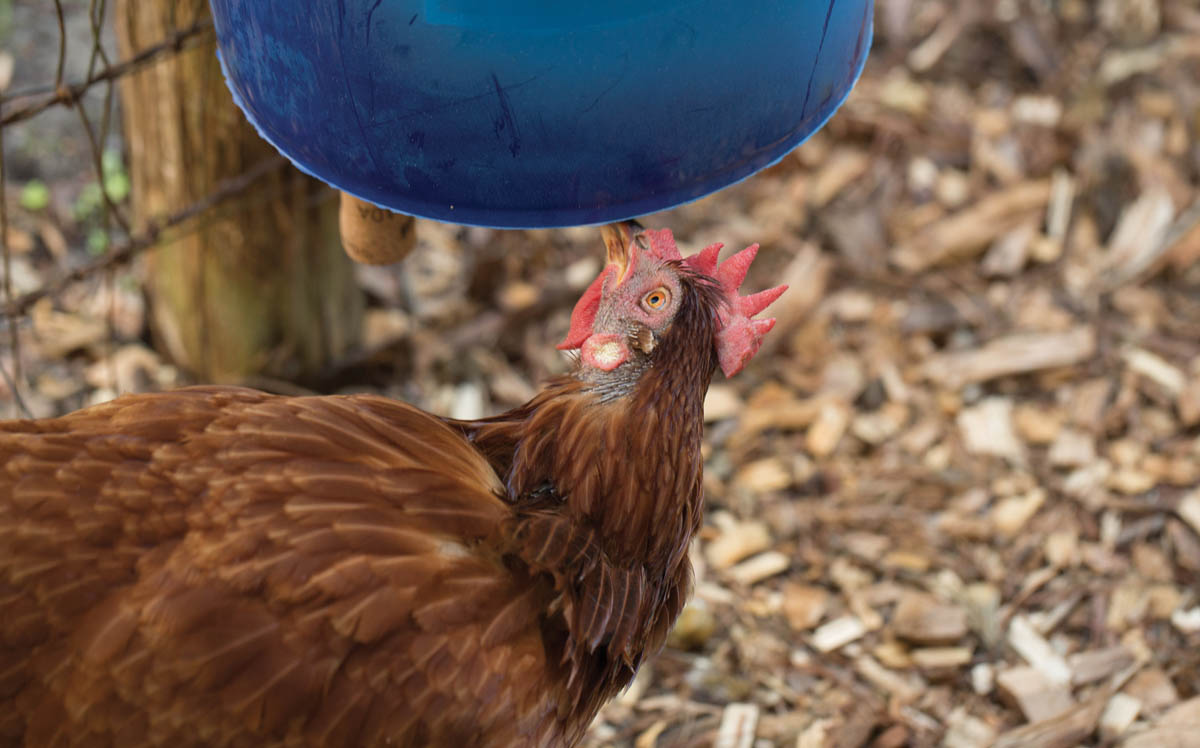
Violetta enjoys her reward for giving the corks a good whack. The eyebolt acts like a toggle switch and drops pellets from the bucket.
For four years we had been happily using a gravity feeder. But marauding gangs of sparrows had started plundering the feeder’s open saucer occasionally. Despite their big appetites, sparrows are small enough to fit through the 2" × 4" openings in the fencing. Thank goodness mourning doves can’t get in, or I’d have been buying feed twice a day. We haven’t had signs of rodents, but I was sure some would show up eventually for the grainy buffet. Coming up with a new and improved critterproof feeder was on my to-do list.
Some chicken-keepers choose to keep sparrows and rodents away from their feeder by enclosing the entire pen in hardware cloth. This isn’t a cloth at all, but rather a type of heavy-gauge wire fencing with 1⁄2" × 1⁄2" openings. It is heavier, costlier, and more unwieldy than the 14-gauge fence wire commonly used for enclosing hen pens. For example, a 3' × 50' roll of hardware cloth weighs half again as much and costs three times as much as the same size roll of 14-gauge wire fencing. So I ruled that out.
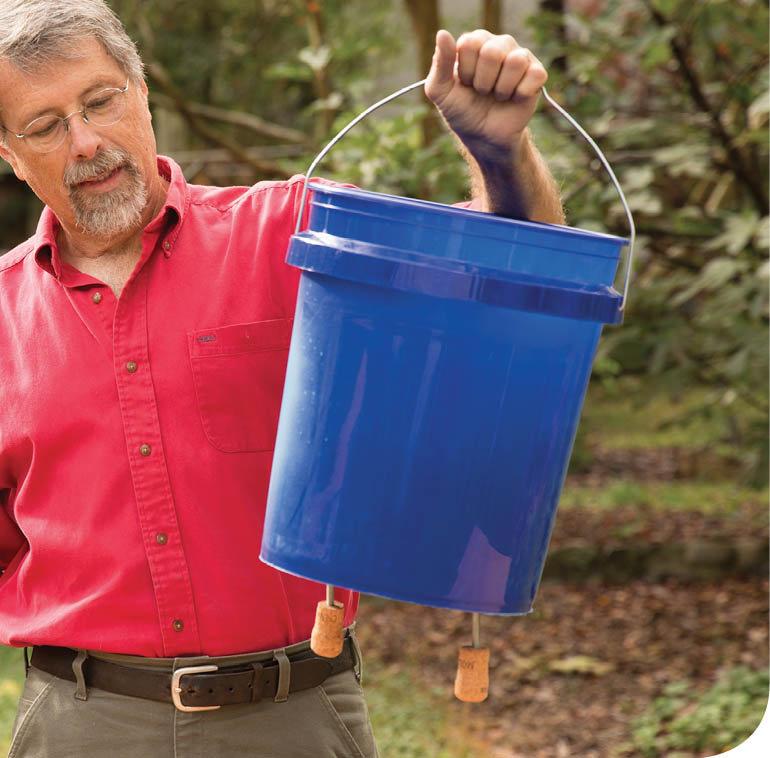
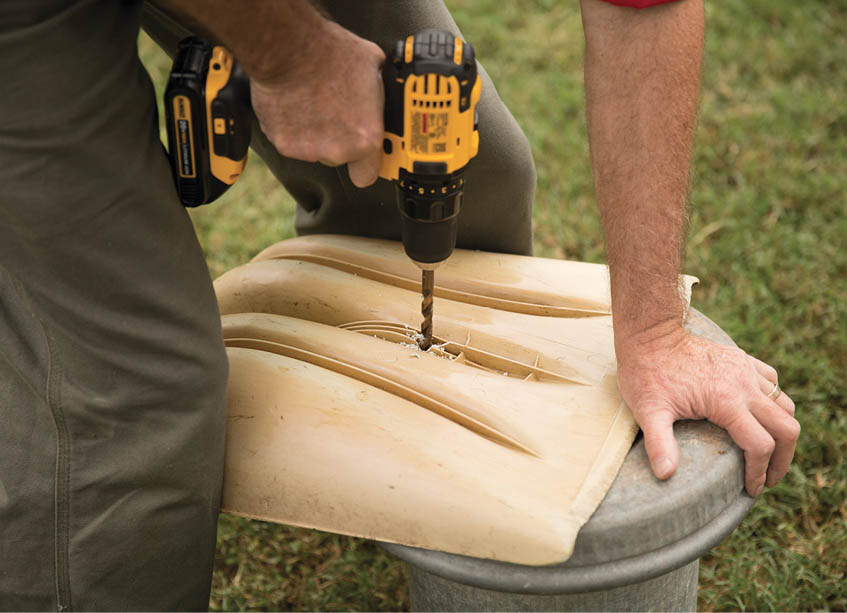
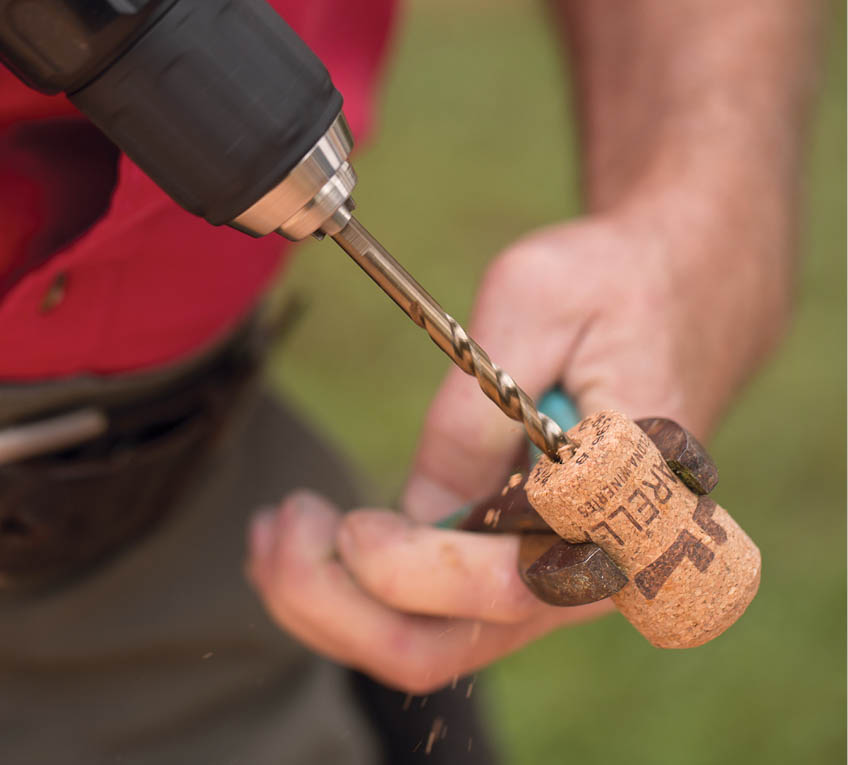
Four-inch-long eyebolts with 1⁄4"-diameter threads make a good toggle switch for your chickens’ vending machine. Drill 5⁄8" holes in the bottom of the bucket and a 3⁄16" hole in the corks for a durable, low-tech device.
There are also some boxy, verminproof feeders made of either metal or cedar available online. The chickens step on a treadle that opens the lid on the feeder, allowing them to eat. When the chickens walk away, the treadle pops up and the lid pops down, closing the feeder and blocking any songbirds or rodents. These treadle feeders cost $200 or more. There are construction plans available online for the wooden ones, but making the angled cuts and putting together the lever arms would be time-consuming and tricky. Plus, if enough debris gets under the treadle to block it, the feeder won’t open and the chickens go to bed without their supper. So I ruled out that option, too.
Thus, I was very glad to find a video by “Coach G” detailing how to build a vending machine (see References and Resources). I’ve customized it a bit for our Hentopia coop, using corks instead of duct tape or glue. The vending machine holds almost a full bag, so we still fill it only about once a month for our seven birds.
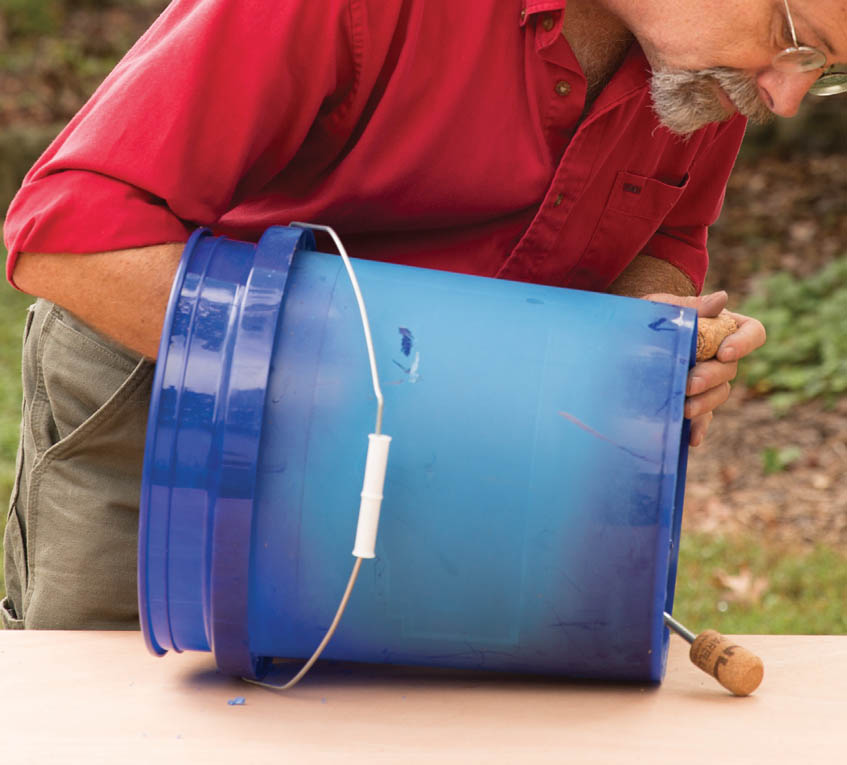
In this device, a 5-gallon bucket (with a tight-fitting lid to keep out the weather and critters) hangs from a post at a height that allows the hens to peck at a couple of corks screwed onto eyebolts run through holes in the bottom. As the eyebolts move — like a toggle switch — small amounts of feed spill out of the holes. Hens eat the feed, leaving little or nothing for freeloading vermin.
How to Make It
What You Need
What to Do
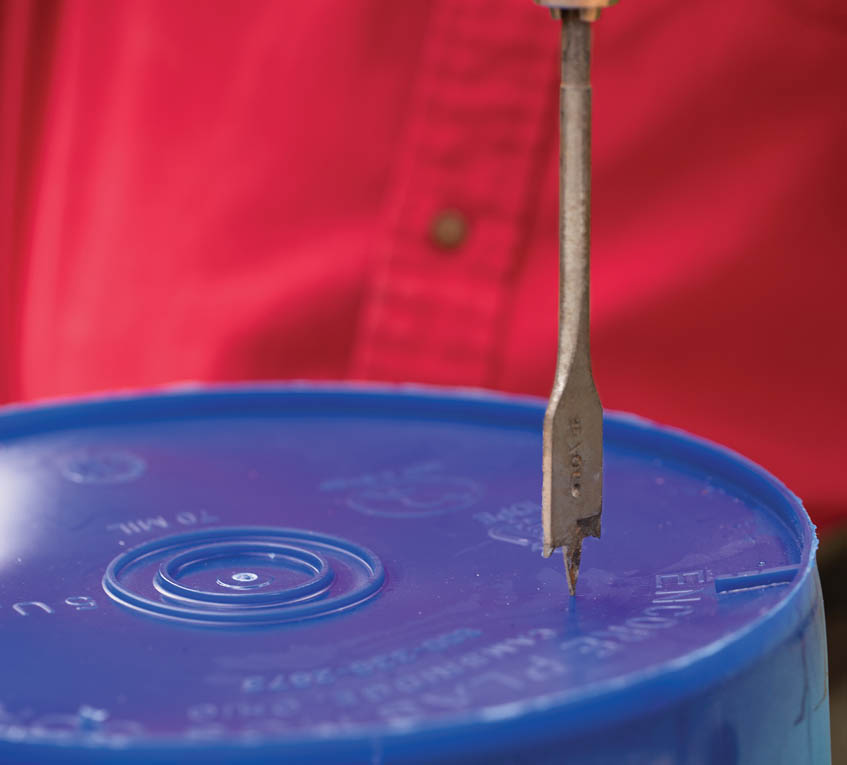
Using the 5⁄8" spade bit, drill two holes in the bottom of the bucket. The eyebolts’ shafts will hang down through these. Put each hole roughly below the spots where the bucket handle attaches (the reason for this will be clear later).
Using the 3⁄16" bit, drill into the bottom of each wine cork a little more than half the distance from one end to the other. This size hole makes room for the eyebolt shaft to enter without splitting the cork. Hold the cork with a pair of pliers so you don’t hurt your hand if the bit goes awry. (In the photo, I’m using a champagne cork for a more celebratory look.)
With one hand inside the bucket holding the eye of one of the eyebolts and the other hand outside the bucket holding one of the corks, screw the cork onto the shaft of the eyebolt. Repeat with the other eyebolt and cork.
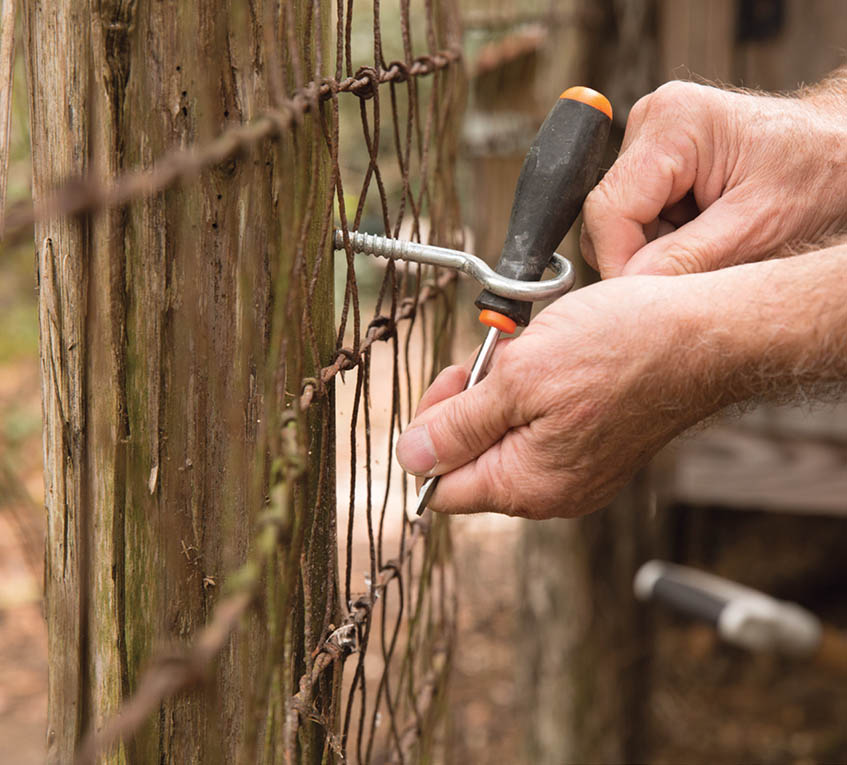
With the eyebolts and corks in place, choose a spot in the pen or coop from which to hang the bucket. You want the corks at the height of the chickens’ heads. Mark the spot for the hook.

As with the corks, use a drill bit that matches the diameter of the hook’s shaft so that there is room for the shaft to enter the drilled hole while allowing the threads to bite into the wood. Screw the hook into place.
Fill the bucket with feed and put the watertight lid on. Hang the bucket from the hook. Tap the corks so that some feed drops out of the bucket. Now you see why the position of the holes matters. If there’s a hole at the back of the bucket, much of the feed will bounce outside the fencing.
At a chicken-keeping workshop I heard a speaker say that a chicken’s diet should be about one-third grains, one-third greens, and one-third bugs. As you might guess, the speaker was selling a system for growing black soldier fly larvae as chicken feed. I was willing to give it a try. Sounded cool. Lots of chicken-keepers rave about soldier fly larvae as a food source. Yet, strangely, Chris has vetoed any backyard projects containing the word “fly.”
But who doesn’t love cuddly, wiggly worms? Growing red worms has not been vetoed.
Even three birds scratching and foraging can wreck a lawn in a week or two.
The topic of growing worms, called vermicomposting, is big enough to require a book in itself. (See References and Resources for more on vermicomposting.)
I’m developing an in-ground worm bin that’s 4 feet by 8 feet across and 1 foot deep. It’s functioning pretty well, but I’m still working out some of the kinks. I’m sure that in another year it will be a smoothly operating red-worm chicken-food-propagating machine. The large size means I can grow large populations of red worms. Its being in the ground means the soil will moderate the summer and winter temperatures that would otherwise inhibit the worms’ growth. During dry spells I maintain the proper moisture level by slowly draining a rain barrel into a soaker hose over the worm bin.
Our chickens and regular compost bins already do a great job disposing of kitchen scraps and most garden scraps, so the worms’ diet will depend on other free sources of organic matter: chaff from local coffee roasters, woody plant scraps, newspapers, cardboard, and irreparable cotton clothes.
Keep in mind that the worms cost about $25 a pound plus shipping, and they are easy to kill by accident or negligence. So take my outline as a bit of inspiration and then do the smart thing: get a book or take a class on vermicomposting or growing soldier fly larvae or mealworms for chicken feed.
We’ve also developed a smaller source to supplement the hens’ insect diet. We use sticky traps to catch the pantry moths that occasionally show up in the kitchen and the cave crickets that multiply in the crawl space. When the sticky traps are full, we set them in the pen. Chickens love these treats, dead or alive. Surprisingly, their beaks do not stick to the traps. The sticky traps are cheaper and safer than pesticides, and the organic, unpoisoned six-legged vermin make our hens happy and save us a tiny bit on chicken feed.
As for the grain portion of our chickens’ diet, that’s easy. We’ve found local distributors for organic layer feed. Supporting organic farmers means fewer chemical fertilizers, herbicides, and pesticides getting into our nation’s drinking-water supplies. Organic chicken feed costs more than nonorganic, but that’s largely because there are so few feed mills dedicated to producing organic grains. Since organic mills are fewer and farther between, a lot of the higher prices we’re paying are the freight charges. But more mills are being established, so prices should fall in the next few years.
As for the grassy portion of our hens’ diet, we had to cut them off from free-ranging in our tiny yard. As you may know from experience, even a few birds scratching and foraging can wreck a lawn in a week or two. Let’s not even talk about the rapid distribution of chicken fertility all over the deck and patio. Instead, I have found some other tools and techniques for keeping more greens in the girls’ diet:
I’ve also been taking advantage of some biennials in the vegetable garden to provide greens for the girls. We always get a great crop of carrots, and from each harvested carrot we toss the tops in the hen pen. Chickens will knock each other down trying to get to them first. Some carrots get too big and woody for us to eat, so I pull those from the vegetable garden and replant them next to the pen. Since they are biennals, they keep growing and will resprout tops that we harvest for the chickens.
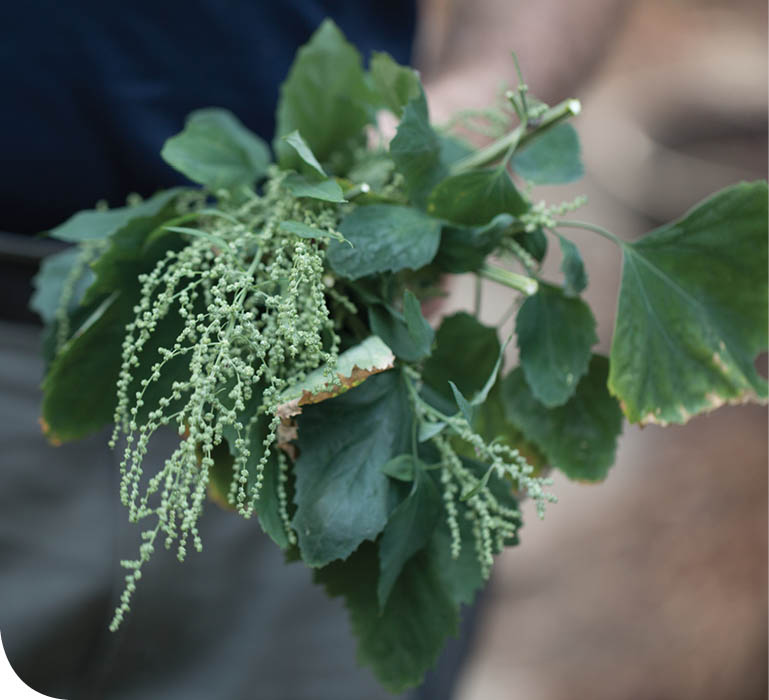
Pigweed and other weeds (such as chickweed, henbit, annual fescue, crabgrass, and purslane) are valuable additions to your hens’ diet.
If I wanted to spend my time and energy carrying chickens back and forth, I could deposit them in a vegetable bed at the end of its season. Then I’d have to fence in that bed to keep them out of other beds growing crops we want to eat. If you want your flock to forage in the garden, wrap suitable beds with chicken wire and corner posts to keep the birds out of trouble. Make sure the chicken wire is high enough to keep them from flying out. You may also be able to channel your birds from the pen to the vegetable beds with a “chunnel.” More about those in chapter 3.
About the time Chris vetoed the fly project, I belatedly realized I was already harvesting greens from our yard every week when I mowed the lawn. I just needed to get these first-rate greens to the chickens.
I dug through piles of might-be-useful-someday objects in the back of the garage, looking for the bagging attachment for our mower. It had never seen any action because our mower shreds the clippings and lets them fall back into the lawn to feed the earthworms and replenish the fertility of the grass. You need little or no lawn fertilizer if you don’t take away the grass clippings.
Now, once a week, the girls get a bag of fresh grass clippings to peck at and devour. I figure the lawn can spare one bagful.
Our mower, a cordless electric, is one of my favorite power tools. Here’s why:
A third of our hens’ diet isn’t yet from greens or bugs, but we’re getting there. Maybe I should start growing duckweed in the water garden. Or set a Japanese beetle trap in the pen.
I belatedly realized I was already harvesting greens from our yard every week when I mowed the lawn.