
A FRUIT PIE PRIMER
“Fine fruit is the flower of commodities.” It is the most perfect union of the useful and the beautiful that the earth knows. Trees full of soft foliage; blossoms fresh with spring bounty; and, finally, fruit, rich, bloom-dusted, melting, and luscious.
—andrew jackson downing (quoting Ralph Waldo Emerson)
It has always been Bubby’s philosophy to keep the food we make simple, fresh, and pure. Fruit pies offer the perfect opportunity to incorporate all of those elements under one crust. The fruit should be the finest, and the sauce it forms should be, as the Reverend Henry Ward Beecher wrote so eloquently, “ . . . the merest drip of candied juice along the edges, (as if the flavor were so good to itself that its own lips watered!) of a mild and modest warmth, the sugar suggesting jelly, yet not jellied. . . .”

Farm Fresh Fruit: Seasonality and the Farmer’s Market
The best fruit pies begin with the best local fruit in season. Before refrigeration, trucking, and supermarkets, pies were made with whatever could be harvested from fields, orchards, gardens, and nearby woods—rhubarb, gooseberries, blackberries and apples—and were patterned by nature’s cycle, not the supermarket. Pies made from fruits out of season came from “put up” jars of preserved fruit conserved back when the harvest was in full swing. Modern hothouse fruit production has made it less and less apparent what is really in season locally.
To obtain the best, freshest, most flavorful, naturally ripened fruit, and to understand the full range of what’s in season where you live, you should get in the habit of making regular visits to your local farmer’s market. Quality is worth waiting for; act in harmony with the season and take each bounty it has to offer.
At Bubby’s, we have a long-standing relationship with the farmers at the local market at Union Square, though there is also a Saturday market in Tribeca that we are fond of, too. We love the Union Square farmer’s market because it’s open four days a week, and it is the most extensive New York City farmer’s market, offering the largest variety, and the most farm stands with which to compare quality and prices. To find the best produce, we stroll through the whole market to survey the choices, smell and taste as we go, inquire about prices (quantity discounts when we’re buying a lot), and make mental notes about who has the best of what. The best-looking fruit is not necessarily the best-tasting fruit. Tasting it is key—most vendors will give you a modest sample of a fruit in plentiful supply. Engage farmers in conversation; they have a great wealth of knowledge to share with you for the asking. Growing years have their own character—an exceptionally wet spring makes certain plants thrive and others stall out. Farmers can educate you about what to expect and when to expect it; teach you how to store and handle produce; and sometimes even give a tip or two on how to prepare it. Curiosity is seldom rebuffed, even amidst the brusque hustle-bustle of New York.
Generally, the first week a new fruit appears, its price is highest. We often use that week to experiment and dream about the pies we’ll produce when abundance starts to drive the prices down in the thick of that fruit’s season. For the thrifty, there are occasionally good deals to be made by going at the end of the market day, when farmers are packing up their wares. Be resourceful—seek out the slightly bruised ripe peaches for a deep discount.
However, we don’t always get to pick and choose our timing based on what the harvest dictates—there are birthdays, events, and holidays that call for pies at times when there’s no obvious produce at the height of its glory. It’s still possible to make an outstanding pie with frozen fruit or supermarket fruit—it may take some planning ahead to ripen fruits prior to baking them, or a little more lemon juice or sugar to punch up the flavor.
Composing Pies: Things to Consider
You have a lot of leeway with the quantity of fruit you use for a pie—anywhere from 3 to 6 cups, depending on your fruit, its supporting ingredients, and your pie plate. Think about how full you want your pie to be and about how the particular fruit cooks down when baked. Is it a hard, dense fruit like a quince, which will not reduce much in size, or a soft, wet fruit like a strawberry, which will cook down a great deal? If your fruit is really juicy and your tin quite small, you might have a big wasteful mess once the filling starts cooking and spilling over. If you have the same scenario with a nice firm apple in a Mile-High Apple Pie, you’ll get a high crust and a perfectly full but well-baked filling. Along the same lines, you can pile up an apple-blackberry pie higher than a blackberry pie because of the water content difference in the fruits inside.
Take into consideration the intensity of flavors of the filling to be used—although we do like an ample pie, more is not always better. Take the Raspberry–Black Currant Pie, for example. Its exquisite flavor is best appreciated in a thinner layer, a smaller mouthful, as a shallow pie or ample tart. The same is true of Concord Grape Pie—the intensity of the dark flavorful grape is powerfully good but best experienced in modest proportion to the flaky double crust, maybe with a dollop of crème fraîche nearby. Imagine what you want a bite of your pie to taste like.
A glazed pie is ideal for fruits that have a better taste and texture uncooked. If you want a high raspberry pie, you might want to consider making an open-faced pie that uses a cooked raspberry sauce glazed over fresh raw raspberries. The raw raspberries won’t release their juices when glazed, and thanks to the thick glaze, they can be piled to the heavens.
Thickening Fruit Pies
How were those early fruit pies thickened? Nineteenth- and early twentieth-century recipes draw from a fine assortment of whatever might have been handy—most often some crumbs, or an egg yolk (perhaps with a little cream or bread crumbs, too), cornstarch, or flour. The pies with egg yolk often used the remaining white to make a meringue topping. The 1941 edition of The Settlement Cookbook (their motto: “The Way to a Man’s Heart”) advises the following, “If fruits are very juicy, brush lower crust with unbeaten egg white or sprinkle with bread, cake, or cracker crumbs.” There are also frugal pies—mock apple pie is an extreme example, where cracker crumbs (the thickener) fill an entire pie in lieu of apples—that were created to replace or extend what the cupboard lacked.
Even the same kind of fruit can vary in how juicy it is—on the large scale, from the early harvest to late harvest, and on the more individualized scale of ripeness. Environment plays a part too—a wet, hot growing season in Georgia produces a big, juicy peach completely different from a small, sweetly concentrated peach grown in the desert Southwest. Know as much as possible about the fruit you want to use so that you can plan accordingly.
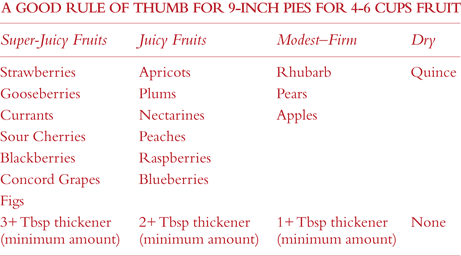
We tend to use flour for all fresh fruit except berries (which take quick-cooking tapioca) and glazed pies (which take cornstarch). All thickeners have advantages and disadvantages; the most important challenge—no matter which thickener you use—is to try to get just the right amount for the fruit at hand, to achieve a concentrated, flavorful sauce that clings to the fruit. Try them all in turn and decide which suits your taste and particular pie best.
All-Purpose Flour, unbleached, is one of the mildest, slowest, most stable thickeners. It’s particularly good in tandem with butter inside an apple, pear, or peach pie. A flour-thickened sauce baked slowly in a pie forms a flavorful, slightly opaque sauce with the fruit juices and sugar. Once flour reaches the optimum temperature, it is quite stable; continued heat does not harm it. It’s particularly recommended for peaches, apples, pears, and firm-fleshed fruits. Flour and butter are sometimes cooked together to make a roux, the thickener of choice in Cajun and Creole sauces, étouffées, and soups. We use a blonde roux as a thickener for the sauces in a number of our savory meat pies.
Cornstarch, a corn-based thickener, forms a translucent sauce. Cornstarch is ideal for fruit sauces cooked only on the stovetop, and particularly for glazed fresh fruit pies. It is flavorless, silky in texture, and thickens a liquid at boiling point; if overcooked, it can give diminished returns, undoing the work it has done. Its power is also substantially weakened if it is paired with an acidic, tart sauce like that of a sour cherry. In excess it can form the gloppy, gel-like filling found in many store-bought pies.
Tapioca is a root-based thickener made from the cassava plant. It comes in a number of forms: flour, flakes (instant tapioca), and pearls (also called pellets). Only some of them are suitable for pie—flakes or flour. Tapioca flakes need to soften and swell a little in fruit juices (about 5 minutes) or they can wind up as crunchy as pebbles on top of the fruit in a lattice pie. When properly cooked, they contribute an interesting texture of their own: soft little gelatinous bubbles. Tapioca produces a clear, glossy sauce and doesn’t impart a starchy flavor. Tapioca flour is also a very good option; it has the good characteristics of flake tapioca but the smooth texture of cornstarch. Tapioca works well for red currant or sour cherry pie because it is undeterred by acidity. It’s also good for bramble berries. The texture of the tapioca is so similar to the drupelets of these fruits. Tapioca becomes less effective the longer it’s cooked, so take care not to overbake pies thickened with tapioca.

Eggs are seldom used to thicken fruit pies, but they are used in custard pies, cream pies, pecan pies, ice cream, and in savory quiche pies. Eggs are discussed in more detail in the context of these recipes.
Sweeteners
Sugar macerates fruit; that is, it draws out the liquids and forms a flavorful syrup with the juices. The more sugar you use, the more thickener you’ll need. Sugar makes sour fruits like red currants, sour cherries, gooseberries, and rhubarb palatable and delicious in a pie; it complements and accentuates fruits with more of their own natural fruit sugars. White refined sugar is recommended for delicate-tasting fruits, as it doesn’t overwhelm them. Moist light brown sugar, with its mild caramel-like flavor (from molasses) can be a subtle addition of flavor, as in the Whiskey-Apple Crumble Pie; dark brown sugar has a bittersweet molasses bite that adds a depth of flavor integral to a brown betty. We avoid corn syrups (high fructose corn syrup): it is highly processed, cloying, and unhealthy. More healthful sweeteners like honey, maple syrup, and molasses may be used with calculation; they impart distinctive flavors and work best with autumn fruits and nuts. Dry-fleshed fruits like apples and quinces absorb the juices they cook in and are good candidates for honey; maple syrup does well in conjunction with eggs in a nut pie; molasses makes Apple Pandowdy especially delicious. To cut down on sugar, combine sour fruits with sweet fruits. The classic example of this is a Strawberry-Rhubarb Pie.
Flavor Heighteners
Ye are the salt of the earth.
—matthew 5:13
Salt—just a pinch—heightens and focuses the flavors of a sweet or savory filling or crust. We use fine sea salt for making most of our crusts and sweet fillings because it dissolves well, though we’ll sometimes use kosher salt for stews and such. Rock salt is best suited for salting the ice in a hand-cranked ice cream maker.
Citrus—juices and zest—are used to keep fruit colors and flavors bright. The acid in citrus juice prevents cut fruit from browning. Some old-fashioned pies use vinegar in this capacity. Zest can sometimes render the filling slightly bitter, so go light on it.
Butter enriches and complements the saucy juices in a pie filling, and it works in tandem with the thickeners. If a pie with butter in the filling chills down too much, the butter will solidify into beads; youmay need to reheat the pie in a hot oven to melt the butter back into the filling.
Spices, Extracts, Liqueurs: Sometimes we’ll throw in a pinch of this or that spice, a dash of almond extract, real vanilla bean, or a flavored liqueur—they add interesting dimensions to the flavor of a fruit pie but should not overpower or upstage the integrity of the fruit’s natural flavors. Our recipes are meant to be suggestive, especially in this area. If you’re a beginner, stick to the recipe at first. If you already have firm opinions about how you want a sour cherry pie flavored but need to consult a tried-and-true recipe for ratios and methods, have at it. Experiment and achieve what you think tastes good in a pie.
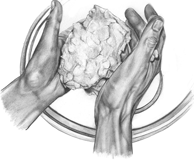
Fruit Pie Craft: A Well-Built Pie
Different varieties of fruit pies are assembled in much the same way. Though the logic might not be apparent at first glance, follow this sequence for a flaky bottom and top crust in support of a well-composed fruit filling. This pattern helps you develop good habits that yield dependable results. You’ll find that if you change the sequence, problems are likely to crop up. We’ve tried to make the reasons why apparent. As with dough making, an ounce of prevention is worth a pound of cure. Pies, especially fruit pies, invite improvisation within a structure. This is the basic structure for a fruit pie:
1. Mix the pastry dough—whether a single or a double crust—and chill it, tightly covered. (See more detail in Chapter 1.)
2. Prepare and cut the fruit. Transfer it to a large bowl. If there is lemon juice in the filling and the fruit is prone to browning, toss the fruit with it.
3. Wait until you’re ready to put the filling inside the pie before you toss the fruit with the sugar and other dry ingredients. If you wait until the last minute to mix the fruit up and put it in the crust, the bottom crust gets a chance to set in the hot oven before the bulk of the fruit juices hit it. The sugar macerates or “sweats” the fruit—the less they touch before they go into the oven, the better. Tapioca is an exception, it must soften up in the juices first.
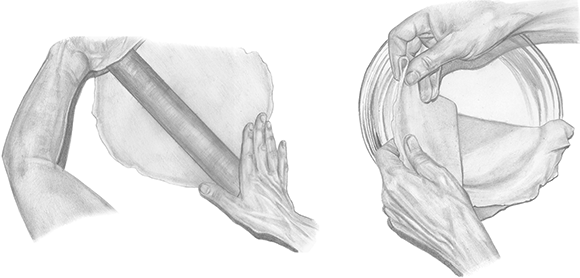
4. Roll out the pastry bottom crust and line a pie tin with it. If it is a single crust, roll and crimp the edge; if it is a double crust, wait—leave the dough that overhangs the edge alone. Refrigerate it.
5. Roll out the second ball of dough for the top crust and leave it on the counter. (Sometimes this top crust is a crumble, crisp, or lattice pastry top. If so, follow recipe.)
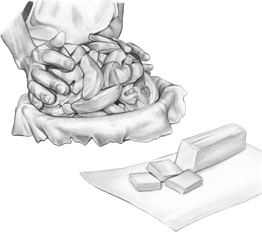
6. Gently toss the fruit with the filling ingredients lightly as you would a salad—just try to distribute your thickener throughout. Use your hands (or a couple of wooden spoons). Taste the sauce to check flavors. Adjust if necessary.
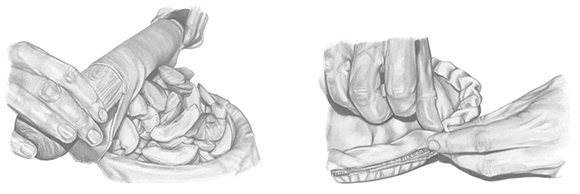
7. Transfer the filling to the cold pastry-lined pie tin. When filling a pie, don’t pack it down; let the filling mound up a little in the middle and tumble where it will. It will cook down.
8. Dot the fruit filling with a little butter if the recipe calls for it (unless it has already been added melted to the filling).
9. Top the fruit with the top crust. Trim the dough’s edge; roll the edge and crimp it.
10. Preheat the oven to 450º and chill the whole pie in the refrigerator. Chilling the pie before baking helps ensure that the fat in the crust is cold and distinct, resulting in pastry that is flaky and light. Waiting to preheat the oven helps keep the kitchen and the pie dough optimally cool during mixing and rolling.
11. Cut vent slits in the top crust, put the pie on a lipped baking sheet to catch stray juices during baking, top the crust as you like (see Pie Vents, Markings, and Pie Birds for Double-Crust Pies), and pop it in the oven.
12. It’s usually best to start the pie in a hot oven (450°F) in order to set the crust, which helps achieve a flaky top crust and a crisp bottom crust. Set a timer for 7 minutes. When the time’s up, take a look. If you have an oven light, peek through the oven window. Watch for the pastry to lose its glossy, wet, doughy look. The surface of the dough should look dry and crustlike, lightly blistered (much like a little friction blister you’d get on your hand), quite blonde, and with faint tinges of golden brown. Learn what to look for—the time it takes is irrelevant (check your oven’s accuracy with an oven thermometer if you’re not achieving much after 20 minutes). If your nose is dependable, you can replace the timer with your sense of smell. It should begin to smell good, like a baked pie.
13. Turn the oven down to medium-high (375°F) to allow the internal temperature of the filling to warm up slowly. Let the filling bake uninterrupted for a nice long stretch—at least 30 minutes. Take notice again when your pie begins to smell fragrant. Fruit pies bake at different rates—even the same kind of fruit, depending on its water content, its ripeness, its sweetness, how it’s been handled, and its chemistry with the other filling ingredients—so it’s best to learn what to look for and let the pie, not the clock, show you when it’s good and ready. What should the pie show you? Two things: bubble and brown.
A crust tastes best when it’s golden brown—this doesn’t mean blonde with tinges of golden brown, it means a full beautiful golden brown. Although the crust is already flaky and set up early on, the fat gets more flavorful and the sugar sprinkled on top caramelizes slightly as the crust browns. The most intense and delicious crust flavors develop in the last five minutes of baking.
One of the reasons to bake a pie at two temperatures—450°F briefly to set the crust, and 375°F to slowly cook the filling—is that a crust rarely browns too quickly at the lower temperature. (Thisis the most common method, but occasionally our recipe instructions advise otherwise.) If your crust is optimally browned before your filling is ready, turn the temperature down to 350ºF and wait it out until the contents of the pie are ready too. If your filling is bubbling nice and thick but your crust is still pale and blonde, you can bump the temperature up to 425ºF so that it browns the surface of the pie aggressively. If you learn what to look for and can adapt your approach, you’ll get consistently great results, no matter how much your pies vary.
Cooling Fruit Pies
Allow time for your fruit pie to cool down thoroughly before serving. If you’re impatient and cut into it straight from the oven, or before it is properly cooled, the hot filling juices—no matter how perfectly thickened—will gush to form a lake where a slice has been prematurely removed, upsetting the filling balance of the entire pie. Pie crust can be just warm to the touch, while the filling may still be quite hot inside. Pie fillings thicken as they cool. Wait at least a couple of hours—preferably three or four—before cutting into a pie. Early morning, when it’s cool and quiet, is a good time to make pies; they’ll have ample time to set up by dinner.
Serving Sizes
Generally, a 9-inch fruit pie yields between six and eight slices. A generous slice of fruit pie makes a fine breakfast, whereas a slender slice of pie might be preferable after a hearty dinner. If the filling is very rich or intense in flavor, you may want to cut as many as twelve slices from a single pie. The first piece of pie often leaves a pie tin with reluctance; many bakers call this one the cook’s. If you find serving yourself first impolite, just discreetly set it aside and serve your dinner companions with the second, third, and fourth pieces.
Pie Transport
Peterboro Basket Co. makes a two-tier pie basket that make traveling with pies easy (see Equipment).
If you’re transporting a pie in the car, you can also nestle it into a big iron skillet lined with a dishtowel if you don’t have a passenger who can hold it while you drive. If you’re carrying a pie somewhere on foot, wrap it loosely in breathable cloth for transport. Don’t cover it up tightly if it is still warm or it will steam the pastry, ruining the crisp crust. A fully cooled pie travels best.
Some pies are harder to transport than others—chilled or layered pies like Mile-High Lemon Meringue are the least amenable to travel. Heed advance cooling and set-up instructions carefully if you have to travel with cold pies. You can travel with a meringue pie, but if you are driving a considerable distance, use a chilled cooler with plenty of support and bracing for the pie. Refrigerate it promptly when you arrive at your destination.
Storing Fruit Pies
Refrigeration makes pastry crust soggy and should be avoided. In general, only refrigerate a pie if it contains animal products (excepting all fats, butter, and the tiny bit of egg, milk, or cream used to paint a top or bottom crust). For instance, a meat or custard pie is best refrigerated for safety. Double-crust pastry needs to breathe in order to remain light and flaky. A “pie safe”, if you are lucky enough to come across one these days, is ideal for storing pies at room temperature. The screen or perforated tin windows allow the pastry to breathe and keep pie predators—insects, rodents, pets (but not people)—at bay.
Double-crust fruit pies should be stored uncovered at room temperature—or, if there are flies around, with a light breathable covering like a clean cotton tea towel. If the room temperature is very hot—upper 90s and higher—the heat can dramatically accelerate spoilage. In this case, refrigeration is definitely a lesser evil. Even inside the refrigerator, let the pastry breathe (uncovered). If you’re worried about refrigerator odors permeating your pie crust, take the time to clean your malodorous refrigerator. To store a meringue pie, you might strategically place several toothpicks sticking up from the meringue and drape plastic wrap over the toothpicks, then press the plastic wrap right up against the cut face of the pie to keep it from forming a skin.
Reheating Fruit Pies
To rejuvenate pies when refrigeration or humid weather or time has dampened your crust’s crisp: Heat the pie at 350°F (5–7 minutes for a slice, 20 or so minutes for a whole pie). You can also “dowdy” a pie if it is losing its appeal. To see how that’s done, turn to Pandowdy.
A microwave does more damage than good in reheating a pie. It transmogrifies the texture of the crust in ways that make it seem both steamed and tough. Glazed fresh fruit pies, like Fresh Blueberry Pie or Fresh Strawberry Pie, should only be served cold or at room temperature.