 MATERIALS
This bag can also be used for the First-Aid Kit on page 54 and for the Outdoors Kit on page 111.
 MATERIALS
• 1 yard of at least 45-inch-wide, heavy, undyed organic cotton canvas
• 1 spool of matching cotton thread (or in a bright contrasting color–we double-dog–dare you!)
 TOOLS
TOOLS
• Tailor’s chalk
• Ruler
• Scissors
• Iron–full of water for plenty of steam
• Ironing board
• Sewing machine
• Straight pins
 SIZES
SIZES
• Choose the size bag you want, then cut your main body panel to the corresponding specifications.
• Small bag:
side A: 22 inches, side B: 30 inches
• Medium bag:
side A: 21 inches, side B: 33 inches
• Large bag:
side A: 29 inches, side B: 35 inches
• Strap sizes to cut: side Y: 26 inches, side X: 5 inches
01. Using the tailor’s chalk and your ruler, mark out a 29-by-35-inch rectangle (if you wish to make the largest size; use the alternate measurements on the previous page to make a different size) on your canvas. This will be the body of your bag. Then mark out two 26-by-5-inch rectangles on the canvas. These will be your handles.
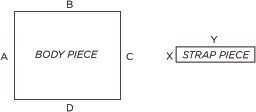
02. Cut out all three pieces.
03. With the wrong side of the body of the fabric (i.e., the side you would like on the inside of the bag) facing up, fold down side A ½ inch, ironing down the fold to keep the crease.
04. Fold the same side over another ½ inch, hiding the cut edge of the fabric, and iron down the new fold.
05. Repeat steps 3 and 4 on side C.

06. Sew down the ironed seams of A and C as close to the inner edge as possible. These edges will be the top edges of your bag.
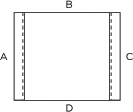
07. Repeat steps 3, 4, and 6 on sides B and D, but only fold down the sides ¼ inch.

08. Now fold this piece in half, right sides together, so that the edge of A is flush with the edge of C.
09. Sew up the sides of B and D, now folded in half, right inside the seam, where you will only be sewing through two layers of fabric.
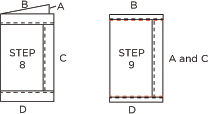
10. Place the folded base of the bag on a table, so the sides stand up vertically.
11. Fold the seamed sides of the bag in toward each other, pressing them flat to the table, seams lined up with the center of the base, and one on top of the other. This should create a square shape, with the base of the bag on the bottom.

12. Flip the square over, so the base is on top. Place your ruler on corner R so that the 5½-inch mark lines up with the center seam perfectly.
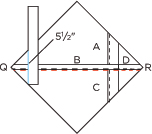
13. Keeping the seam lined up with the 5½-inch mark, adjust the ruler so that one side of corner R meets the beginning of the ruler, and the other meets the 11-inch mark. (If you are making the mediumsize bag, this measurement should be the same. If you are making the small bag, the ruler should be held with 2½ inches being the center point, and 5 inches being the total width.)
14. Draw a line with your tailor’s chalk along the ruler, then pin down the corners to avoid shifting.
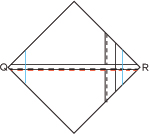
15. Repeat steps 12, 13, and 14 on corner Q.
16. Sew along the lines drawn with the tailor’s chalk. This will create a rectangular base for your bag.
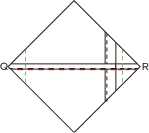
17. Flip the bag right-side out, so these triangles that make up the rectangle are on the inside, laying flat against the bottom.
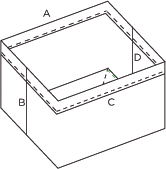
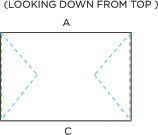
18. Sew along the edges of the triangles inside the bag, as closely as possible, taking care not to sew one side of the bag to the other. The body of your bag is now done.
19. Moving on to the handle pieces, lay them wrong-side up and fold down sides Y ½ inch. Iron them down.

20. Fold the handle pieces in half, wrong sides together, so that X is folded in half. Iron.

21. Sew along side Y as close to the edge as possible.

22. Fold sides X up ½ inch on both sides of the strip and iron them down.

23. Pin the ends of the handles onto the bag about 9 inches in from the seams and 2 inches down from the top, with the ends of the folded edges against the side of the bag, so they are hidden.
24. Attach the handles by sewing a rectangular shape around the edges of the 2 inches where the handles overlap the bag, and along the top edge of the bag.
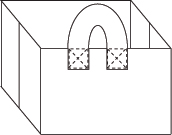
25. Add structure to your bag by measuring in from the top seam of the bag 5½ inches, folding, and pinning the folded fabric down to the bottom corner. Repeat on all four corners of the bag.
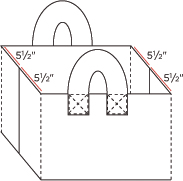
26. Sew up about ¼ inch into these folds, then remove the pins.
Your bag is now complete and should be able to stand on its own!