
AS I MENTIONED EARLIER, ALL TOE-UP SOCKS START, NOT SURPRISINGLY, WITH A TOE. THERE ARE A NUMBER OF DIFFERENT TECHNIQUES FOR CASTING ON AND KNITTING THE TOE OF A TOE-UP SOCK. MY FAVORITES ARE DEMONSTRATED HERE. ALL OF THESE CAST-ON TECHNIQUES ARE DEMONSTRATED OVER TWO CIRCULAR NEEDLES BUT COULD JUST AS EASILY BE EXECUTED USING ONE LONG CIRCULAR IN THE MAGIC LOOP TECHNIQUE. WITH THE EXCEPTION OF THE SHORT-ROW TOE, I RECOMMEND USING EITHER TWO CIRCULAR NEEDLES OR ONE LONG CIRCULAR FOR YOUR CAST-ON INSTEAD OF DOUBLE-POINTED NEEDLES, BECAUSE WITH EACH YOU ARE CREATING TWO SETS OF STITCHES PARALLEL TO EACH OTHER. WITH A CIRCULAR NEEDLE, YOU CAN MOVE THE SET OF STITCHES NOT BEING WORKED TO THE CABLE OF THE NEEDLE, MAKING IT MUCH EASIER TO KNIT THE STITCHES THAT ARE IN PLAY.
This demonstration is based on a sock that is 48 stitches around. It is started by provisionally casting on half of the total sock stitches, in this case, 24.
Using scrap yarn in a color different from the sock yarn being used, crochet a chain that is several chain stitches longer than the number of knit stitches you need. Use a smooth nonfuzzy yarn for the chain—picking up stitches in a chain crocheted from mohair or bouclé is not easy! For a 24-stitch cast-on, I usually make my chain about 30 stitches long. Bind off the last stitch and cut the yarn. Tie a knot in this tail of yarn; you are going to “unzip” this provisional cast-on later by undoing and pulling on this end, so the knot will make the right end easier to find.
Look at the chain. One side of it will be smooth and look like a row of little Vs. The other side will have a bump in the center of each V.
Using your sock yarn and two double-pointed needles (or one circular needle), knit 1 stitch into the bump in the center of each little V on the back side of the chain until you have 24 stitches (see Short Row Toe 1).
Purl back across the stitches. You are ready to start the short rows.

Row 1 Knit 23 stitches. With the yarn in front, slip the last stitch from the left needle to the right needle (see Short Row Toe 2). Turn your work.
Row 2 Slip the first, unworked stitch from the left needle onto the right needle. Purl the next stitch (you will have wrapped that first stitch around its base with the working yarn), and purl across the next 21 stitches in the row. Move the working yarn as if to knit and slip the last stitch. Turn.
Row 3 Slip the first stitch and knit across to the last stitch before the unworked stitch. Wrap and turn.

Row 4 Slip the first stitch and purl across to the stitch before the unworked stitch. Wrap and turn. Continue working rows 3 and 4 in this manner (see Short Row Toe 3).
Work until 8 of the toe stitches are wrapped and on the left side, 8 stitches are “live” in the middle, and 8 are wrapped and on the right. At this stage, you should be ready to work a right-side row. Your toe is half done.
Note: The number of stitches you leave unworked in the middle depends on how wide you want your sock toe to be. If you want it a bit wider, do a couple fewer short rows. If you want it a bit narrower, do a couple more short rows.
Row 1 Knit across the live stitches to the first unworked, wrapped stitch. On the next stitch, pick up the wrap and knit it together with the wrapped stitch.
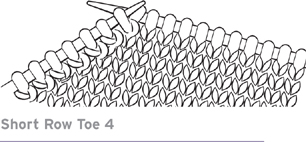
Note: The wrap sits almost horizontal around the vertical stitch. Put your needle through the horizontal wrap, then the vertical stitch, and then knit the two together (see Short Row Toe 4).

Wrap the next stitch (so that it now has two wraps) and turn (see Short Row Toe 5).

Row 2 Slip the first (double-wrapped) stitch and purl across to the first unworked, wrapped stitch. Pick up the wrap and purl it together with the wrapped stitch. Wrap the next stitch and turn (see Short Row Toe 6).
On subsequent rows, you will pick up both wraps and knit or purl them together with the stitch.
Continue until you have worked all the stitches and you once again have 24 live stitches.
(If you are using double-pointed needles, divide the 24 stitches over 2 needles.)
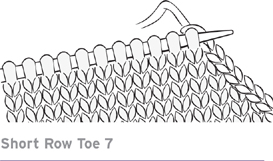
Undo the bound-off end of your crocheted chain. Stick the point of a third double-pointed needle (or a second circular needle) in the stitch below the chain. Unzip the chain (like opening a bag of sugar) one stitch at a time as you stick the tip of the needle in each stitch, moving each stitch onto the needle (see Short Row Toe 7).
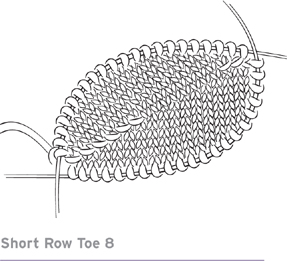
These stitches go on your second circular needle. If you are using double-pointed needles, divide these 24 stitches over the third and fourth needles (see Short Row Toe 8).
On your first round after toe shaping, you may want to pick up an extra stitch or two between the live stitches and the stitches you have picked up from the cast-on, to close up any holes that might have been created. On the next round, remember to decrease back down to the previous number of stitches per needle.
You will now continue knitting the foot of your sock.
This toe can be a little tricky at the start, but you can easily master it with a bit of practice. One advantage is that you don’t need a provisional cast-on or waste yarn. It’s an easy technique to memorize, so you can do it “on the go,” without having instructions in front of you every time.

Hold two circular needles with the points parallel. Hold the tail of the yarn against the front of the bottom needle, and bring the yarn from the front to the back between the needles, wrap it up and over from behind the top needle, then down in front of the top needle and between the needles again, from front to back, and around the bottom needle. You are wrapping your yarn around the needles in a figure eight (see Figure Eight 1).

If your goal is to have, for example, a total of 16 stitches, you want to have 8 loops on each needle (see Figure Eight 2).
The working yarn is going between the needles from front to back, and the last loop is over the bottom needle. Turn your work upside down so what was the bottom needle is now on the top. Pull what is now the bottom needle out carefully so that the bottom stitches dangle on the cable of the needle.
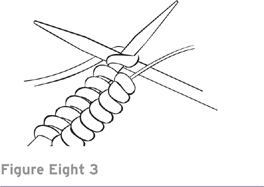
Using the free end of the top circular needle, knit the 8 stitches on that needle (see Figure Eight 3).

Now turn the work again so that the bottom needle with the unworked loops is now on top. Making sure to hold your working yarn tight and using the other end of the top circular needle, knit the 8 stitches on the top needle. For this initial row, the stitches will be twisted the wrong way, so you will need to knit into the backs of the loops when you encounter these twisted stitches (see Figure Eight 4).

Work 2 more rows like this so that you have completed 4 rows. You will have a needle at the top of your work with 8 stitches on it and a needle at the bottom of your work with 8 stitches on it (see Figure Eight 5).
You have completed the setup for your toe. The stitches in the middle of your work may be loose, but you can tighten them up a little by working the excess yarn toward one side after you have completed a couple of rounds.
Start the increases. Work the first round as follows:
Needle 1 K1, M1, knit to the last stitch, M1, k1.
Needle 2 K1, M1, knit to the last stitch, M1, k1.

Knit 1 round without increasing (see Figure Eight 6).

Repeat these 2 rounds until you have the total number of stitches you need for your sock, half on needle 1 and half on needle 2 (see Figure Eight 7).
After you get past the cast-on, the construction of the “Easy Toe” is very similar to the Figure-Eight Toe but, as the name suggests, it is much easier. You will start with a provisional cast-on, like the Short-Row Toe. Using waste yarn, crochet a chain that is several chain stitches longer than the number of knit stitches you need. For example, if you are starting with 8 knit stitches, make your chain 12 stitches long. Cast off the last stitch and cut the yarn. Tie a knot in this tail of yarn; you are going to “unzip” this provisional cast-on later by undoing and pulling on this end, so the knot will make the right end easier to find.

Using your sock yarn and 1 circular needle or 2 double-pointed needles, knit 1 stitch into the bump in the center of each little V on the back side of the chain until you have 8 stitches (see Easy Toe 1).
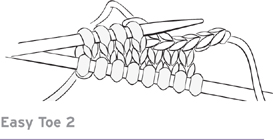
Work in stockinette stitch for 4 rows. Unzip your provisional cast-on stitches, and place them on a second double-pointed needle or circular needle (see Easy Toe 2).
You will have a needle at the top of your work with 8 stitches on it and a needle at the bottom of your work with 8 stitches on it.
Start the increases. Work the first round as follows:
Needle 1 K1, M1, knit until the last stitch, M1, k1.
Needle 2 K1, M1, knit until the last stitch, M1, k1.
Knit 1 round without increasing.
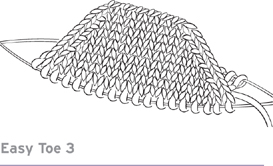
Repeat these 2 rounds until you have the total number of stitches you need for your sock, half on needle 1 and half on needle 2.
For the Turkish Cast-On, you will need two circular needles of the same size. They can be different lengths, however.
Make a slipknot on the top needle.
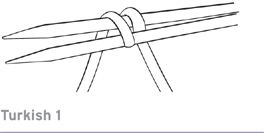
Holding the needles in your right hand with the points together, facing left, wrap the working yarn around both needles, working left to right, half the number of times that you want the total number of stitches to be (see Turkish 1).

For example, do 8 wraps for a total of 16 stitches. (Do not count the slipknot on the top needle.) (See Turkish 2.)
Turn your work upside down so what was the bottom needle is now on the top, and pull the bottom needle out until the wrapped loops are sitting in the middle of the cable of the needle; allow this bottom needle to dangle.
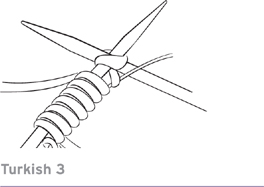
Bring the nonworking end of the top needle up to knit into the loops on the top needle (see Turkish 3).
After knitting the loops on the top needle, turn your work upside down. Slide the loops on the cable of what is now the top needle onto the tip of that needle, and slide the stitches just worked on the cable of what is now the bottom needle.
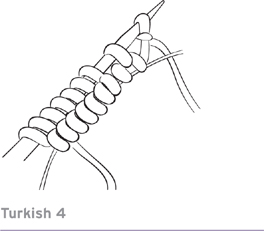
At this point, slide the slipknot off the tip of the needle and undo it, allowing it to hang (see Turkish 4).
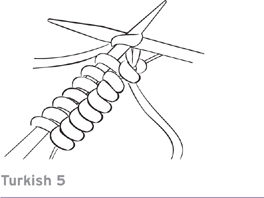
With the working yarn, which is coming from the last stitch on the other needle, knit across the loops with this needle. Be sure to pull the yarn snug as you work the first stitch, to avoid a gap (see Turkish 5).
Pull the needle through to the right so that the stitches just worked are on the cable and the needle is dangling. Turn. Slide the stitches to the tip of the now top needle, and knit across the stitches with the other end of this needle.
After 2 rounds worked in this manner, start the increases. Work the first round as follows:
Needle 1 K1, M1, knit until the last stitch, M1, k1.
Needle 2 K1, M1, knit until the last stitch, M1, k1.

Then knit 1 round without increasing (see Turkish 6).
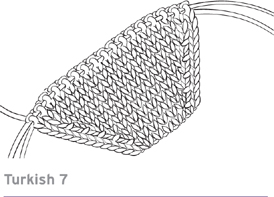
Repeat these 2 rounds until you have the total number of stitches you need for your sock, half on needle 1 and half on needle 2 (see Turkish 7).
Judy’s Magic Cast-On is my favorite cast-on method for toe-up socks. Once you get the hang of this technique, it is quick and easy to execute and makes a perfect toe every time. Its creator, Judy Becker, very generously gave me permission to share this technique here.
While I find that the easiest way to work this cast-on is with two circular needles, Judy shows you how to do it using double-pointed needles on her website (see the resources section).
You will need two circular needles of the same size. They can be different lengths, however.
Hold the two needles together in your right hand, one on top of the other.
Pull out some yarn from your skein. How much you pull out depends on how many stitches you are casting on. For a total of 16 stitches—8 on the top needle and 8 on the bottom needle—pull out about a 12 (30.5cm) tail of yarn.
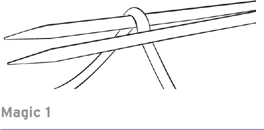
Loop the yarn around the top needle so that the working yarn (the strand attached to the skein) is coming up from the bottom and the tail is in the back (see Magic 1).
With your left hand, pick up the yarn so that the tail goes over your index finger and the working yarn goes over your thumb.
Grasp both strands of yarn with the rest of your fingers to hold the yarn in place on the needle.

This will make a loop around the top needle that counts as 1 stitch (see Magic 2).

While holding the bottom strand firmly with your thumb, use your index finger to loop the yarn tail around the lower needle and pull it snug. You now have a loop (a stitch) on each needle (see Magic 3).
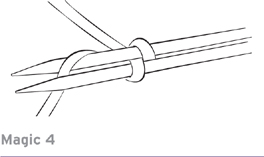
Now, while holding the yarn tail firmly with your index finger, bring the working yarn up with your thumb to loop around the top needle. There are now 2 stitches on the top needle: the loop you just cast on plus the first loop (see Magic 4).
You will continue in this manner, casting on loops by alternating between the index finger and the thumb. The yarn tail controlled by your index finger always wraps around the bottom needle, and the working yarn strand controlled by your thumb always wraps around the top needle.
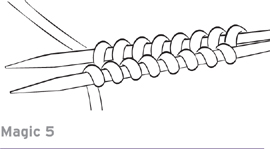
Repeat these steps until you have cast on 8 stitches (or your desired number of stitches) onto each needle, for a total of 16 stitches (see Magic 5).
Now begin knitting these stitches:
Round 1 Turn the needles so that the bottom needle is now on the top. Pull the now bottom needle out until the stitches are sitting in the middle of the cable, and allow this needle to dangle. Pick up the working yarn. Make sure that the yarn tail is situated between the working yarn and the needle; otherwise, your first stitch will unravel.
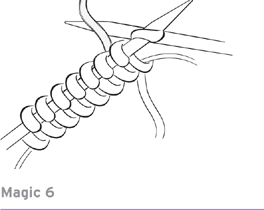
While holding the yarn tail snug with your left hand, knit the row of stitches. If the first stitch becomes loose while you are knitting it, you can pull on the yarn tail to tighten it up (see Magic 6).

Turn the work so that the working yarn is on the right and the needle with the unworked stitches is on the top. Pull the now bottom needle to the right so that the stitches you just knit are resting in the middle of the cable, and allow this needle to dangle. Pull the top needle to the left so that its stitches are ready to knit. Knit these stitches. Note that these stitches will be twisted so that on this first round only, you have to knit them through the back loops to reorient them so that they are sitting normally on the needle for the next round (see Magic 7).
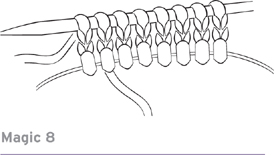
You have completed 1 round (see Magic 8).
You might find that the stitches are slightly uneven and loose. Remember to cast on over the needles at your usual cast-on gauge. Practice will make perfect. It may take you a few tries to get the hang of the perfect gauge.
You are now ready to work your increases. Work the first round as follows:
Needle 1 K1, M1, knit until the last stitch, M1, k1.
Needle 2 K1, M1, knit until the last stitch, M1, k1.
Then knit 1 round without increasing.

Repeat these 2 rounds until you have the total number of stitches you need for your sock, half on needle 1 and half on needle 2 (see Magic 9).