JUST AS THERE ARE MANY WAYS TO CAST ON FOR TOE-UP SOCKS, THERE ARE MANY WAYS TO BIND OFF THE CUFFS. A FEW OF MY FAVORITE TECHNIQUES ARE EXPLAINED HERE.
The sewn bind-off is quick and easy to do, which makes it one of my favorites. When you work it, be sure not to pull the yarn too tight through the stitches. You want the edge to be nice and stretchy. What might look somewhat ruffled and unattractive with the sock off the leg looks smooth when the sock is worn.
When you have finished knitting the cuff of your sock, cut the yarn, leaving a tail at least 18" (45.5cm) long and thread it through a tapestry needle.
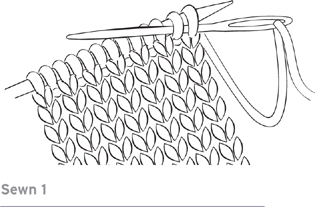
First, insert the yarn through the first 2 stitches on the needle as if to purl, and gently pull all the way through. Leave these stitches on the needle (see Sewn 1).
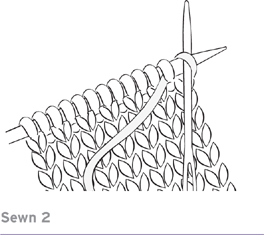
Now, insert the yarn back through the first stitch on the needle as if to knit, and gently pull it all the way through, dropping that stitch off the needle (see Sewn 2).

Repeat these two steps until you have sewn through all of the stitches. Weave the end of the yarn tail invisibly on the inside of the sock, and trim the end (see Sewn 3).
It’s easy to make the point between the beginning and the end of the bind-off less discernible. After you run the yarn back through the first stitch, move it from the left needle to the right needle so that it will become the last stitch to be cast off.
The Russian bind-off is another great favorite of mine because it, too, is quick and easy. It has the advantage of being executed without any tools other than your knitting needles. In some instructions for the Russian bind-off, you are told to work the bind-off in purl all the way around or in knit all the way around. When I am doing a ribbed cuff on a sock, I do the bind-off in ribbing. I generally do k2, p2 or k3, p3 ribbing, so I knit the knits and purl the purls. When it comes to working the 2 stitches together, I work it knit or purl, depending on what the second stitch of the two is, working the decrease as “knit 2 together through back loops” or “purl 2 together.”
(In the instructions below, I use the word work to mean either knit or purl, depending on which stitch presents itself next.)
Work 2 and slip these 2 stitches back onto the left-hand needle, work 2 together (see Russian 1).

Now work 1 and slip the 2 stitches onto the right-hand needle back to the left-hand needle, work 2 together (see Russian 2).
Repeat the second step until you have 1 stitch remaining. Cut your yarn and fasten it off (see Russian 3).
The tubular bind-off works when you are creating a k1, p1 ribbing. It involves a bit of extra work, as you first separate the knit and purl stitches onto two different needles and then graft the stitches together. It creates a beautiful stretchy edge. Trust me, it’s worth the extra effort.
Work k1, p1 ribbing for the cuff of the sock, as deep as you want your cuff to be.
Now work 4 rounds as follows:
Round 1 Work k1 sl1 around.
Round 2 Work sl1 p1 around.
Round 3 As round 1.
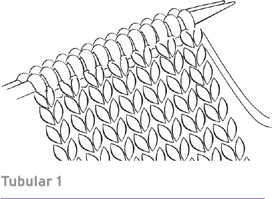
Round 4 As round 2 (see Tubular 1).
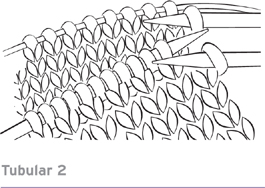
You now need to separate the stitches. Hold two circular needles in your right hand. Slip the first knit stitch onto the front needle (simply transfer it from needle to needle; do not twist it). Slip the first purl stitch onto the back needle (again, simply transfer it from needle to needle without twisting). (See Tubular 2.)
Repeat for all stitches.

You now have all your knit stitches on the front needle and all your purl stitches on the back needle (see Tubular 3).
Now you need to graft the stitches together. Cut the yarn, leaving a tail of at least 18 (45.5cm) long, and thread it through a tapestry needle.

When you start grafting, on the first knit stitch insert the yarn through the stitch and pull it through, but place a coilless pin through the stitch before you drop it off the needle. Repeat for the first purl stitch (see Tubular 4).

When you have finished grafting all the stitches in the round, put the pinned knit stitch back on the front needle and put the pinned purl stitch on the back needle (see Tubular 5).
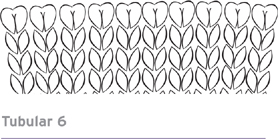
Do the last half of the grafting maneuver on the final repeat (see Tubular 6).
Grafting, or the “Kitchener stitch,” is covered in the techniques section of most knitting how-to and reference books as well as in many online tutorials. Basically, you have the stitches to be grafted on parallel needles held in your left hand and the yarn tail threaded through a tapestry needle.
Set up to graft:
Insert the threaded tapestry needle into the first stitch on the needle closest to you as if to purl and pull it through, leaving the stitch on the needle.
Then insert the needle into the first stitch on the back needle as if to knit, leaving the stitch on the needle. Pull the yarn through.
Now perform the following four steps:
1. Insert the yarn through the first stitch on the front needle as if to knit, and slip the stitch off the end of the needle.
2. Insert the yarn through the next stitch on the front needle as if to purl, and leave it on the needle. Gently pull the yarn through the stitch.
3. Insert the yarn through the first stitch on the back needle as if to purl, and slip it off the end of the needle.
4. Insert the yarn through the next stitch on the back needle as if to knit, and leave it on the needle. Pull the yarn through the stitch.
You can chant a mantra while you do this: “front knit-off, front purl-on,” and “back purl-off, back knit-on.” It works for me!
There are a few different ways to create a picot edge. This one is very easy, which makes it another favorite of mine.
Work 6 rounds in stockinette stitch (knit every stitch).
On the next round, k2tog, yo around to create a row of eyelets.

Work 6 more rounds for a facing and bind off very loosely (see Picot 1).

Using the yarn tail threaded through a tapestry needle, turn the facing to the inside of the sock, folding at the eyelet round, and loosely stitch down in place (see Picot 2).
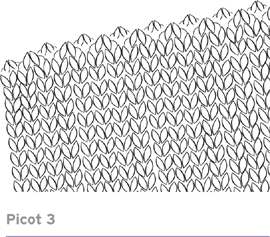
Gently press the edge with a steam iron, or wet-block it (see Picot 3).
There are variations on the picot edge. You can leave the stitches “live” after completing the facing and tack each live stitch down by threading the yarn through each loop and through the back of a stitch on the inside of the sock. You can also work the facing in a k1, p1 ribbing to draw it in slightly to hug the leg.