Chapter 1: Starting with PowerPoint Basics
Discover PowerPoint basics such as creating, saving, and closing a presentation. Each presentation you build exists in its own separate PowerPoint file. After showing you how to create a new presentation, this chapter teaches you how to find and open existing presentation files.
Start PowerPoint and Explore the Start Screen
Introducing PowerPoint
With PowerPoint, you can create a professional-looking slide show. The PowerPoint program provides tools you can use to build presentations that include graphics, media, animations, and an assortment of ways to transition from slide to slide. It provides various views and user interfaces to suit your particular needs. These PowerPoint tools enable you to design and build a quality presentation. Many tasks start in Backstage view. To access this view, click the File tab on the ribbon.
Build an Outline

You can type text in outline form to build slides for your presentation. In the Outline view, an icon represents each slide, and each slide contains a slide title next to the icon. Second-level lines of text on the outline appear as bullet points on the slide. These bullets convey the main points you want to make about each topic.
Choose a Slide Design and Layout
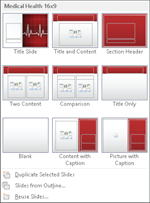
A slide design applies preset design elements such as colors, background graphics, and text styles to a slide. A particular slide layout applied to a slide determines what type of information that slide includes. For example, a Title Slide layout has a title and subtitle. A Title and Content layout includes a title, plus a placeholder that holds a list of bullet points, a table, or other graphic elements.
Add Content

You can add content such as text, charts, and pictures to the slide in the Slide pane of Normal view. You can also insert text boxes that enable you to add slide text that does not appear in the presentation outline.
Work with Masters
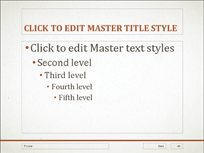
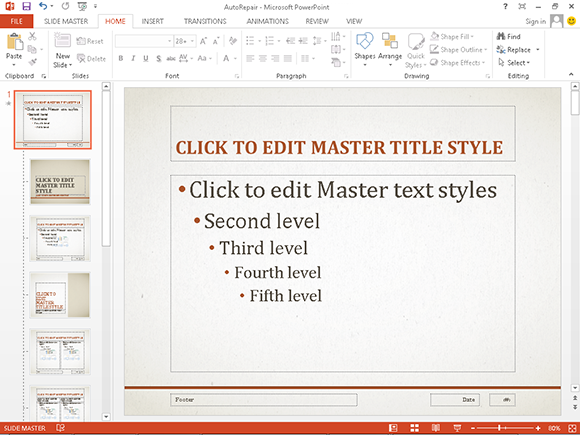
A set of slide designs and a slide theme combine to create a set of master slides. Masters enable you to add content that you want to appear in a particular location on slides. This saves you from having to add repeating content, such as your company logo, to each slide. For example, you can set up the master so an identical footer appears on every slide.
Organize Slides
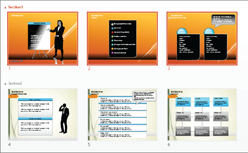
After creating several slides, you may need to reorganize them to create the proper sequence for your presentation. You can reorder slides in Slide Sorter view. This view shows slide thumbnails that you can move, delete, duplicate, or hide. You can also perform these actions on the Slides Thumbnail pane in Normal view.
Set Up Your Show
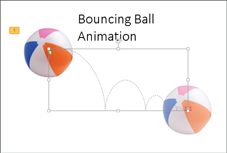
You can add narration, animations, and transitions to your slides. You can record a narration that plays when you give your presentation. Use animation to move an element on-screen, such as a ball bouncing onto the screen. Transitions control how a new slide appears on-screen — for example, a slide can fade in over the previous slide.
Run a Slide Show

After you add the content, choose slide designs, and add special effects, you are ready to run your slide show presentation. Tools appear on-screen during the slide show — they help you control your presentation and even enable you to make annotations on your slides as you present them. Presenter view shows your notes and provides a timer to ensure that your presentation is flawless.
Start PowerPoint and Explore the Start Screen
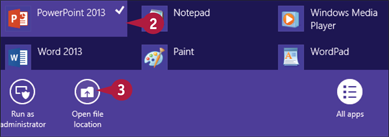
You can start PowerPoint from the new Windows 8 Start screen so you can begin designing a presentation. When you open PowerPoint 2013, the redesigned start screen appears automatically. From the start screen, you can start a new presentation or open an existing one. The start screen lists recently opened presentations and allows you to create a presentation from templates on your computer, or search for PowerPoint templates on the Internet.
Start PowerPoint and Explore the Start Screen

 Turn on your computer.
 Press
Press  .
.
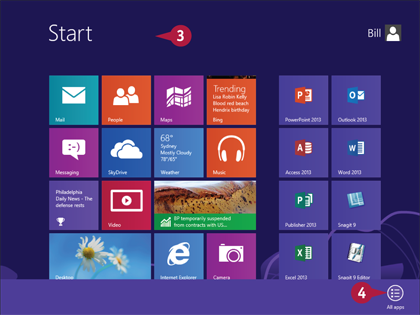
The Start screen appears.
 Right-click the background on the Start screen.
The All apps button appears.
 Click the All apps button.
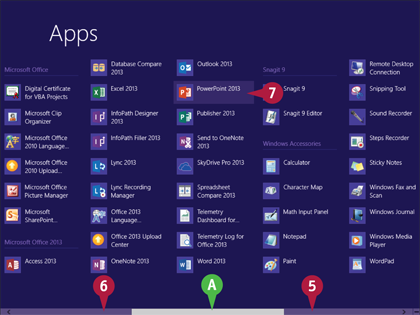
All applications appear on the Start screen.
 Position the mouse pointer (
 ) at the bottom of the Start screen.
A A scroll bar appears.
 Scroll across to find the PowerPoint 2013 icon.
 Click the PowerPoint 2013 icon.
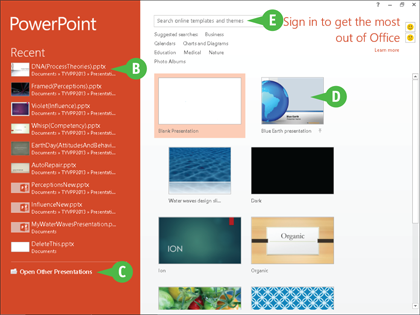
PowerPoint opens and displays the start screen.
B You can open a recently opened presentation.
C You can open a file from your computer.
D You can create a new presentation by clicking a template.
E You can search for a template on the Internet.
Start a New Presentation
You can create a new presentation from the start screen when you start PowerPoint, or from the File tab on the ribbon (also known as Backstage View). You can create a new presentation from scratch or by using a template. Creating a presentation from scratch allows you to design freely without preconceived notions, while working from a template saves time and promotes ideas by starting you off with a certain look and theme. You can find templates on your computer, as well as on the Internet for free or for a fee. Your computer needs an Internet connection to download online templates.
Start a New Presentation
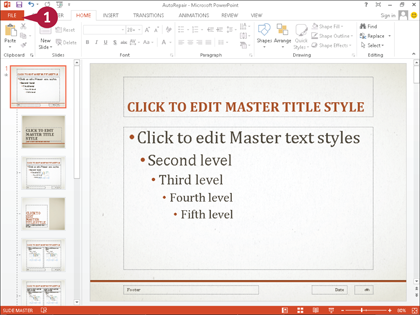
 Click the File tab to show Backstage view.
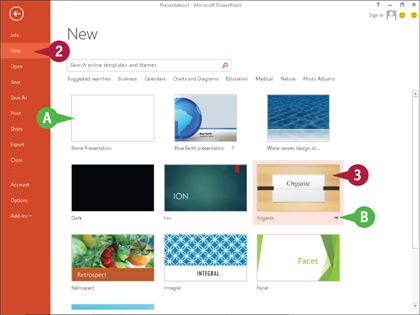
 Click New.
Templates available on your computer appear.
A You can choose a blank presentation.
B You can click the Pushpin button ( ) to pin a template to this list (
 changes to
  ).
).
 Click the presentation template of your choice.
This example uses Organics.
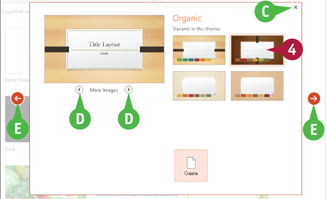
A dialog box appears, showing a preview of the template.
C You can click the Close button ( ) to cancel.
D You can click Back ( ) or Forward (
 ) to view other slides from this template.
E You can click Back ( ) or Forward (
 ) to view other templates from the list.
 Click a color scheme.
The preview changes to reflect your preferences.
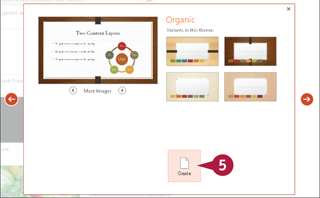
 Click Create.
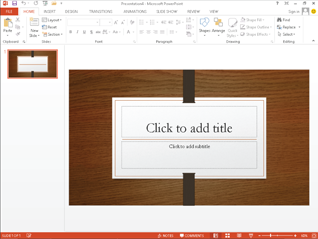
PowerPoint creates a presentation from the template.
Search for Templates Online
The larger your choice of PowerPoint templates, the greater the chance you will find one that suits your needs. Fortunately, there are literally thousands of PowerPoint templates available online. You can search for an online template by using the PowerPoint search feature, or an Internet search engine.
The PowerPoint search feature allows you to search by a keyword and shows you online presentation templates associated with that keyword. The search feature shows you a preview of the template and the name of who provided it, and then downloads the template for you! Remember to download only files from websites that you trust.
Search for Templates Online
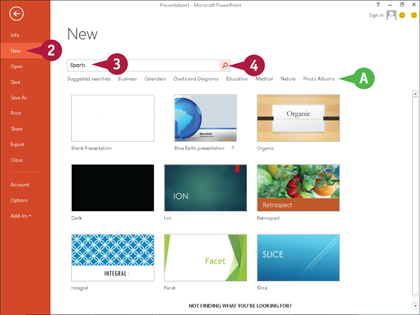
 Click the File tab to show Backstage view.
 Click New.
Templates available on your computer appear.
A You can search by clicking one of the suggested searches.
 Type a keyword in the search text box and click (
 ).
).
This example uses Sports.
 Click Search (
 ).
).
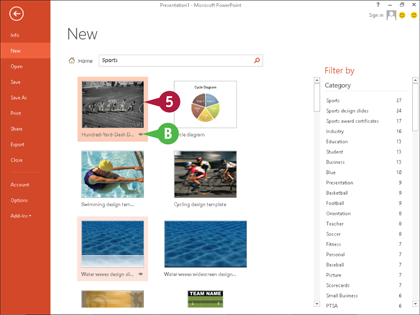
PowerPoint shows online templates that match the search text.
B Click the Pushpin button ( ) to pin a template to your list of templates (
 changes to
  ).
).
 Click the template of your choice.
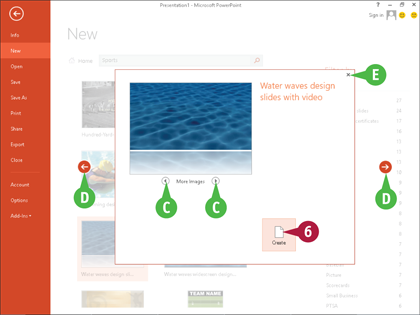
A dialog box appears, showing a preview of the template.
C You can click Back ( ) or Forward (
 ) to view other slides from this template.
D You can click Back ( ) or Forward (
 ) to view other templates from the list.
E You can click the Close button ( ) to leave Backstage view.
 Click Create.
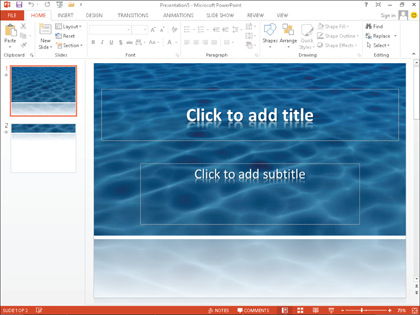
PowerPoint creates a presentation from the template.
Save a Presentation
After you create a presentation, you should save it for future use. You should also save the presentation often while working on it to avoid losing any changes. Saving a PowerPoint file works much like saving any other Microsoft Office program file: You need to specify the location in which to save the file and give the file a name. If you want to save a presentation that has previously been saved, you can click the Save icon in the upper-left corner of the PowerPoint window to quickly save it.
Save a Presentation
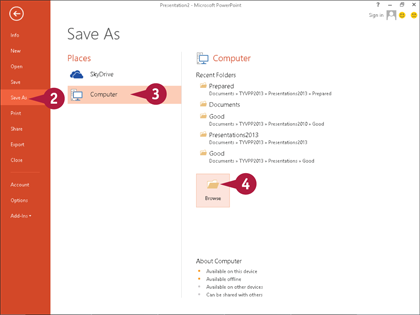
 Click the File tab to show Backstage view.
 Click Save As.
 Click Computer.
 Click Browse.
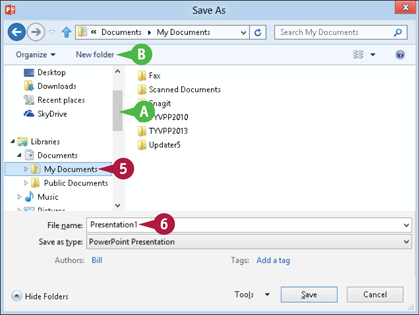
The Save As dialog box appears.
 Click the folder where you want to save your file.
This example saves to My Documents.
 Click in the File name text box to select the text and then type a filename.
A You can click and drag the scroll bar to find more folder locations.
B You can click New folder to create a new folder.
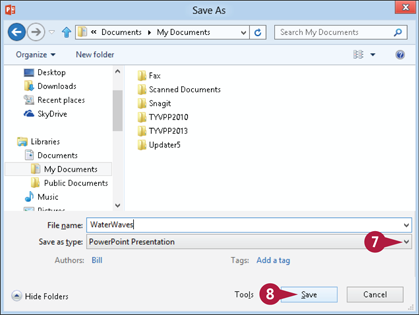
In this example, the filename is WaterWaves.
 Click the Save as Type down arrow (
 ) to change the file type from the default.
Note: If you choose a format other than the default PowerPoint format, you may see a prompt about an issue such as version compatibility. Respond to the prompt to continue saving.
 Click Save.
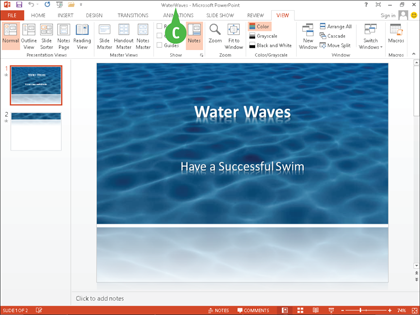
PowerPoint saves the presentation and the Save As dialog box closes.
C The new filename appears in the title bar.
Find a Presentation
Sometimes you want to open a presentation file but you forget what you named it or you forget which folder contains it. Finding that file is very important because you need it not only to design the presentation, but also to present the slide show. If it is not on the Recent Presentations list in Backstage view and browsing for it is unsuccessful, you can use the PowerPoint search feature to locate the file. You can also use the search feature on the Windows 8 Start screen to locate it.
Find a Presentation
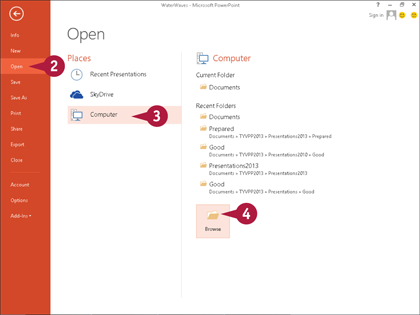
Use the Open Dialog Box
 Click the File tab to show Backstage view.
 Click Open.
 Click Computer.
 Click Browse.
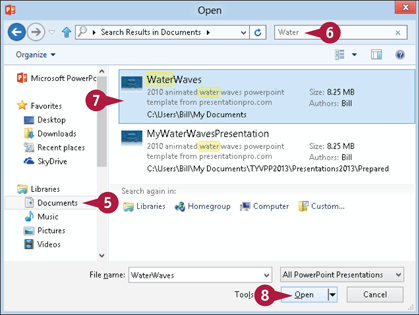
 Click the parent folder that you think may hold the file, even if you think it is in a subfolder.
 Type a keyword in the search text box.
Note: PowerPoint searches filenames and file contents.
This example searches for Water.
As you type, the Open dialog box shows files containing the keyword.
 If PowerPoint finds your file, click it.
 Click Open
The file opens.
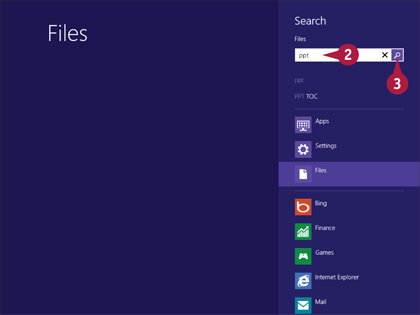
Use the Windows 8 Start Screen
 Press
Press  +
+  .
.
The Search screen appears.
 Type a keyword in the text box.
 Click the Search icon (
 ).
).
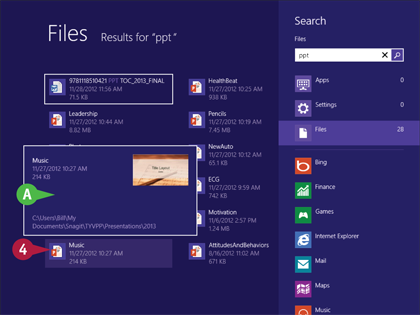
Files that contain the keyword appear in the search results.
 If PowerPoint finds your file, click it.
A You can position your mouse pointer ( ) over the file to see details about the file.
The file opens.
Open an Existing Presentation
After you save and close a presentation, you must find it and open it the next time you want to use it — you need to open it to design it as well as to present the slide show. You can locate your presentation by using the Open dialog box to browse your computer for it. If you used the presentation recently, the quickest way to open it is to find it in the Recent Presentations list in Backstage view.
Open an Existing Presentation
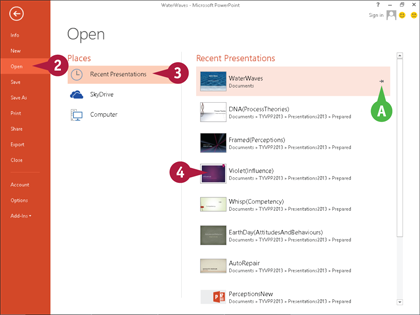
 Click the File tab to show Backstage view.
 Click Open.
 Click Recent Presentations.
The Recent Presentations list appears.
A You can click the Pushpin ( ) to pin a presentation to the list (
 changes to
  ).
).
 If you find your presentation on the list, click it and PowerPoint opens it.
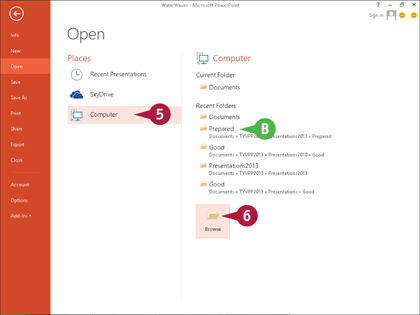
 If your presentation is not on the Recent Presentations list, Click Computer.
B If you find your folder location in the Recent Folders, you can click it there.
 Click Browse.
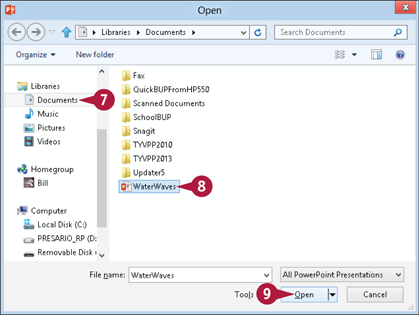
The Open dialog box appears.
 Click the folder that contains the presentation file you want to open.
This example selects Documents.
 Click the filename.
This example selects WaterWaves.
 Click Open.
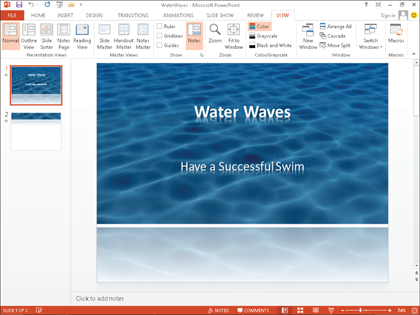
PowerPoint opens the presentation.
Close a Presentation
When you finish working with a presentation, you can close it. Closing the presentation gives you a less cluttered workspace on your computer and frees valuable computer memory to process other work that you need to do. If you share the file with others on a network, closing it allows them to access the file without worrying about sharing violations.
When you close a file with unsaved changes, PowerPoint prompts you to save the presentation to avoid accidentally losing your work. For more on saving a presentation, see the section, “Save a Presentation,” in this chapter.
Close a Presentation
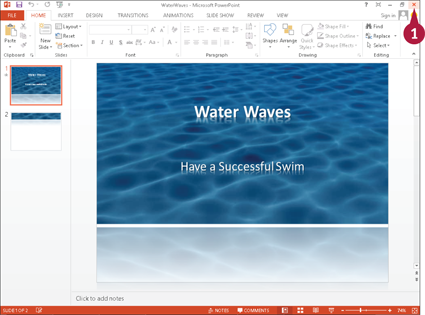
 Click the Close button (
 ).
).
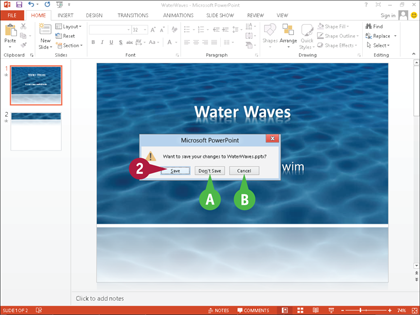
A message may appear, asking if you want to save changes.
 Click Save.
A If you do not want to save the changes to your presentation, click Don’t Save.
B To abort closing the presentation, click Cancel.
The file closes, but PowerPoint remains open.
Note: You can also close the presentation by pressing  +
+ .
.
Delete a Presentation
Occasionally you will come across an old file while browsing for a presentation to open. This file may have out-of-date information or may be an unneeded backup copy. You can conveniently delete the file from the Open dialog box.
Deleting old files frees up space on your hard drive. However, you should make sure that the file is backed up somewhere in case you need it in the future.
Delete a Presentation
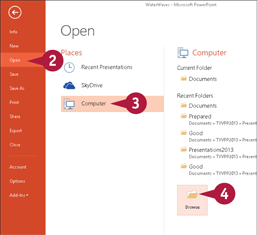
 Click the File tab to show Backstage view.
 Click Open.
 Click Computer.
 Click Browse.
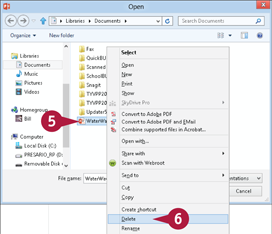
The Open dialog box appears.
 Right-click the file you want to delete.
This example deletes WaterWaves.
The submenu appears.
 Click Delete.
The Delete File dialog box appears.
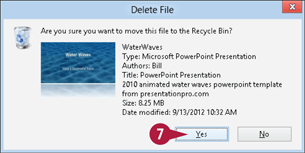
 Click Yes.
PowerPoint deletes the file and puts it in the Recycle Bin.
Note: You also can browse files from Windows Explorer and delete any file.
