Chapter 3: Changing PowerPoint Options
PowerPoint is a powerful tool that becomes even more powerful when you customize it the way you want it to perform. You can adjust various settings to personalize PowerPoint, so you can use it more efficiently and effectively.
Introducing PowerPoint Options
Modify View and Slide Show Options
Customize the Quick Access Toolbar
Introducing PowerPoint Options
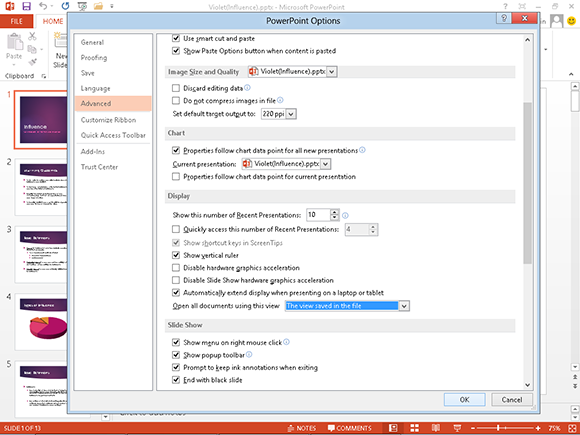
PowerPoint provides a wide variety of option settings that enable you to customize how it performs. The options are grouped on tabs in the PowerPoint Options dialog box, and then further grouped into categories. You can change these settings to control the behavior of certain features in PowerPoint, and optimize less noticeable settings such as the default save location. Settings that are more visible include customizing the Quick Access Toolbar and the ribbon so that your favorite and most commonly used commands are at your fingertips. Changing PowerPoint options allows you to design presentations as effectively and efficiently as possible.
General Options
In the General options, you can enable or disable the Mini Toolbar and Live Preview. The Mini Toolbar is a floating contextual toolbar that gives you quick access to formatting commands when you select text. Live Preview shows how a feature affects your slide when you position the mouse pointer ( ) over a choice in a gallery. You can enable or disable ScreenTips, which is the feature that gives you pop-up descriptions of command buttons when you position the mouse pointer (
 ) over a command button on the ribbon. You can also change the username, which appears in the properties of presentations.
Proofing Options
The Proofing tab affects the way that Microsoft Office checks for spelling and grammar errors in PowerPoint. Changes to these settings also affect the settings in the other Microsoft Office programs. You can add words to the custom dictionary and make exceptions to spelling rules. You can customize the powerful AutoCorrect and AutoFormat tools. While you type, AutoCorrect detects possible spelling errors and AutoFormat adjusts formatting to the surrounding formatting. You can control settings such as whether PowerPoint automatically capitalizes the first words of sentences and whether it checks the spelling of words that are in all uppercase.
Save Options
You can adjust the way PowerPoint saves presentations with the Save options. This tab controls the default file location for saving documents, and allows you to choose the default file format. AutoRecovery automatically saves your PowerPoint presentation at regular intervals so that if PowerPoint unexpectedly closes, it can recover your work. You can disable AutoRecovery or adjust how often AutoRecovery automatically saves presentations. You can even save the fonts you use in your presentation so you can guarantee that the presentation looks good even on a computer that does not recognize the fonts you use.
Language Options
The Language tab allows you to choose the language used for the ribbon, tabs, ScreenTips, and Help. You can include additional editing languages, which affect dictionaries, grammar checking, and sorting. This is useful if you use languages other than English in your presentations, such as when your organization has divisions or departments overseas. If you use languages other than English, setting up and using these options can make your experience with PowerPoint 2013 a delightful one.
Advanced Options
Advanced options allow you to customize settings for printing, some editing, and slide show features. Some settings, such as print options, only apply to individual PowerPoint presentations. Advanced options control what you see on the screen during slide show presentations. For example, you can control whether you see the pop-up toolbar during presentations. The slide show pop-up toolbar allows you to perform various tasks during a slide show presentation. Cut, copy, and paste options and display options are also found here.
Ribbon and Quick Access Toolbar Options
Although you can add a limited number of commands to the Quick Access Toolbar from the toolbar itself, you can add any command to it from the Quick Access Toolbar tab in the Options dialog box. Along with being able to add commands to the ribbon, you can also add tabs, add groups, and rename existing tabs and groups. An excellent use of this feature is to create a ribbon tab with your most commonly used commands so they are at your fingertips on a single tab, thereby making design work efficient and effective.
Add-ins
Add-ins are small chunks of programming that enhance the functionality of PowerPoint. Add-ins can be developed specifically for PowerPoint, or can be Component Object Model (COM) add-ins that enable you to use the functionality of another program in PowerPoint, such as a PDF writer or screen-capture program. You can get add-ins that give you special tools to design presentations or that add special functionality to your slide shows. Add-ins are available through third parties, or you can create them if you have programming experience.
Trust Center
In the Trust Center, you can read the Microsoft privacy statements and learn about security. Malicious programs can be attached to documents in various ways. You can customize settings to control the behavior of safeguards used against these threats. If you open only presentations that you trust, you can minimize security so there is no need to respond to security messages. If you open presentations of unknown origin, you can heighten the security so that malicious programs cannot affect your computer through a PowerPoint presentation.
Modify General Options
PowerPoint provides a wide variety of options that enable you to customize how it works. Options for features such as Live Preview, ScreenTips, and the Mini Toolbar are found in General options. These settings determine whether you see the Start screen when you open PowerPoint and which file extensions PowerPoint will open. You can also change the username, which PowerPoint records in the properties of each presentation to identify who creates it. You can change these options in the General tab of the PowerPoint Options dialog box.
Modify General Options
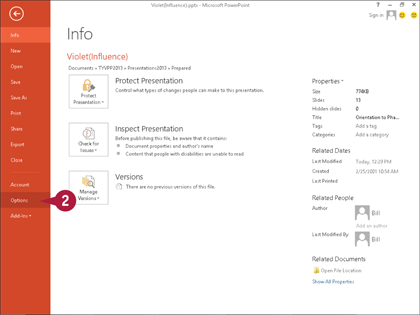
 Click the File tab to show Backstage view.
 Click Options.
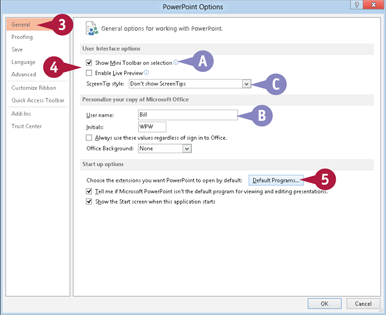
The PowerPoint Options dialog box appears.
 Click General.
 Click to enable (
 ) or disable (
 ) options under the User Interface options heading.
A You can position your mouse pointer ( ) over the Information icon (
 ) to see a brief description of an option.
B You can click the Office Background down arrow ( ) and select a color scheme for the PowerPoint window.
C You can click the ScreenTip style down arrow ( ) and select a ScreenTip style to display when you position the mouse pointer (
 ) over a command.
 Click Default Programs.
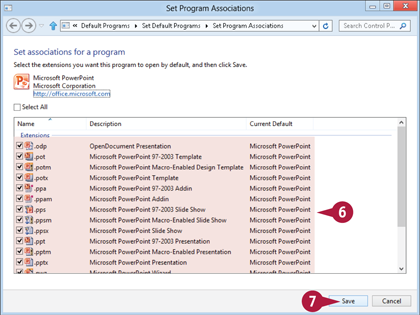
The Set Program Associations dialog box appears.
 Click to enable (
 ) or disable (
 ) files whose extensions you want PowerPoint to open by default.
 Click Save.
PowerPoint saves your changes and the dialog box closes.
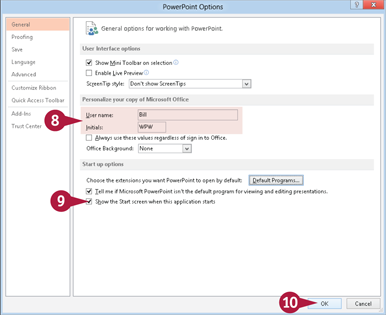
 Type your username and Initials in the text boxes.
 Click Show the Start screen when this application starts (
 changes to
  ) to disable the Start screen page when PowerPoint starts.
 Click OK.
PowerPoint applies your new settings and closes the PowerPoint Options dialog box.
Change Spelling Options
Misspellings in presentations are never good. The powerful spell-checker in Microsoft Office automatically and continually checks spelling in PowerPoint as you type. The spell-checker identifies possible misspellings by underlining them with a red, wavy line. To review a word, you can simply right-click it. You can use this tool to check spelling as you type text, or you can disable the tool. When you need to check spelling, you can always use the spell-checker manually. You can customize how the spell-checker handles possible misspellings in the PowerPoint Options.
Change Spelling Options
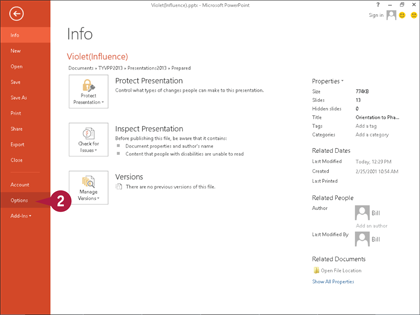
 Click the File tab to show Backstage view.
 Click Options.
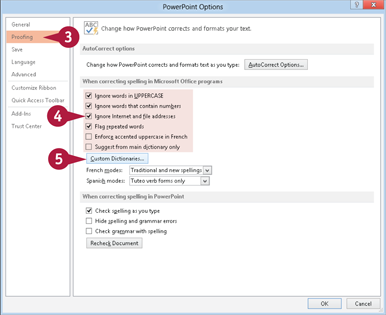
The PowerPoint Options dialog box appears.
 Click Proofing.
 Click to enable (
 ) or disable (
 ) options that determine how spell-checker flags certain errors.
Note: Changes that you make here also affect the spell-checker in the other Microsoft Office programs.
 Click Custom Dictionaries.
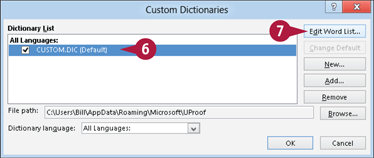
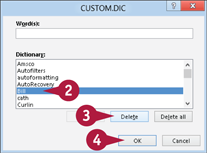
PowerPoint displays the Custom Dictionaries dialog box. PowerPoint automatically creates a custom dictionary (CUSTOM.DIC) when you add words during a spelling check. You can manually add words to your custom dictionary.
 Click CUSTOM.DIC from the list so it is checked (
 ).
).
 Click Edit Word List.
The CUSTOM.DIC dialog box appears.
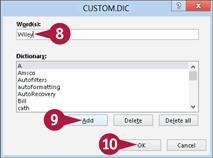
 Type the desired word in the Word(s): text box.
 Click Add.
PowerPoint adds the word to the Dictionary list.
 Click OK.
The CUSTOM.DIC dialog box closes.
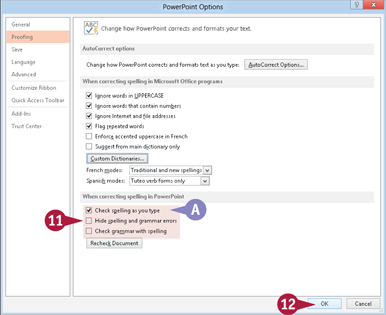
 Click to enable (
 ) or disable (
 ) spell-checker options in PowerPoint.
A If you disable the Check spelling as you type option, you can run the spell-checker manually by clicking the Spelling command on the Review tab of the ribbon.
 Click OK.
PowerPoint applies your new settings and closes the PowerPoint Options dialog box.
Change AutoCorrect Settings
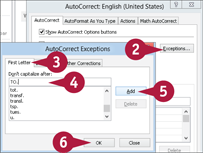
The AutoCorrect feature automatically corrects common typing and spelling errors as you type. You can add words to a list of common misspellings, empowering AutoCorrect to automatically correct words that you routinely misspell. For example, you can tell it to change “actoin” to the word “action” automatically. You can also delete corrections that already exist on the list. For example, you can delete the automatic correction of changing (c) to ©. You can also make exceptions of words that you do not want to be marked as misspelled.
Change AutoCorrect Settings
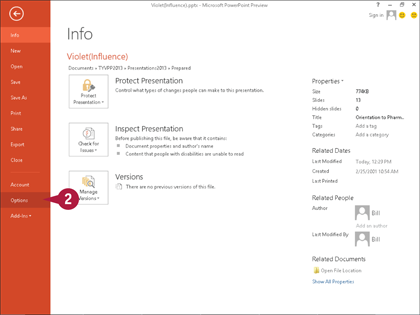
 Click the File tab to show Backstage view.
 Click Options.
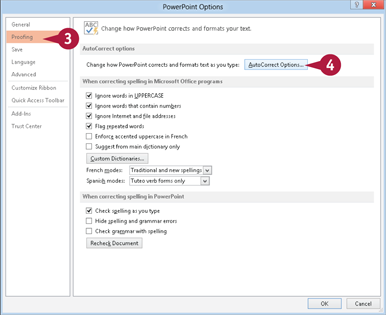
The PowerPoint Options dialog box appears.
 Click Proofing.
 Click AutoCorrect Options.
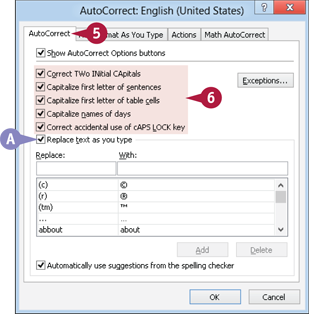
The AutoCorrect dialog box appears.
 Click the AutoCorrect tab.
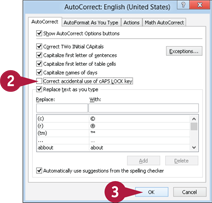
 Click to enable (
 ) or disable (
 ) any of the standard AutoCorrect options.
A To disable the misspelling correction feature, click the Replace text as you type option ( changes to
  ).
).
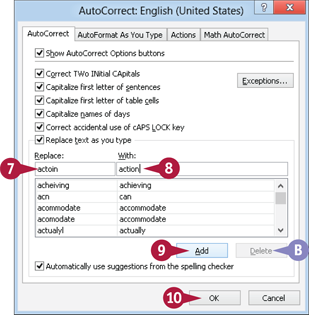
 To add a word to the list, type the misspelled version of the word in the Replace: text box.
 Type the correct spelling of the word in the With: text box.
 Click Add.
B You can delete a word from the list by clicking it and then clicking Delete.
 Click OK in each of the two open dialog boxes.
PowerPoint applies your new settings.
Change AutoFormat Settings
AutoCorrect has a feature called AutoFormat, which speeds up certain formatting that is cumbersome to perform. Examples include changing 1/2 to 1⁄2, replacing ordinals (1st) with superscript (1st), and changing Internet paths to hyperlinks (www.test.com). This is a very convenient feature because making these types of formatting changes can be tedious. It also automates bulleted and numbered lists, and automatically fits text to placeholders. You can customize these settings to suit your particular needs to streamline your work.
Change AutoFormat Settings

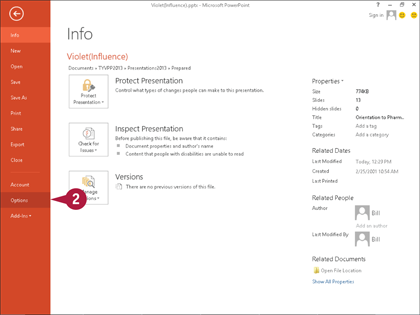
Click the File tab to show Backstage view.
 Click Options.
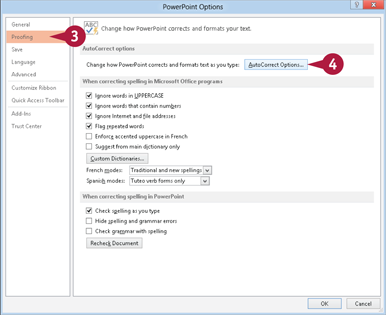
The PowerPoint Options dialog box appears.
 Click Proofing.
 Click AutoCorrect Options.
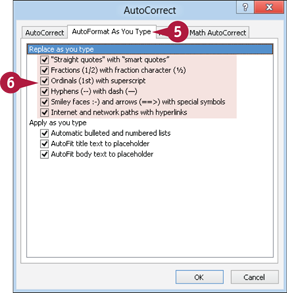
The AutoCorrect dialog box appears.
 Click the AutoFormat As You Type tab.
 Click to enable (
 ) or disable (
 ) any of the options under Replace as you type.
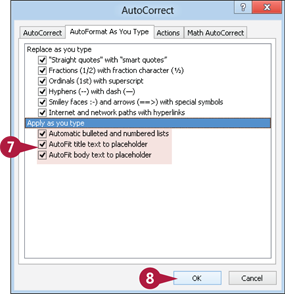
 Click to enable (
 ) or disable (
 ) any of the options under Apply as you type.
These settings control whether text automatically sizes in the placeholders.
 Click OK in each of the two open dialog boxes.
PowerPoint applies your new settings and closes both the AutoCorrect and PowerPoint Options dialog boxes.
Customize Save Options
By default, PowerPoint saves a presentation in your user Documents folder with the PowerPoint 2013 format. For example, if your username is Bill and you save a presentation for the first time, the Save As dialog box uses the folder c:\Users\Bill\Documents\ as the default. If you share your presentations with colleagues who use an older PowerPoint version, you may want to change the settings so the default file format is the PowerPoint 2003 format because PowerPoint 2003 cannot open a file format later than that. You can also embed fonts in the saved presentation to preserve its look on any computer.
Customize Save Options
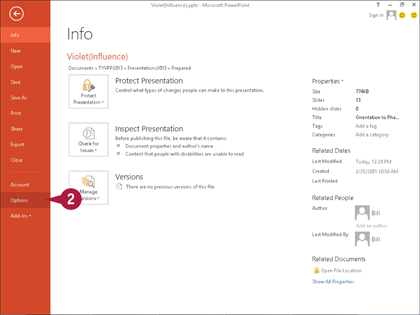
 Click the File tab to show Backstage view.
 Click Options.
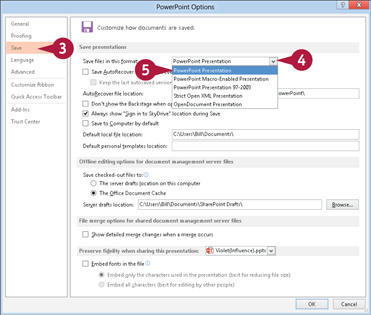
The PowerPoint Options dialog box appears.
 Click Save.
 Click the Save files in this format down arrow (
 ).
).
 Click a file format.
Note: The file type for PowerPoint 2013 is PowerPoint Presentation.
The next time you save a new file, the file type you specify here will appear as the file type in the Save As dialog box. You can choose a different file type during the save.

 Click to enable (
 ) or disable (
 ) options under the Save presentations heading.
A If desired, click the spinner box ( ) to change the number of minutes between AutoRecover saves.
B Click to deselect ( ) the Save AutoRecover information every option to disable the automatic saving feature.
C AutoRecover files are discarded when you close PowerPoint. Click to enable ( ) this option to retain the last file if you close without saving the file.
D To change the default save location, type a new default location.
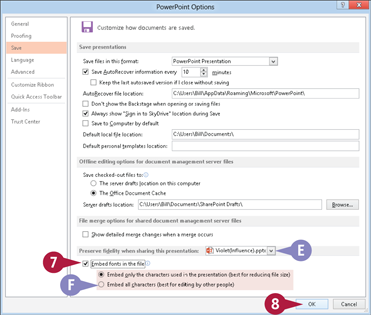
 Click the Embed fonts in the file option (
 changes to
  ).
).
E The fonts for this particular presentation are saved with it, so it will not appear differently when viewed on a system without those fonts.
F You can further specify whether to embed all characters or only those in use.
 Click OK.
PowerPoint applies your new settings and closes the PowerPoint Options dialog box.
Modify View and Slide Show Options
You can change which features are available in the various PowerPoint views. The availability of these features may be determined by the option settings or by the type of presentation. In the Display and Slide Show options, you can select which view PowerPoint uses by default, such as Normal view or Slide Sorter view. You can also control whether the toolbar appears during the slide show presentation. These choices ensure that your preferred tools are on-screen when you need them.
Modify View and Slide Show Options

 Click the File tab to show Backstage view.
 Click Options.
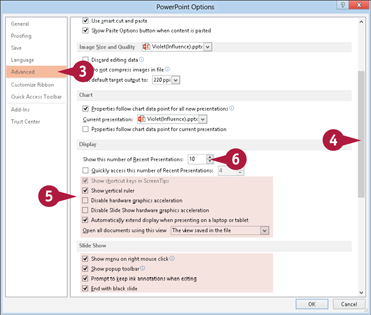
The PowerPoint Options dialog box appears.
 Click Advanced.
 Click and drag the scroll bar to locate the Display and Slide Show headings.
 Click to enable (
 ) or disable (
 ) options under the Display heading.
 Click the spinner box (
 ) to change the number of files displayed in the Recent list on the File tab.

A You can position your mouse pointer ( ) over the information icon (
 ) to see a brief description of an option.
 Click the Open all documents using this view down arrow (
 ).
).
 Click a viewing choice.
PowerPoint uses the specified view when opening presentations.
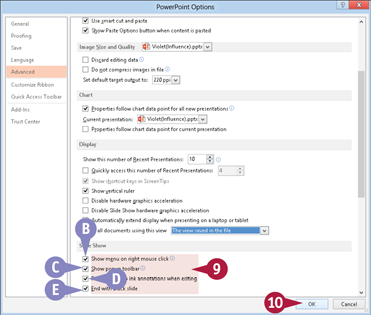
 Click to enable (
 ) or disable (
 ) options affecting behavior during a slide show.
B Determines whether you can use the shortcut menu.
C Controls the toolbar that faintly appears at the bottom-left corner of slides.
D Determines whether you can save annotations you made on the slides upon exiting the slide show.
E Determines whether the slide show ends with a blank, black slide.
 Click OK.
PowerPoint applies your new settings and closes the PowerPoint Options dialog box.
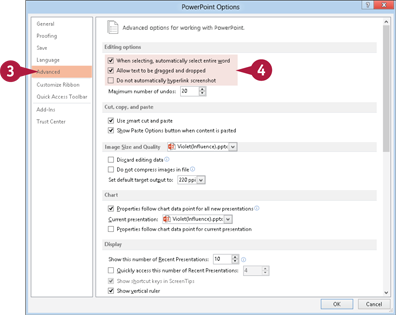
Change Editing Settings
You can change how certain editing tools work. For example, you can modify how the cutting and pasting, text selection, and Undo features perform. These features are useful, but can be annoying and cumbersome if not personalized through the settings in the options. You can also control the use of features such as the Paste Options button. This button appears when you paste a cut or copied object or text. It supplies convenient options for pasting, and you can click it to see commands for working with a pasted selection.
Change Editing Settings
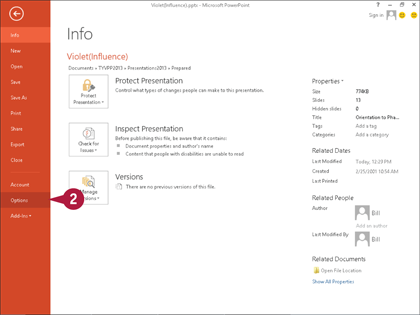
 Click the File tab to show Backstage view.
 Click Options.
The PowerPoint Options dialog box appears.
 Click Advanced.
 Click to enable (
 ) or disable (
 ) options under the Editing options heading.

 Click the spinner box (
 ) to change the number of undo edits you can perform with the Undo button (
 ) on the Quick Access Toolbar.
This feature consumes considerable system memory, so if PowerPoint performs slowly, you should lower this number.
A Some options apply to only one presentation. You can select which presentation.
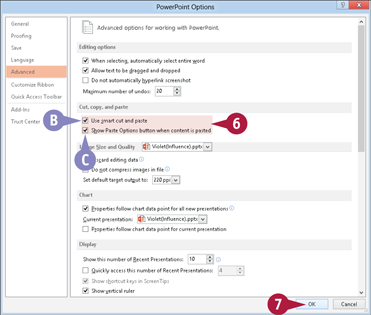
 Click to enable (
 ) or disable (
 ) options under the Cut, copy, and paste heading.
B Smart cut and paste is a feature where PowerPoint adds missing spacing around pasted text or objects.
C Click to disable the Paste Options button ( ) that appears when you perform a copy-and-paste operation (
 changes to
  ).
).
 Click OK.
PowerPoint applies your new settings and closes the PowerPoint Options dialog box.
Work with Print Options
The PowerPoint Options dialog box offers several print options, making it easy to control presentation printing. For example, you can modify the way your printer handles fonts and the resolution of inserted graphics. You can also specify that a particular presentation always be printed with a particular printer and settings, saving you the trouble of choosing those settings every time you print that particular file. These settings can save time when printing presentations.
Work with Print Options
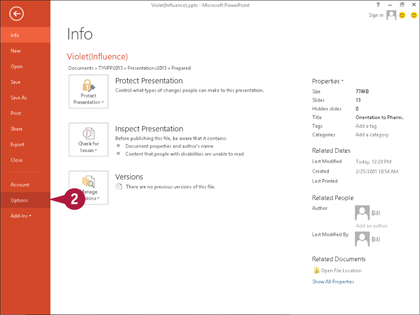
 Click the File tab to show Backstage view.
 Click Options.
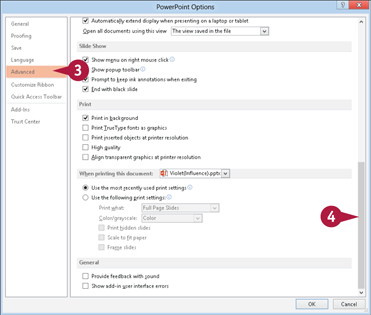
The PowerPoint Options dialog box appears.
 Click Advanced.
 Click and drag the scroll bar to the bottom of the PowerPoint Options dialog box.
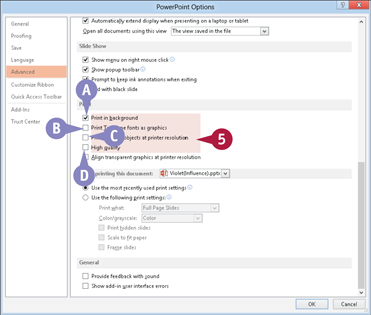
 Click to enable (
 ) or disable (
 ) options under the Print heading.
A Print in background enables you to work in PowerPoint while printing.
B Print TrueType fonts as graphics prevents distortion of fonts.
C Enable this setting to use the printer’s resolution settings to ensure quality printing of graphics.
D High quality increases the resolution of graphics, but can slow printing.
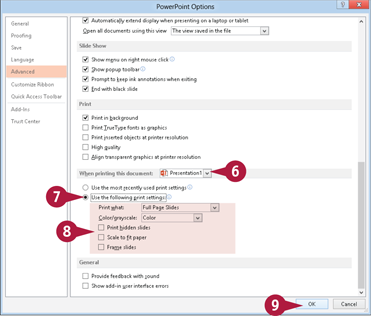
 The next options apply to a single presentation; click the down arrow (
 ) to select which presentation these options will affect.
 Click the Use the following print settings option (
 changes to
  ).
).
The related settings become available.
 Click to select print settings.
 Click OK.
PowerPoint applies your new settings and closes the PowerPoint Options dialog box.
Customize the Quick Access Toolbar
The Quick Access Toolbar appears above the ribbon in the upper-left corner of the PowerPoint window. You can move it below the ribbon if you like. This toolbar offers buttons for the most frequently used commands, providing even easier access than the ribbon.
You can add buttons to the Quick Access Toolbar to quickly access the commands you use the most, and you can remove buttons that you do not use. This allows you to reduce the number of clicks needed to run commonly used commands, thus streamlining your design work.
Customize the Quick Access Toolbar

 Click the Quick Access Toolbar down arrow (
 ).
).
 Click More Commands.
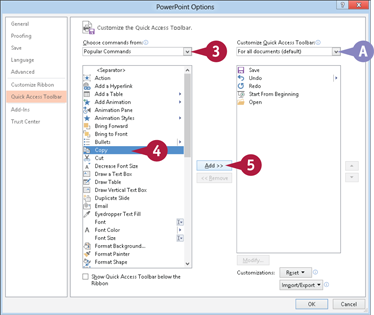
The PowerPoint Options dialog box appears, with Quick Access Toolbar displayed.
 Click the down arrow (
 ) and select the category or tab that holds the command button you want to add to the Quick Access Toolbar.
 Find your desired command on the list and click it.
A To add a command to the toolbar of a particular presentation, click the down arrow ( ) and select that presentation from the Customize Quick Access Toolbar list.
 Click Add.
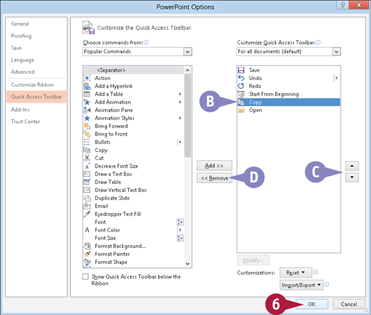
B The command appears on the list of commands under Customize Quick Access Toolbar.
C Click Up ( ) or Down (
 ) to change a command’s position.
D Click Remove to remove a command from the toolbar.
 Click OK.

E The PowerPoint Options dialog box closes, and the Quick Access Toolbar reflects the changes you made.
Customize the Ribbon
You can add commands to the PowerPoint ribbon, as well as add tabs and groups. Adding commands to the ribbon adds proficiency to the way you handle tasks and commands. An excellent use of this feature is creating a ribbon tab with your most commonly used commands so they are at your fingertips on a single tab, thereby making design work efficient and effective. You can add commands to existing tabs and rename existing tabs and groups.
Customize the Ribbon
Tour the Ribbon Tab Outline
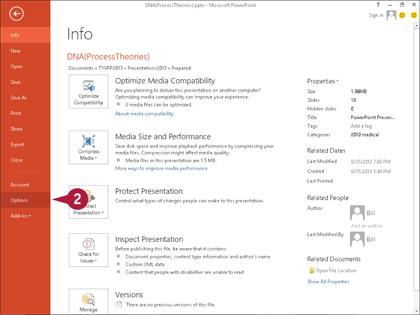
 Click the File tab to show Backstage view.
 Click Options.
The PowerPoint Options dialog box appears.
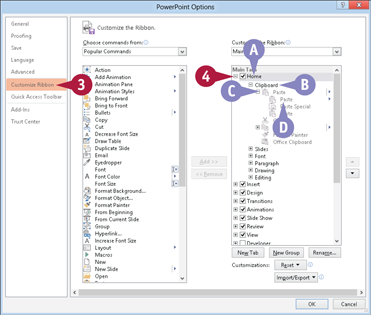
 Click Customize Ribbon.
 Click the plus sign (
 ) to expand a level (
 changes to
  , which is used to collapse a level).
A The first level of names on the list shows ribbon tabs.
B The second level shows ribbon groups.
C The third level shows ribbon commands, or ribbon menus and galleries.
D The fourth level shows commands of ribbon menus and galleries that are on the third level.
Add a Custom Tab to the Ribbon
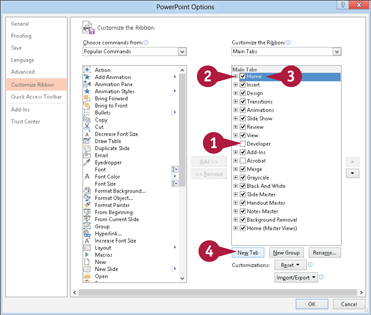
 Click the check box (
 ) to disable a tab and remove it from the ribbon (
 changes to
  ).
).
 Click the plus sign (
 ) to collapse the Home tab (
 changes to
  ).
).
 Click a tab name from the list — your custom tab is inserted below it.
 Click New Tab.
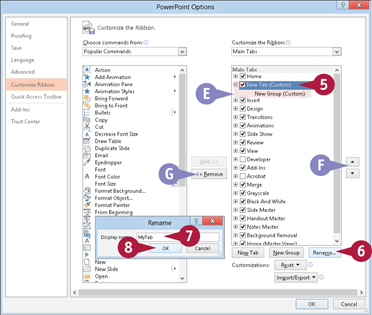
E A new tab appears with one new group.
 Click New Tab (Custom).
F You can use the Up ( ) and Down (
 ) buttons to change the position of the tab.
G You can remove a custom tab by clicking Remove.
 Click Rename.
The Rename dialog box appears.
 Type a name in the text box.
 Click OK.
How people use ribbon commands depends upon how they work with PowerPoint. In fact, PowerPoint users often have a group of commands that they frequently use, and so many advanced users create a single tab with all of their favorite commands on it. You can group commonly used commands on a custom tab to make it easier than ever to design your presentation. Creating a presentation takes time, so you can make your design process faster and more effective by creating tabs with your favorite commands on it.
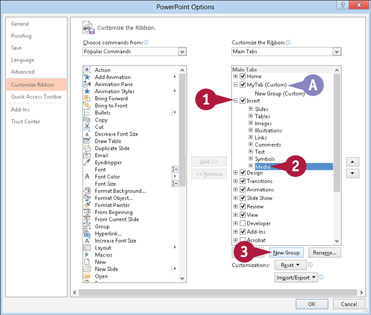
A The tab name changes to MyTab.
Add a Group
 Click the plus sign (
 ) to expand the Insert tab (
 changes to
  ).
).
 Click a group name from the list; your custom group is inserted below it.
 Click New Group.
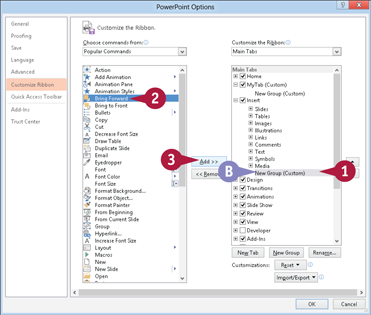
B A new group level appears.
Add a Command
 Click New Group (Custom).
 Click a command from the list.
 Click Add.
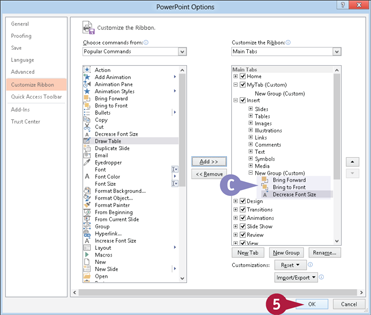
 Repeat Steps 2 and 3 for any commands you want in any group, including existing groups.
C PowerPoint adds your commands to New Group (Custom).
 Click OK.
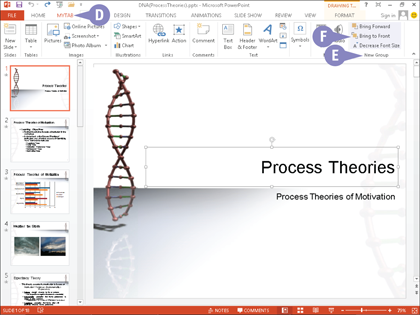
The PowerPoint Options dialog box closes, and the ribbon reflects the changes you made.
D PowerPoint adds MyTab to the ribbon.
E PowerPoint adds the group, New Group, to MyTab.
F PowerPoint adds the selected commands to New Group.

