Chapter 4: Writing and Formatting Text
A professional presentation commands respect and conveys ideas easily. Nice formatting makes text easier to read and helps make your slides more attractive and polished. Changing the formatting can completely change the look, feel, and mood of a presentation.

Explore Text Formatting Options
Using the Spelling Check Feature
Understanding Slide Structure
You use PowerPoint to build a presentation slide by slide. Those slides, whether shown as a slide show or printed, make up your presentation. Different types of slides (slide layouts) serve different functions in your presentation. The slide layout controls which objects a slide contains and the placement of those objects on the slide. You can learn more about layouts in Chapter 5. The structure of the presentation affects flow and visual appeal.
Title Slide

The Title slide typically appears first and includes the presentation title or topic, and a subtitle. The subtitle might be the presenter’s name or the name of the presenting company, or it might be the date and location of the presentation. There is usually just one title slide in a presentation, though they are sometimes used at the beginning of slide sections.
Title and Content Slide
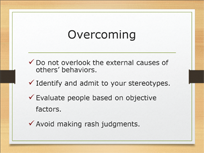
A Title and Content slide is perhaps the most frequently used slide layout. It includes a title plus a placeholder where you can add one of several types of content: a bulleted list, table, chart, clip art, picture, SmartArt graphic (diagram), or media clip (sound or video).
Other Slide Content

PowerPoint provides other slide layouts for your convenience: Two Content, Comparison, Content with Caption, Picture with Caption, and Blank. Each layout includes placeholders to position your information. Choose the layout that best presents your concepts and the associated data or graphics.
Slide Sections
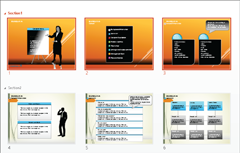
You may need to divide a presentation into logical sections. Section breaks allow your audience to ask questions or for the group to take a break. You can easily change the slide theme of each section, possibly to denote a change in topic. You can introduce a new section with a slide using the Section Header or Title Only layout.
Explore Text Formatting Options
You can use various text formatting tools in PowerPoint to change the appearance of selected text. The Font and Paragraph groups on the Home tab of the ribbon provide most of the tools you need, or you can make formatting changes in the Font or Paragraph dialog boxes. You can also change the formatting of entire placeholders using the Quick Styles command on the Home tab.
Change the Font

When you type text on a slide, it is formatted with a font that is determined by the presentation theme you apply. The font (lettering type) gives a certain look and feel to your presentation, such as formal or informal. Changing the formatting of text can emphasize a certain word or line. You can change the font for selected text or for all text in a title or bulleted list.
Resize Text
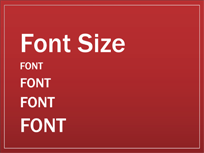
Properly sizing presentation text makes the text more readable and attractive. You can modify the text size to reflect the environment where you make the presentation. Smaller text may be readable for a presentation viewed on a kiosk, but larger text may be needed to ensure clarity in a lecture hall. You can also use size to emphasize words.
Change Text Color and Other Attributes

You can use text color for both design and practical purposes. The text color should be appealing to the eye. More importantly, it should provide a good contrast against the slide background so that the text is easy to read. You can also apply attributes such as bold, italic, and underline to slide text. Use colors and attributes to add emphasis to important words or phrases in your presentation.
Selecting Text or Placeholders

You can change the formatting of the text in a placeholder — how you select the placeholder determines which text changes. To select text in a placeholder, simply click the text, click and drag across it, or double-click a word. The placeholder border becomes a dashed line. To select the entire placeholder, click the border. The border becomes solid and your changes affect all of the text in the placeholder.
Add a Slide
When you open a new presentation, PowerPoint creates a blank title slide. To build your presentation, you can add as many slides as you like — just select one from the several slide templates that are available in the slide gallery by default.
Determine the number of slides in your presentation based upon how many topics you want to cover and the time you have available to cover them. Each slide should cover or detail a new topic.
Add a Slide
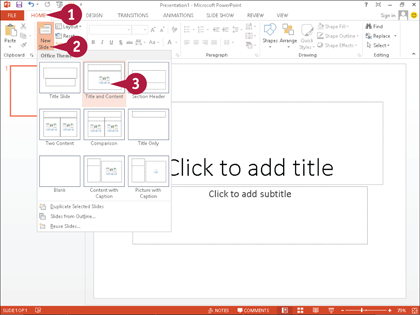
 With a presentation open, click the Home tab.
 Click the New Slide down arrow (
 ).
).
 Click the desired slide layout from the gallery.
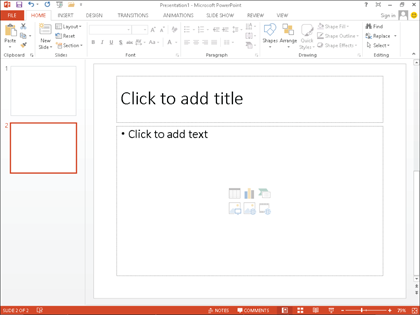
A new blank slide appears with the specified layout.
Note: Depending on circumstances, clicking the top half of the New Slide button inserts a slide with either the Title and Content layout or the same layout as the current slide.
Delete a Slide in Normal View
As you build your presentation, you may decide you do not need a particular slide. In this case, you can simply delete that slide. It is common to use an existing presentation as the basis for other presentations. In that situation, you may need to delete several slides that are irrelevant or out of date. You can either hide or delete slides. If you are confident that you do not need a slide, delete it to keep your presentation uncluttered.
Delete a Slide in Normal View
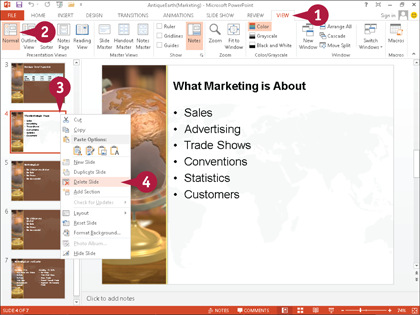
 Click the View tab.
 Click Normal.
Note: For more on Normal view, see Chapter 2.
 Right-click the slide you want to delete.
The submenu appears.
 Click Delete Slide.

PowerPoint deletes the slide.
Note: You can also click the slide, and then press  .
.
A Click the Undo button ( ) on the Quick Access Toolbar if you decide you need the slide and want it back in the presentation.
Type and Edit Text on a Slide
You can type text into a placeholder on a slide so you can convey information to the presentation audience through the written word. There are three types of placeholders that can hold text: title, content (bulleted list), and subtitle. You simply click the placeholder and then start typing. You can also go back and edit text you have already typed. Bullet points are discussion points, not detailed sentences. Remember to keep them short.
Type and Edit Text on a Slide
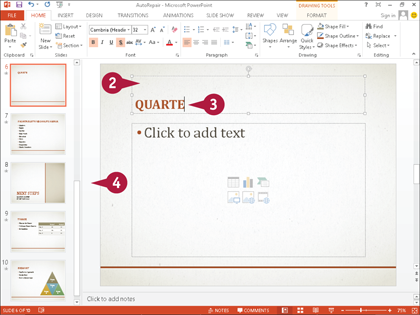
Enter Text
 With a presentation in Normal view, add a Title and Content Slide.
Note: See the section “Add a Slide” in this chapter to learn how to add a slide.
 Click the title placeholder.
The insertion point appears and the “Click to add title” text disappears.
 Type your text.
 Click outside the placeholder.

A PowerPoint adds the text.
 Click the content placeholder.
 Type your text.
 Press
Press  .
.
B The insertion point moves to the next line.
 Repeat Steps 6 and 7 for all bullet points for that slide.
 Click outside the placeholder.
PowerPoint adds the text.
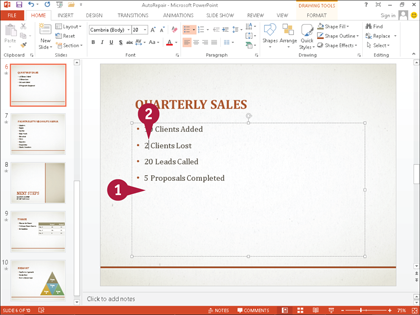
Edit Text
 Click anywhere within a title, subtitle, or text placeholder.
 Click the existing text where you want to change it.
The insertion point appears where you clicked. You can press  to delete text to the left, or press
  to delete text to the right of the insertion point.
 Press
Press  .
.
This example deletes the number ‘2.’

 Type any text you want to add.
This example types the text ‘Two.’
 Click and drag over one or more words.
 Press
Press  .
.
PowerPoint deletes the selected text.
Format Text Color and Style
Color adds flair to any presentation. You can use text color to make your text more readable and more attractive. Choose text colors that are a good contrast with the background so your audience can easily read the text during the slide show. You can select colors from a standard palette or work with custom colors. Use text colors along with text styles such as bold or shadow to add emphasis to the words in your presentation.
Format Text Color and Style
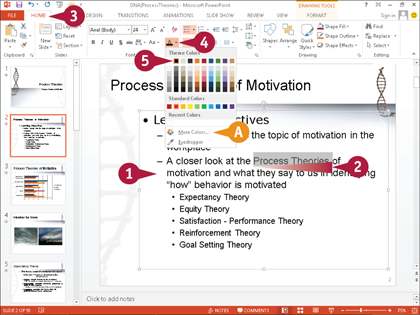
 Click a placeholder to select it.
 Click and drag over one or more words.
 Click the Home tab.
 Click the Font Color down arrow (
 ).
).
A color palette appears.
 Select a color from the palette.
A For a custom color, click More Colors.
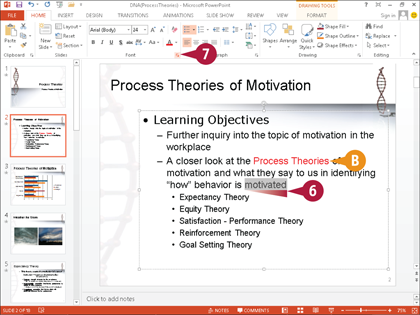
B The text you selected changes to the color you chose.
 Click and drag over one or more other words.
Note: You can also double-click to select a single word.
 Click the dialog box launcher button (
 ) in the Font group.
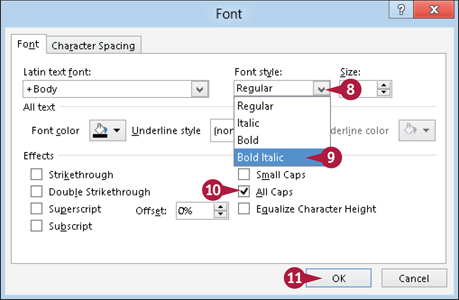
The Font dialog box appears.
 Click the Font style down arrow (
 ).
).
 Click a style from the list.
 Click an effect to apply to your text (
 changes to
  ).
).
 Click OK.
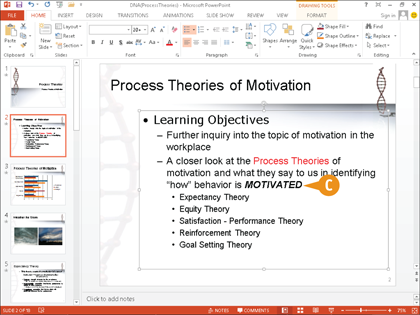
C PowerPoint changes the text to the style that you selected.
Format Text Font and Size
The font you choose for text portrays a certain look and feel. Some fonts are playful, and others more formal. Fonts are divided into four main types: serif fonts, with cross strokes on the letter ends; sans serif fonts, which do not have cross strokes on the letter ends; script fonts, which look like handwriting; and decorative fonts such as Algerian, which are heavily stylized. Font size is important because your audience should be able to read all of the text in your presentation without straining their eyes.
Format Text Font and Size
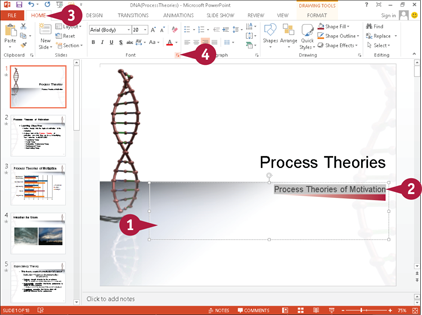
 Click a placeholder to select it.
 Click and drag over one or more words.
 Click the Home tab.
 Click the dialog box launcher button (
 ) in the Font group.
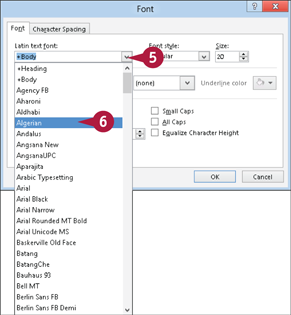
The Font dialog box appears.
 Click the Latin text font down arrow (
 ).
).
 Click the desired font.

 Double-click the number in the Size text box and type a new font size.
A You can also click the spinner ( ) beside the Size text box to increase or decrease the font size.
 Click OK.
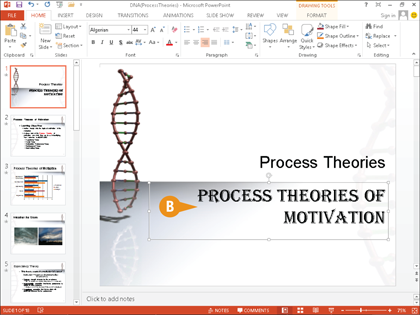
B PowerPoint applies the new formatting to the text.
Note: If the placeholder is not wide enough to accommodate the size of the font with the number of characters in one line, then the auto-formatting feature makes the text two lines.
Cut, Copy, and Paste Text
When you edit your presentation, you can move text by using the Cut, Copy, and Paste features. Using these features assures accuracy and saves time because you avoid typing the text manually. Cut removes text from its original location. Copy duplicates the text, leaving the original in place. Paste places either cut or copied text into another location. You can also cut, copy, and paste objects like placeholders and pictures. If you change your mind or make a mistake, you can use the undo feature to reverse the commands you made.
Cut, Copy, and Paste Text
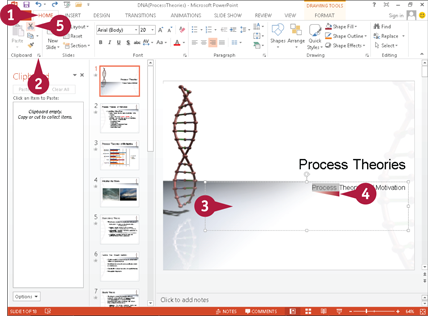
 Click the Home tab.
 Click the dialog box launcher button (
 ) in the Clipboard group.
The Clipboard task pane appears.
 Click a text placeholder to select it.
 Click and drag to select text.
 Click the Cut button (
 ).
).

A PowerPoint removes the selected text and places it on the Windows Clipboard.
 Click and drag to select different text.
 Click the Copy button (
 ).
).
Note: If you do not open the Clipboard, it holds only your most recent copied or cut text.
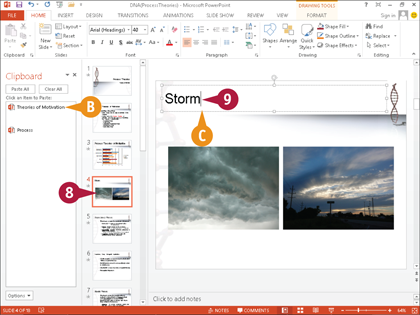
B PowerPoint copies the selected text to the Clipboard.
 Select the slide where you want to paste the text.
Note: For more information on navigating slides, see Chapter 2.
 Click within the placeholder to position the insertion point where you want to paste the text.
C The insertion point appears in the placeholder.

 To paste an item that you copied, click it in the Clipboard.
D PowerPoint pastes the cut or copied text into the placeholder.
E You can also click Paste to paste the most recently copied item, which is always the first item on the Clipboard.
Format Bulleted Lists
Bulleted lists are the heart of any presentation. They summarize key points the presenter wants to make. You can format bulleted lists with different styles of bullets. For example, you can use check marks as bullets in a list of points for a project. You can use pictures and symbols as bullet points and dictate the size of bullet points as well.
If you place the insertion point within the text of a placeholder, only the bullet for that line changes. To change all bullets, click the placeholder border to select the entire placeholder.
Format Bulleted Lists
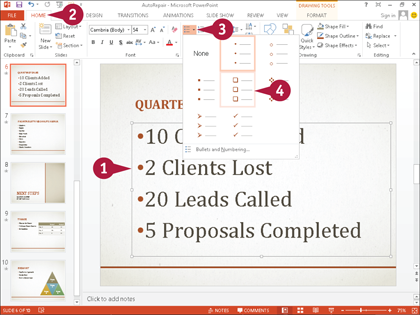
 Click the border of a placeholder containing a bulleted list.
 Click the Home tab.
 Click the Bullets down arrow (
 ).
).
 Click a bullet style from the gallery.
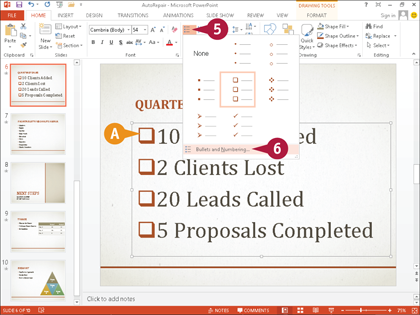
A The bullets change to the new style.
 Click the Bullets down arrow (
 ).
).
 Click Bullets and Numbering at the bottom of the gallery.
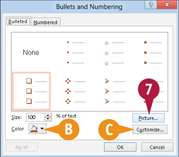
The Bullets and Numbering dialog box appears.
B You can change the bullet color.
C You can click Customize to use a symbol as a bullet.
 Click Picture.
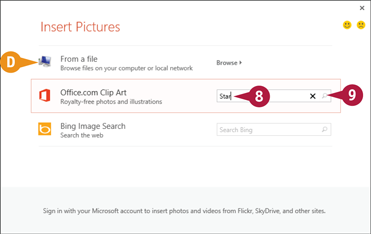
The Insert Pictures dialog box appears.
D You can use a picture from your computer.
 Type a keyword into the Office.com Clip Art text box.
 Click the Search button (
 ).
).

 Click a picture from the selection.
 Click Insert.
E The picture appears as a bullet.
Using the Spelling Check Feature
You should check the contents of your presentation for spelling accuracy because good presentations do not have spelling errors. Not all of us are spelling bee winners, but your audience will definitely notice spelling errors. Fortunately, PowerPoint offers a spelling check feature to improve your spelling accuracy without using a dictionary. You can check the spelling of all the words throughout your presentation so it is as professional as possible.
Using the Spelling Check Feature
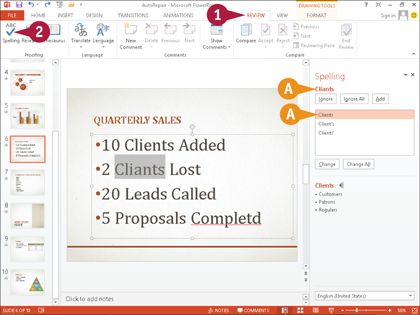
 Click the Review tab.
 Click Spelling.
Note: You can also press  to start the spelling check.
A The Spelling task pane appears, displaying the first questionable word and suggested spellings.
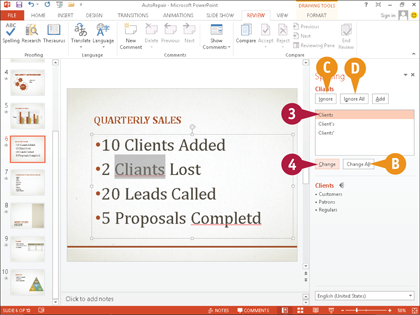
 Click a suggestion from the Suggestions list.
 Click Change to replace the misspelling.
B You can click Change All to replace all instances of the misspelled word.
C You can click Ignore to leave the spelling as is.
D You can click Ignore All to leave all instances of this spelling as they are.
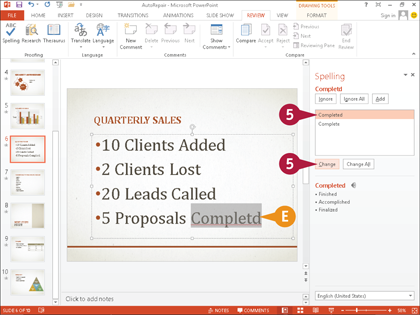
E The spelling check proceeds to the next questionable word.
 Repeat Steps 3 and 4 until the spell check is complete.
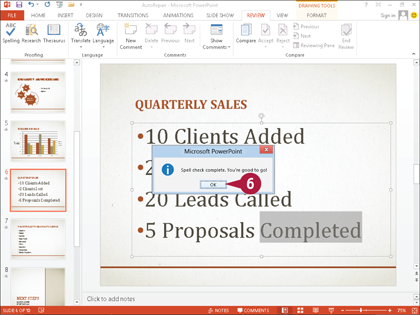
A dialog box appears notifying you when the spelling check is complete.
 Click OK.
The Spelling task pane closes.
Note: If PowerPoint options are set to check spelling as you type, red wavy lines may appear under possibly misspelled words after you type them. You can right-click the word and then click an option in the shortcut menu that appears.
Using the Research Feature
As you type text in a presentation, you may need to check definitions or facts. PowerPoint gives you the convenience of researching a topic without a dictionary, thesaurus, or any other references; you can research the topic without leaving PowerPoint! If your computer has an Internet connection, you can use the Research feature to search reference books and research sites for relevant information on your topic. PowerPoint finds relevant references so you can open them with a click of your mouse button!
Using the Research Feature
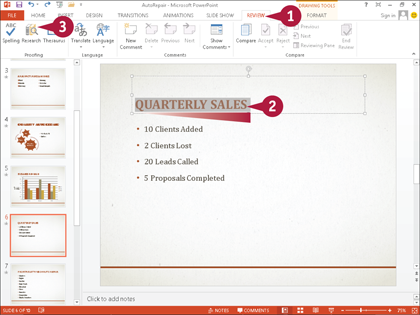
 Click the Review tab.
 Click and drag across the text you want to research.
 Click Research.
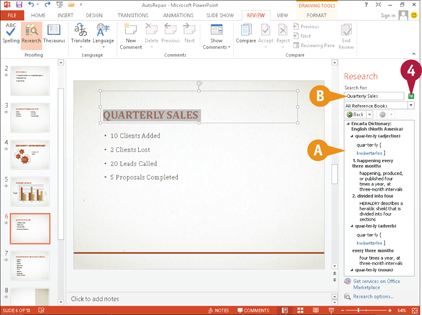
The Research task pane appears with the selected text in the Search for text box.
 Click the Search button (
 changes to
  ).
).
You can click the Stop button ( ) to cancel the search.
A The search results appear.
B If you want to change the search topic, type it in the Search for text box and click the Search button ( ).
).
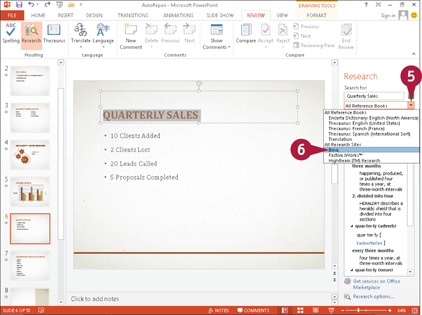
 Click the Search for down arrow (
 ) to change where the Research feature looks for information.
 Click to select a research site from the drop-down list.
PowerPoint changes the search results to reflect your change.
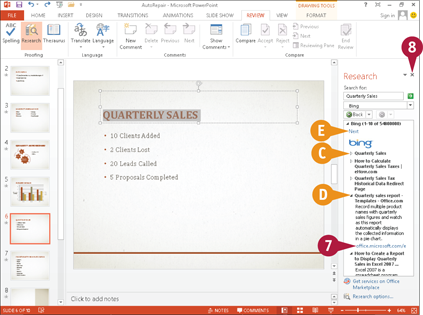
C Click the Expand icon ( ) to expand a listing (
 changes to
  ).
).
D Click the Collapse icon ( ) to collapse a listing (
 changes to
  ).
).
E Click Next to see the next listings.
 Click a link.
Additional information appears or a Web site opens, depending on the type of link it is.
 Click the Close button (
 ) to close the Research task pane.


