Chapter 8: Using Themes
You can use the themes that are built into PowerPoint as well as online themes to apply a professional-looking design to your presentation. Although it is possible to design slides by applying slide backgrounds and graphics manually, or by formatting elements on slides or master slides one by one, people most commonly use slide themes to develop their presentations.

Apply a Theme to Selected Slides
Apply a Texture or Picture Background
Make a Theme the Default for New Presentations
Understanding Themes
A theme is the look, color, and graphics that the slides in your presentation have in common. You can use a theme from the PowerPoint program, get one from Microsoft Office Online, or use a theme from an existing presentation. You can also create a blank presentation, and then apply a background and graphics to create your own theme — and then save the theme.
Theme Elements

By default, each new presentation you create uses a blank design theme. When you choose a specific theme, PowerPoint applies a set of colors, fonts, and placeholder positions to the slides. All of these elements vary greatly from theme to theme. The theme can also include a background color, background graphics, and effects for background graphics.
Apply Themes

It is easy to apply a theme to a single slide, a section, or the entire presentation. Generally it is better to use one theme for an entire presentation so that the slides have a consistent look and feel. However, you can also choose to apply a different theme to a particular slide for emphasis.
Modify Themes

Although PowerPoint provides professionally designed slide themes, you can tailor existing themes to meet your specific needs. You can change the background, background color, or the color scheme of the entire theme. Once you design a theme you really like, you can save it to the theme gallery to use again.
Themes and Masters

Slide masters determine where placeholders and objects appear on each slide layout. Each theme has a master slide for the Title slide, a master slide for the Title and Content Slide, and so on. After you apply a theme, you can modify the masters. Any changes you make to the master slides automatically appear in your presentation slides. You can also change the fonts on the master slides.
The Anatomy of a Theme
Themes control several aspects of your slide design. The theme determines the locations of placeholders, the color scheme, the slide background, and any graphics that may be part of the theme. These characteristics vary considerably from theme to theme. For example, the title may be on the top of slides in one theme and on the bottom of slides in another theme. These variations give each theme its own flavor and personality.

A Placeholder Position
Placeholder positions vary from theme to theme. Each theme has a set of slide masters that control where placeholders appear on each slide layout.
B Graphic Elements
Some themes include graphic elements that are typically part of the background. To avoid accidentally changing them, you can modify them on the slide masters, but not on individual slides.
C Color Scheme
Themes control the colors applied to slide text, the background, and objects such as tables, charts, and SmartArt Graphics. You can change colors on individual slides.
D Background
Themes specify the background applied to slides. The background might be a solid color, a gradient, or a pattern, and may include graphics.
E Effects
Effects give a dimensional appearance to graphics by adding shadows, transparency, 3-D, and more. A theme may apply a particular style of effect to graphics.
Apply a Theme to Selected Slides
You can apply a different theme to a single slide in either Normal or Slide Sorter view. You may want to apply a different theme to a single slide to emphasize the slide or make it stand out. If you apply a different theme to a single slide, you will normally want it to complement the design of the theme used on the other slides in the presentation. As you advance slides, the transition from one theme to another affects your viewers.
Apply a Theme to Selected Slides

 Click View.
 Click Slide Sorter.
 Select a slide or slides.
Note: To select multiple slides, click the first slide, and then press  while clicking additional slides.

 Click the Design tab.
 Click the Themes down arrow (
 ).
).

The gallery of themes appears.
 Right-click a theme.
The shortcut menu appears.
 Click Apply to Selected Slides.

A PowerPoint applies the theme to the slide(s) you selected.
Apply a Theme to All Slides
You can apply one theme to all the slides in a presentation. It is important to give your slides a consistent appearance so your presentation looks professional. While the slide layouts may vary, the theme supplies common colors, graphics, and more. This allows you to focus on content rather than design and formatting. You may design a presentation and then decide that the theme you originally chose does not set the proper mood for the presentation. No problem, just apply a different theme for the proper feeling. You can change the theme in either Normal or Slide Sorter view.
Apply a Theme to All Slides

In Slide Sorter view, click at least one slide.
Click the Design tab.
Click the Themes down arrow ().
The gallery of themes appears.
Click a theme.

PowerPoint applies the theme to all slides in the presentation.
Note: You can also right-click a thumbnail in the gallery and then click Apply to All Slides.
Apply a Theme to a Section
It is common to change topics during a presentation. For example, a person teaching a class about Microsoft Office changes topics when moving from teaching PowerPoint to teaching Excel. If you change topics, you might want to alter the mood to one that is more appropriate for the new topic. You can apply themes to sections of a presentation. Doing so gives each section a look and feel that is consistent with the others, yet makes it obvious that that particular section of your presentation is dedicated to a specific topic. You can change the theme in either Normal or Slide Sorter view.
Apply a Theme to a Section

In Slide Sorter view, click a section heading.
Click the Design tab.
Click the Themes down arrow ().
The gallery of themes appears.
Click a theme.

A PowerPoint applies the theme to all slides in the section.
Change Theme Colors
Each theme includes a color scheme. You can add variety or emphasize certain slides by changing the color scheme of only those particular slides. You can also change the color scheme of an entire presentation or a section of a presentation. When you alter the color scheme, the other aspects of the theme, such as placeholder position and background objects, stay the same — only the colors change. You can change the color scheme in Normal view or Slide Sorter view.
Change Theme Colors

In Slide Sorter view, click a slide or slides.
Note: To select multiple slides, click the first slide, and then press while clicking additional slides.
Click the Design tab.
Right-click a color scheme from the Variants gallery.
Click Apply to Selected Slides.

PowerPoint applies the color scheme to the slides you selected.
Select a slide designed with the theme you want to change.
Right-click a color scheme from the Variants gallery.
Click Apply to Matching Slides.

PowerPoint applies the color scheme to all slides whose theme matches the selected slide.
 Right-click a color scheme from the Variants gallery.
 Click Apply to All Slides.

PowerPoint applies the selected color scheme to all slides in the presentation.
Modify the Background
A theme applies a background on which all slide elements sit. You can make the background a color or plain white, or you can even use a texture or digital picture as a background. For example, you can use a digital photo of a new product as a slide background for a presentation introducing the product. You can change the background for one slide, for a theme, or throughout the presentation and you can do this in Normal or Slide Sorter view. Be careful with your choice of background — a complicated background can make a presentation hard to read or distracting.
Modify the Background

Select the slide(s) you want to modify in Slide Sorter view.
Note: To select multiple slides, click the first slide, and then press while clicking additional slides.
Click the Design tab.
Click Format Background.

The Format Background pane appears.
Click the Fill icon ( ).
).
Click Solid fill ( changesto
  ).
).
Click the Color button ( ).
).
Click a color.
A You can click Apply to All to apply the color to all slides.
PowerPoint applies the background color to the selected slides.

Click Gradient fill ( changes to ).
PowerPoint applies a preset gradient to the background.
B You can adjust gradient options to change the direction and gradient type.
C You fine-tune the gradient by adjusting its characteristics, such as brightness and transparency.

Click Pattern fill ( changes to ).
 Click a pattern from the gallery.
PowerPoint applies the background pattern to the selected slides.
Apply a Texture or Picture Background
If you really want to make a slide more dramatic, you can push design limits by using either a texture or a digital picture as a background. For example, you can use a digital photo of a landscape and sunrise for a slide introducing a new idea. Typically, you would not do this for an entire set of slides because a complicated background makes a slide difficult to read and can be hard on the audience’s eyes. You can add a picture to the background of a slide in either Slide Sorter or Normal view.
Apply a Texture or Picture Background

Select the slide(s) to which you want to add a background in Slide Sorter view.
Note: To select multiple slides, click the first slide, and then press while clicking additional slides.
Click the Design tab.
Click Format Background.

The Format Background pane appears.
Click the Fill icon ().
Click Picture or texture fill ( changes to ).
The slide fills with a preset texture.
A Click the Texture button ( ) to apply a texture to the background.
Click File.

The Insert Picture dialog box appears.
Click the folder that contains the picture file you want to insert.
Click the picture file.
Click Insert.

The Insert Picture dialog box closes and the picture becomes the background.
Click the Picture icon ( ) to apply color corrections to the picture.
B You can click Apply to All to apply the background to all slides in the presentation.
TIP
How can I remove a texture or picture from the background?
With the Format Background pane open, follow these steps:
Click the Fill icon ().
Click Solid fill ( changes to ).
Click the Color button ().
Click Automatic.
PowerPoint removes the background.

Save Your Own Theme
If you spent a lot of time creating your own theme, you may want to use it again. For example, say you designed a theme from scratch or modified an existing theme, where you applied a color scheme and background that really works, and possibly some graphics. If you do not want to do all this work again, you can save the results as a theme. This enables you to quickly apply that combination of color, background, and graphics to other presentations.
Save Your Own Theme

Click the Design tab.
Click the Themes down arrow ().
The gallery of themes appears.
A If you save your theme in the PowerPoint theme default folder, it will appear under Custom.
Click Save Current Theme.

The Save Current Theme dialog box appears.
Type a filename.
B This is the default folder location for themes.
Note: Do not change the folder location. Your themes appear in the gallery of themes because they are in this folder location.
Click Save.
PowerPoint saves the theme and adds it to the Custom section of the gallery.
Make a Theme the Default for New Presentations
By default, a new presentation has a blank background and uses the Calibri font in varying sizes and weights for the various placeholders. If you have a theme that you use often, you can make that theme the default for new presentations so it is automatically applied to future blank presentations. This gives you a fast start in designing a new presentation. If the default theme is not right for any particular presentation, you can always change it to one you prefer.
Make a Theme the Default for New Presentations

Click the Design tab.
Click the Themes down arrow ().
The gallery of themes appears.
Right-click the theme you want to set as the default.
Click Set as Default Theme.
The theme immediately becomes the default theme. Any blank presentation you create uses that theme.

Click the File tab to show Backstage view.
Click New.
A The selected theme appears as the default theme.
Save a Template
A template is a boilerplate presentation that you use repeatedly but change certain items each time you use it. It includes a presentation design plus reusable content such as slides that you would often use in a particular type of presentation. For example, you may have a template presentation for selling to a purchasing group’s clients — content about the purchasing group does not change from client to client, so you would have slides about them in the template along with slides that you would tailor to each client. You can save a lot of time by using templates for repeatable presentations.
Save a Template

Click the File tab to show Backstage view.
Click Save As.
Click Computer.
Click Browse.
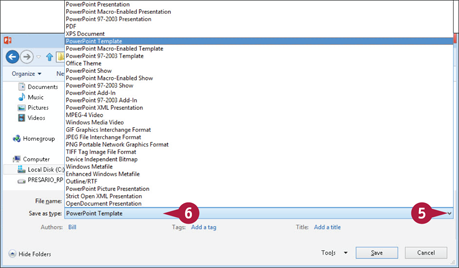
The Save As dialog box appears.
Click the Save as type down arrow ( ).
).
Click PowerPoint Template.

A This is the default folder location for themes and templates.
Note: It is best not to change this folder location. Your templates appear in the templates gallery because they are in this folder location, which is the same as the theme folder location.
Type a filename.
Click Save.
PowerPoint saves the presentation as a template.

Click the File tab to show Backstage view.
Click New.
 Click Custom.
B Your template appears in the Custom template gallery.
Note: You may need to close and open PowerPoint for the template to appear in the Custom template list.