Chapter 9: Using Masters
Masters enable you to make global settings for your slides, such as inserting your company logo or a page number on every slide. When you change a master, all slides based on that master also change.
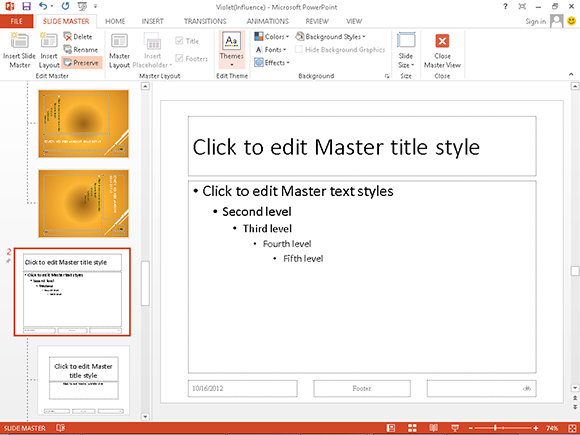
Understanding Slide Master Elements
Open and Close Slide Master View
Insert a Graphic in Slide Master View
Omit Master Graphics on a Slide
Understanding Masters
PowerPoint offers three master views: the Slide Master, which determines how presentation slides look; the Handout Master, which controls how a printed version of your presentation looks; and the Notes Master, which dictates how a printout of your notes looks. The three master views enable you to set up the basic structure for each slide layout, plus the notes and printed handouts. This saves time because you do not need to design each presentation slide from scratch. For example, the Title and Content slide layout is designed once in the Slide Master view, but you can use it over and over again.
Work with Three Kinds of Masters
The Master Slides consist of a set of slides called the Layout Masters — there is one Layout Master for each slide layout that you will use to build your presentation. The Master Slides also include a slide called the Slide Master, which controls the theme and formatting for the Layout Masters. The Handout Master controls the look and layout of the printed handouts when you print the slides of your presentation. The Notes Master controls how the printout of your presentation notes looks.
Using Masters to Make Global Changes
Any change, including formatting, that you make to a Layout Master is applied to its corresponding presentation slides. For example, if you redesign the Layout Master that controls the Title and Content layout by moving the title from the top of the page to the bottom, every slide in the presentation using the Title and Content layout reflects that change. This saves you time and gives your presentation a consistent look and feel. If you change the formatting of an element on the Slide Master, PowerPoint changes that element on all Layout Masters and all presentation slides.
How Masters Relate to the Theme
Masters are based on themes. When you apply a theme to your presentation, PowerPoint automatically creates a set of Master Slides with that theme. You can alter the theme of your Master Slides and then save it as a new theme. If you apply more than one theme to your presentation, you will have multiple sets of Master Slides — one for each theme. For example, if you have three themes, you will have three Title and Content Layout Masters, one for each theme. You can change the design of the Layout Master of the Title and Content slide in one theme without affecting the Title and Content slides in the other two themes.
Overriding Master Settings
When you make changes to individual presentation slides, those changes take precedence over settings on the corresponding Layout Master or the Slide Master. For example, if you change the font color of the title placeholder of a Title and Content presentation slide in Normal view, a change to the title placeholder font color of the Title and Content Layout Master does not affect it. The change on the individual presentation slide takes precedence. If you place a graphic on a Layout Master, you can omit it from the background of an individual presentation slide in Normal view.
Understanding Slide Master Elements
You can use the Master Slides to create global design settings for your slides. The Slide Master and Layout Masters contain placeholders where you can format text. They also contain various placeholders for footer information, slide numbers, and a date. Any change to a Layout Master is applied to any presentation slide that has its corresponding layout. When you make a formatting change to a placeholder on the Slide Master, PowerPoint applies that change to any corresponding placeholder anywhere in the presentation. One change can affect many slides, but only for the theme associated with the Master Slide you are changing.
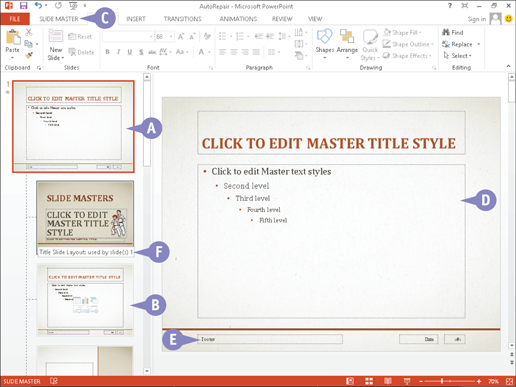
A Slide Master
The Slide Master is connected to its related Layout Masters with a dotted line. The Slide Thumbnails pane shows one set of Master Slides for each theme.
B Layout Masters
Layout Masters represent the various slide layouts that you can insert into a presentation, such as the Title and Content layouts. Changes on a Layout Master affect only those presentation slides with the layout of that particular master.
C Slide Master Tab
Use the Slide Master tab to change Master Slides — you can design the background of masters, change or insert placeholders, and change theme colors and font schemes.
D Placeholders
You can format an entire placeholder, some of its text, or each bullet point individually by selecting a particular bullet point before formatting.
E Footer, Date, and Slide Numbers
The Date placeholder positions the date on slides; the Page (#) placeholder provides page numbers on slides; the Footer placeholder provides a footer on the slides.
F Dependency on a Master Design
Position the mouse pointer ( ) over any slide in the Slide Master view and a ScreenTip shows you which presentation slides use that Layout Master design.
Open and Close Slide Master View
You work with the Slide Master and Layout Masters in Slide Master view. Opening Slide Master view automatically displays the Slide Master tab for working with the set of Master Slides. This tab was created to help you design the Master Slides, but you can also use the other tabs on the ribbon. After you make changes to the Master Slides and close Slide Master view, PowerPoint redisplays whatever view you had open previously — Normal view, Slide Sorter view, or Notes Page view. Global changes to presentation slides due to changes in Master Slides are reflected there.
Open and Close Slide Master View

 Click the View tab.
 Click Slide Master.
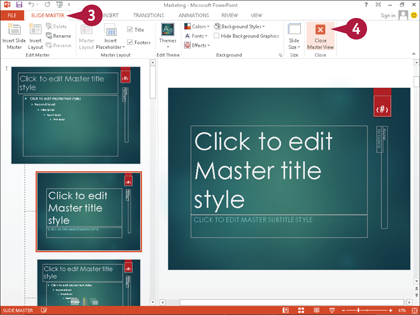
Slide Master view and the Slide Master tab appear.
 Click the Slide Master tab.
 Click Close Master View.
Slide Master view closes and PowerPoint restores the previous presentation design view.
Remove a Placeholder
The Layout Masters contain placeholders for the slide title, text or graphic content, date, footer, and slide numbers. If you are not using a particular placeholder, you can remove it from the Layout Masters.
Deleting a placeholder from the Slide Master at the top of the Slides Thumbnail pane does not delete it from the Layout Masters, though formatting changes that you make to placeholders on the Slide Master do affect the formatting of associated presentation slides.
Remove a Placeholder
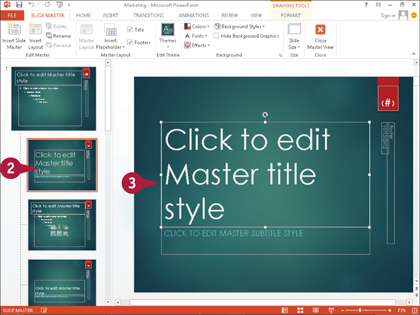
 Display Slide Master view.
Note: To display Slide Master view, see the section, “Open and Close Slide Master View.”
 Click the Layout Master that contains the placeholder you want to remove.
 Click the border of the placeholder to select it.
 Press
Press  .
.

A PowerPoint deletes the placeholder.
Note: If you delete a placeholder from a Layout Master, PowerPoint does not delete the placeholder from existing presentation slides. Slides inserted in the presentation after you make this deletion from the Layout Master will not contain the placeholder.
Insert a Placeholder
Sometimes the slide layouts that are available to you are not quite right. You may need to add a placeholder to a Layout Master to create a slide layout that suits your needs. You can insert a new placeholder in any Layout Master in Slide Master view. This saves time because you do not have to add the placeholder to every presentation slide that needs one. You can insert placeholders for text or content, plus other types of placeholders like picture or chart placeholders. You can also resize, reposition, or reformat any placeholder at any time.
Insert a Placeholder

 Display Slide Master view.
Note: To display Slide Master view, see the section, “Open and Close Slide Master View.”
 Click a Layout Master.
 Click the Insert Placeholder down arrow (
 ).
).
 Click a placeholder type.

The crosshair pointer ( ) appears.
 Click where you want the upper-left corner of the placeholder and drag across the slide to where you want the lower-right corner of the placeholder.

A When you release the mouse button, the placeholder appears.
 With the new placeholder still selected, click the Home tab.
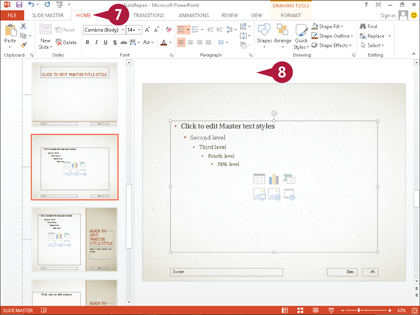
 Use the tools on the Home tab to format the placeholder.
 Click outside the placeholder when finished.
Add a Footer
The Slide Masters have placeholders for footers that you can use to show information such as your company name on slides. You can move the footer anywhere on the Master Slide. To save time, you can add a footer to a single Master Slide instead of individual presentation slides.
If you add a footer to the Slide Master, it appears on all slides. If you add a footer to a Layout Master, it appears only on presentation slides with that layout. You can also use footers in the Handout Master and Notes Master.
Add a Footer

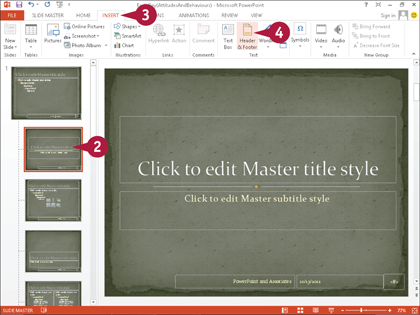
 Display Slide Master view.
Note: To display Slide Master view, see the section, “Open and Close Slide Master View.”
 Click the Slide Master or one of the Layout Masters.
 Click the Insert tab.
 Click Header & Footer.

The Header and Footer dialog box appears.
 Click Footer (
 changes to
  ).
).
 Type your information in the text box.
 Click Apply.
A You can click Apply to All to add the footer to the entire set of Master Slides.
Note: Adding the footer to the entire set of Master Slides also applies the footer to all presentation slides.
B The footer appears on the Layout Master and any presentation slides that share its layout.
Add a Date
The set of Slide Masters includes a placeholder for a date. You can add a particular date or one that shows the computer’s system date. You can move the date anywhere on the Master Slide. To save time, you can add the date to a single Master Slide instead of individual presentation slides.
If you add the date to the Slide Master, it appears on all slides. If you add the date to a Layout Master, it appears only on presentation slides with that layout. You can also use dates in the Handout Master and Notes Master.
Add a Date
 Display Slide Master view.
Note: To display Slide Master view, see the section, “Open and Close Slide Master View.”
 Click the Slide Master or one of the Layout Masters.
 Click the Insert tab.
 Click Header & Footer.

The Header and Footer dialog box appears.
 Click Date and time (
 changes to
  ).
).
 Click the Update automatically option (
 changes to
  ).
).
A You can change the format of the date by clicking the down arrow ( ) and selecting a format from the list.
 Click Apply.
B You can click Apply to All to add the date to all presentation slides.
C The date appears on the selected slides.
Set Up Slide Numbers
You can have PowerPoint automatically number the presentation slides with the option to not include a slide number on the title slide. You can reposition the slide number placeholder anywhere on the Slide Master or Layout Masters. To save time, you can add the slide number to a single Master Slide instead of numbering presentation slides individually.
You can set up slide numbers on the Slide Master, which affects all slides; Layout Masters, which affect only slides with corresponding layouts; or particular presentation slides in Normal view.
Set Up Slide Numbers

 Display Slide Master view.
Note: To display Slide Master view, see the section, “Open and Close Slide Master View.”
 Click the Slide Master or one of the Layout Masters.
 Click the Insert tab.
 Click Header & Footer.

The Header and Footer dialog box appears.
 Click the Slide Number option (
 changes to
  ).
).
 Click the Don’t show on title slide option (
 changes to
  ).
).
 Click Apply to All.
A You can click Apply to apply slide numbers only to selected slides.
Slide numbers appear on all presentation slides except the title slide.
Insert a Graphic in Slide Master View
You can use Slide Master view to insert a graphic or picture that appears on every slide. For example, your organization or company might want its logo on all slides for professionalism and consistency. You can place a graphic or picture on every slide of your presentation by inserting a single graphic in the Slide Master.
If you insert a graphic on the Slide Master, it appears on all slides. If you insert a graphic on a Layout Master, it appears only on presentation slides with that layout.
Insert a Graphic in Slide Master View
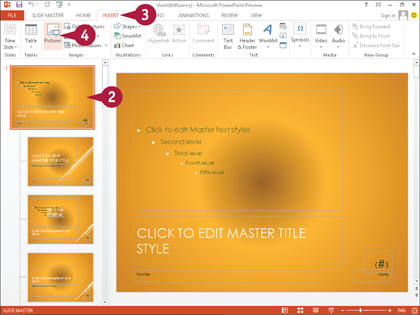
 Display Slide Master view.
Note: To display Slide Master view, see the section, “Open and Close Slide Master View.”
 Click the Slide Master.
 Click the Insert tab.
 Click Pictures.

The Insert Picture dialog box appears.
 Click the folder that contains the image file you want to insert.
 Click the image file.
 Click Insert.
A The dialog box closes and the image appears on the Slide Master, where you can move and resize it as needed. It also appears on all slides.
Work with Multiple Masters
You may decide to use a few different looks in your presentation. For example, you may have a theme for your morning session and one for the afternoon session of an all-day presentation. You may decide to use different themes for visual differentiation between sections, yet you want consistency for the slides within each section. When you apply a theme to your presentation, PowerPoint automatically creates a set of Master Slides with that theme. If you apply more than one theme to your presentation, you then have multiple sets of Master Slides — one for each theme.
Occurrence of Multiple Masters
When you apply more than one theme within a single presentation, PowerPoint creates a set of Master Slides for each theme. Each set of Master Slides has a Slide Master, plus one Layout Master for each slide layout that you see in the slide gallery, which you see when you insert a slide. Masters are based on themes, so you cannot switch the theme of a set of Master Slides, though you can create a new blank set of Master Slides and design it from scratch. This enables you to save the theme so you can use it later.
Themes with Multiple Masters
If you use multiple themes (and therefore multiple masters), make sure the themes are complementary. You can do this by selecting slide designs with similar color themes and fonts, plus graphics and backgrounds that work well together. Although you can, you would not typically mix and match themes throughout your presentation; you should apply a theme to a particular section. You can learn how to create sections in a presentation in Chapter 6. When you have sections in your presentation, PowerPoint applies a change in theme to the selected section, not the entire presentation.
Multiple Masters and Slides
If your presentation has multiple masters, you can apply the different master designs to presentation slides by layout and theme. When you insert a slide, you find each theme in the slide gallery. Grouped within each theme, you find the various slide layouts — one for each Layout Master in the Master Slides. For example, if you use three themes in your presentation, you have three Title and Content Layout Masters, one for each theme and all independent of each other. If you change the Title and Content Layout Master of one theme, it does not affect the Title and Content Layout Masters of the other themes.
Masters are Independent
If you change the Layout Master of one set of Master Slides, this change does not affect the same layout on another set of Master Slides. Changes to your Layout Masters are automatically applied and only appear on corresponding presentation slides — those changes only affect the presentation slides with that particular slide layout and theme combination. This means you can change a slide layout for any particular theme without affecting any other Layout Masters with the same layout, but a different theme. To make a universal change for a particular slide layout, you must change each Layout Master for that slide layout in each set of Master Slides.
Insert a New Blank Master
If you cannot find a presentation template that you like, or you need a very specific and unique look, you can create your own set of Master Slides with its own theme. You can insert a blank set of Master Slides and customize it in Slide Master view. You can then format the text in placeholders, change the background, add graphics, and so on. Chapter 4 tells you how to format text, and Chapter 10 provides information on working with graphics. By changing various elements, you can create a unique master design.
Insert a New Blank Master

 Display Slide Master view.
Note: To display Slide Master view, see the section, “Open and Close Slide Master View.”
 Click Insert Slide Master.

A new set of Master Slides appears.
A PowerPoint numbers each master.
B You can apply an existing theme to the new set of Master Slides by clicking the Themes button and selecting a theme from the gallery.
Preserve Master Slides
When you preserve a set of Master Slides, this means that it will not automatically be deleted from a presentation. If you do not preserve it, PowerPoint removes a set of Master Slides if you delete all of the presentation slides that use it. PowerPoint automatically preserves all Master Slides. If a set of Master Slides is not preserved, you can preserve it to avoid its automatic removal. That way, you can use it for future presentation slides. You can also unpreserve a set of Master Slides. You can manually delete a set of Master Slides in Slide Master view even if it is preserved.
Preserve Master Slides
 Display Slide Master view.
Note: To display Slide Master view, see the section, “Open and Close Slide Master View.”
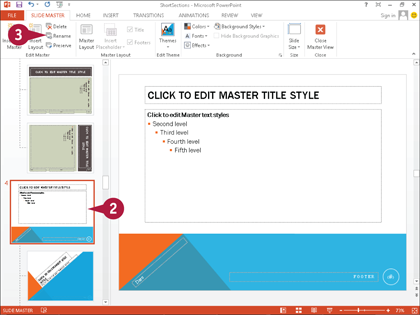
 Click the Slide Master you want to preserve.
Note: You must click a Slide Master, not a Layout Master.
 Click Preserve.

A PowerPoint preserves the master and a Preserve icon ( ) appears on the Slide Master thumbnail.
B The Preserve toggle button becomes highlighted.
Note: To reverse the process, perform Steps 1 to 3 again so the Preserve button is no longer highlighted.
Rename Master Slides
If you insert a blank set of Master Slides, PowerPoint automatically gives it a default name, but you can apply a more descriptive name. For example, if you designed a set of Master Slides with colorful, geometric shapes, you might rename it Deco so the name is easy to remember when you want to refer to it. Giving the Master Slides your own descriptive name makes it easier to select the correct Master Slides when you apply a layout to a slide.
Rename Master Slides

 Display Slide Master view.
Note: To display Slide Master view, see the section, “Open and Close Slide Master View.”
 Click the Slide Master you want to rename.
Note: You must click a Slide Master, not a Layout Master.
 Click Rename.
The Rename Layout dialog box appears.
 Type a name.
 Click Rename.

The dialog box closes, and PowerPoint renames the Master Slides.
A You can position the mouse pointer ( ) over the Slide Master thumbnail to see a ScreenTip with the new name.
Work with the Notes Master
Changes in the Notes Master affect the Notes Page view and how the Notes Pages print. Notes Page view shows what you will see when you print Notes Pages in Backstage view. The Notes Master has a placeholder for the slide and for the Notes area, as well as placeholders for the header, footer, date, and slide number.
You can modify the format of Notes text, move placeholders around, delete placeholders, and enter headers and footers. See Chapter 14 for information about printing notes.
Work with the Notes Master

 Click the View tab.
 Click Notes Master.
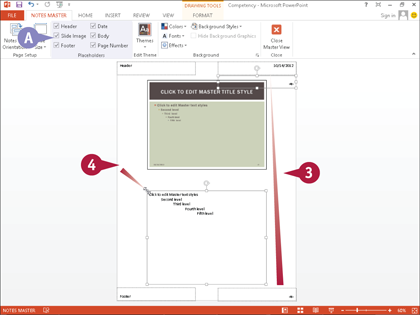
The Notes Master view appears and the Notes Master tab appears on the ribbon.
 Click any placeholder border and then drag the placeholder to another location.
 Click any placeholder border and resize it by clicking and dragging one of the handles.
A You can click options to add ( ) or remove (
 ) placeholders.
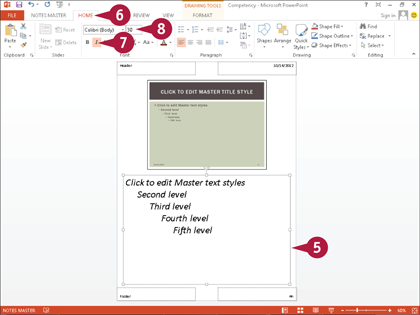
This example resizes the Notes text placeholder, and moves the page number placeholder to the bottom.
 Click any placeholder border to select it.
 Click the Home tab.
 Click the Italic button (
 ).
).
 Type 30 into the Font Size text box.

B You can select a bullet point to format an individual bullet.
C You can click the Drawing Tools Format tab to display other formatting options.
 Click the Notes Master tab.
 Click Close Master View.
Notes Master view closes.
Work with the Handout Master
Sometimes you may not have notes to print, but you still want to give your audience a handout to take notes. Handouts are printouts of the slides in your presentation and they are printed in Backstage view. Handout Master view determines what is printed on the handouts. You cannot move or resize the slide placeholders, but you can move, resize, and format the font of the other placeholders to control the appearance of your printed handouts. Any formatting you do on the Handout Master appears in the Handout printout.
Work with the Handout Master

 Click the View tab.
 Click Handout Master.
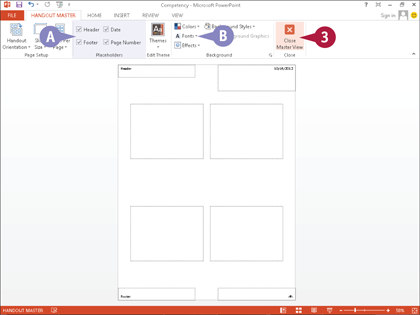
Handout Master view and the Handout Master tab appear.
A You can click options to add ( ) or remove (
 ) placeholders.
B You can click Fonts to change the font style of all text placeholders on the page.
Note: You can click commands on the Home tab to format individual placeholders.
 Click Close Master View.
Handout Master view closes.
Omit Master Graphics on a Slide
Inserting a graphic on the Slide Master applies that graphic to all presentation slides; inserting a graphic on a Layout Master causes that graphic to appear on corresponding presentation slides. You can prevent a Slide Master graphic from appearing on individual presentation slides. For example, you may need to remove a graphic from a specific presentation slide because the graphic overlaps with other objects, such as a table or chart. You may also need to remove a graphic from certain slides because it simply does not apply to those slides.
Omit Master Graphics on a Slide

 Select the slide(s) you want to change in Normal or Slide Sorter view.
Note: To select multiple slides, click the first slide, and then press  while clicking additional slides.
 Click the Design tab.
 Click Format Background.
The Format Background task pane appears.
 Click Hide Background Graphics (
 changes to
  ).
).

The master graphics disappear from the slide.
 Click the Close button (
 ) to close the Format Background task pane.
Create a Custom Slide Layout
There may be times when you need a slide with a unique layout. For example, you may want to compare three items, but there is no slide layout with three content placeholders. You can work in Slide Master view to add a new slide layout to the set of Master Slides. This saves time because you do not need to insert additional placeholders into individual slides. You create your custom slide layout with three content placeholders, then insert new slides with the custom layout, or apply the custom layout to existing slides in your presentation.
Create a Custom Slide Layout

 Display Slide Master view.
Note: To display Slide Master view, see the section, “Open and Close Slide Master View.”
 Click in between the thumbnails where you want to insert the new slide layout.
 Click Insert Layout.
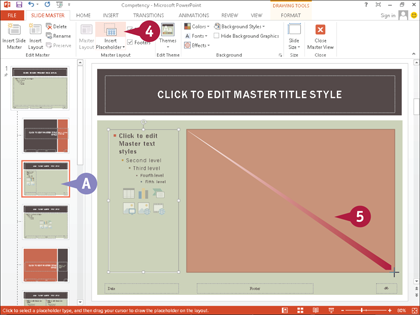
A A new Layout Master appears as a thumbnail.
 Click Insert Placeholder.
 Click and drag across the slide where you want the placeholder.
Note: See “Insert a Placeholder” earlier in this chapter.

The placeholder appears.
You can move, format, and resize the placeholder as needed.
 Click Close Master View when finished.
Slide Master view closes.
 Click the Home tab.

 Click the New Slide down arrow (
 ).
).
The gallery of layouts appears.
B Your custom layout appears in the gallery.