Chapter 12: Incorporating Media
PowerPoint enables you to build exciting visual and sound effects into your presentations. You can place photographs, videos, and audio clips anywhere on your slides to enhance presentations. You can add dramatic artistic effects to your photographs or remove the background from them. Finally, you can edit photos and videos directly in PowerPoint, saving time and money because you do not need an editing program.

Adjust Brightness and Contrast
Remove the Background from a Picture
Insert Media from the Internet
Insert a Picture
If you have an image file stored on your computer, such as your company logo or a picture of your product, you can insert the image into a PowerPoint slide. It is common for PowerPoint presentations to have pictures in them. You can insert pictures into a placeholder using the Insert Picture icon in the placeholder, or you can insert a picture directly on a slide to give you more versatility when you work with it. After you insert an image file, it becomes an object on your slide. To learn how to move, resize, and format objects, see Chapter 10.
Insert a Picture
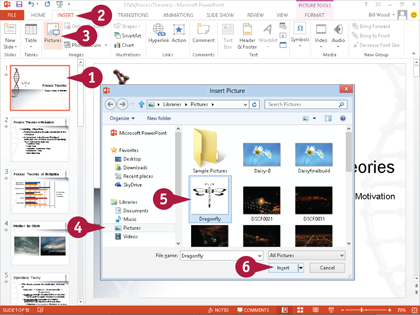
 Select a slide in Normal view.
 Click the Insert tab.
 Click Pictures.
The Insert Picture dialog box appears.
 Select the folder containing the file you want to insert.
 Click the file.
 Click Insert.
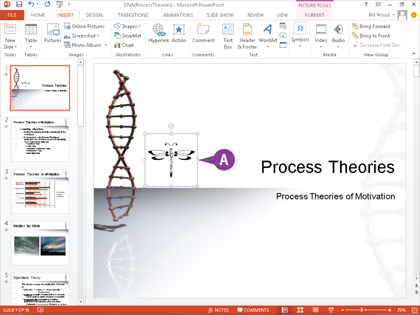
A The image appears on your slide. Size and position the image as needed.
Note: To learn how to position and resize objects, see Chapter 10.
Add a Border
Some clip art has transparent backgrounds, but sometimes the background of the picture or clip art does not blend with the background of the slide. After you insert a picture, you may want to set it apart from the rest of the slide by adding a border to it. A border makes the picture crisp, and also helps it stand out from other items on the slide and makes a clear break from the background of the slide. You can format the border by changing the thickness, making it something other than solid, or converting it to a different color.
Add a Border

 Click a picture.
 Click the Picture Tools Format tab.
 Click Picture Border.
The gallery of borders appears.
 Click a border color.
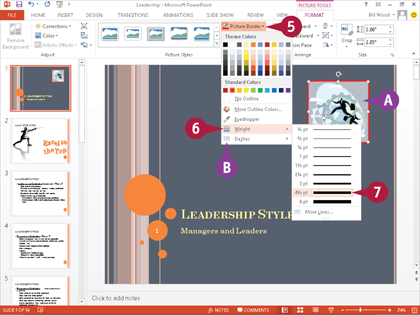
A The border appears around your picture.
 Click Picture Border.
 Click Weight.
 Click a border thickness.
The border thickness changes.
B You can click Dashes to change the border to something other than solid such as dashes or dots.
Adjust Brightness and Contrast
You can adjust the brightness and contrast of a picture in PowerPoint to maximize its visual impact. Many times, a picture is not perfect when you take it, or it does not show well on a screen. Brightness indicates how bright or dark the entire picture is. Contrast indicates how well you can see shades and colors against each other in the picture. Typically you want the picture to be bright and have high contrast because then it is easy for the audience to see. Adjusting the brightness and contrast may be all the picture needs to look good.
Adjust Brightness and Contrast
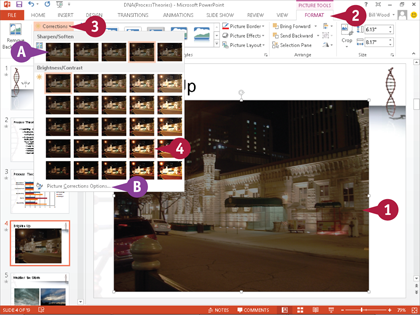
 Click a picture.
 Click the Picture Tools Format tab.
 Click Corrections.
The gallery of corrections appears.
 Click a Brightness/Contrast option from the gallery.
A You can also apply a Sharpen/Soften effect.
B You can click Picture Correction Options for more detailed options.

PowerPoint adjusts the brightness and contrast.
Adjust Color
Conditions outside of your control can affect a picture that you take with your camera. PowerPoint saves you the time and effort of performing color corrections in another program because you can do it right in PowerPoint! You can adjust the color of your pictures to make them pleasing to the eye, or recolor them for interesting effects. For example, you may want a picture that is monochrome in a color that matches the color scheme of your presentation. Standard color variations are determined by the theme of the presentation, but many other variations are also available.
Adjust Color

 Click a picture.
 Click the Picture Tools Format tab.
 Click Color.
The gallery of colors appears.
 Click your choice of Color Saturation, Color Tone, or Recolor options.
This example selects a recolor option.

PowerPoint adjusts the color.
Note: Color Saturation determines how much color is in the picture and varies anywhere from black and white to a lot of color.
Note: Color tone affects the actual color — for example, a change in color tone may give the white items in your picture a slightly yellow hue.
Crop a Picture
A picture often contains things that you would rather not have in the image. For example, you may have a picture of a few friends, but only want the face of one particular friend in the picture. You can crop a picture so that the main subject of the picture fills the entire image. When you resize a picture, the objects in the picture change size accordingly and proportionately — you simply change the size of the picture. Cropping trims the edges from a picture in the same way as cutting them with a pair of scissors.
Crop a Picture

 Select a picture.
 Click the Picture Tools Format tab.
 Click Crop.
Black crop marks appear around the picture.
 Position the mouse pointer (
 ) over a crop mark (
 changes to
  ).
).

 Click the crop mark (
 changes to
  ).
).
 Drag the crop mark inward to remove a part of the picture.
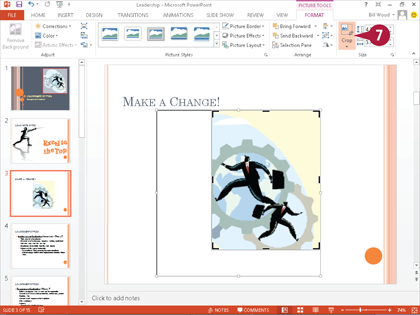
When you release the mouse button, you can see both the original picture and the cropped picture.
 Click Crop.

PowerPoint crops the picture.
 Move and resize the picture if needed.
Note: See Chapter 10 to learn how to move and resize objects.
Remove the Background from a Picture
You may want to remove the background of a picture so you can work with just the main subject of the picture. Using the Remove Background feature in PowerPoint, you can remove the background from a picture easily and simply, and superimpose the remaining image onto a slide background or possibly another picture. This automated feature helps you avoid the inconvenience of importing the picture into PowerPoint after using a separate program to remove the background.
Remove the Background from a Picture

 Select a picture.
 Click the Picture Tools Format tab.
 Click Remove Background.
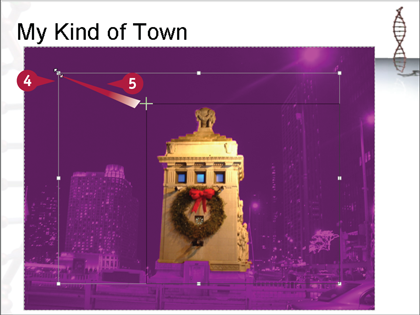
The background becomes magenta and PowerPoint automatically attempts to detect the object in the foreground. A marquee with handles appears.
 Position the mouse pointer over a marquee handle (
 changes to
  ).
).
 Click and drag the marquee handle (
 changes to
  ) to resize the marquee.
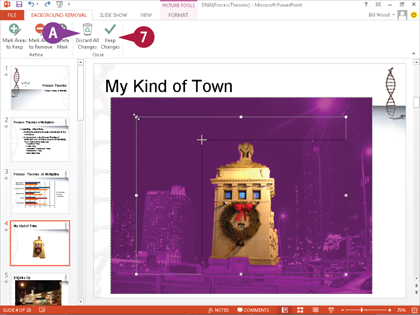
 Repeat Steps 4 and 5 with the various marquee handles until PowerPoint detects the foreground object that you want.
Note: Very small adjustments to the marquee help PowerPoint determine the object that you want in the foreground.
 Click Keep Changes.
A To escape without saving changes, you can click Discard All Changes.
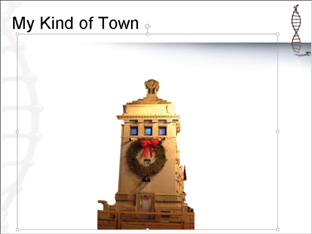
PowerPoint removes the background and only the foreground subject remains.
Using Artistic Effects
You may want to apply an interesting effect to a photo to add spice to your slide show. For example, you can make a picture look as if an artist sketched it. Many of these common special effects are available at the click of a button in graphics programs. Several artistic effects are also available in PowerPoint, so there is no need to use a separate program to give your picture a special effect. You can apply effects such as pixelation, blurring, and pencil sketch without leaving PowerPoint.
Using Artistic Effects

 Select a picture.
 Click the Picture Tools Format tab.
 Click Artistic Effects.
The gallery of artistic effects appears.
 Click an artistic effect.

PowerPoint applies the artistic effect.
Compress Pictures
Image and picture files can be very large. When you insert them into your presentation, your PowerPoint file also becomes large. This can slow the performance of your slide show presentation as well as performance while designing your presentation. You can improve performance by compressing image files, which has little impact on their quality. PowerPoint gives you the ability to determine how much compression occurs, thereby determining how much the compression affects the quality of the image. Compressing pictures permanently changes the images — you cannot reverse those changes.
Compress Pictures

 Select a picture.
 Click the Picture Tools Format tab.
 Click the Compress Pictures icon (
 ).
).
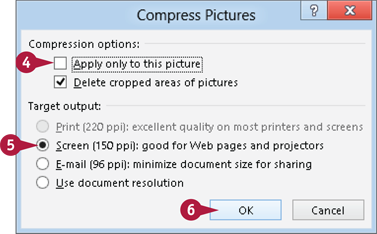
The Compress Pictures dialog box appears.
 Click to disable (
 ) Apply only to this picture so all pictures in your presentation are compressed.
 Click Screen (
 changes to
  ) for a resolution you can show to an audience with a projector.
 Click OK.
PowerPoint compresses the pictures.
Using Layout Effects
You may want to organize and compare several pictures on one slide. You can make pictures look sharp by combining them with SmartArt Graphics, which is much more attractive than arranging the pictures on the slide with a list of bullet points. SmartArt Graphics enable you to combine pictures in many interesting groupings, and then apply text to the individual pictures or the entire group. You can also apply a workflow or hierarchy to pictures using SmartArt Graphics — using pictures in this way can give the audience an immediate impression without you saying a word.
Using Layout Effects
Apply a Layout
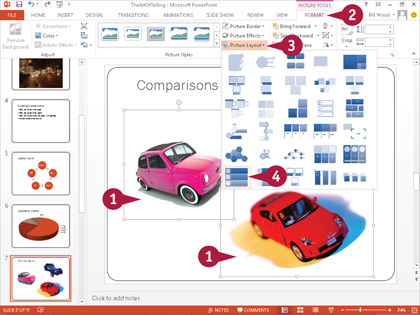
 Select pictures in Normal view.
Note: To select multiple pictures, click the first picture, and then press  while clicking additional pictures.
 Click the Picture Tools Format tab.
 Click Picture Layout.
The gallery of picture layouts appears.
 Click a picture layout.
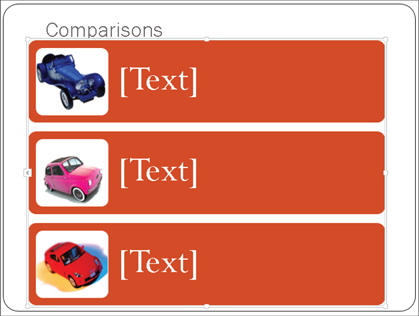
PowerPoint applies the SmartArt Graphics picture layout to the pictures.
Note: See Chapter 5 to learn how to edit and change SmartArt Graphics and how to enter text into SmartArt Graphics.
Change a Picture
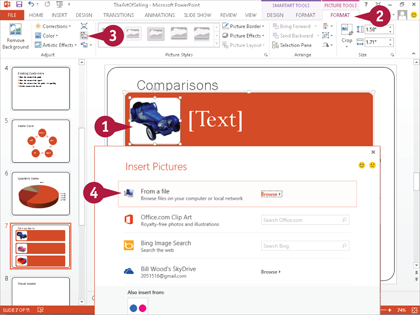
 Click a picture.
 Click the Picture Tools Format tab.
 Click the Change Pictures icon (
 ).
).
The Insert Pictures dialog box appears.
 Click From a file.
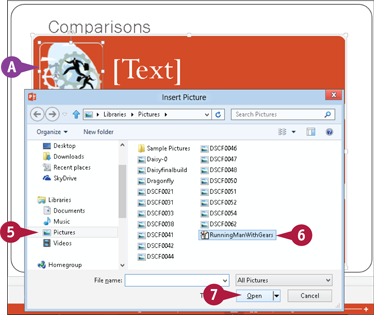
The Insert Picture dialog box appears.
 Click the folder containing the picture file.
 Click the picture.
 Click Open.
A PowerPoint changes the picture to the image you selected.
Insert Media from the Internet
When you try to use only your own resources to design a presentation, you severely limit yourself while designing it. The Internet has an unlimited amount of clip art, pictures, video clips, and audio clips. Much of this media is royalty-free, as is the case with the media from the Microsoft Office.com website. Searching the Internet for this type of content can be cumbersome, but PowerPoint has a search feature for just this purpose so you can save time and effort. You can insert the perfect video or picture directly into your presentation with just one or two keywords.
Insert Media from the Internet

 Select a slide in Normal view.
 Click the Insert tab.
 Click Online Picture.
The Insert Pictures dialog box appears.
 Click the Office.com Clip Art text box and type a keyword.
 Click the Search icon (
 ).
).

The Office.com results appear.
A You can click the Close button ( ) to cancel.
B Note the picture description and picture size.
 Click Back to Sites.
 Repeat Steps 4 and 5 using the Bing Image Search.
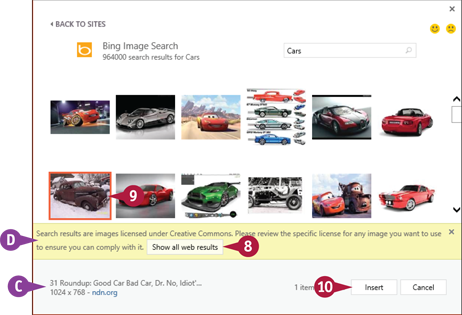
The Bing Image Search results appear.
C Note the picture description, picture size, and the hyperlink to the website where the picture originates.
D Some of these pictures are not royalty-free.
 Click Show all web results for even more results.
 Click an image.
 Click Insert.

The image you selected appears on the slide.
Note: PowerPoint filters its search to the choice you make. For example, if you click the Video button on the Insert tab, PowerPoint only searches for videos.
Insert Video and Audio Clips
You can enhance your slide show by inserting video or audio on a slide. A video clip can provide endorsements, testimonials, or instructional pieces that can be helpful during a presentation, or you may want to include something interesting or funny. An audio clip can play interesting sounds, such as applause, during a slide, or you can play an audio clip as background audio during several slides or even the entire slide show.
Both audio and video clips use this same procedure, except when you insert audio, a megaphone icon appears on the slide instead of a video.
Insert Video and Audio Clips
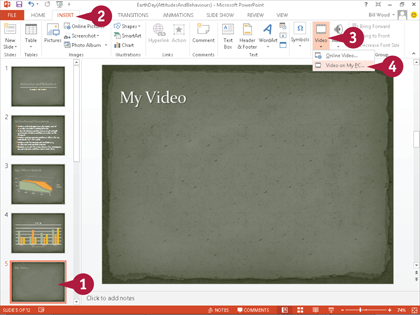
 Select a slide in Normal view.
 Click the Insert tab.
 Click Video or Audio.
 Click an option in the drop-down menu.
This example chooses Video on My PC.

The Insert Video or Insert Audio dialog box appears.
 Select the folder containing the file.
 Click the file.
 Click Insert.
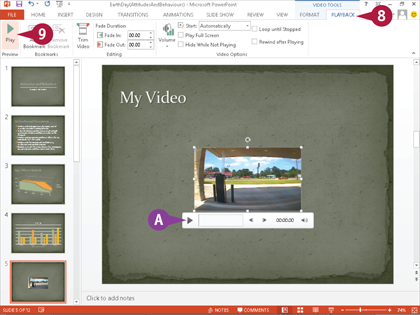
The video or audio appears on your slide.
Note: You can size and position a video as needed. To learn how to position and resize objects, see Chapter 10.
A The Control bar appears when you position the mouse pointer ( ) over the clip.
 Click the Playback tab.
 Click Play (
 changes to
  ).
).
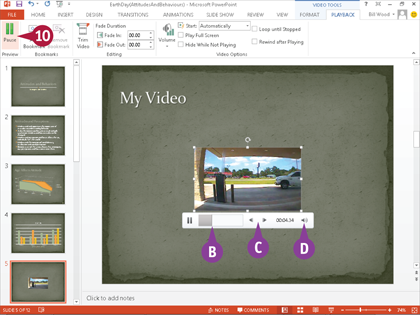
B You can click anywhere on the slide to jump to any part of the clip.
C You can click the Forward ( ) and Back (
 ) buttons to jump forward or backward 0.25 seconds.
D You can use the Volume button ( ) to adjust the sound.
 Click Pause (
 changes to
  ).
).
The video or audio stops playing.
Record an Audio Clip
You can bring interesting sound effects into your presentation with audio clips. You can draw your audience into your slide show by playing audio at just the right time during the show. For example, you may want applause when a slide with sales figures appears. You can also use a longer audio to play sound for several slides, or maybe background music for the entire slide show. You can record an audio clip in PowerPoint and insert it directly to a slide without using different software to record it first. Bring excitement to your slide show by recording your own audio directly to a slide.
Record an Audio Clip

 Select a slide in Normal view.
 Click the Insert tab.
 Click Audio.
 Click Record Audio.
Note: You need a microphone attached to your computer to perform this task.

The Record Sound dialog box appears.
A Click Cancel to abort the recording and discontinue insertion of the audio.
 Click the Name text box.
 Type a name for your recording.
 Click the Record button (
 ).
).

 Record your audio into the microphone.
 When you are finished, click the Stop button (
 ).
).
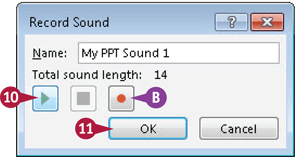
 Click the Play button (
 ) to listen to your recording.
B You can click the Record button ( ) to continue recording additional audio.
 Click OK when you complete your recording.
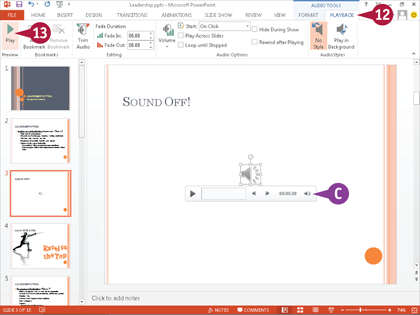
 Click the Audio Tools Playback tab.
 Click Play (
 changes to
  ).
).
The audio plays.
C You can use the Volume button ( ) to adjust the sound.
Trim Video Clips
Videos are usually not the length you want for your presentation, and so you will probably want to trim them. You may want to only play a snippet of a video during a slide show to show a little information about something, or you may have a leader or trailer in the video that you do not need your audience to see. PowerPoint gives you the convenience to trim the video right on the slide so you need not leave PowerPoint to use other software to do it.
Trim Video Clips
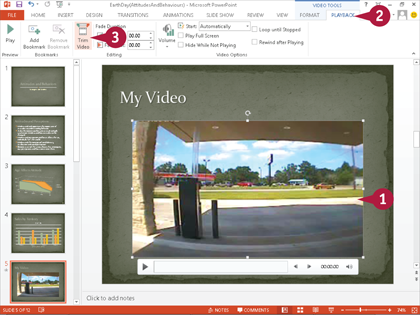
 Click a video clip.
 Click the Video Tools Playback tab.
 Click Trim Video.

The Trim Video dialog box appears.
 Click and drag the green marker where you want the video to begin.
The video frame that plays at that time appears in the window.

 Click and drag the red marker where you want the video to end.
The video frame that plays at that time appears in the window.
 Click OK.

The dialog box closes and PowerPoint trims the video to your specifications.
 Click the Video Tools Playback tab.
 Click Play (
 changes to
  ) to view the trimmed video.
Trim Audio Clips
You may have an interesting part of a song to play for your audience, or a clip from an interview to share with them, but you do not want to play an entire audio clip for them. You might have an audio clip that you recorded and inserted directly onto a PowerPoint slide, but it needs to be shorter. In any of these cases, you can trim an audio clip directly in PowerPoint to make it the perfect length for your purpose. This handy feature saves you the inconvenience of trimming the audio clip in a different program and then importing it into PowerPoint.
Trim Audio Clips

 Click an audio clip.
 Click the Audio Tools Playback tab.
 Click Trim Audio.
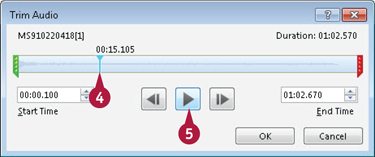
The Trim Audio dialog box appears.
 Click the slide where you want to listen to the audio.
Note: Do not click the slide if you want to start listening from the beginning.
 Click the Play button (
 changes to
  ).
).
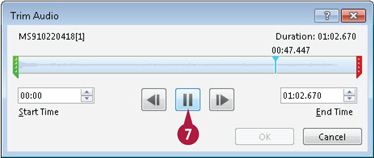
 Listen and find where you want to trim the beginning and end of your audio.
 Click the Pause button (
 changes to
  ) to stop the audio.
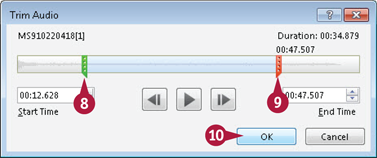
 Click and drag the green marker where you want to trim the beginning of the audio.
 Click and drag the red marker where you want to trim the end of the audio.
 Click OK.
The dialog box closes and PowerPoint trims the audio to the length that you specified.
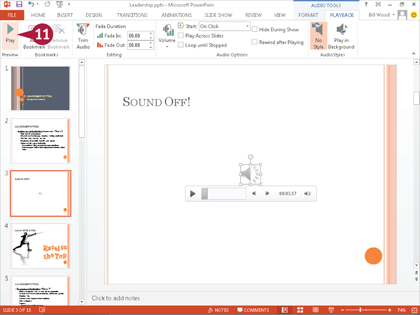
 Click Play (
 changes to
  ) to listen to the trimmed audio.
Note: Trimming an audio clip is reversible. Repeat this process to reverse it.
Insert a Screenshot
You may want to show something from your computer in a slide show. For example, you may want to take a screenshot of an SAP data entry screen to show why users are having difficulty entering information into a data entry form. You can take a screenshot of an open window or a section of the computer display and insert it onto a slide without leaving PowerPoint. The screenshot feature is a fast and convenient way to take a snapshot of something on your computer and put it into a presentation.
Insert a Screenshot
Choose an Open Window

 Select a slide in Normal view.
 Click the Insert tab.
 Click Screenshot.
The Available Windows gallery appears. Windows that are open, but not minimized, appear in this gallery.
 Click a window in the gallery.

PowerPoint inserts the window screenshot onto the slide.
Note: Only windows that are not minimized appear in the Available Windows gallery. If you want to take a screenshot of a window, it must be restored or maximized.
Choose a Section of the Screen

 Repeat Steps 1 to 3 in the previous steps.
The Available Windows gallery appears.
 Click Screen Clipping.
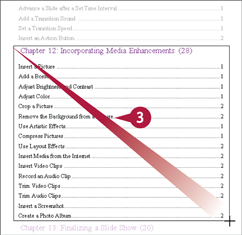
The PowerPoint window disappears, showing whatever is under it. The mouse pointer ( ) changes to the crosshair pointer (
 ).
).
 Click and drag across the section of screen that you want in your screenshot.

The PowerPoint window reappears and the screenshot appears on the slide. You can size and position the screenshot as needed.
Note: To learn how to position and resize objects, see Chapter 10.
Create a Photo Album
You can set up slides so that they advance automatically, and you can also play an audio clip across slides and have it loop indefinitely. This is a perfect scenario to show a photo album. You can create a photo album and then show it like any other slide show or set it up to flip through the pictures automatically, complete with background music! You can create an especially nice photo album to share pictures with family and friends with the professionalism that PowerPoint affords you. The procedure described here creates a new presentation.
Create a Photo Album
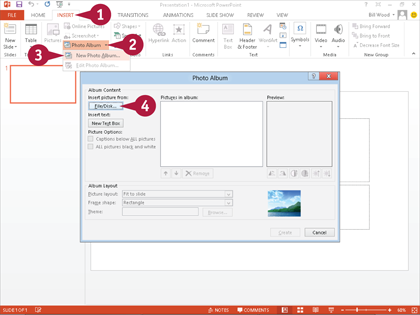
 Click Insert.
 Click the Photo Album drop-down arrow (
 ).
).
 Click New Photo Album.
The Photo Album dialog box appears.
 Click File/Disk.
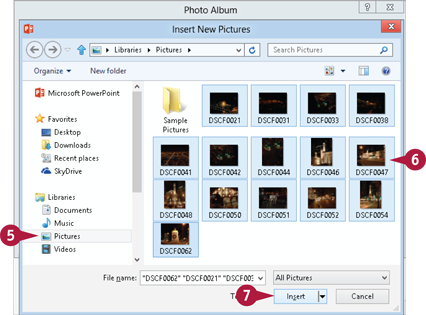
The Insert New Pictures dialog box appears.
 Click the folder that holds your picture files.
 Click pictures that you want in your photo album while pressing
  to select multiple files. All selected pictures appear in the photo album.
 Click Insert.
The Insert New Pictures dialog box closes.
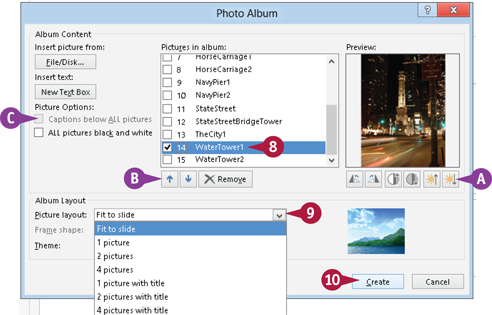
The Photo Album dialog box reappears.
 Click a picture to view it.
 Click the Picture layout drop-down arrow (
 ) and select a layout.
A You can use these picture correction features if you select only one picture.
B You can click to select one or more pictures to move or remove them.
C This option is available only when the layout has multiple pictures.
 Click Create.
PowerPoint creates the photo album.
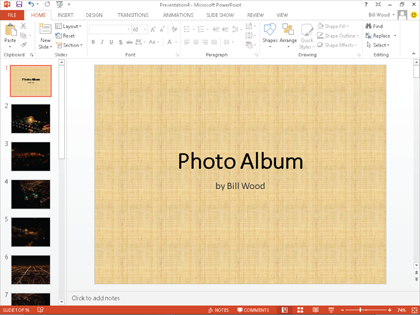
Note: You can design a photo album like any other presentation.
Note: Click Edit Photo Album from the Photo Album drop-down menu on the Insert tab to change the pictures in the slide show.


