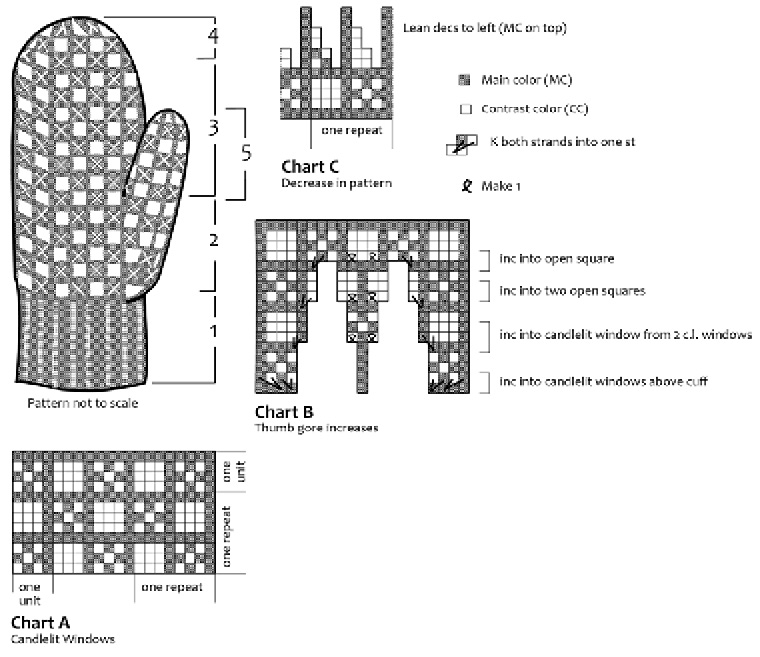
Candlelit Windows Mitten
I learned the Candlelit Windows pattern in Nova Scotia from Janetta Dexter, who also included it in her small, handmade book, Traditional Nova Scotian Double Knitting Patterns, but, as a pattern, it’s everywhere throughout the North Atlantic. It shows up as a background pattern in Latvia, Norway, Sweden, Prussia, and the Faroe Islands, as well as in Canada and New England.
Shopping in Tórshavn in the Faroe Islands, I discovered it on the flap of a little backpack knitted for tourists. It was not in Hans Debes’ Føroysk Bindingarmynstur, the collection of traditional Faroese two-colored knitting patterns. When I asked a local knitter about it, she said, “Maybe not, but it’s a completely ordinary Faroese pattern!” In fact, the elements of it: squares and crossed squares were there, but separated into two patterns. Apparently, author Hans Debes felt the small motifs were more important than their arrangements into larger patterns.
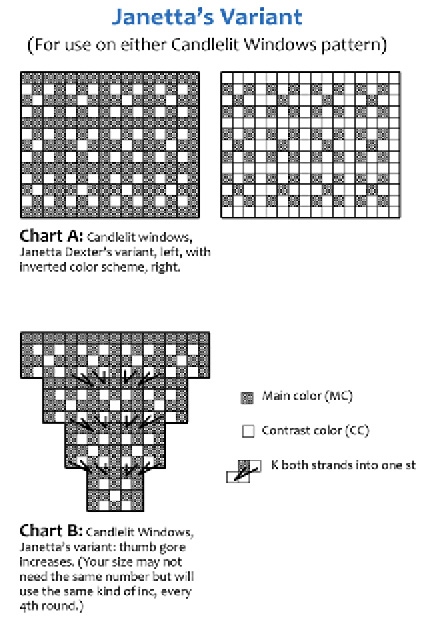
Janetta Dexter also knits this pattern as simple x’s, without the open windows in between. The window look is altogether lost and banks of x’s give a high-tech look that is amusing because it’s so old and low tech. Janetta’s variant is easier to knit than the original and is convenient for figuring increases, decreases, and sizes.
Because I learned this pattern in eastern North America, I have given the mitten a traditional “in-pattern” thumb gore, which means each increase is of the total number of one unit of pattern, (in this case, four stitches clustered around a single center stitch). There is no obvious wedge and no round without a complete band of pattern. If this annoys you, substitute the simpler universal thumb gore exactly where the organic in-pattern thumb gore is located. You will not be the first knitter to do so.
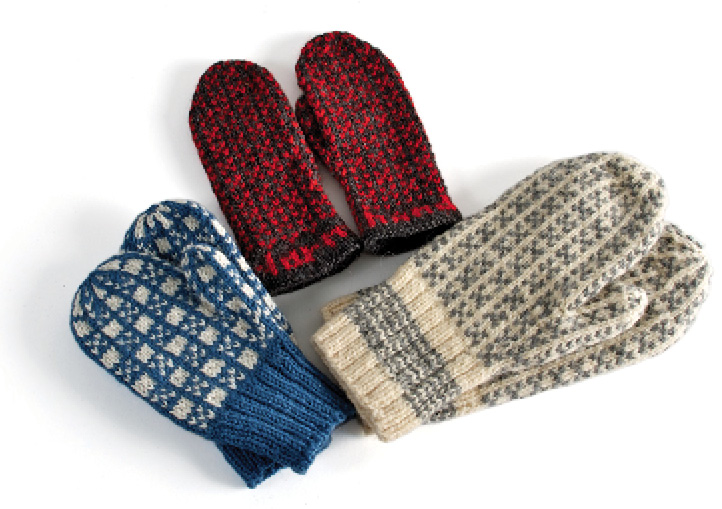
I’ve provided an optional patterned, stockinette cuff, common in Maine, a blessing for those of us who hate to rib. A hundred years ago, mittens had no long cuffs, and were worn over ribbed wristers. When cuffs came in, not everyone in Maine thought of ribbing them, and a number of stockinette cuffs appear on Maine folk mittens that are unknown elsewhere. Check out Pulled-Up Mittens, p. 100, for more.
Technical stuff
Pattern: A 8-st/8-rnd repeat, but treated as a 4-st/4-rnd repeat. Follow charts from lower right. Janetta’s Variant is a 4-st and 4-rnd repeat. Neither pattern can easily be knitted flat. When knitting the solid color rnd, let the CC hang at beg of rnd.
Definitions. A “unit” is one little square of pattern. There are Candlelit Window blocks (with an X in the middle) and open square blocks (with nothing in the middle). A “band” is 4 rnds of pattern, a vertical band starting with Rnd 1 and ending with Rnd 4 of the charted pattern.
Carry ahead the color of the “framework” to give the appearance of lights shining through windowpanes.
In the Maine/Nova Scotia/New Brunswick tradition, this pattern wraps around the hand, at all points an even multiple of 4. All incs are in the first pattern round and all are 4 sts, a full block of pattern, around a center stitch. See Chart B.
Yarn amounts. Two 4 oz skeins (2 colors) of Bartlettyarns Fisherman’s 2-ply will make 2 prs of children’s 8–10 mittens with patterned cuffs.
Neither Women’s Small or Medium work for this pattern at 6 spi. Instead, For Woman’s Small, knit Child’s 8–10 at a tension of 6.5 spi on needles one size smaller. For Women’s Medium, knit Men’s M at a tension of 6.5 spi also on needles one size smaller. The lengths are the same in both cases, and the mitten will be a tad narrower.
Note. Terms in italic are explained in Terms and Tech-
niques. Please check out T & T at least once, then refer to it when moving into unknown areas. Abbreviations are explained in the directions.

Directions
Abbreviations. beg, beginning; dec, decrease; in, inch(es); inc, increase; k, knit; p, purl; rnd, round; spi, stitches per inch; st(s), stitches; tog, together (k2 together); CLW, Candlelit Windows.
1. Ribbed cuff. On 3 U.S. no. 2 needles, cast on 36, 39, 45 (54, 60) sts in MC. Join and with 4th needle, work k 2, p 1 ribbing around until cuff is at least 1.66, 2.16, 2.33 (2.5, 2.66 ) inches long, striping if you wish.
Change to larger needles and stockinette. Work 1 rnd plain, increasing 4, 5, 7 (6, 4) sts, evenly spaced, to a multiple of 4 sts. 40, 44, 52 (60, 64) sts. 6 sts before end of rnd, join CC.
2. Hand and thumb gore.
Read this whole section before going any farther. It sounds complicated, but it sorts itself out.
Inc. All thumb gore incs are in first rnd of a 4-rnd pattern band, as shown in Chart B. Inc every 4th rnd, 4 sts each time, always centering the inc above the previous inc, and always on both sides of the center st, which is not increased.
The center st will be either part of a vertical line or the center st of a pattern element. (Are you thoroughly confused now?)
At some point, every size has 2 identical blocks side by side, as you inc in increments of 4 rather than 8. This is intended, not a mistake.
Follow Chart B, reading from lower right, and choose the situation you face (going from a candlelit window to an open square or from 2 open squares to one, etc.). When you’ve followed the chart once, you probably won’t need to look at it again.
Set up pattern. Begin charted pattern, starting from lower right, BUT the inc comes at the beg of the first rnd of pattern.
With the first inc, Sizes Child’s 3–4 and ML become a multiple of 4, not 8, and will have 2 identical blocks next to each other. This is all right. Start the thumb gore with 2 identical candlelit window blocks at beg of the first rnd (Chart B, bottom). K 4 rnds of pattern even.
With the first inc, Child’s 4–6, Child’s 8–10, and MM become 8 sts multiples and will come out even in pattern (until the next inc).
Start Candlelit Windows pattern at Line 5 of Chart B and inc for the thumb gore starting with the 4th st. The center of your inc line will be the center st of a CLW block.
Inc every 4th rnd, following appropriate options on Chart B, a total of 1, 2, 2 (3, 3) times to add 4, 8, 8 (16, 16) new sts. 44, 52, 60 (72, 76) sts.
All sizes: K 4 rnds (1 ) in pattern even, ending with the solid color round.
3. Take off thumb sts. In the first pattern round, take off sts for the thumb: Put 9, 13, 13 (17, 21) thumb gore sts on a holder—the center st and 4, 6, 7 (8, 10) sts from each side of it. Using twisted Make 1, cast on 5 sts over the gap, alternating colors to maintain first pattern round. 40, 44, 52 (60, 64) sts.
K even 2.25, 3.3, 3.66 (4, 4.33) inches above thumb hole, (about an inch short of the finished hand length). Complete pattern band.
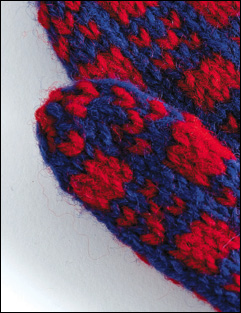
4. Dec. Pattern Rnd 1, begin dec for tip of mitten, following Chart C, and leaning the decs to the left. The dec is worked in every 4-st unit around the hand, eating up little squares from right to left and ends with all MC sts. When there are about 8 sts left, break yarn with a 4-in tail. With yarn needle draw up remaining sts on the tail to close the tip.
5. Thumb: Pick up 9, 13, 13 (17, 21) sts from holder on two needles, pick up 5 sts from top of thumb hole. Pick up and twist 1 st in each corner. Total: 16, 20, 20 (24, 28) sts. (For Child’s size 4-6 and maybe for M L, this thumb is a bit too wide, so work it with a size smaller needles to tighten it up.) K even in pattern 1.25, 1.5, 1.75 (2, 2.25) inches, or to halfway up the thumbnail. Finish the pattern band, then dec as on hand. Finish.
6. Return to Step 1. Knit another identical mitten. This mitten can be worn on either hand.