Crow’s Feet Mittens with Gumption

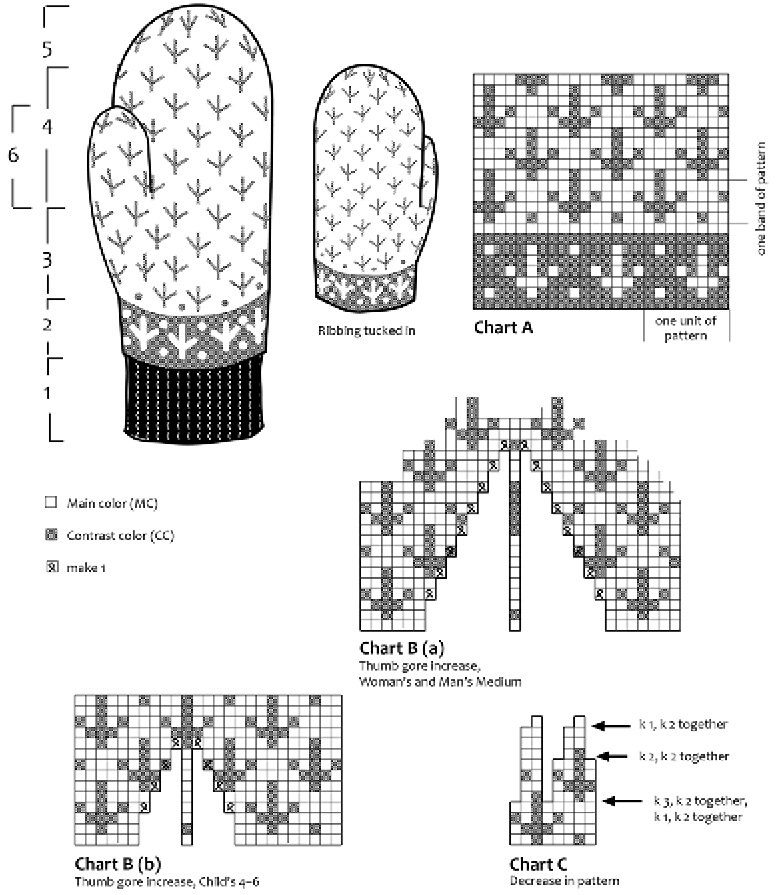
Crow’s Feet can be laugh wrinkles in the corner of the eyes of even little children, or they can walk across the snow, leaving tracks behind like the footprints on these mittens.
Traditional Crow’s Feet mittens, sometimes called “Partridge Feet mittens,” have an all-over pattern of bird footprints. This is a little different.
Nora Johnson, who first taught me about old-time mittens, told me to put a band of pattern without an increase above a ribbed cuff. When I tried that with Crow’s Feet mittens, the mitten seemed too long—until I folded the ribbed cuff in.
That then was a Mitten!
I tried the extra band of pattern as a color reverse and knitted the whole mitten with a looser tension to see how it would work out. So, like many of these mittens, this is and isn’t a traditional mitten. But it’s got gumption.
The ribbed cuff can be worn either in or out, but for me, it seemed right tucked in. See what you think.
These are not the same directions for Partridge Feet Mittens in my book Flying Geese and Partridge Feet. These are more loosely, and thus more easily, knitted.
Technical stuff
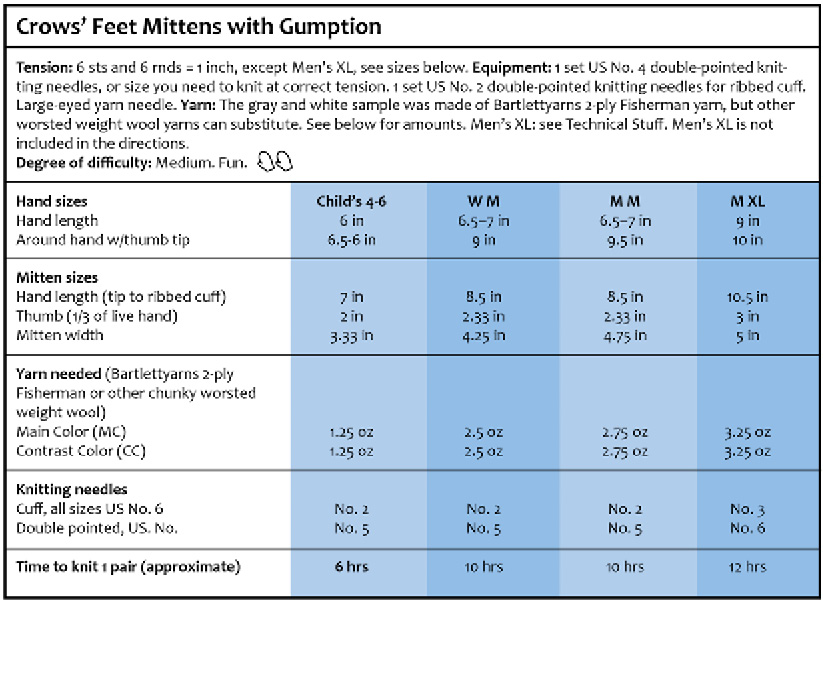
The color pattern is a multiple of 8 sts and 2 x 4 rnds. As this is a typical small geometric pattern that fits exactly around the mitten with no breaks, all sizes must be a multiple of 8 sts. This complicates making sizes that don’t appear here.
The thumb gore inc is worked on both sides of a central st above a knitted dot and maintains the appearance of the pattern. The tip is decreased between footprints of each pattern unit.
Sizes other than those shown do not fit the color pattern readily. However, Man’s XL, which seems perfect for this look, can be made one of two ways:
Start with 60 sts and inc to 64 sts after the ribbing. The thumb gore directions don’t work for this size, so consider using another color pattern on the thumb and thumb gore, perhaps the universal thumb gore (see Terms and Techniques). Use the measurements above to determine where to take off stitches for the thumb, where to begin decreasing, etc. (Thumb and thumb gore are the same length, and length from base of thumb gore to end of hand is 3 x thumb length.)
Or, Follow the directions for Men’s Medium, but use US No. 6 double-pointed needles at a tension of 5.5 spi, but increase the lengths to match the measurements above. If you choose this option, use a chunky worsted weight yarn like Bartlettyarns 2-ply Fisherman or Brown Sheep Lamb’s Pride Worsted yarn.
Note: Terms in italic are explained in Terms and Techniques. Please check out T & T at least once, then refer to it when moving into unknown areas. Abbreviations are explained in the directions.

Directions
Abbreviations. beg, beginning; CC, contrast color; dec, decrease; inc, increase; k, knit; MC, main color; p, purl; rnd, round; spi, stitches per inch; st(s), stitch(es); tog, together (K2 together).
1. Cuff: Cast on 39 (48, 54) sts in CC on smaller needles. K 2, p 1 for 2.5 (3, 3) inches.
2. Change to larger needles and K 1 rnd plain in CC, increasing 1 (0, 2,) sts between k sts in the ribbing. 40 (48, 56) sts. Begin Chart A at lower right. K entire dark band and 3 rnds into light pattern without incs.
3. Inc for thumb gore. Right mitten: Place thumb inc around the first dot of the first needle. Left mitten: Place thumb inc around the last dot (Chart B) from the end of the third needle. Following Chart B for your size, inc: make 1 right, work center st (above the dot), make 1 left. Inc this way every 2nd rnd 4 (8, 8) times. 8 (16, 16) new sts. Total 48 (64, 72) sts.
Work even until thumb gore is 2 (2.33, 2.33) inches long, measured along the centerline.
4. Put 11 (15, 15) thumb gore sts on a holder, including the center st and 5 (7, 7) on each side of it. Using twisted make 1, cast on 3 (7, 7) sts above thumb hole in pattern. 40 (56, 64) sts.
Work even in pattern until knitting just covers the little finger or measures about 5.25 (8.5, 8.5) inches above ribbed cuff (about 1.5 inches less than final length).
5. Dec circularly by k2 tog in the spaces between bird feet as shown on Chart C, (a little 2-foot slice of mitten top). Ideally, slant decs away from birdy toes. On the second set of Crow’s Feet, there will be 1 st between feet, and then only 3 sts between their long toes. When the tip of the last toe is finished, break CC yarn with a 4-inch tail, and push it inside mitten. Follow Chart C for 2 more rnds, then break yarn with 6-inch tail.

Match the length of your mitten with the finished measurements at the beginning of these directions. If you are not happy, measure the length of the dec section, write it down, then rip back to the beginning of the decs and work enough more so that the length of the dec section and your new work will equal your desired length.
If you are satisfied with the length, break yarn and, with a yarn needle draw up remaining sts on the tail to close the tip.
6. Thumb: On 2 needles, pick up 11(15, 15) sts from holder; on a third needle, pick up 3 (7, 7) sts above the thumb hole; and pick up and twist 1 st in each corner. 16 (24, 24) sts.
Continue pattern from thumb gore. (The pattern on inside of thumb will be upside down to the pattern on the hand.)
Work even in pattern for 1.75 (2, 2) inches or to the middle of the thumbnail. If you find the thumb too tight or too loose, rip it out and re-knit it with needles one size larger (for too tight) or smaller (for too loose). It doesn’t take long and you will be rewarded by having a warm and functional mitten.
Dec and end as on hand, following chart C. Finish.
7. Return to Step 1 and knit another identical mitten. These mittens can be worn on either hand.