Shetland Ladders Mittens

When I first started looking at mittens in Maine and Eastern Canada, the traditions in Newfoundland and Labrador seemed unconnected to the rest. In most of the region, two-colored mittens have small geometric patterns that wrap perfectly around the hand. There are no broken patterns and never a different design on the palm.
Many knitters continued the pattern onto the thumb gore, with an unusual increase technique that makes the extra stitches appear almost magically without interrupting the pattern.
The mittens can be worn on either hand. Nova Scotia knitting historian Janetta Dexter told me that local knitters make only right mittens and twist them around to make a left, but in fact, the mittens are completely ambidextrous, a closed tube with a thumb and thumb gore.
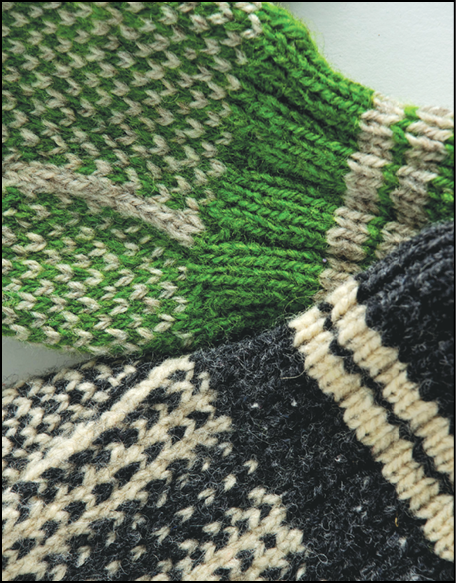
Newfoundland and Labrador mittens are different, knitted with a striking pattern on the back of the hand, and palms in a salt-and-pepper pattern (K 1 MC, K 1 CC). The thumb gore, also salt-and-pepper, is often outlined in a contrasting color to simplify increasing. No need to have a set multiple of stitches around the hand. And there are right and left mittens.
The strong pattern on the back may continue to the finger tips but often stops at the base of the fingers, to be replaced with more salt-and-pepper, as if the knitter had a glove pattern she hadn’t bothered to adapt to a mitten.
The knitting is set up with all the back stitches on one needle and the palm stitches divided between two others, resulting in a very flat mitten that seems wider than ordinary.
Although it’s uncertain where this very different set of traditions came from, similar mittens are knit in Ireland, the Shetland Islands, the Faroe Islands, and possibly other North Atlantic islands. The reason they are not better known is that they are knit mostly as work mittens for family members and are seldom made for sale, while more finely knit, fancy patterned mittens are on display in knit goods stores.
The directions given here for both mittens and finger mitts are from Newfoundland and Labrador. The pattern on the back of the mitten is a mitten color pattern [as distinguished from the next, a sweater color pattern] from Shetland; the pattern on the back of the finger mitts is a sweater pattern from the Faroe Islands, but works so well on mittens
Made on comfortably large needles, with a relaxed gauge, both mittens are strikingly handsome and warm. They are still used as work mittens in Shetland and Newfoundland/Labrador.
Technical stuff
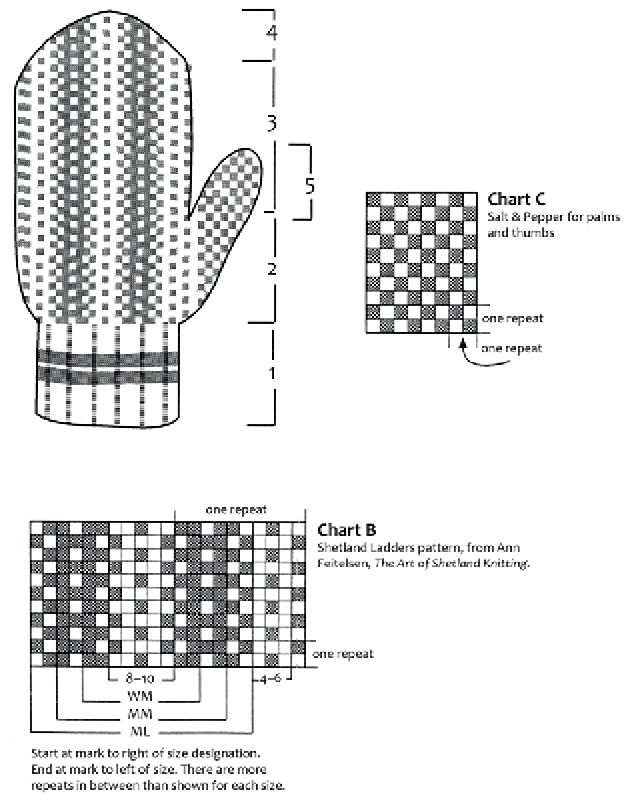
Pattern. Shetland Ladders is a 10 st, 2-rnd repeat that looks like interlocked dark and light ladders. It is worked only on the back of the mitten. Eyunstovu Slants can also be used for these mittens, as can numerous other Newfoundland and Faroe diamond and check patterns. (See Favorite Mittens and Føroysk Bindingarmynstur.)
Generally the main color, usually the darker color, is carried ahead.
The palm and thumb are worked in Salt & Pepper, a 2 st, 2 rnd repeat.
Like many Canadian mittens, these are worked on only one size needle, in this case, US No. 4. The transition between ribbing and stockinette is made by adding stitches in the first stockinette rnd.
Note: Terms in italic are explained in Terms and Techniques. Please check out T & T at least once, then refer to it when moving into unknown areas. Abbreviations are explained in the directions.
Directions
Abbreviations. beg, beginning; CC, contrast color; dec, decrease; in, inch(es); inc, increase; k, knit; MC, main color; p, purl; rnd, round; SSK, slip, slip, knit; st(s), stitches; tog, together (k 2 together).
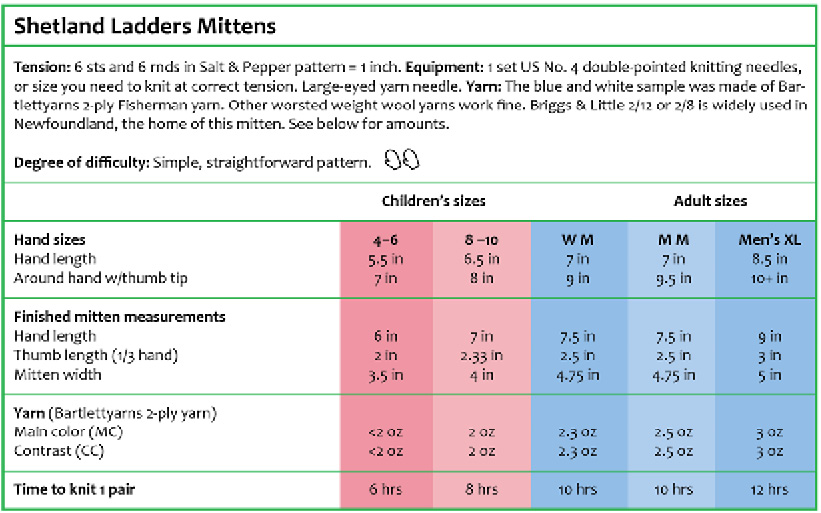
1. Cuff. Cast on 32, 36 (40, 44, 48) sts in MC. K 3, p 1 for 10 rnds MC, 3 rnds CC, 1 rnd MC, 3 rnds CC, and 9 rnds MC. Newfoundland knitters are partial to 26 rnd mitten cuffs, and although stripes may vary, the length of the cuff seems not to.
Set-up rnd for hand. Arrange sts so that one-quarter each are on Needles 1 and 2 and the remaining half are on Needle 3.
Inc by make 1 between k sts of the ribbing distributing incs on Needles 1/2/3 as follows: 3/3/7, 3/3/7 (4/4/9, 5/5/11, 6/6/13) sts. (Subtract 1 st from inc on Needle 3 if using a pattern with a 2-st center, for example, 4 blocks of Labrador Diamonds.)
45, 49 (57, 65, 73) sts, still with one quarter each on Needles 1 and 2 and one half on Needle 3.

2. Start pattern and thumb gore at the same time: Work Salt & Pepper (Chart C) on Needles 1 and 2.
Right mitten. On Needle 1, k 1 CC st; work Salt & Pepper (Chart C) for 5 sts; k 2 CC on the 7th and 8th st. (The first CC st and the two CC sts outline the thumb gore. Maintain these marking sts the length of the thumb gore.) Work remainder of Needle 1 and all of Needle 2 in Salt & Pepper.
Left mitten, the reverse. Needles 1 and 2: Work Salt & Pepper, Chart C, to 8 sts before end of Needle 2, then k 2 CC; work 5 sts Salt & Pepper; k 1 CC. The 2 CC sts and the final CC st outline the thumb gore. Maintain these marking sts the length of the thumb gore.
On Needle 3, work Shetland Ladders pattern, following Chart B from the starting point for your size, reading chart from lower right. You should reach the end of Needle 3 at the point in the pattern indicated for your size. If not, check number of sts and whether there’s a mistake in your pattern. The first rnd is the foundation and all that comes after depends on its being just right.
Inc by knitting both colors into the first and last Salt and Pepper sts within the 2 marking lines every rnd until there are 13, 13 (15, 19, 21) thumb gore sts, between the CC markers. Be careful to keep colors in the right order as you inc. 53, 57 (67, 79, 89) sts.
Work even in pattern until 2, 2.33 (2.5, 2.5, 3) inches above cuff.
Put thumb gore sts on a holder. Discontinue CC marking sts by including them in Salt & Pepper pattern on the hand. Cast on 5 sts over the gap, matching pattern to the palm. 45, 49 (57, 65, 73) sts.
3. Hand. Work even until 2.5, 3.25 (3.75, 3.75, 4.25) inches above thumb hole (or to base of ring fingernail).
4. Dec. At little finger edge, SSK at end of needle and k 2 tog at beginning of next needle, maintaining both patterns. Dec 2 sts every rnd on little finger side 2 times, then dec 4 sts each rnd, 1 st at each end of the Needle 3 and 1 st at each edge of the palm (but not in the middle). carefully maintaining the patterns and leaning decs toward the end of the needles until 12 sts remain.
Compare the length of your mitten with the finished measurement at the beginning of these directions. If you are satisfied with the length, break yarn with a 6-inch tail. Use a yarn needle to draw the remaining sts up on the MC tail to close the tip.
If you are not happy, measure the length of your dec section, write it down, then rip back to the beginning of the decs and work enough more (or rip more) so that the length of the decrease section plus your new work will equal your desired length.
5. Thumb. Pick up from holder 13, 13 (15, 19, 21) sts on 2 needles. Pick up 5 sts from back of thumb hole. Pick up and twist 1 st from each corner of thumb hole. 19, 21 (23, 25, 27) sts.
Join MC and CC strands by sewing into the p side, starting from where you will begin knitting. This gives you a firm start to your knitting. You can neaten up the stitching later. Work Salt & Pepper, matching pattern to the thumb gore, until thumb measures 1.75, 2 (2.25, 2.25, 3) inches, measured on inside of thumb.
Thumb dec. K 2 together at both ends of each needle, every rnd, leaning dec toward ends of needles, until 6 to 8 sts remain. Break yarn with 6-inch tail, draw dark strand through remaining sts and pull up firmly to close the tip. Finish.
6. Return to Step 1 and knit another. Be sure to make it for the opposite hand. It’s distressing to finish two right mittens and have the choice of knitting two lefts (will you? or will you knit two more rights?) or ripping one out to the cuff and starting over. I have done this more than once. Don’t you do it.

