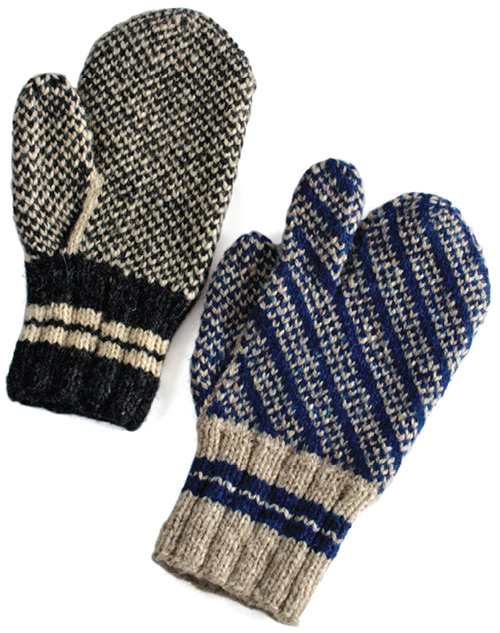
Eyunsstovu Slants Finger Mitts

Ey∂unsstovumynstri∂! Whoa! Is that a mouthful or what? If you want to know how to say it in its homeland, the Faroe Islands, ∂ is silent and the y between consonants is pronounced like ü in German —kind of Ay-uns Sto’ vu muen’ stree —“the pattern from Ey∂unsstovu,” a farm in the Faroe Islands, where it’s usually knitted into sweaters. (Since the ∂ is silent, and looks more like a crossed d with a slanted stem than the symbol I’ve substituted, I’ve eliminated it in the name of the pattern.)
I saw Eyunstovu Slants first on a young father on Mykines, a tiny remote island far to the west of the other islands. His mother had knitted it into his sweater because the family comes from Ey∂unsstovu.
I liked the pattern immediately, especially the way it met at the shoulders and armholes. Of course, mittens have no shoulders or armholes, and this pattern doesn’t have to come out even, as it has no center and the palm is different from the back of the hand.
The Faroe Islands lie at the northern end of the Gulf Stream, where winters are mild, hard freezes rare, and the grass often stays green all winter—on top of the houses! Perhaps people there don’t need a rugged mitten these days.
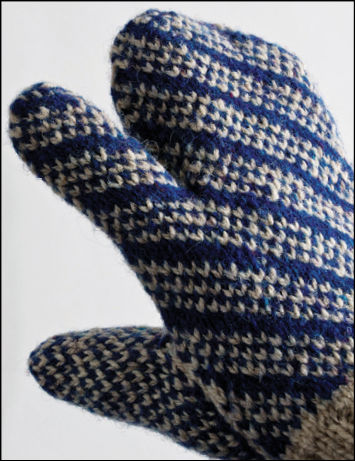
Eyunsstovu Slants is comfortable to knit, a small, simple pattern with a big impact. It works nicely on the back of Newfoundland mittens, gloves, or finger mitts.
For more bold, Faroe Islands patterns, consult Hans Debes, Føroysk Bindingarmynstur (Føroyskt Heimavirki, 1986). All patterns are charted; no need for a translation.
The directions for these Labrador-style finger mitts are based on native Labradoran Harriet Pardy Martin’s verbal directions to her daughter Doris Saunders, who, as an anthropologist, was armed with a tape recorder. Doris gave me permission to use her directions.
Technical stuff
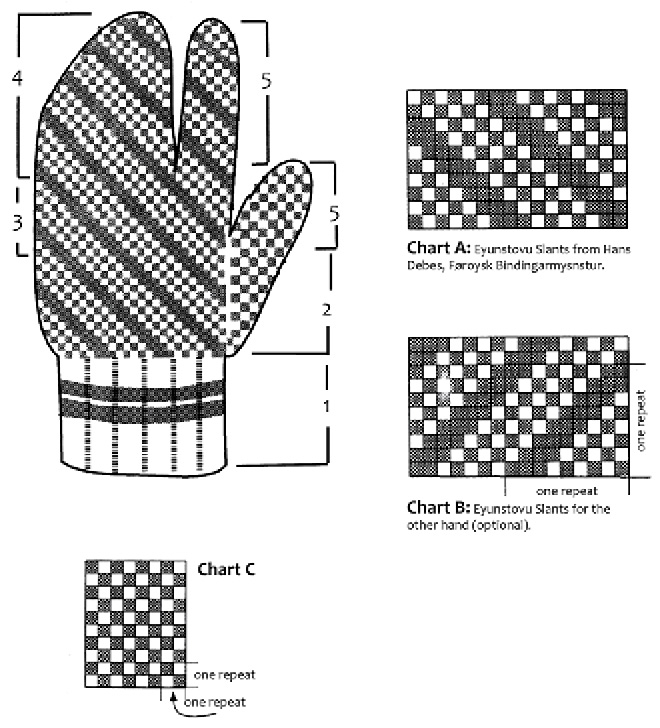
Pattern. Eyunsstovu Slants, the pattern on the back, is an 8 st x 8 rnd repeat which needs no centering. The palm is in Salt & Pepper, a 2 st x 2 rnd repeat.
Shetland Ladders can also be used on the back of these finger mitts, as well as many other Newfoundland and Faroe diamond and check patterns (See my Favorite Mittens and Føroysk Bindingarmynstur.
Carry the darker color ahead throughout.
Like many Canadian mittens, these are worked on only one size needle, in this case, US No. 4. The transition between ribbing and stockinette is made by adding stitches in the first stockinette rnd.
Note: Terms in italic are explained in Terms and Techniques. Please check out T & T at least once, then refer to it when moving into unknown areas. Abbreviations are explained in the directions.

Directions
Abbreviations. beg, beginning; CC, contrast color; dec, decrease; inc, increase; k, knit; MC, main color; p, purl; rnd, round; SSK, slip, slip, knit; st(s), stitches; tog, together (k 2 together).
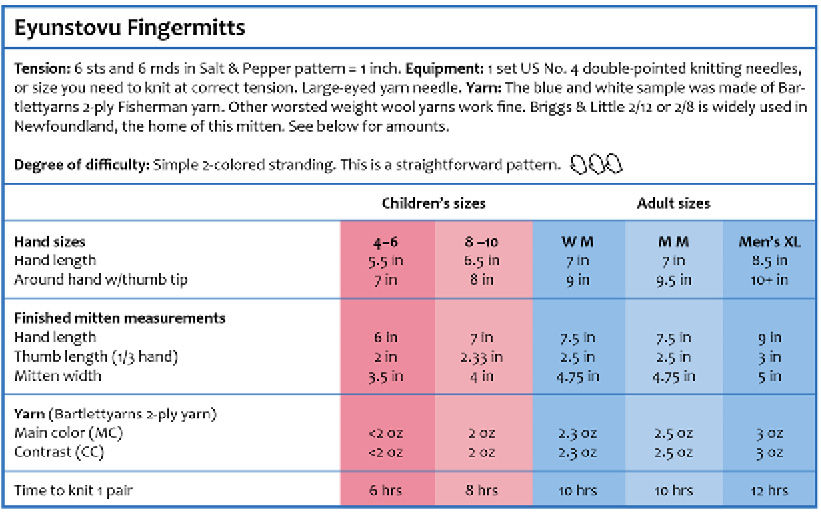
1. Cuff. Cast on 32, 36 (40, 44, 48) sts with MC. K 3, p 1 for 10 rnds in MC, 3 rnds contrast color (CC), 1 rnd MC, 3 rnds CC, and 9 rnds MC. Newfoundland knitters are partial to 26 rnd mitten cuffs, and although stripes may vary, the length seems not to.
Set up for hand. Without changing the starting point of the rnd, arrange sts so that one-quarter each are on Needles 1 and 2 and the remaining half are on Needle 3. Place the beg of the rnd (and Needle 1) on the edge between the front and the palm, so that there is no obvious shift in the pattern between rnds.
Inc by make 1 between k sts of the ribbing distributing incs on Needles 1/2/3 as follows: 3/3/6, 3/3/6 (4/4/8, 5/5/10, 6/6/12) sts. (Add 1 more st to Needle 3 if using Shetland Ladders or other pattern with a 1-st center.)
44, 48 (56, 64, 72) sts, still with one quarter each on Needles 1 and 2 and roughly one half on Needle 3.

2. Start pattern and thumb gore at the same time: Work Salt & Pepper (Chart C) on needles 1 and 2.
For right fingermitt. On Needle 1, k 1 CC st; work Salt & Pepper for 5 sts; k 2 CC marker on the 7th and 8th st. (The first single CC st and the 2 CC sts outline the thumb gore. Maintain these marking sts the length of the thumb gore.) Work remainder of Needle 1 and all of Needle 2 in Salt & Pepper.
For left fingermitt, the reverse. Needles 1 and 2: work Salt & Pepper, Chart C, to 8 sts before end of Needle 2, then k 2 CC; work 5 sts Salt & Pepper; k 1 CC. The two CC sts and the final CC st outline the thumb gore. Maintain these marking sts the length of the thumb gore.
On Needle 3, work Eyunstovu Slants pattern, following Chart A from lower right corner.
Inc by knitting both colors into the first and last Salt and Pepper sts within the 2 marking lines, every rnd until there are 13, 13 (15, 19, 21) sts, excluding markers. Be careful to keep colors in the right order as you inc. 52, 56 (66, 78, 88) sts.
Work even in pattern until 1.25, 2 (2.5, 2.5, 3) inches above cuff. Put all thumb gore sts between (but not including) the markers on a holder.
3. Hand. Cast on 5 sts over the gap and continue even in pattern for 1, 1.25 (2, 2, 2.5) inches (a little less than the thumb gore length. If you have the hand you’re knitting for available, slip on the finger mitt and see if there’s room to slide a knitting needle under the working needles and between the index and middle finger. That’s what you want.).
Take off sts for trigger finger
Right fingermitt. Place 5, 6 (7, 8, 9) sts from Needle 3 and 7, 8 (9, 10, 11) sts from Needle 1 onto a holder = 12, 14 (16, 18, 20) sts (above thumb hole).
Left fingermitt. Take 7, 8 (9, 10, 11) sts from Needle 2 starting exactly above the thumb hole and moving to the back of the hand, and 5, 6 (7, 8, 9) sts from Needle 3 onto a holder = 12, 14 (16, 18, 20) sts (above thumb hole).
4. Three finger pocket. Cast on 2 sts over the gap, redistribute the sts so the palm is divided between Needles 1 and 2, and the back is on needle 3. Continue to work the remaining palm sts in Salt and Pepper and Eyunsstovu Slants on the remaining back sts. (Or, in the Newfoundland tradition, work Salt & Pepper all the way around the finger portion. Dec or inc 1 st if necessary for an uneven number of sts to make the pattern continuous.)
K even in pattern until 2.5, 3.25 (3.75, 3.75, 4.25) inches above thumb hole or to base of ring finger nail.
Dec. At little finger edge, SSK at end of needle and k 2 tog at beginning of next needle, maintaining both patterns. Work 1 rnd even, then dec every rnd only at center palm and little finger junctures until just beyond the end of the middle finger (leaning decs toward ends of needles and maintaining patterns). Then k 2, k 2 together twice around in Salt and Pepper, until 15 sts remain. K 1 rnd plain.
Compare the length of your mitten with the finished measurement at the beginning of these directions. If you are satisfied with the length, break yarn with a 6-inch tail and, with a yarn needle, draw the remaining sts up on the tail to close the tip.
If you are not happy with the length, measure the length of your decrease section, write it down, then rip back to the beginning of the decreases and work enough more (or rip more) so that the length of the decrease section and your new work will equal your desired length.

5. Trigger finger, both hands. From holder, pick up 2 sts on Needle 1; 5, 6 (7, 8, 9) each on Needles 2 and 3. On Needle 1 again, pick up from cast on edge, 2 sts and pick up and twist 1 st from each corner, all on Needle 1. 16, 18 (20, 22, 24) sts. Tuck 3-finger portion inside mitten if it’s in your way.
Work even both patterns (or, optionally, only in Salt & Pepper) until 3.75, 4.25 (4.5, 4.5, 5) inches above thumb hole, or halfway up the index fingernail.
Trigger finger dec: SSK at end and k 2 tog at beg of all 3 needles, maintaining pattern and leaning decs toward ends of needles, until 6-8 sts remain. (The trigger finger is always a little shorter than the hand.)
Break yarn with a 6-inch tail, draw dark yarn through the remaining sts and pull up firmly.
6. Thumb. Pick up from holder 13, 13 (15, 19, 21) sts on 2 needles. Pick up 5 sts from the back of thumb hole. Pick up and twist 2 sts in corners. In Rnd 1, k 2 tog at the corner by the back of the hand. 19, 21 (23, 25, 27) sts.
Work even in Salt & Pepper 1.75, 2 (2.5, 2.5, 3) inches, measured on the palm side of the thumb.
Thumb dec: K 2 together at both ends of each needle, every rnd, leaning dec toward ends of needles, until 6 to 8 sts remain. Break yarn with 6-inch tail, draw dark strand through remaining sts to close tip. Finish.
Knit another for the other hand. Be sure to make it for the opposite hand. Little is more useless than 2 fingermitts for the same hand. You can’t even twist one around to wear on the other hand.

