Striped Mittens
Variations on a Theme
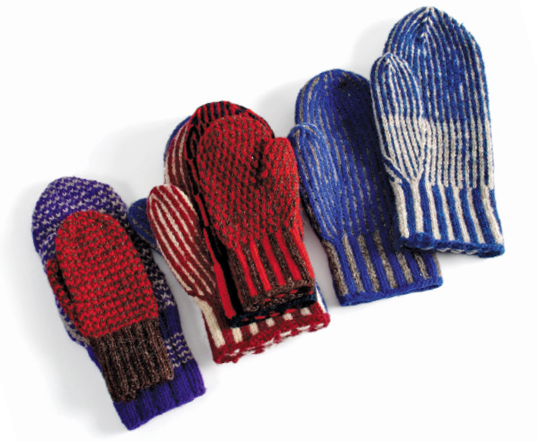
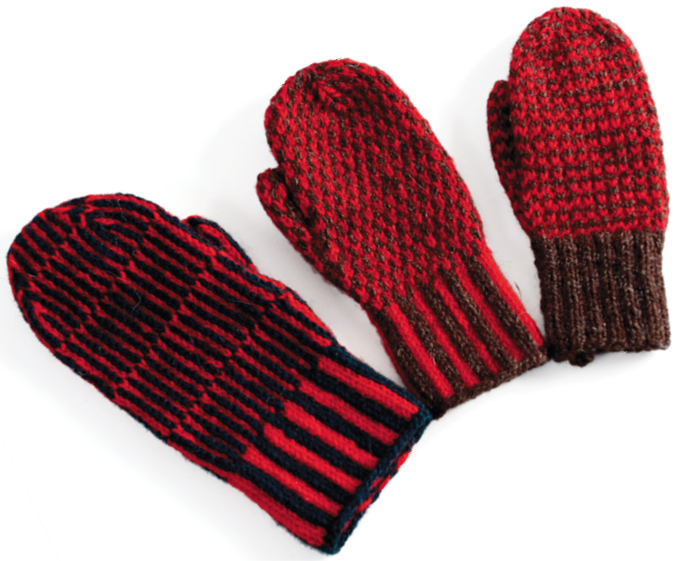
Stripes was the first Maine mitten pattern I learned, the first I wrote down, and it is still one of my favorites to wear.
Knitters who have the striped mitten pattern in their family—from Maine to Gotland, Sweden—love it for its clean lines, its firm, thick fabric, and for the interesting ridgey-ness built into the pattern.
From Nora Johnson of Five Islands, Maine, I learned how to make the ridges appear, and I learned her tricky tree-branching thumb gore increase, but her decrease at the end of the hand and the thumb was only okay—maybe too complicated and only moderately attractive.
I learned the decrease given here from a knitter at Sheep and Wool Day at the New Hampshire Farm Museum. She had found several pairs of striped mittens in her late grandmother’s coat pockets. Hoping to carry on the family knitting heritage, the woman carefully picked open the ends of several fingers to understand how they were made. Because one color of the stripes was clearly above the other in the knitting, she concluded that the two-color stripes were formed by knitting one color in each round, slipping its opposite. (Carrying one color ahead produces the same evidence of one color lying above the other in the round.)
What excited me, however, was the still-intact fingers, skillfully decreased in a neat pairing of SSK (slip, slip, knit) and knit-2-together so that the dark stripes met dark and light met light perfectly along the decrease lines.
As soon as I got home, I cast on stitches and knit a finger mitt to figure out the decrease. The decrease here produces the same result as the New Hampshire glove fingers, but who knows whether I too have gotten the same result with an entirely different technique. Anyone with such a decrease for stripes in their family is welcome to call, write, or email me to tell me I’m doing it all wrong!
There are a few variants on Striped Mittens—Offset Stripes, Waving Stripes, and Newfoundland Rickrack Stripes. You can use the same pattern for all four, changing only the particulars.
Striped Mittens first appeared in Fox & Geese & Fences. It has been revised to fit the format of this book, and the cast-on and decrease directions have been changed.
Technical stuff
The cuff pattern is a 4 st/1 rnd repeat: K 2 MC, k 2 CC on a multiple of 4 sts. The hand and thumb pattern is a 2 st/1 rnd repeat: K 1 MC, k 1 CC on an even number of sts.
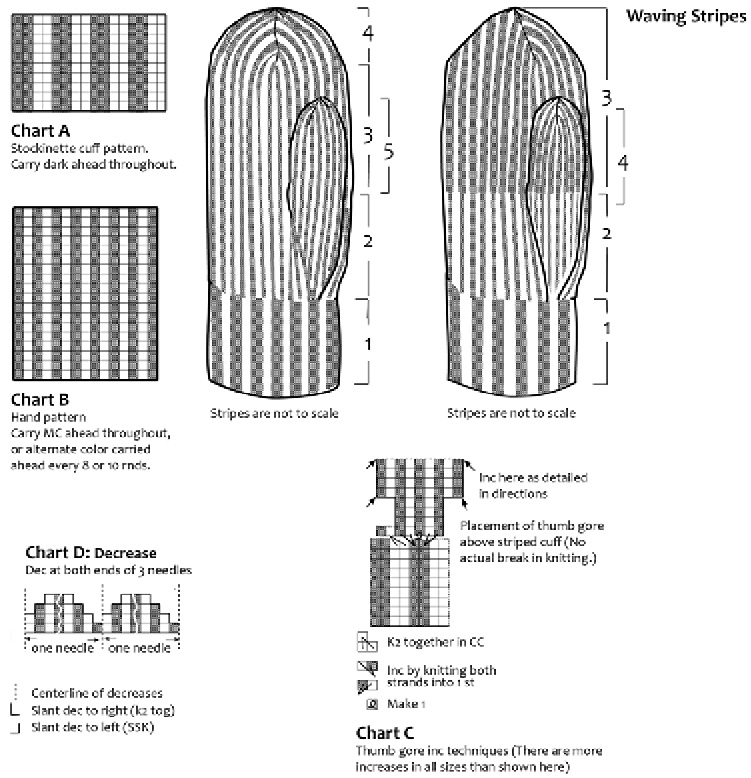
Nora Johnson showed me a wonderfully organic treatment of the thumb gore, which looks as if 3 narrow stripes branch from one of the dark stripes on the cuff. Follow Chart C and the inc directions.
Because you must have an even number of stitches for the 1-stitch vertical stripes, you’ll have to dec 1 st just after you inc 3 sts at the base of the thumb gore. Don’t miss this step in the directions, or your stripes won’t come out even!
The simple ridged effect is achieved by carrying one strand ahead throughout, usually the darker, less flashy color, and aligning all color changes vertically.
This is a close fitting mitten, rather like a glove, so the hand circumference with thumb tip doesn’t correspond to the tension x number of stitches. But it will still fit.
This mitten is knit circularly on 4 needles and can be worn on either hand. The hand and cuff are knitted on the same size needles.
Note: Terms in italic are explained in Terms and Techniques. Please check out T & T at least once, then refer to it when moving into unknown areas. Abbreviations are explained in the directions.
Directions
Abbreviations. beg, beginning; CC, contrast color; dec, decrease; inc, increase; k, knit; MC, main color; p, purl; rnd, round; SSK, slip, slip, knit; st(s), stitches; tog, together (k 2 together).
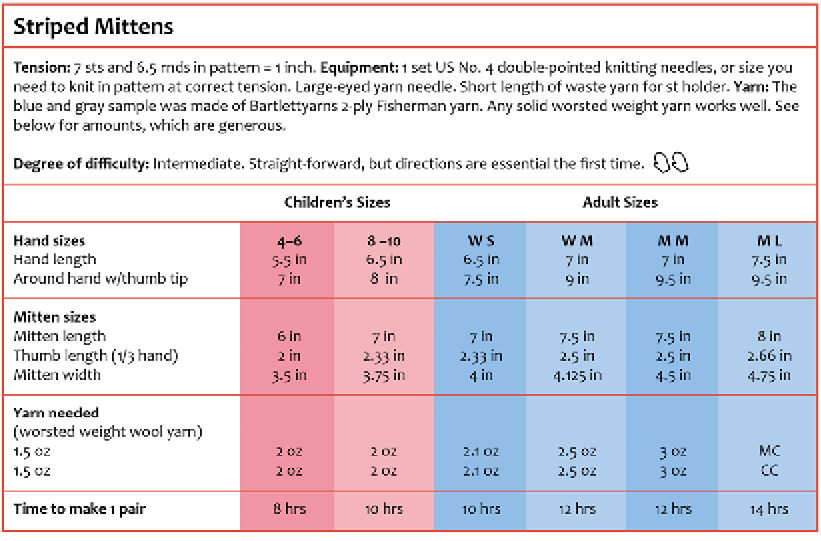
1. Cuff. Using Maine cast on and MC, tightly cast on 44, 44 (48, 52, 56, 60) sts.
Start Chart A, cuff pattern, immediately: K 2 MC, k 2 CC. Carry MC ahead consistently.
Work even until cuff measures 2.5, 2.5 (2.75, 2.75, 3, 3) inches. (This is longer than usual but looks good in Stripes.)
2. Set up Stripes pattern and thumb gore. Change to hand pattern, Chart B, and immediately set up branching thumb gore:
Above first MC cuff stripe, k both colors, MC then CC into the first MC st. Make 1 MC clockwise, then k both colors, CC then MC into the second MC st. Place marker. You have now added 3 sts, making your total sts an odd number, so your pattern won’t work. K next 2 sts tog in CC, and everything’s all right again. Work to middle of Needle 2.
Inc 2 sts: On little finger side, K both colors into 1 st in pattern sequence. Repeat in next st. 48, 48 (52, 56, 60, 64) sts.
Work 2 rnds even.
Inc. Use this clever and attractive increase to add 2 sts in each outside MC stripe of thumb gore (4 sts in 1 rnd):
K 1 MC. With the left needle, lift the purl loop from 2 rnds beneath the st just knitted (It will be the first loop under the working yarn on the back of your work.) Insert right needle into loop and K both colors into this st, CC then MC. this is a left leaning inc. Work to st before marker.
With the right needle, lift the purl loop of the next st from previous rnd from under and behind the next st. K both colors into the loop, first MC then CC. Now k 1 MC in the next st on the left needle as usual. This is a right leaning inc of 2 sts.
Total, 4 inc sts in pattern. You will be able to see the beginnings of 2 MC Y-shapes with a CC st emerging in the middle of each.
Inc this way every 4th rnd a total of 2, 3 (3, 4, 4, 4) times until there are 11, 15 (15, 19, 19, 19) sts between the 2 outside MC lines.
56, 60 (64, 72, 76, 80) sts total.
Work even until thumb gore measures 2, 2.33 (2.33, 2.5, 2.5, 2.66) inches.
Take off thumb gore sts. Put on a holder 13, 15 (15, 19, 19, 19) thumb gore sts from within the two MC edge sts (but, in Size Child’s 4–6, include the MC edge sts). Using twisted make 1, cast on 5, 5 (5, 5, 7, 7) sts over the gap, in pattern.
48, 50 (54, 58, 64, 68) sts.
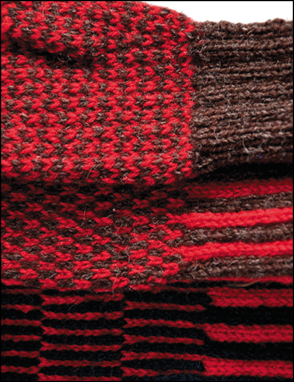
3. Hand. Work even in pattern 3, 3.33 (3.33, 3.75, 3.5, 3.84) inches, close to the end of the hand. This will seem long, but the dec is quite fast, and the knitting pulls in quickly.
4. Set up dec. Arrange sts on 3 needles so that one needle covers the center back, there are about the same number of sts on each needle, and each needle begins with an MC st.
Dec Rnd 1. At end of each needle, SSK in the color of the next-to-last st (MC in this case). From now on, sts facing each other at the ends of needles will be the same color.
Dec Rnd 2, and all following rnds. At beginning of each needle, k 2 tog in the color of the 2nd st. At the end of each needle, SSK in the color of the next-to-last st. The decs will lean toward the “seam,” and the colors will match and meet there. Dec in every rnd.
When 12 to 14 sts remain, stop.
Compare the length of your mitten with the finished measurement at the beginning of these directions. If you are satisfied with the length, break yarn with a 6-inch tail. Use a yarn needle to draw the remaining sts up on the tail to close the tip.
If you are not happy, measure the length of your dec section, write it down, then rip back to the beginning of the decs and work (or rip) more, so that the length of the dec section and your new work will equal your desired length.
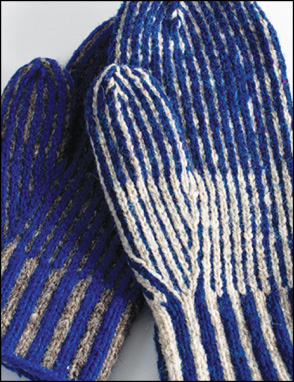
3. Thumb. On 2 needles, pick up 13, 15 (15, 19, 19, 19) thumb gore sts from holder, 5, 5 (5, 5, 7, 7) sts from top of thumb hole. Pick up and twist 1 st from each corner of the thumb hole.
20, 22 (22, 26, 28, 28) sts.
Work even in pattern, continuing stripes from the body of the mitten on all sides of the thumb. It will look astonishingly skilled, and you will be praised by all who notice. Be sure to point out this touch, and the matched sts at the dec lines, to any who fail to notice.
Continue in pattern until thumb is 1.37, 1.75 (2, 2.5, 2.5, 3) inches long, or just above the middle of the thumb nail.
Dec as on hand until 12 sts remain. End as on hand.
Finish. Draw all tails inside the mitten. Turn inside out and weave all tails under the floats of the opposite color. Trim tails.
Return to Step 1, and make a mitten for the opposite hand. Although there are right and left mittens, they can be used on either hand if, Heaven forbid, you should lose two identical striped right mittens or accidently knit two left mittens.
Variants
If, after you make a few striped mittens, you begin to waver in your excitement for the style, you can change and play with the pattern. Because of its simplicity, a little change has a big impact.
This section is like the follow-up to recipes in the Fanny Farmer Cookbook, where you are told to try putting coconut or chocolate chips into the cake. Everything in the recipe stays the same except you add coconut and maybe drop the vanilla.
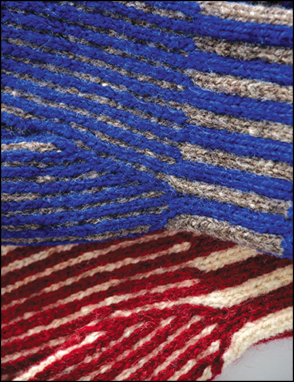
Wavy Striped Mittens from Sweden. The change is as simple as switching the color carried ahead part way up the mitten. This causes the opposite color to dominate for a while. It will probably create amazement among your friends, too.
To make this mitten, follow the Striped Mitten directions exactly, but change the color carried ahead after taking off the thumb, then possibly change back again just before decreasing.
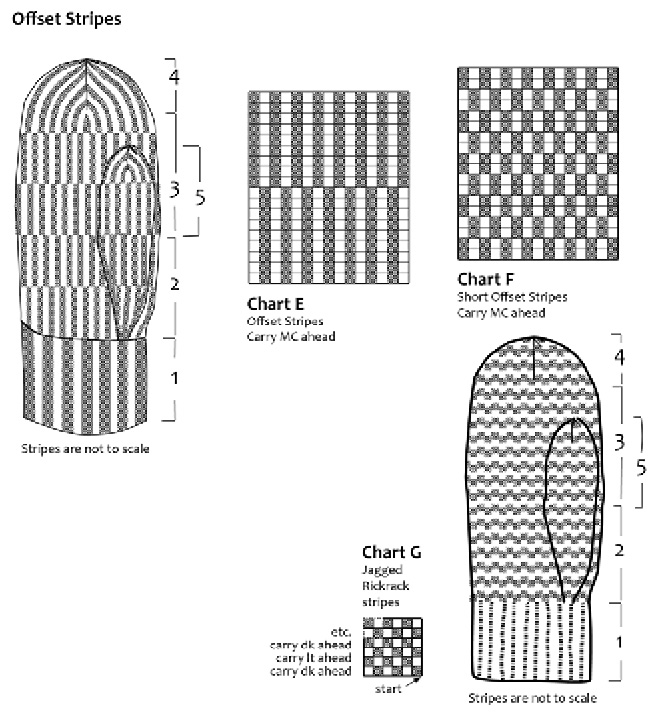
Long Offset Stripes. Mrs. Richardson in Phippsburg, Maine, used to make mittens with long offset stripes that shifted every 8 or 9 rounds. Doing this retains the pull-up effect, but changes the appearance greatly. Use Chart E and the graphic. Carry the darker color ahead throughout.
Short Offset Stripes. Some local knitters reduce the length of the stripe to 2 or 3 rounds. Offsetting the stripes every 2 rounds flattens out the pull-up effect, but with a 3-round stripe, the pull-up kicks in again.
The sample is made of Rauma 3-ply Strikkegarn in Size 4 to 6 years.
An alternative, not shown, is to change the color carried ahead at the same time the stripe shifts. This stacks up the carried-ahead stitches lengthwise and makes a kind of check/horizontal striped effect that is interesting to look at. Try both and see what you think.
To make either version, use Striped Mittens pattern and Chart F. Inc for the thumb gore by knitting both colors into 1 stitch twice on both sides of the thumb gore every 4th round.
