Hadelands Mittens
A Hidden Rib
This is a scrumptious mitten that developed from a misunderstanding, or maybe several misunderstandings; the sort that occur when one person tells another in a whisper how to do something, and the instructions are passed on, never written down, from person to person, until the final product is only marginally like the original whisper.
The original mitten comes from the Hadeland district of Norway. In Votten i Norsk Tradition, Norwegian knitting historian Ingeborg Gravjord describes it as a typical local pattern: “The colors can vary, but the pattern and the shape are always the same . . . A vertically striped, ribbed pattern, a stockinette gauntlet cuff, a herring-bone patterned thumb, and thumb gore.”
The decrease is made within the pattern, so the 5-st ribbed pattern is narrowed to 4 sts, 3 sts, then 2, and finally to perhaps 18 sts in a single color that, in the manner of New England mittens, are drawn up on the tail from knitting, rounding the tip of the mitten, unlike the 90° housetop ending one expects in Norwegian mittens.
First knitted by Pernille Pedersdatter (Egge) Rosendal (b. 1823) for her family and neighbors, the mitten pattern was taken up by one of her daughters, who then taught it to others. It was revived after World War II, and became a local sales item at Hadelands Museum gift shop.
The mitten in Hadelands Museum is not a very pretty mitten. It is what Maine people would call “garmy.” There is too much of it, too big, too round, too much cuff, too fat a thumb. But then, there are misunderstandings.
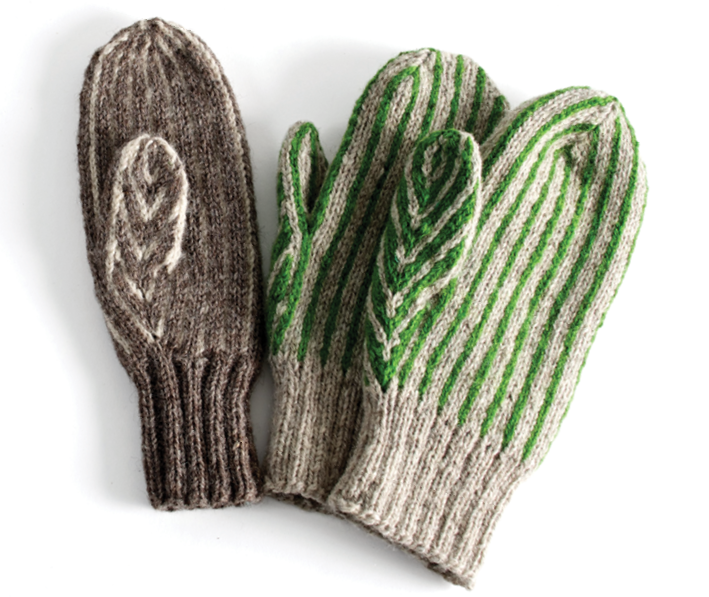
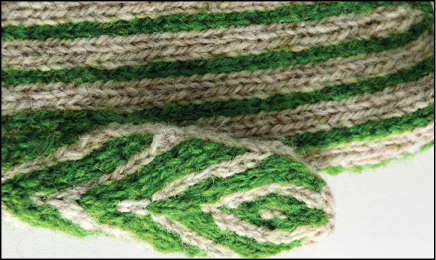
The first misunderstanding was apparently by Torbjørg Gauslaa, the Norsk Husflid’s consultant for the area, who re-interpreted the ribbed pattern as K 1 dark, p 1(not p 2 as in the original) dark, k 1 dark, k 1 light. The dark color, a moss green in that case, was carried ahead. She reinterpreted the herringbone thumb and thumb gore as a leaf pattern with increases branching from the center. A charming mitten, which I photographed at her house and tried to copy. I still haven’t quite gotten the thumb to come out like hers.
With measurements and tension calculations from Nora Johnson’s striped mitten and Norwegian Rauma DK-weight Strikkegarn, my first try came out as narrow as an arrow, but otherwise looked like Torbjørg’s. I projected my photos of her mitten onto a screen, counted stitches, crunched numbers, and reworked the directions.
My second try was in two similar colors of heavier Bartlettyarns Fisherman yarn, and, on a whim, I decided to carry the contrast color ahead instead of carrying the main color ahead, as both the Hadelands knitters and Torbjørg had.
Oooh! Amazing things happened!
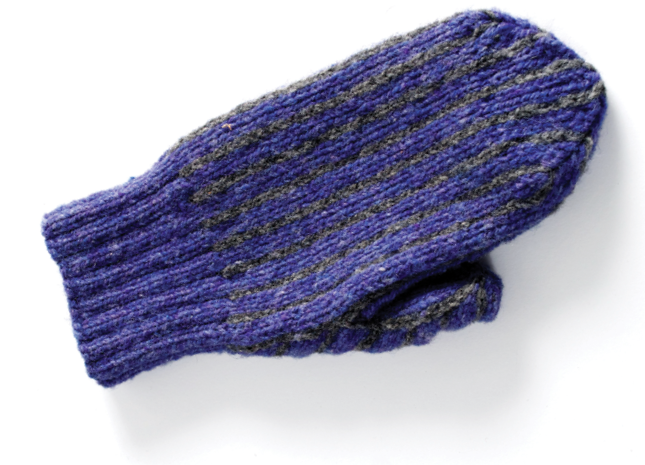
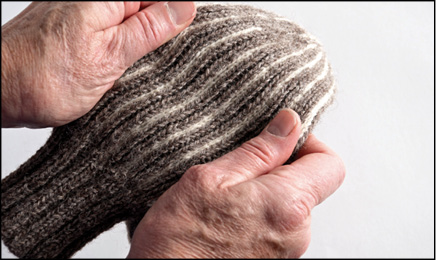
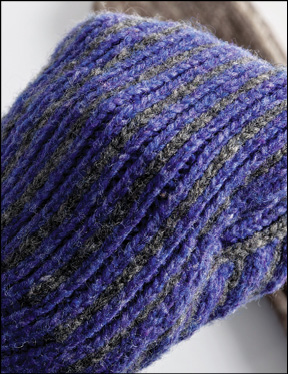
Instead of the raised, dark green ridges with an opening purl stitch in the middle, the whole surface became flat. The purl stitch was squeezed completely out of sight except when the mitten was put on, then it showed as deep cracks in the extremely flat surface.
The pattern, a 4-st repeat, now rises directly from the (new) ribbed cuff and is seemingly no wider. In actual fact, a MC purl stitch hides between the 2 k sts of the ribbing on the hand. The single, carried-ahead CC sts pull the 2 MC sts together and squeeze the purl stitch out of sight. The purl rib shows only when the mitten is worn and the hand flexes somewhat. Beautiful and strong, but also subtle and very Scandinavian. A great mitten for a guy, but with the leaf pattern on the thumb, equally suited for a woman.
Whenever I worry about polluting the pure folk handcraft of earlier knitters, I remind myself that each knitter works with a received pattern and adds or subtracts elements of it to suit herself. And so—here is a handsome Yankee version of a Hadelands mitten.
Technical stuff
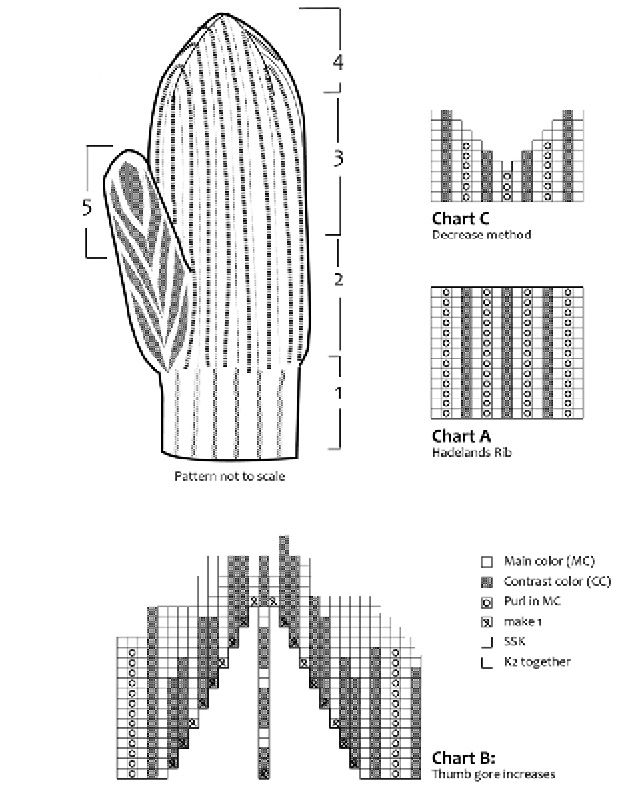
Pattern stitch is a 4-st, 1-rnd repeat, shown on Chart A: K1 MC, p1 MC, k1 MC, k1CC. Carry CC ahead except where instructed not to in order to achieve the effect of the gray and violet (or green and gray) sample.
To flatten out the thumb gore pattern to match that on the hand, carry MC ahead only on the thumb gore. Doing this requires your attention in every rnd. (Carrying CC ahead here makes the 2-st CC stripes pop out and distorts the outside of the thumb oddly. If you have a better solution, I’m here in Maine waiting to hear about it.)
Measuring the tension in this pattern is a bit odd, because of the sunken p st. You can wait and measure tension in the first 2 inches of pattern, but in this one instance, you might want to make a test swatch, casting on about 24 sts on 3 needles and knitting circularly in the Hadelands ribbed pattern for about 3 inches. Bind off in pattern. Wash the swatch in warm soapy water, spin it almost dry in the washing machine, and cut it open. Lay the swatch out flat, but don’t stretch it at all. Place a ruler over it, placing the inch line at the edge of a MC stripe. Count all visible sts. You should see 6 sts per inch. If so, you actually have the correct tension of 8 spi—including 2 hidden p sts.
Decs at the top of the hand were within the pattern on the original Hadelands mitten: a 4-st pattern became a 3-st pattern, then 2 and finally all the single sts were pulled up on the knitting tail. In this reinterpretation, the stripes meet along three SSK/K2tog paired dec lines (à la Striped Mittens), leaving the pattern and the thickness of the fabric intact.
The leaf-like thumb design is Torbjørg’s interpretation. accomplished with a left and a right make-1 inc around a single center st. The inc continues up into the thumb, but once the upper limit to how many sts are needed there is reached, a corresponding number of sts is decreased on the outer edges.
Note: Terms in italic are explained in Terms and Techniques. Please check out T & T at least once, then refer to it when moving into unknown areas. Abbreviations are explained in the directions.
Directions
Abbreviations. Dec, decrease; in, inch(es); inc, increase; k, knit; m 1, make 1; p, purl; rnd(s), round(s); SSK, slip, slip, knit; spi, stitches per inch; st(s), stitch(es); tog, together (K 2 tog).
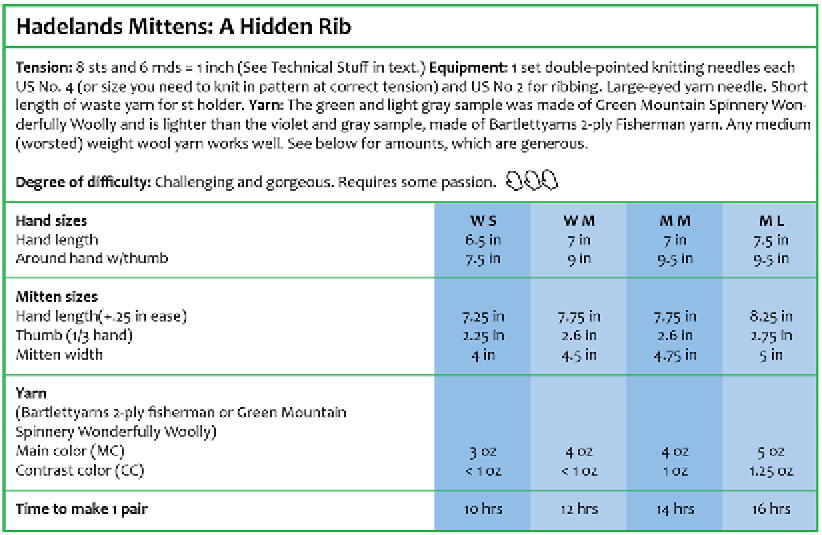
1. Cuff. On smaller needles, cast on 48 (51, 57, 60) sts on smaller needles. Rib: K 2, p 1 for 2.4 (2.66, 2.66, 3) inches. 6 sts before end of final rnd, join CC. Slip last p st onto Needle 1.
2. Hand and thumb gore. Set up hand: Change to larger needles.
Rnd 1. Set up both thumb gore (first) and Hadelands Rib pattern (next).
Set up thumb gore. K 1 CC into the p st you just moved. Above the first k rib: K 1 MC, k 1 CC in the bar between k sts, K 1 MC, k 1 CC. This is the base of the thumb gore, outlined by CC sts. The newly made CC st in the middle is the center of the thumb gore. Lay a short piece of contrasting yarn in front of it as a marker, if you wish.
Always carry MC ahead in the thumb gore area.
Set up Hadeland’s rib pattern. Above every k rib, k 1 MC, p 1 MC into bar between k sts, k 1 MC, then k 1 CC into p rib st. Carry CC ahead consistently! All the k 1 CCs should be above p sts of the cuff, and all the new p sts should be between 2 k sts of the ribbing. If this is not the case, find out where you went wrong and fix it now. It will only get worse if you don’t. (I re-knit my third Hadeland’s mitten so many times the yarn fuzzed.)
64 (68, 76, 80) sts.
Rnd 2. Thumb gore inc follows Chart B.
K 1 CC. Change to carrying MC ahead, k 1 MC st, make 1 CC st leaning right. K 1 CC (the center st), make 1 CC st leaning left, work to edge of thumb gore. Change to carrying CC ahead.
Complete rnd in Hadelands Rib.
Inc this way every 2nd rnd, following the colors shown in Chart B, until there are 17 (19, 21, 23) sts between (but not including) the 2 outside CC lines of the thumb gore. Continue central inc every 2 rnds, but now dec at both edges of thumb gore in every inc rnd: K1 MC, K2 tog in the color of the 2nd st, inc as usual at the center line, work to 3 sts from end of thumb gore, SSK 2 tog in color of 3rd st from the end, k 1 MC. In the following rnd, k above the dec in the same color (MC into MC or CC into CC).
Work thus until thumb gore measures 2.4 (2.5, 2.5, 2.75) inches from top of cuff.
Total, 78 (84, 94, 100) sts, of which 17 (19, 21, 23) sts are the thumb gore.
3. Take off thumb sts. Put thumb gore sts on a holder. Using twisted make 1, cast on 7 sts above the thumb hole continuing the color sequence of Hadeland’s rib pattern from the hand. 68 (72, 80, 84) sts.
Work even 3.33 (3.75, 3.66, 3.84) inches. This will seem long, but the dec is 6 sts in every rnd and the end comes quickly.
4. Set up dec. Arrange sts on 3 needles so that one needle covers the center back, there are about the same number of sts on each needle, and each needle ends with a p st. (It’s all right to move the beginning of the rnd over a few sts.)
Dec Rnd 1. At end of each needle, SSK in the color of the next-to-last st (MC in this case). From now on, sts facing each other at the ends of needles will be the same color and type (p or k).
Work 1 rnd even.
Dec Rnd 2, and all following rnds. At beginning of each needle, k 2 together in the color of the 2nd st. At the end of each needle, SSK in the color of the next-to-last st. The decs will lean toward the “seam,” and the colors will match and meet there.
When the second to last st (or the second st) is a p st, work it as a k st for the dec. When there is a long CC float at the dec seam, catch it on the MC strand on both sides of the decs. (See weave in in T & T).
Dec in every rnd. When 12 to 14 sts remain. stop.
Compare the length of your mitten with the finished measurement at the beginning of these directions. If you are satisfied with the length, break yarn with a 6-inch tail. Use a yarn needle to draw the remaining sts up on the tail to close the tip.
If you are not happy, measure the length of your decrease section, write it down, then rip back to the beginning of the decreases and work enough more that the length of the dec section plus your new work will equal your desired length. Dec and end as above.
3. Thumb. Pick up 17 (19, 21, 23) sts from holder on 1 needle. Pick up 7 sts from top of thumb hole on 2 needles and pick up and twist 1 st from each corner in CC (or 2 sts—as many as you need to avoid a hole there. K these optional 2 sts tog as 1 CC st in the first rnd.) 26 (28, 30, 32) sts.
On outside of thumb, continue thumb gore pattern and carry MC ahead. Match inside of thumb to Hadeland’s rib on hand and carry CC ahead between the first and last CC st of the inside. The beauty of this mitten is its precision, and the lines from the hand should flow without interruption up the inside of the thumb.
26 (28, 30, 32) thumb sts.
Work even 1.75 (2.1, 2.1, 2.25) inches.
Dec thumb tip:
Follow Chart C decreases until 9 sts remain.
Break yarn with 6-inch tail. With yarn needle, draw up remaining sts on tail to close tip. Finish.
Return to Step 1, and make a second mitten. This mitten can be worn on either hand. (The back-of-hand panel in the dec area shifts to another panel and works for either hand.)
