Terms and Techniques
An Illustrated Glossary
Bind Off: 1. K 2, pass the first st over the second (leaving 1 st on the right needle, then *k 1, pass the old st over the new* and repeat until only 1 st remains. Break yarn and thread the end through the last st and pull up gently.
Bind off 2. K 2 sts together, leaving 1 st on right needle. *Slip st on right needle back onto left needle and k 2 sts together.* Repeat until 1 st remains. Break yarn and thread end through last st and pull up gently. Should you need to undo your bind off, this bind-off pulls out easily.
Boiled wool: Most garments called “boiled wool” are actually fulled and shrunk after the fabric is woven or knitted, or in the case of mittens, after the garment is completed. They are rarely boiled.
Beda Spooner of New Sweden, Maine, boils her yarn in the skein before she knits it. Boiled yarn has an interesting ropey quality and doesn’t usually shrink more.
Boil a large pan of water (1.5 to 3 gallons). Add a little soap or shampoo, and 1 to 2 tbsp. ammonia. Immerse skeins opened to large tied loops. Simmer for about 20 minutes. Fish out yarn on a stick or a wooden spoon and rinse thoroughly in cool water. Squeeze water out by rolling the skeins in towels, or by putting skeins in the washing machine on the spin cycle (only). Hang to dry.
Braided edging: See Twined purl “braided edging.”
Carry . . . ahead: See Knitting with 2 Colors.
Carrying, or catching up, behind: See Weaving in.
Cast on: Maine cast on is also called “twisted long-tail cast-on.” An old cast on that makes a strong but flexible edge, it has recently been rediscovered by traditional knitters in northern Europe and North America.
Twisted Long-Tail Cast On


Cast on above thumb hole: Use the twisted loop of the Maine cast-on, but lay the loop onto the right needle without knitting it off. The extra twist presents little diagonals easy to pick up as stitches when knitting the thumb.
Center pull ball: See Winding a center pull ball.
Dec, decs: Decrease.
K 2 together (knit 2 together) leans to the right: Knit 2 sts at the same time, so they become one st. K 2 together can be on the right side of a decrease line to form 1 st of a vertical band of two or more sts on the dec line.
Use k 2 together on the left side of a decrease line when the line of the pattern knitting is to go straight into the decrease line, as at the end of striped glove fingers. Its opposite partner is SSK. These butt up perfectly if done on alternating rounds.
Decrease – SSK Slip, Slip, Knit

Decreases

SSK (Slip, Slip, Knit 2 together), invented and named by Barbara Walker, turns two stitches around before knitting them together through their back loop, so the dec lies flat and leans to the left. Do this: Slip 2 sts, one at a time (slip, slip), as if to knit, onto the right needle. Insert the left needle from the left through both sts, over the right needle (as if to purl backward), and k both sts together onto the right needle from that position.
Double knitting: See Knitting with 2 Colors.
Fair Isle knitting: See Knitting with 2 Colors.
Finish: To finish the tip of fingers, hand, or thumb, break yarn with a 6- to 8-inch tail, draw tail through all remaining stitches, thread tail through these sts once more, then draw tail to the inside of mitten or glove. Draw any other tails, from yarn joins or picking up for the thumb or fingers, to the inside, too.
Turn mitten inside out, then darn tails at tops of fingers, thumb, and hand back and forth across the tip once or twice.
Work all tails into back of work with running sts diagonally across the inside, picking up single purl loops. When working in two colors, threading tails under floats of the opposite color makes an almost invisible finish your grandmother would approve of.
Use conveniently located tails to repair any small holes at base of thumb, fingers, and beginning of ribbing by darning back and forth over hole. Work cast-on tail over and under alternate rounds of purl ribs (inside) lengthwise and tight against a knit rib. Trim tails close to fabric.
Fulling is sometimes incorrectly called Felting. Fulling uses feltmaking techniques to shrink and mat the fiber of woven or knitted fabric. Not all wool shrinks or felts. Superwash treated yarns will never shrink or felt, but some completely natural wools do not either. Oily yarns designed for fishermen’s wear usually full nicely.
You don’t need rubber boots, a boat deck, or an engine manifold to full mittens, although a North Atlantic fisherman may tell you otherwise. You will need a washboard, real soap (Murphy’s Oil Soap, Ivory Flakes, natural or baby shampoo, Orvus animal shampoo, etc.), one to three tablespoons of ammonia (optional), two dishpans, about three gallons of boiling water, very cold or icy water, elbow grease (you have your own). To felt one or more pairs of mittens:
1. Prepare boiling water. While waiting for it to boil, trace around each mitten on a sheet of large paper (paper bags or newspaper is fine). Place the tracing in a convenient place to compare with the mittens during the process.
2. Fill one dishpan half full of boiling water. Add enough cold water that you can stand to put your hand in it. Put the legs of the washboard in this water. Fill the other dishpan with cold water.
3. Submerge the mittens in hot water. Drag them onto the washboard, and put a large glop of soap on them.
4. Scrub the mittens vigorously on the washboard. Keep them hot by repeatedly dunking them in the hot water. Keep them soapy.
5. After a few minutes, plunge mittens into icy water, squeezing cold water through them quickly, so they are shocked by the cold. You will be, too. Rinse mittens until they’re no longer soapy.
6. Repeat steps 3 through 5 several times. The mittens will feel soft and mushy in the warm water and become stiff in the cold. Keep adding boiling water as the hot bath cools, and change the cold water frequently as it warms up or gets too soapy. Add soap to the mittens each time they go in the hot water.
7. The knit will thicken and become hairier and the stitches will become less visible as you work. Check now and then for shrinkage against your tracing and by slipping your hand into the mittens. If they haven’t shrunk at all, repeat steps 3–5 a few more times. If they have shrunk, decide whether to continue.Depending on the looseness of the knit, mittens can shrink as much as thirty percent in length and fifteen percent in width, becoming quite thick and “boardy.” The looser the knit, the greater shrinkage you can count on. A fairly dense knit will probably not shrink more than fifteen percent lengthwise, ten percent widthwise. Shrinking is not “undoable,” as my computer says, so stop in time.
8. Add two to three tablespoons household ammonia to the next-to-last rinse to soften and whiten the mittens by removing any remaining lanolin.
9. If you tire of this process, throw the mittens into the washing machine with a load of clothes instead, and/or dry them in the dryer, also with other things. You lose control over size, but the job will be done. (Running them through the laundry to start with yields a shrunken but less fuzzy mitten, in case you’re tempted.)
10. Roll the mittens in a towel to press out most of the water and dry in a hot place, or put in the washing machine on “spin.” A warm radiator is quick and ideal.
11. Brush finished mittens with a stiff brush, starting at cuff and working toward fingertips. Brush both sides of the thumb toward the tip. If you wish, turn mittens inside out and brush the inside to a light nap as well.
12. Fishermen and other outdoor workmen intentionally wear these mittens wet, as children do unintentionally. Their hands stay warmer than if their mittens had been dry, although the mitten itself may become coated with frost or snow. The secret is to stay active as you’re wearing them and to squeeze or fling excess water out immediately.My brother-in-law took a wet pair on his fishing boat in winter and claimed they froze solid. Maybe his hands weren’t in them. Maybe he didn’t shake them out. Maybe he wasn’t working.
Holder for live stitches held aside, as at the thumb hole. You can use a purchased stitch holder of whatever size seems right, a safety or blanket pin. Or, using a yarn needle, thread a length of a contrasting yarn or even a piece of cotton string through the stitches. I prefer yarn or string, as the stitches on hold remain flexible as I work.
Inc. Increase: See also, Make One.
Knitting with one strand, use “make one” as an increase.
Knitting with two or more strands, whatever the color, k 2 strands (ordering the colors to fit the pattern) into one stitch. When you return to this st in the next rnd, k each strand as a st. To inc in a single color stretch of two-colored knitting, use make 1.

Joining a new color: Seven sts before you want to use the new color, k over and under the short end of the new strand seven times without knitting it:
Anchor the new color by catching the end between stitches, then bring the end attached to the ball to the left and raise and lower it above and below your work point and both needles. Or, still holding it to the left, push the right needle alternately over and under it before wrapping the working yarn around the needle.
Join a new Strand

This anchors the new strand so that you can begin knitting easily and firmly. You will not need to work in the tail later, and can simply trim it close to the fabric. If the new color shows on the right side of work, give the tail a little tug and it will sink to the back side.
The process is the same as “weaving in” or “catching up” the float of a second color on a long single color stretch.
Knitting off: Joining two horizontal raw edges of knitting by binding off both pieces simultaneously, for example, at the shoulder of a sweater or on a squared-off mitten tip.
To set this up, leave the sts on needles. Lay the two needles side by side, with the points in the same direction and right sides of the knit facing.
Insert a (same size) needle through both first sts and k them together. K the next 2 sts together the same way, then pass the first st over the second. Proceed this way until only 1 st remains.
Knitting with four needles produces a seamless, tubular, stockinette garment. It preceded knitting with a circular needle and means working in knit on one side of the work only. One line of stitches around is called a “round” or “rnd,” rather than a “row.” All knitted patterns in this book are knitted on four or five needles, circularly.
If knitting with four needles seems daunting, realize that you are only knitting on two needles, as usual, while the others are holding stitches until you get to them.
To knit on four needles, distribute cast-on stitches on three double-pointed needles, then form them into a triangle, with the two ends meeting. Check to make sure the cast-ons are all right side down, with no twists. With the fourth needle, knit into the first st cast on. Continue to knit across the needle. When you reach the end, the original first needle will be empty. Use it to knit the first stitch (and all the others) of the second needle. Continue this around. And around and around.
At the end of the first round, check again that you have no twists. This is your last chance to get rid of them, and if you don’t, you will be knitting a mobius strip—fun for some shawls and hats, but death for mittens and gloves.
If you suddenly find yourself with two empty needles and great difficulty knitting the stitches on the remaining two, you forgot to use the fourth needle. No crisis. Slip half the stitches from the overly full needle onto one of your empties and continue with the fourth needle.
Knitting with four needles—or five: Most Americans who knit circularly, but don’t use circular needles, are knitting on four needles, that is, the stitches are distributed on three needles and the fourth is used to knit. Most Europeans, on the other hand, use five needles, arranging the stitches on four and knitting with the fifth. The advantages of knitting with five needles include ease in finding halfway and quarter points on the round. The work can easily be laid flat to check against a measurement, can more easily be tried on (more corners = greater flexibility), and can be neatly rolled around the needles to lay in a purse or knitting bag.
In old photographs, elderly Northern European knitters throw their yarn with their right index fingers and knit with four needles. Nineteenth-century farm stockings in Copenhagen’s National Museet have toe decreases coming together in three lines, typical of knitters decreasing at the ends of three needles (with the fourth in action), so a four-needle set was apparently once the standard.
Hundreds of years of tradition and habit stand behind the four-needle tradition, whose only real advantage in North America may be that you only have to buy one set of four needles—the usual number packed in an American set. Most of the directions in this book are set up for four, not five, needles.
Knitting with two colors, also called “stranding,” “double-knitting,” or “Fair Isle knitting,” means knitting with two, or occasionally three, strands of yarn, alternating colors to form a pattern on the knit side. Both (or all three) strands continue around the work, with the floats of the yarn not in use lying behind the work. Stranding can be done using any of various ways of holding the knitting, but care is required to produce a smooth result with a minimum of tangles.
To have the pattern show up clearly and prevent the yarns twisting together, you must always pick up one color from under (and in front of) the other, the second color from over (and behind) the first—behind and in front referring to the direction of knitting. This is called “carrying (the first color) ahead.” “Carry the dark color ahead,” a traditional knitter will tell you. That’s what they mean.
This causes one color to be emphasized over the other consistently, so the pattern stands out boldly and evenly. You may have seen color knitting where the pattern seems indistinct and mushy. This is caused by not carrying one color ahead, possibly by always picking up both colors from the same place, as in an old instruction passed from Norwegian pattern to Norwegian pattern, “Always pick up the new color from beneath.” This means, “Always pick up the contrast color beneath the main color,” but I (and others) have read this, “Every time you change colors, pick up the color you are changing to from underneath,” which is wrong. Write “Always pick up the new color from beneath the old,” in a little circle and draw a red line through it. NO.
To carry one color ahead, designate one color the “main color” (MC) or background color; the other, the “contrast color” (CC), or pattern color and decide which you want to emphasize. Usually it will be the pattern color (CC), unless the pattern color is white. White emphasizes itself, and the only time to emphasize white is in a pattern of fine one-stitch lines or separated dots. If the colors of roughly equal intensity are about equally used, it doesn’t matter which is carried ahead, but choose one.
The rule is, the color to be emphasized should come from under or to the left of the other color.
If you knit throwing the yarn with your right hand, bring the emphasized color under the background color, the background color over, from behind, the emphasized color. One way to do this is to control the tension with your fourth or little finger, and pick colors as you need them with your right index finger, one from beneath, the other from above. Another is to lay the emphasized color over your middle finger, the background over your index finger. This is tough to figure out at first, but with practice it flows naturally.
If you pick the yarn from your left index finger, place the emphasized color to the left of the background color on your left index finger. (Never, ever, go under the emphasized color to get the background color, or vice versa.)
If you are comfortable with both right- and left-hand knitting, put the emphasized color over your left index and knit the background color with your right hand. This is called two-handed knitting, or stranding, and is probably the least stressful way of knitting with two colors, if you can manage it.
Make 1: An increase invented by Elizabeth Zimmermann: Make a thumb cast-on (a twisted yarn over) between stitches. This is almost invisible if twisted counterclockwise going into the thumb gore and clockwise as you leave the thumb. (The reverse is okay too, but be consistent.)
Increase

Marker: In some patterns it’s difficult to keep track of the beginning of the rnd or the point at which to increase or decrease. Place a marker before or after this point. Plastic markers are available at yarn stores or tie a little loop in a four- to six-inch bit of contrasting yarn. Place this over the needle to mark the spot and slip it with each rnd. Be careful not to knit it in! Or, thread a bit of yarn, or thread, through the knitting at the point you wish to mark, moving it up in the knitting as you need to. This eliminates the need to slip the marker in every round.
Nøstepinde: Nöstuh-pinna. A Scandinavian yarn-winding stick, often beautifully turned or carved or both, often of fine woods, and sometimes made as a gift for a sweetheart. It serves as a core for handwinding yarn efficiently and neatly and is essential in twined knitting for winding small balls of yarn with both ends readily accessible. See Winding a centerpull ball, and twined knitting.
Pick up the thumb: If you have cast on with a twisted cast on, pick up on one needle the stitches cast on for the continuation of the palm through the little diagonal, or through one-half of each stitch if you’ve not used a twisted cast on. Divide the remaining stitches, stored on a string between two needles.
One or more stitches are usually picked up in each of the two corners (the location of the corners will be obvious) by catching the side of a stitch at the edge of the thumb hole. As you pick these up to knit them in the first round, give each a half-twist, which makes them settle peacefully into their corners instead of spreading to make an ugly little hole.
Some knitters prefer to pick up two to three stitches at one or both corners to ease the thumb joint and match color patterns on the thumb to those on the palm. To create more ease at this joint, pick up two or three stitches, duplicating the color a single st would have had, then decrease in the next two rounds at these points.
Knitting the first round, match the new stitches to the pattern on the thumb gore side. Although it’s nice when the palm stitches join perfectly with the thumb pattern, the inside of the thumb is a good place to hide pattern mismatches or a reverse in pattern.
Round. Rnd: Once around a set of double-pointed needles, or a circular needle. See Knitting with Four Needles.
I use “beginning of round” or “end of round” often, but how do you find the beginning and end of circular knitting? In a small garment such as a glove or mitten, grab the tail from the cast-on, which you haven’t woven in yet, and follow the stitches up to the needles. Usually, the beginning of the round falls at the start of the first needle and the end of the round (the same place) at the end of the third (or fourth) needle.
In most two-color knitting, the joint of the pattern falls at the beginning/end of the round, but this joint is invisible in lengthwise stripes. If you still have trouble keeping track of the beginning of the round (you shouldn’t), run a bit of contrasting yarn up the knitting between between the first and last stitches of the round.
S-Ply: See Z-ply.
Shrinking: See Fulling, Felting
Scrap yarn: To be sure you have enough of each color for that stripe on both mittens, make each scrap into two equal balls, one per mitten. If you come to a break in the scrap, spit-splice it together.
Spit splice: To join the ends of two pieces of wool yarn of the same color without knots, the spit splice is the ancient solution of choice.
1. Leave a six-inch tail. Fray the ends of both the new and the old piece about 1 inch into the yarn. It should look like a troll doll’s hair, frizzy.
2. Hold the new and old yarns end to end, then overlap the frizzy parts.

3. (I learned this splice from Torbjørg Gauslaa of Lillehammer, Norway, who said, “Now we come to what all our grandmothers did that we can’t bring ourselves to do any more:”) Holding them overlapped, lick them juicily all over. Saliva is an age-old glue in the fiber world. Water won’t work. If licking wool doesn’t appeal to you, spit into your palm instead. Licking is neater.
4. Spit into one palm, then roll the joint together energetically between your palms, generating heat and friction, for about ten seconds, felting the fibers. Lick more, or spit in your hand, and rub more until you have a continuous splice as fine as the yarn itself, with nothing sticking out. Check the splice for firmness by tugging it gently lengthwise. It shouldn’t fall apart. If it does, break your first effort off and start with fresh fibers.
5. When twined-knitting, you will have to do this twice on each ball of yarn—once for each end—and the balls are small. Be sure to break the old strand with different length tails so that your splices don’t fall at the same place in your knitting.
This can be used for any same-color join, but is a must in twined knitting, and the Polish Twined Basket Mittens.
SSK: slip, slip, knit. See Decreases.
Stranding: See Knitting with two colors.
Stripes, horizontal: For narrow horizontal stripes, one to four rounds, carry the color not in use up without breaking it. For wider horizontal stripes, or if there are many colors, you may wish to join each new color as it occurs, or carry up only the main color.
Tension/gauge: Tension and gauge are two different terms for the same thing—the number of stitches per horizontal inch and the number of rows/rounds per vertical inch. Different weights of yarn have different ideal tensions—the number of stitches per inch at which the yarn knits with ease into fabric—but many yarns can be knitted at looser or tighter tensions than their ideal. Most of the mittens in this book are knitted at a tighter than usual gauge for the given yarn, creating a dense fabric.
Tension controls the size of the final garment. For example, a Man’s large mitten is 4.5 inches wide (9 inches around). To get this size, multiply 9 times the number of stitches per inch, usually (for mittens) between 6 and 8 stitches per inch. Knitting at the given tension will produce exactly the given product. Should you knit 4 stitches per inch when the instructions call for 6, your 4.5-inch-wide man’s large mitten will suddenly become 7 inches wide, large enough to use for a Christmas stocking and useless for warmth. This will disappoint both you and the recipient, and you won’t feel good about your knitting.
Most knitting directions suggest knitting a tension swatch—a patch about 4 x 4 inches with the yarn, needles, and pattern you plan to use—to see if the number of stitches you knit with this yarn and needles corresponds to the directions.
I don’t ask you to make a tension swatch—mittens are often about the size of a swatch, but you should check your tension after the first inch or so of stockinette to see if your tension matches the pattern. Measure it in several places, and rip back if you are off as much as a half-stitch per inch. Should you toss up your hands and say,“Oh, well, it’ll fit someone,” chances are it won’t fit the person you intended it for.
If you want to make a tension swatch, cast on as many stitches as needed for four inches in the pattern on the suggested needles. Knit around on four needles, just as if you were making a mitten, and use the exact yarn, color, and pattern called for. Knit up about four inches, then bind off. Give the swatch a quick bath and a gentle scrub in lukewarm water, roll it in a terry washcloth or towel to remove most of the water. Cut it straight up one side between sts, and open it flat. (It will not fly to pieces, fear not.) Measure two inches, count the stitches, and divide by two. If the number of stitches/inch (your tension) is the same as the directions call for, you’re in free. If you have more stitches per inch, your tension is too tight, and you will need to use a larger needle size. If you have too few stitches per inch, your knitting is too loose, and you will need a smaller needle size. My tension moves up half a stitch per inch with every American needle size, which gives you a starting point for adjusting your own needle size.
If you are knitting in pattern on teeny-tiny needles and still getting too few stitches per inch or largish needles and still getting too many stitches per inch, consider changing your knitting style, tightening or loosening it by changing how tightly you hold the yarn, or consult a knitting friend for help. Don’t change your style in the middle of a piece!
Some patterns also have a vertical gauge, x rounds per (vertical) inch. Knitting exactly to this gauge is not as important as the widthwise gauge, but if yours is wildly off the suggested number of rounds per inch, you can fudge by doing some quick math: Pattern suggests 7 rnds = 1 inch. I knit 6 rnds per inch. Thumb gore is three 6-rnd pattern bands tall. Multiply 3 x 6 rnds = 18 rnds. Divide by 7 = 2 with 4 left over. 4 is a little more than half of 7, so the thumb gore is slightly over 2.5 inches. Multiply the 2.5 inches by your 6 rnds/inch = 2.5 6-rnd bands of pattern to get exactly the same size as the mitten in the pattern. Most patterns in this book, however, are expressed vertically in inches, so you won’t have to go through these mathematical gymnastics.
Thumb gusset/thumb gore: These two words mean the same thing, a widening of the mitten starting at the base of the thumb and continuing to the point where the thumb separates from the rest of the hand.
The mitten thumb before it leaves the hand needs about 20–33 percent more stitches than the rest of the hand. Whether the mitten starts with this many more stitches, or they are added in a single increase round at the top of the cuff, or they are added one stitch each round, two stitches every second round, or six stitches every sixth round, they must be present before the thumb separates from the hand or the mitten will be too narrow and will finally pull apart right at that separation point.

A. The simplest mitten has no thumb gore. A straight tube with a thumb emerging about half-way up. The thumb sometimes looks like a finger sewed onto the mitten. The width for the base of the thumb is present in the width of the tube, and what this mitten lacks is not really a thumb gore but narrowings for the wrist and the fingers because, to fit a human hand and allow room for the thumb to move, the simple mitten has to be as wide as the widest part of the hand.

B. The side-wedge thumb gore, created by increasing between two marking stitches on one side of the mitten, is probably the most common in North America. Using two side stitches as markers, increase twice within them every second or third round until there are enough stitches for the thumb and the thumb gore is one-third as long as the hand. Thumb stitches are then separated from the rest and either knitted into a thumb right then or held on a holder to be knitted later. One or two stitches may be added after taking off the thumb gore stitches, and sometimes two more when picking up the thumb, but not necessarily.
C. The Norwegian thumb gore is also common, probably because it comes charted right into the popular Norwegian two-colored Selbu mittens with eight-pointed stars, flowers, and the like on the back. The standard Selbu thumb gore starts just above the cuff, one or two stitches from the edge of the hand with an increase every third round inside both edges of a wedge. It makes a definite right and left mitten: Wails from those who painstakingly knit two lefts or two rights and are faced with ripping and reknitting or making two more. Norwegian thumb gores (and thumbs) usually have a charted pattern that fits the theme of the design on the back. You will find Norwegian thumb gores on Newfoundland Mittens, Lithuanian Ribby Mittens, and others.
D. Knitters of traditional Maine mittens will recognize the Fox-and-Geese thumb gore. Mittens in the Maine or Gotland (Sweden) tradition have bands of small geometric pattern that wrap around the hand, meeting perfectly on the other side. Maintaining the pattern while increasing is tricky business even for the tiniest patterns, requiring that each increase have the same number of stitches as one unit (repeat) of the pattern—ergo, a four-stitch repeat requires a four-stitch increase all at once, a six-stitch repeat requires a six-stitch increase, and so forth. Two-stitch repeats require that every increase be two stitches, but unless this is placed in the center of the thumb gore or unless the thumb gore is to be lopsided (and it can be), there will have to be a corresponding two-stitch increase on the other side of the thumb gore. Because of this characteristic of these banded patterns, the patterns are passed from knitter to knitter over generations complete with their unusual increase and decrease patterns.
The benefit of increasing six stitches (or four or five stitches) in one round is that you needn’t increase again until you have knitted as many rounds as stitches in the increase. That is, with six-stitch repeat, there are only two increase rounds in an average adult mitten. Nice.
The other benefit of this type of thumb increase is that the thumb gore spreads suddenly but smoothly from the hand, much as the thumb itself projects from the hand. This is the thumb gore I find fits my hand the very best.
E. The one-sided thumb gore is one I learned with twined knitting, and is fun, easy, and a little surprising to look at. It makes a definite right and left hand. One stitch from the beginning (right mitten) or end (left mitten) of the round, make 1 (See Increases) or k 2 strands into the same stitch if working with two strands. Doing this in every round is equivalent to increasing twice every other round, and winds up with the same number of increases, but only on one side. Which side (toward the palm? toward the edge of the mitten?) is a matter of dispute among those who care, with those for the palm side saying there is
better thumb mobility there, those for the edge increase saying the same.
I find that the palm wears out quicker at the point where the thumb joins when the increase is by the edge, but that also looks better. The one-sided thumb gore can be applied to almost any mitten or wrister.
F. The Eastern thumb base is the last type of thumb gore you will find in this book. You will see it on mittens from Nepal to Turkey, and anywhere in between. Some mittens and gloves from this area are knitted from the tip downward to the cuff, but no matter whether the thumb gore is increased or decreased, it looks roughly the same: The knitter starts as far into the round as half the number of stitches for the thumb. The increases grow toward the hand rather than toward the thumb, so that the thumb gusset is no longer a wedge at all, but a constant number of stitches that leave the hand in imitation of the thumb muscle on the palm of the hand. This is worked on both front and back and sticks out to the side, so the mitten (or glove) can be used on either hand.
You will find the Eastern thumb base on Gershwin Finger Mitts, and Boston Street Vendor’s Afghan Gloves.
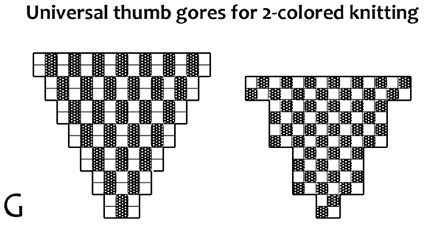
G.The universal two-colored thumb gore is presented here to give you a thumb and thumb gore when the size you’re making doesn’t work with the color pattern you’re making. This might happen with any of the small geometric patterns like Candlelit Windows or Crow’s Feet. The easiest solution is an all over k 1 MC, k 1 CC, with two inches each side every fourth round. This can turn out in any of the ways charted, but you can choose.
Twined knitting (TK) is knitting from both ends of a single ball of yarn, alternating ends, with a half twist between stitches to create the appearance of twine lying between the rounds on the purl side. The half twist is accomplished by always knitting with the strand not used in the preceding stitch and always picking the strand up in the same way, either from beneath the old strand (counterclockwise) or carrying the new strand over the old strand (clockwise) (this in direct contradiction to directions for knitting with two colors).
Twined knitting can only be done by throwing the yarn, whether left or right handed, which may account for its disappearance in much of Northern Europe. Two-handed knitting cannot possibly work, and knitters who pick the yarn from their left hand find twined knitting difficult if not impossible.


Most commercial yarn is plied clockwise (S), so that twined knitting clockwise tightens the spin of the yarn, eventually overspinning it until it kinks up like a damaged telephone cord. On the other hand, twined knitting an S-plied yarn counterclockwise slowly unspins the yarn, which may suddenly fall apart in the middle of a stitch. Generally, overspinning is considered the better alternative.
To lessen both effects, twined knitters use small yarn balls, one ounce or less, and let the ends twist or untwist before spit splicing on a new ball.
As the two strands are given a half twist with each stitch, the other end of the yarn, toward the ball, is given a half twist in the opposite direction. Eventually the two yarns get seriously twisted up.
Solution: Start by knitting with the yarn about four feet away, on the floor. When the yarn still gets twisted up, unspin it. Stick an empty needle into the ball, twist both strands near the ball around the needle and reinsert the needle, locking both strands in place. Lift the ball by these two strands, close to the knitting, and let the ball dangle and unwind. If you use small center-pull balls as suggested, give the ball a pinch and it will often support itself without the knitting needle treatment, while untwisting.
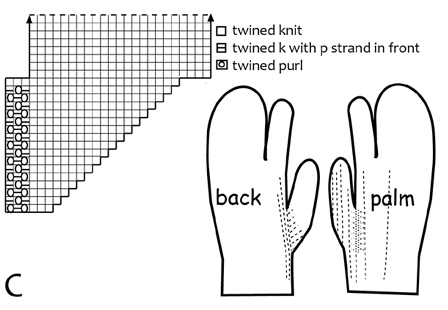
Twined purl: The purl version of twined knitting. Both strands are brought forward and purled, one after the other, always bringing the new strand either over or under the one before, both strands getting exactly the same treatment. The float of the yarn not used in each stitch is carried on the front of the work and creates the appearance of a piece of twine laid under the tops of the purl stitches.
Twined purl “braided” edging. This is not braided at all, but looks a little like applied loop braiding. The braid comprises three rounds. First round, set up the colors: twined knit 1 MC, 1 CC around. Second round: twined purl, 1 MC, 1 CC, purling MC into the previous round’s MC, CC into CC. The twining will appear like a two-colored cord, lying on the front of the work. Third round: twined purl, again matching MC with MC, CC with CC, but reverse the direction of the twining: if you twined clockwise before, twine counterclockwise now, or the reverse if you were twining counterclockwise before. You should see small sideways V’s of color emerging. The top of the first round purl sts will form the point of each V.

The zigzag stripes of Stripes and Zigzags wristers are an extension of this pattern created by maintaining the same twining for several rounds, then switching. (For the wrister, you knit rather than purl the entire project, however.)
Weave in means to attach the non-working yarn to the back of the work, either to join a new strand or to prevent an easily snaggable long carry (or float) between stitches in the non-working yarn. Canadian, American, and English knitters seem to weave in more than others, sometimes making it a rule to weave in if the carry is more than two stitches. My rule is generally to weave in if the carry is longer than four stitches, and then to weave in at the middle, at either the third or the fourth stitch, or every fourth for exceptionally long carries—which one should avoid like death and taxes.
Weave in by lifting the non-working color over both needles, knitting one stitch with the working yarn under the non-working yarn, then lowering the non-working color and knitting the working strand above it.
The appearance on the purl side of a correctly done weave-in is a little, wide V of the working color holding down the non-working color.
See also, Joining a new color.
Prevent the second strand from showing by checking the knit side after each weave-in (or each round) and giving the woven-in end a little tug to keep it flat against the back of your work. You can also do this when you’re finished with the garment, but you could then wind up with the loop you were trying to prevent.
Winding a center-pull ball: Winding a ball of yarn that can be pulled from the center is essential for twined knitting, which uses both ends of the ball simultaneously, but center-pull balls are useful for many fiber crafts. A center-pull ball doesn’t roll around the floor (knitting bag, table, etc.) when you’re knitting and doesn’t come unwound or get tangled in your knitting bag when your back is turned. It may not occur to cats to hunt a center-pull ball.
If the two colors you’re working with in a pair of mittens are wound into one ball with the dark color out, the light color stays clean, and you can easily unspin twists between your work and the ball, following the directions below.
To wind a center-pull ball, use a nøstepinde (nusta-pinna), sometimes called a “yarn dibble” since it looks like a gardening dibble, a nicely turned, polished hardwood winding stick about 3/4 inch in diameter and 8 to 10 inches long. This functions as a fat thumb that, unlike your own thumb, can be rotated indefinitely. The nøstepinde preserves a wide hole down the center that lets the yarn relax and feed graciously from the center. If you like balls that hang like bobbins, wind small (1 oz.) nøstepinde balls and give them a pinch to collapse the center hole around the yarn. You will then be able to lift them by the center strand.
Lacking a sweetheart willing to whittle or turn you a nøstepinde, you can use a short end-length of broomstick, a sanded and waxed 3/4-inch by 8-inch dowel, a round wooden spoon handle, a bunch of thick knitting needles, or even a Sharpie pen.

1. Get someone to hold the skein, or lay it across your knees or around the back of a chair.
2. Secure one end of the yarn to the handle end of the nøstepinde with a clove hitch (two thumb cast-ons). Holding the stick in your second hand, wind a little pad crosswise near the tip of the smooth end of the stick. When there are a score or so of turns, begin winding diagonally across these turns.
3. Rotate the stick away from you slightly (one cog in a geared wheel) with each turn of the yarn so that each lay of yarn lies neatly beside the one before. The ball will develop the regularity of a machine-wound ball of string. The ball should have a shoulder that grows away from the stick so that, once started, you don’t wind up to the stick with each turn. As you wind, think “round” or even “squarish” rather than “egg.” The finished ball should be able to sit on its buttocks. Holding the left index finger on the ball near the end of the stick and the left thumb near the bottom of the ball, help guide the yarn diagonally onto the ball.
4. When about a yard remains, take a couple of turns around the ball’s tummy, and tuck the end under these turns, ready to use, unlikely to tangle. Remove the ball from the nøstepinde and slip the clove hitch off. Tuck all but a short end into the hole in the center of the ball. You now have a ball with both ends readily accessible.
Z-Ply: The Z and the S refer to the lay of the twist in plied yarn, which looks like the center line of either an S or a Z. Commercial yarn is usually Z-spun (counterclockwise) and S-plied (clockwise). In the days of hand-spinning, yarn for knitting was often S-spun and Z-plied. Various people still S-spin yarn: Navaho spinners S-spin singles for weaving, considering that yarn should be spun in the direction of the sun (clockwise). One Swedish mill still produces Z-plied yarn for twined knitting, and Klaksvik Spinderi in the Faroe Islands produces S-spun, Z-plied yarn, which in the Faroes is considered to be the only authentic Faroese knitting yarn.
S-spun wools are thought to lie more comfortably in the spin and to have more sheen, because sheep’s wool is said to have a naturally clockwise crimp. Modern spinning machinery is set to spin counter-clockwise (Z) and ply clockwise (S), which is thought to work better for weaving.
If you look at commercial singles like Bartlettyarns Bulky or Lopi singles, you will see the Z-plied look. However, Lopis and other singles are not plied at all. The single is the same as one ply for S-plied yarn.
If you have access to both, I recommend not working them together: You will feel the difference even if it’s not visible in the finished product.