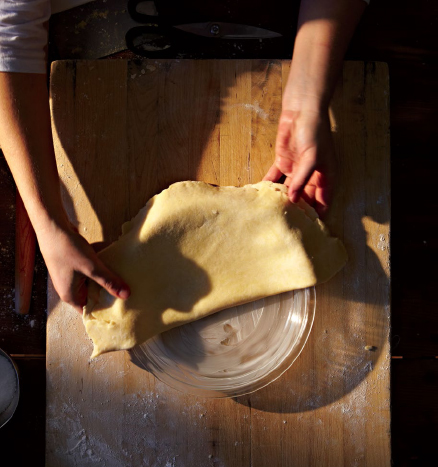
Fitting Dough for a Pie Pan
Fold the dough disc in half and lay it across one side of a well-buttered pie pan, positioning the seam in the center. Unfold the disc and gently slide and fit the dough down into the pan; do not pull or stretch the dough. Make sure there are no gaps between the dough and the pan; if there are air bubbles, burst them with a fork.

Trim the dough overhang to allow 1 to 1½ inches of excess, measuring from the inner rim of the pan. Cover the crust with plastic and refrigerate for at least 30 minutes, preferably 1 hour or more, and tightly wrapped, up to 3 days before using. The rolled out, fitted, tightly wrapped crust can also be frozen for up to a month.
Fitting Dough for a Tart or Springform Pan
Place the pan in the middle of the dough disc, and using a pastry wheel, trim the dough into a circle at least 1½ inches larger around than the pan bottom if using a springform pan, or 2 inches larger around than the pan bottom if using a tart pan.
Butter the pan thoroughly. Separate the pan base from the pan ring (if using a springform pan, leave the latch open). Fold the dough disc in half and lay it across one side of the pan base. Unfold the disc so that it is centered over the base. Pick up the pan ring, bring your hand through its bottom, and hang it on your forearm. Using the same hand, pick up the dough-lined pan base and position it on your fingertips. Guide the pan ring up with the opposite hand while lowering the base and crust to fit inside. Place the pan on a flat surface (if using a springform, close the latch). Gently finish sliding and pushing the dough down the pan sides until it is settled into the corners (where the side meets the bottom) of the pan; do not pull or stretch the dough. Make sure there are no gaps between the dough and the pan.
If using a springform pan, the dough may come only partway up the side of the pan, depending on the height of the pan. The shell should have only about 1½-inch-high sides when finished.
For a tart pan, fold the excess dough overhang to the inside of the shell to reinforce just the sides, and press to seal. Trim off the crust that remains extended beyond the top of the pan by pressing down and out with your thumb and using the pan edge to pinch it off.
If the dough is to be prebaked, prick the sides and bottom about 15 times with a fork. This allows the crust to “breathe” a little by letting steam escape from within while it is baking, which prevents shrinking. Cover the crust with plastic and refrigerate for at least 30 minutes, preferably 1 hour or more, and tightly wrapped, up to 3 days before using. The rolled out, fitted, tightly wrapped crust can also be frozen for up to a month.
Cutting and Weaving Lattice
Throughout this book you will see different examples of lattice widths and weaving, including braiding. Lattice can be cut into any width you desire. Be creative with shapes and sizes. There are just a couple of things to remember: it’s much easier to work with the dough when it is well chilled, and a pizza cutter is the easiest tool to use for cutting lattice strips. The following directions are for a pie with a total of 8 strips of lattice.
A: On a floured surface, roll the prepared dough into a circle approximately 12 inches in diameter and about ⅛-inch thick, following the directions provided under “Rolling Out the Dough” here.
B: Using a pizza cutter, trim one inch of dough from either side of the disc to square off the circle; discard the trimmings.
C: Cut the remaining shape into 8 strips of equal width. This is your lattice. Transfer the lattice to a parchment-lined (or flour-dusted) baking sheet and chill for a minimum of 30 minutes.
To weave the lattice:
D: Lay strip number 1 of the lattice vertically across the top of the filled pie, just slightly to the left of the center. Lay strip number 2 over strip number 1 at a 90 degree angle, just below the center of the pie. Lay strip 3 over strip 2 to the right of and parallel to strip 1. E: Lay strip 4 over strip 2 to the left of and parallel to strip 1. F: Fold back the right end of strip 2, and lay strip 5 to the right of and parallel to strip 3. G: Unfold strip 2 so it’s on top of strip 5, completing your vertical lattice placement.
H: Fold back the top ends of strips 1 and 5, and lay strip 6 above and parallel to strip 2. I: Return the top ends of strips 1 and 5 to their original positions. Fold back the bottoms of strips 1 and 5, and lay strip 7 below and parallel to strip 2. J: Return the bottom ends of strips 1 and 5 to their original positions. Fold back the top ends of strips 3 and 4, and lay strip 8 above and parallel to strip 6.
K: Return strips 3 and 4 to their original positions. Your pie is now ready to be crimped. For instructions on crimping, see “Assembling and Crimping Fruit Pies” here.