The Basics
Transfer the Pattern
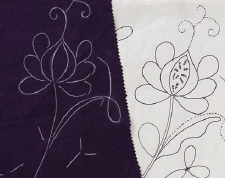
I recommend using a black permanent marker to trace the whole design onto a large piece of paper. Then tape your drawn design to a window or lightbox and cut your background fabric an inch or so larger on all sides. Once you have completed the appliqué, you can trim it to its perfect size. Place your background fabric on top of your traced paper pattern, taking care to align and center your background fabric. With a full-sized pattern to refer to, you do not need to trace every motif exactly; you need only trace one line for the stems and mark the placement of most leaves with a dash. For small flowers, like the three-petal violets in the example, I only mark three lines. Similarly, I mark simple crosses or dots where there are berries. If you do trace a full flower, make sure you trace slightly within the line to avoid having to erase too much after completing the appliqué.

Mark your fabric with as few lines as possible.
I have tried many of the erasable pencils for transferring patterns, and my favorite remains the mechanical chalk pencil marker. It erases best with a soft-bristled toothbrush. The results are better than an eraser, and the advantage of the soft brush is that the bristles can get right up against the appliqué without damaging your sewing.
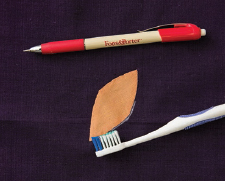
Chalk markers erase easily with a toothbrush.
Appliqué
I use only three different techniques for my appliqué: appliqué of stems without preparing the bias, ovals and circles gathered around templates, and freezer paper templates for the remainder.
STEMS
Although my projects appear to have great lengths of meandering, multicurved stems, almost all the lengths used are short, and most only curve in one arc. When you start a project, note which stems lie under the others. I appliqué all the stems in a piece first. However dull this might be, it makes sense to get the stems out of the way.
1. Cut the stems ⅜˝ wide on the bias of the fabric, at a 45° angle to the edges.
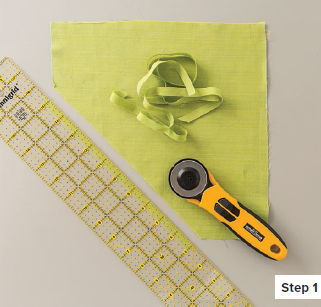
Cut stems ⅜˝ wide.
2. Place the edge of the bias stem against the drawn line on the background, right sides together. Make sure that the top of the bias stem is placed against the inner curve of the arc. Make small, neat running stitches along the entire top length of the bias stem, ⅛˝ from the traced line.
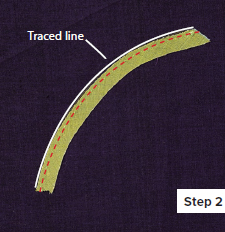
Sew a running stitch along the top of the bias stem, ⅛˝ from the traced line.
3. Go back to the beginning of the stem and fold. As you sew, finger-press the raw edge to the stitching. Then fold it over again so that the folded edge aligns with the pencil line. Blindstitch the folded edge in place, matching the traced line and covering the raw edge.
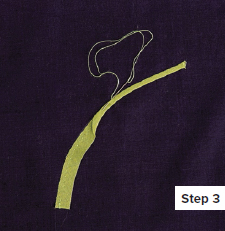
Fold the strip and blindstitch in place.
Stitching Stems with Multiple Curves
The method described above works best for stems that curve in one arc at a time. If you have a stem that arcs in two or more curves, you must create each arc individually. Stitch one curve completely before starting the next. Make sure you have enough bias for the entire stem length.
Stitch curve A with a tiny running stitch as before.
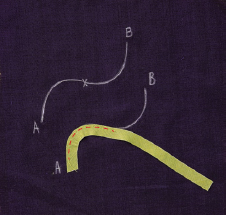
Stitch curve A.
Fold and stitch curve A with a blind stitch as before.
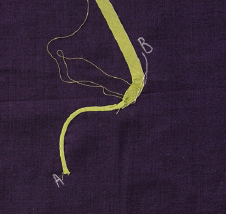
Finish curve A.
Rotate the piece 180° and stitch curve B. Where the curves meet, turn the edges under with your needle and blindstitch both edges in place.
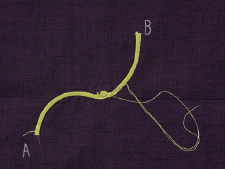
Finish stitching the curves.
SHAPES GATHERED AROUND TEMPLATES
All circle and oval appliqués are gathered around templates made of card stock or heatproof plastic (such as Mylar). Always trying to devise methods that don’t involve special equipment, I have come up with a foolproof method to transfer traced circles and ovals onto simple card stock.
1. Trace the circles from the pattern onto freezer paper. With a hot dry iron, fuse the shiny side of the freezer paper to the card stock. The card stock is now rigid enough for you to reuse each template several times. If you want a more rigid piece of card stock, iron some freezer paper on the reverse side, too.
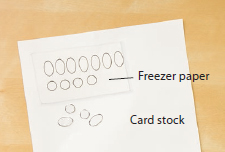
Freezer paper fused with card stock makes fantastic templates.
2. Cut the templates and use them as a guide to cut the fabric, adding a ¼˝ seam allowance. If you are cutting several similar berries, fold your fabric to cut a stack of several all at once.
3. Knot your thread and make a small, neat running stitch about ⅛˝ from the raw edge of the circle or oval.
4. Place the template inside the sewn circle and pull the thread until the fabric is tightly gathered around the template.
5. Press the front and back of the fabric-covered template with a hot iron.
6. Loosen the gathers just enough to slip out the template. Tighten the thread and press once more. Your piece is ready to appliqué.
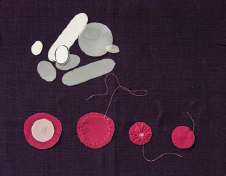
Simple steps for perfect circles and ovals
TIPS
To trace circles and ovals easily, pay a visit to your local arts and crafts store to buy circle and oval templates. All my circles and ovals are standard template sizes and easily matched. It’s easier to draw perfect circles from a template than to trace them freehand.
I like to use a big seam allowance for gathering fabric around the templates. The resulting berries and fruits appear stuffed, which adds texture to the piece.
I find it best to set aside some time at the ironing board to make all my gathered shapes in one sitting. I then store them in small plastic bags until I’m ready to use them.

ALL OTHER SHAPES
I use freezer paper to cut all my other pieces to size. I do not use freezer paper in the appliqué process itself. Instead, I use it to make sure that my pieces are correctly sized and with the inner curves snipped, if necessary, for ease of appliqué. Carefully look at the whole flower first to see the best order of appliqué, and then label your templates accordingly.
1. Place the freezer paper shiny side down on the pattern and trace the templates with a fine permanent marker. Label the templates as necessary. Cut out these freezer paper templates on the drawn line.
2. Place your freezer paper templates shiny side down on the right side of the fabric, with the curves on the bias. Iron them on using a hot, dry iron.
TIP
Always place your templates on the bias of the fabric. Your curves will be curvier, and your points will be pointier. This is one of the most important nuggets of information I can give you. It will make your appliqué easier to sew and give you optimum results.
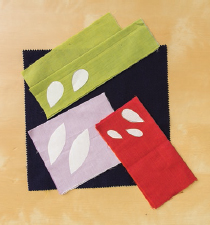
Always place templates on the fabric’s bias.
3. Cut out your pieces with a scant ¼˝ seam allowance all around. Where there are inner curves, such as in wavy-bottomed leaves, snip the fabric up to the freezer paper along each inner curve.
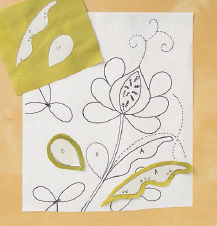
Snip inner curves up to the freezer paper.
4. Peel the freezer paper off the piece to be appliquéd. It is much easier to manipulate the fabric when appliquéing without the encumbrance of freezer paper on top, underneath, or in basted edges. Position your motif, matching the reference lines on your background fabric, and sew in place, turning under the seam allowance as you go using either your fingers or the tip of your needle.
LEAVES
As a right-handed person, I find that I automatically start to appliqué leaves on the left side of the stem, at the point where the leaf touches the stem, and work outward. After removing the freezer paper, I appliqué this round-bottomed leaf on the left side of the stem, from the point where the leaf meets the stem and moving outward.
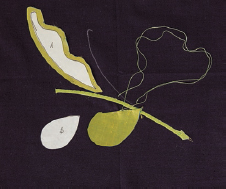
Start on the left side of the stem and work outward.
This round-bottomed leaf shape, which is also used in many of the petals, is the easiest to appliqué. If you cut the fabric on the bias, you should find that the seam allowance turns under easily to give it a smooth curve.
WAVY-BOTTOMED LEAVES
1. With a larger piece such as this, and with those inner curves to turn under, baste the leaf in place first with 2 or 3 stitches down the center. It’s important to baste only in the center, so you don’t hamper turning under the seam allowance.
2. I always start to appliqué this leaf in the center of the top edge, turning under the seam allowance as I go. If the leaf is on the right side of the stem, I work toward the base of the leaf. If it is on the left side of the stem, I work away from the stem.
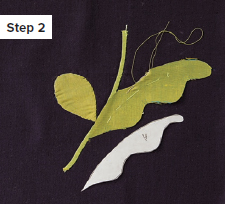
Start at the leaf’s top center.
3. Appliqué toward the stem. When you reach the stem, simply turn under the seam, creasing it into a point (see Perfectly Pointed Leaf Tips). Stitch in place. Pivot the piece to sew the next edge.
4. As you reach the top of the first “hill,” generously push under the fabric to make an inner curve. I always exaggerate the turn under, and then pull the fabric back out using my needle until I have the curve I want. Inner curves will turn in easily if you have snipped the inner curves sufficiently.
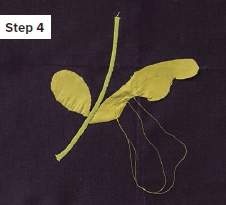
Stitch the first curve.
5. Repeat Step 4 for the second curve near the leaf tip. Make the leaf tip as elegant as possible, and then continue appliquéing until you reach your starting point.
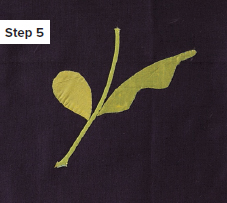
Stitch the second curve.
TRADITIONALLY SHAPED LEAVES
1. When positioning the leaf, make sure that you have sufficient fabric to turn in along the stem. I automatically place it so the raw edge of the leaf very slightly overlaps the stem.
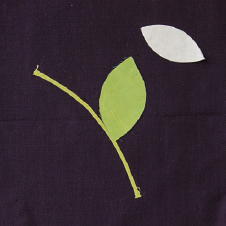
Position the leaf so its raw edge overlaps the stem.
2. For leaves on the right of the stem, start appliquéing at the midpoint of the upper leaf. Then sew down to the stem, turning under the seam allowance against the stem. Tuck under the leaf point and stitch it securely in place before working the underside of the leaf.
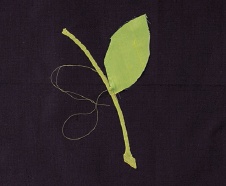
3. Work up to the leaf tip, folding under the seam allowance for the best point you can manage. Stitch the tip in place, and then work back to your starting point. For leaves on the left of the stem, start appliquéing at the stem and work outward.
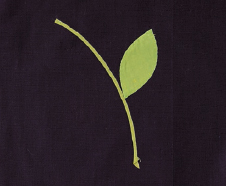
PERFECTLY POINTED LEAF TIPS
Although I do not trim the ends of my leaf points before appliqué, I pride myself on their sharp points. With the seam allowance turned under, the tips have a bit of bulk that appeals to my desire for texture in my designs.
1. Start to appliqué at the midpoint of the top of the leaf. Work toward the first tip. Stop stitching ⅛˝–¼˝ from the tip and make a firm anchoring stitch.
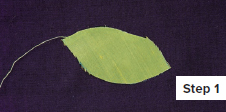
2. Fold under the seam allowance at a 90° angle to the top of the leaf. Crease the seam allowance into place with your finger.
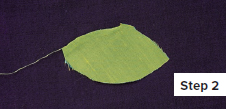
3. Fold the crease from Step 2 in again to make a sharper point. Finger-press the fold to secure it.
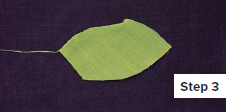
4. Blindstitch the fold into place before it has a chance to move; then continue stitching along the lower edge.

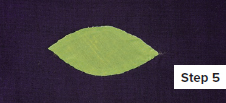
5. Repeat Steps 2–4 at the other end of the leaf for a similarly perfect point.
PREVENTING SHADOWING
With a dark background and the use of sheer silks and cottons, it is inevitable that shadowing will occur if motifs are left unlined, as shown in leaf A (at right). I find the easiest way to prevent shadowing is during the cutting process.
1. Use the freezer paper template to cut the motif with its seam allowance.
2. Use the same template to cut another in the same fabric but without the seam allowance. I simply take the freezer paper off the cut motif and reuse it to cut a second motif without the seam allowance.
3. Position the motif without the allowance in place on the fabric and baste a couple of stitches down the center.
4. Appliqué the motif with the seam allowance on top. The turned-under seam allowance will automatically find its way under the lining for a nice smooth surface.
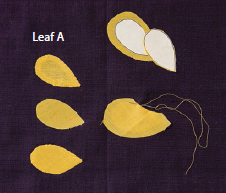
Steps to minimize shadowing on a dark background
TIP
To easily add trapunto-style texture to your work, repeat the process but use a thin layer of batting instead of the fabric lining.
APPLIQUÉ WITH SILK
If you are using silk, you may find that an applied fusible interfacing provides sufficient backing to prevent shadowing. I have thoroughly researched the best way to interface silk and can wholeheartedly recommend that you use a jersey-style fusible interfacing for best results. You want a fusible interfacing that doesn’t hinder the silk’s natural stretch, and the interfacings intended for jersey fabrics do this beautifully. Once interfaced, appliquéing with silk is simple, with minimum fraying to hinder your work.
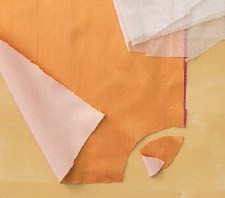
Jersey fusible interfacing keeps silk supple and fray-free.
A PERFECT SILK THREAD FOR YOUR APPLIQUÉ
One day, while I was looking in despair at my fraying heap of silks, it occurred to me that the thread from the raw edges would be perfect for appliquéing motifs of the same color. I found that the crosswise threads, called the weft, often separate with ease. With a gentle pull, they come away as an individual thread. Some silks work better than others. Silk taffetas work best for me, as they have strong, sturdy threads that make fantastic appliqué threads.
Run the thread through wax before you use it—but this is easy too! Take the base off a new tea light candle; you’ll find that the wick comes out with the metal disc, leaving a perfect central hole. Thread your needle with the silk strand and then run it through the hole against the wax for a perfect silk thread.

Embroidery Stitches
Although Euphoria is a mass of embroidery, I use mainly three stitches, and none of them is complicated. I also use a simple straight or seed stitch.
WHIPPED RUNNING STITCH
The whipped running stitch is used for tendrils, stalks, and stamens. I like to use six strands of embroidery floss for tendrils on a larger piece and three strands for more delicate work. I sometimes use two strands of variegated embroidery cotton for a lighter, more delicate effect. With its rickrack appearance, this stitch is amazingly easy and effective.
1. Thread a sharp, pointed embroidery needle with enough thread to work the length of the tendril and back again, plus an extra 6˝ or so. Make a small neat running stitch from point A to point B.
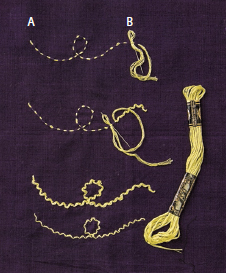
Whipped running stitch: The top tendril uses 6 strands of embroidery floss; the bottom tendril uses 3 strands.
2. At point B, reverse your needle to avoid catching the background with the sharp point and weave back to point A, looping through the stitches. Always loop in the same direction—that is, always from left to right or always from right to left. Note: You are not weaving in and out of the stitches. Keep the thread fairly loose.
3. When you reach point A, take the needle through the fabric and weave through a couple of stitches on the reverse side. Cut the thread.
4. Press carefully with a hot iron.
TIP
If you run out of thread while working back through the stitches, take the thread through to the reverse side and fasten. Thread your needle again, bring the thread through at the same point, and carry on as before.
DETACHED BUTTONHOLE STITCH
This stitch is used for stamen heads both at the end of stalks and alone. It is a general decorative stitch whenever you feel a motif could benefit from further embellishment. I like the result best when I use three strands of embroidery floss. Using all six makes a rather bulky stitch for these delicate projects.
1. Knot your thread. Coming up from the reverse side of the fabric, make a long stitch of about ⅓˝. Take the thread back to your first stitch and repeat. This will give you a stalk of 6 threads to work around.
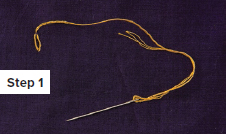
2. Using the eye end of the needle, make a blanket-stitch loop around the 6 threads.
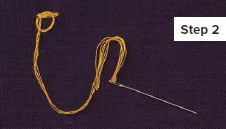
3. Pull the loop tight. Repeat Step 2, pulling each new stitch up tightly against the last.
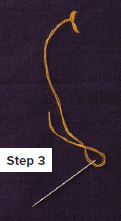
4. Once you have wrapped the whole length, fasten off on the reverse side of the fabric.
The ridge of this stitch has a tendency to curve and develop a life of its own, which is a quality I love, as it adds life to the stamen heads.

SEEDED STAMEN STITCH
I invented this stitch specifically for my poppies, and I have subsequently found that I use it in a number of ways. I like to use a variegated thread for this and have fallen in love with Sulky Blendables 12-weight cotton thread. But you could experiment with a number of alternatives, such as silk thread or embroidery flosses. Remember that it is a delicate stitch; I feel it looks best when you can see many individual strands. With Sulky 12-weight, I like to use a double strand of thread.
1. Start this stitch at the seed head end, not the base. Make a knot in your embroidery thread; then make a long stitch of about ½˝, taking the needle back to your starting point.
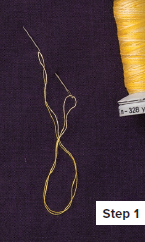
2. Repeat Step 1 to make another stitch.
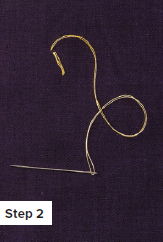
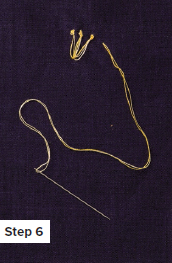
3. Using the eye end of the needle, make a blanket-stitch loop around the 4 threads at the top of the stitch.
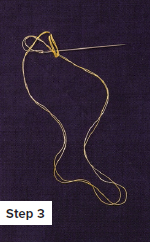
4. Pull the loop tight. Repeat this loop one more time if you want a heavier-looking knot at the end.
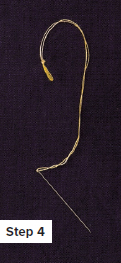
5. Take the needle through to the reverse side of the fabric and bring it to the front again alongside the first seed head, about ⅛˝ away.
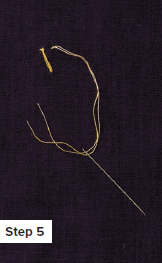
6. Repeat Steps 1–5 until you have worked as many stamens as desired. Fasten off on the reverse side of the fabric.
