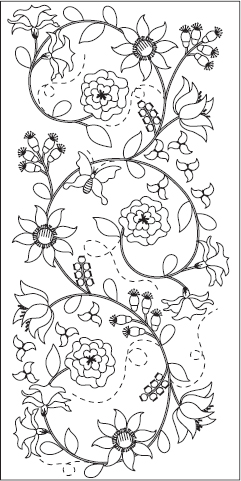

Tudor Rose Panel
Finished block in Euphoria: 36˝ × 18˝
Finished panel: 36½˝ × 20½˝

This was my final panel when stitching Euphoria, and I knew that the dimensions needed to be 36˝ × 18˝ to fit as the last piece in the puzzle. As the largest individual panel, it was the most challenging. I am particularly pleased by how well it works both vertically and horizontally.
I am thinking of adding a sleeve to the panel and inserting some card stock in the same manner as the window boxes. That way, it can stand on a mantelpiece or shelf.
Fabric requirements and instructions are for making the separate panel. To make the Euphoria panel, you will need a background piece of 37˝ × 19˝; trim to 36½˝ × 18½˝ after appliquéing.
 Aster, China
 Morning Glory
 Peony
Peony
 Rose Hip
 Butterfly 3
MATERIALS AND CUTTING
2½ yards of fabric for background, backing, and binding
CUT
2 rectangles 37˝ × 21˝ for background and backing; trim to 36½˝ × 20½˝ after appliquéing and quilting
4 strips 1¼˝ × width of fabric for 120˝ of binding
NOTE
If you prefer to use bias binding, you will need an additional square 20˝ × 20˝ to cut 4 strips across the diagonal.
16˝ × 16˝ square of green fabric for stems
CUT
⅜˝-wide bias strips
¾ yard total of assorted solid fabrics for flowers and leaves, including 3 shades of green, 4 shades of pink through red, and 3 shades of lilac through purple
38˝ × 22˝ piece of batting
Card stock
Freezer paper
Fabric-marking pencil and eraser
Embroidery floss
Construction
Refer to The Basics for general appliqué and embroidery information.
1. Locate the full-size pattern (pullout page P2). Trace the appliqué design onto the background fabric.
2. Use card stock and freezer paper templates to make the appliqué pieces.
3. Appliqué all the stems, and then add the rest of the appliqués and embroidery as directed for the individual flowers in Part 1: The Flowers.
4. Erase all pencil lines for appliqué and press carefully with a hot iron.
Finishing
1. Layer the top with batting and backing; then baste the layers together. Quilt as desired. If you choose to echo quilt, start quilting close to the motifs and then radiate outward in lines about ¼˝ apart.
2. Press the completed panel on the reverse side; trim to 36½˝ × 20½˝.
3. Sew the binding strips together in a long strip. Fold under ¼˝ at one end of the binding strip. Starting at the center of one side, sew the binding all the way around the panel, using a ¼˝ seam allowance. Overlap the ends by ½˝ and trim. Fold over ¼˝ along the raw edge of the binding and blindstitch to the back.
