
Euphoria
Finished quilt: 80½˝ × 86½˝

Of all my quilts, this one has a special place in my heart. I loved the process of making it—it contains so many family memories and those of our lives in Chile. The final result is exactly what I had hoped for. It exudes joy, bounty, color, and movement. I didn’t know what I would call it during its development. But as soon as I saw the panels joined together, the word and sentiment that came immediately to my mind was euphoria—and so, that is what it became. The background fabric was a shot cotton with a nap that required careful directional piecing and a considerable amount of extra fabric. Note that the quantities are given for fabrics without a nap. If you choose to use a directional background, you will need to increase your background quantity accordingly.

MATERIALS AND CUTTING
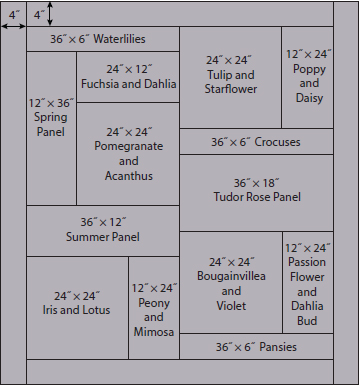
Note: All panels are cut slightly oversized and are trimmed to their correct measurements after appliquéing. Final panel measurements are as follows:
9 yards of fabric for background, borders, and binding
CUT
4 squares 26˝ × 26˝; trim to 24½˝ × 24½˝ after appliquéing
4 rectangles 14˝ × 26˝; trim to 12½˝ × 24½˝ after appliquéing
3 rectangles 8˝ × 38˝; trim to 6½˝ × 36½˝ after appliquéing
2 rectangles 15˝ × 38˝; trim to 12½˝ × 36½˝ after appliquéing
1 rectangle 20˝ × 38˝; trim to 18½˝ × 36½˝ after appliquéing
2 border strips 5˝ × 72½˝
2 border strips 5˝ × 86½˝
9 bias strips 1¼˝ wide, cut on a 45° angle from 40˝ of fabric for 440˝ of single-fold bias binding
NOTE
When you cut across the width of 40˝-wide fabric at a 45° angle, you will get a length of approximately 52˝.
7¼ yards for backing (pieced crosswise)
84˝ × 90˝ piece of batting
2½ yards, cut across the diagonal at ⅜˝ for stems (subcut as needed)
5 yards total of solid fabrics for flowers and leaves
Card stock
Freezer paper
Fabric-marking pencil and eraser
Embroidery floss
Construction
Refer to The Basics for general appliqué and embroidery information.
1. Work each project’s panel individually as instructed in Part 2: The Projects. I reversed the Peony and Mimosa Pillow pattern for the quilt.
2. Erase all pencil lines for appliqué and press carefully with a hot iron.
3. Trim each panel to the measurements as given in Materials and Cutting (previous page).
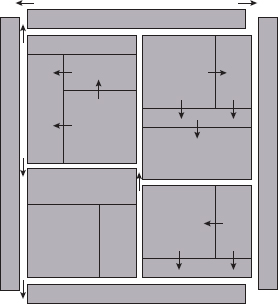
4. It is easiest to join the panels together into 4 quadrants; then join these into 2 halves. Join the halves with a central seam. Add the top and bottom borders, followed by the side borders. Refer to the diagram for pressing directions.

5. To camouflage the seams and give unity to the quilt, appliqué butterflies and dragonflies over the seamlines and into the borders. Embroider some tendrils that extend from one block to another, over the seams that join the blocks. Use the quilt photograph as a rough placement for the insects. I stitched approximately 30 butterflies and 30 long trailing tendrils over the seamlines.
6. Erase all lines and press the top carefully.


Finishing
1. Layer the top with batting and backing; then baste the layers together. Quilt as desired. If you choose to echo quilt, start quilting close to the motifs and then radiate outward in lines about ¼˝ apart.
2. Press on the reverse side.
3. With an erasable fabric marker, mark your finished quilt with straight lines 3˝ from the border seam. You need this as a guide for placing the curved-edge pattern.
4. Locate the curved-edge template (pullout page P1). Use this to cut a template from freezer paper. Pin or lightly iron the template into place and draw a line around the curve. It is important to draw the 4 corners first, and then draw 3 or 4 curves on either side of each corner. This will help ensure that the curves will meet correctly in the center. Stagger them a little bit here and there to make the curve fit, if necessary.
5. Refer to Stitching Bias Binding onto a Wavy-Edged Quilt to prepare the panel’s wavy edge and to stitch the binding in place.