When it comes to the feed grains, corn gets all the glory. Point out that grain sorghum is almost equal to corn in nutrient value and that it will outproduce corn in dry climates, and in fact, will grow in dry climates where corn won’t, and you are met with silent disbelief. Point out furthermore that grain sorghum makes a fine flour for human diets and the silent disbelief may turn to not-so-silent snickers. A great many people have never even heard of grain sorghum.
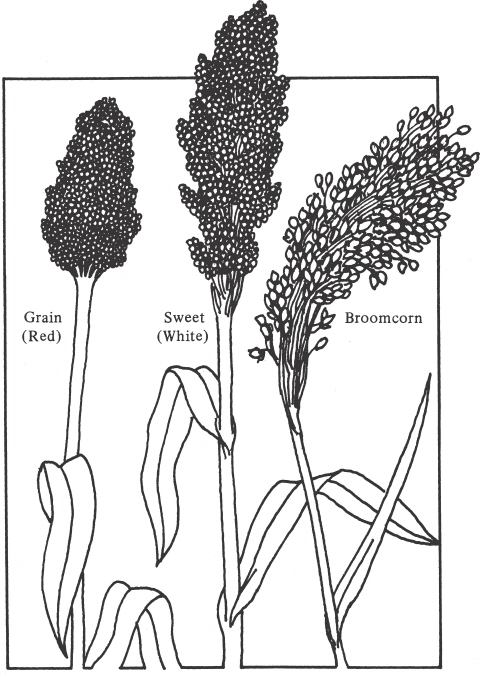
If you are driving down a highway in Texas and see a field of what looks like knee-high corn, only the leaves are narrower, that’s grain sorghum that has not headed out yet. If you spot a field anywhere from the Corn Belt to Louisiana that looks like the tallest corn you’ve ever seen, but that doesn’t have any ears—only clusters of small seeds on top—that’s sweet sorghum. And if you notice a field of cornlike plants with bushy, whiskbroom tops where the tassels should be, that’s broomcorn. All three plants belong to the sorghum family, and all three can have a place on your homestead, or in your garden.
Grain Sorghum
More often called milo, grain sorghum is a major feed grain grown in Texas, Oklahoma, and parts of the dry Great Plains all the way to California. Grain sorghum grows well throughout the South and competes with corn in some parts of the Corn Belt, though it certainly never takes the place of corn in humid climates.
Grain sorghum reaches a height of about 4½ feet with the seed clusters forming at the top of the stalk. In commercial plantings, the grain is harvested with a combine about like wheat. Yields are comparable to corn, about 100 to 180 bushels per acre on unirrigated land, depending on fertility. But where corn will only yield 80 bushels per acre in dryland western growing conditions, sorghum can yield 100 bushels.
Grain sorghum seed is brownish with yellow and red coloration mixed in. The browner the seed, the more tannin is present, generally speaking, and the lighter the seed, the less tannin. The higher the tannin content, the less palatability the grain has for cattle and presumably for human consumption. Lighter-colored varieties, especially those labeled “yellow endosperm” varieties, are the most palatable. Also, tannin content seems to be related to crude protein digestibility: the higher the former, the lower the latter. So although grain sorghum usually contains more crude protein than conventional corn, less of it is digestible. All of which would seem to direct you to selecting yellow endosperm varieties, especially if you are a homesteader looking for alternate kinds of whole grains for table use.
But if birds are a problem where you live, that choice may be debatable. Birds are the proverbial fly in the ointment to growing yellow endosperm sorghum because they love the stuff. Out West, in a one-thousand-acre sorghum field, the birds might wipe out several acres worth and no one would miss it much. But in Georgia, or Ohio, or similar areas, where birds are more numerous and fields smaller, raising the grain can be a mighty poor business. When a friend of mine grew a couple of rows of yellow endosperm grain sorghum in his garden for flour, the birds literally wiped out all of the clusters he didn’t cover with paper bags.
So plant breeders, who are certainly a resourceful lot, have developed bird-resistant varieties. It was noted that the higher the tannin content, the less birds ate the grain, at least if there was anything else around to eat. So breeders developed grain sorghums that have a high tannin content when the grain is in the milk stage—which is when the birds really like to gobble it—but in which tannin content decreases at maturity, for better palatability. These sorghums can be planted even in the Lake Erie region where red-winged blackbirds can descend like a plague of locusts on farmers’ fields.
The palatability of bird-resistant sorghums evidently affects only livestock. Chickens relish grain sorghum of any kind, and I can vouch for that. I have saved seed, even from sweet sorghum, which is not considered a feed grain, and the chickens loved it.
Grain sorghum seed certainly doesn’t look like corn seed, being smaller than peppercorns and roundish. But when you plant your grain sorghum, think corn. Both are raised about the same way, though there’s more variability in sorghum culture than with corn. Sorghum has been planted successfully in everything from 7-inch rows to 40-inch rows. A happy medium, 30-inch rows, is your best bet. In the row, you should maintain no more than three plants per running foot, and in dry climates less than that. The amount of seed farmers plant per acre varies all over the place too, depending on climate, row spacings, and fertility. Some farmers in dry areas plant less than 2 pounds per acre and in humid areas as much as 16 pounds. Again, strike a happy medium: 8 pounds is plenty. You don’t want to plant sorghum too thickly or you’ll have thin, weak stalks that lodge.
Plant grain sorghum about ten days after the proper corn-planting dates in your area. Because sorghum can be planted later than corn, southern farmers can plant it after harvesting wheat in June and so get two crops from the same field in the same year. Also, the later planting date of sorghum gives the small farmer or homesteader greater flexibility. If your corn planting gets delayed by bad weather, or your old equipment (or primitive hand-tool methods) is too slow to get the corn you need out on time, you can plant the rest of the acreage to grain sorghum. For instance, if you have only weekends for homestead work and it rains on two weekends in May so that you are facing June only half finished, grain sorghum to the rescue!
Cultivate for weeds as you would in corn, which means as soon as possible after planting. Sorghum looks more like grass when it first comes up, and you’ll probably have it growing too thickly, so if your early cultivation buries a few of the plants, don’t worry about it.
Diseases
I always dread writing about plant diseases because most of the time small-scale growers won’t have a major problem, and, if they do, by the time they find out what’s wrong, it’s too late to do anything. And it is so easy to misdiagnose diseases. The standard advice might be useful for commercial, veteran growers, but they already know what’s wrong and consult university experts to find out what to do about it. University experts don’t always know, either. But if I don’t mention these diseases, I will be accused of not giving complete information. In farming there is no such thing as complete information.
Grain sorghum diseases include bacterial leaf spot, bacterial streak, anthracnose, gray leaf spot, helminthosporium blight (don’t try to say that one during Happy Hour), rough spot, rust, sooty strips, target spot, and zonate leaf spot. In the drier regions west of the Mississippi, such leaf diseases are seldom a problem of major proportions. In humid areas, they can cause trouble in a wet year. Crop rotation, sanitation, and the use of resistant varieties are the best ways to avoid bacterial and fungal diseases, as is true of most grains most of the time.
Three kinds of downy mildew attack sorghum. Two of them, popularly called “crazy-top” and “green-ear,” are rare and of little concern to the homesteader. The third kind of downy mildew, however, has caused problems along the Texas Gulf Coast, has spread throughout the South, and has been discovered as far north as Indiana. Diseased seedlings show a white “down” on the underside of leaves. The down releases more spores, which cause lesions on plants. The leaves first become striped, then shred.
Fortunately, hybrids are available with a high degree of resistance, especially for growing in the humid South. Also, avoid growing Sudan grass or sorghum-Sudan hybrid grasses where downy mildew is a problem. These close relatives of sorghum can become heavily diseased and contaminate the soil for years.
Maize dwarf mosaic (MDM) strikes grain sorghum worse than it does corn, at least when sorghum is grown in the proximity of Johnson grass. Johnson grass serves as a reservoir for the virus, especially over winter. Then aphids feed on the Johnson grass and carry the virus to sorghum and corn. A typical symptom on sorghum is a light- and dark-green mottling of the leaves, discoloration of the heads, and stunted growth.
Eradicating Johnson grass would eliminate much of the problem, but that seems to be an impossibility. Cut down a Johnson grass shoot, and fourteen come up to take its place, seemingly overnight. Cut two and twenty-eight appear. A really energetic cutter can create a jungle in two days. And the stuff grows so fast you can’t afford to leave a tractor in the middle of a field overnight. You might not be able to get it out until winter.
I exaggerate, of course, but not as much as you might think if you have never tried to negotiate with Johnson grass.
No sorghum hybrid is completely resistant to MDM, but some varieties are quite tolerant of it. Unless weather conditions turn unusually cool, an infection doesn’t seem to make much headway. Hot weather seems to hold it in check.
A number of stalk and root rots damage grain sorghum: charcoal rot, fusarium stalk rot, red stalk rot, and some others of minor significance. The only control is to use recommended resistant varieties sold in your area. But remember that nutritional problems sometimes look like diseases. Iron deficiency in sorghum is a good example. It causes leaves to turn yellow with dark green veins and leaf tips to turn white. That’s not very helpful, though, because any number of diseases also exhibit those symptoms.
If planted too early in cold, wet soil, sorghum seed is prone to rot, more so than corn. Nonorganic growers treat seed with a fungicide, but the best defense is to delay planting until the soil has warmed properly. One rule of thumb says to plant when the soil surface (2-inch depth) at noon registers at least 70°F.
Harvesting Grain Sorghum
Harvesting sorghum by hand is easier than harvesting wheat. When the seed heads are ripe and dry, the grain comes out of them easily enough; in fact, it will shatter out if left in the field very long after ripening. Go down the row after the seeds are hard, but not dead, falling-off ripe, and cut the seed heads off with about a foot of stalk. Pretend you are cutting a bouquet of seed clusters for display in a large vase or urn, which, by the way, is an excellent thing to do with the seed clusters. The brown-red-yellow seeds make an attractive fall table decoration. Tie the stalk heads together into bundles and hang in the barn, or spread no more than two or three bundles deep in a clean, out of-the-way corner. Hanging or laid out, the clusters can dry until you need them.
In the North, grain sorghum grown commercially must often be harvested before it is completely mature, then artificially dried, because of the shortness of the season. If you allow the crop to stand in the field and the fall is wet, you might have trouble getting it harvested at all before it molds. Therefore, on the small homestead, cutting the heads before they are completely ripe and hanging the bundles in a dry barn is a doubly good idea.
Larger plots of grain sorghum will need to be harvested with a grain combine unless you have a large number of teenagers around with nothing to do between baseball and football seasons and can make them believe they are not harvesting milo, but playing for a championship in an up-and-coming new sport. A quarter of an acre seems to be the most to try to harvest by hand unless you are a real glutton for work. But sorghum will not be one of your “main grains,” and a little will go a long way on a homestead. Since the grain will yield 100 bushels to the acre with a little luck, you ought to get 25 bushels from a quarter-acre, or 12 bushels from an eighth of an acre, or at least 6 from a sixteenth of an acre. Six bushels is certainly adequate for a small homestead. Some for you and some for the chickens. After chewing on the stub of my pencil for fifteen minutes, my calculations say that a row of grain sorghum 200 feet long can be expected to yield at least 1 bushel of grain. And that might be the right amount for your first venture into grain sorghum.
Storing the seed (threshed or in the bundles) poses no insect problems in the North, at least not in my experience. But in the South (or, I suppose, anywhere grain sorghum has been stored over a number of years), both the rice weevil and the Angoumois grain moth (no, I do not know how to pronounce that one either) can be problems, so say the experts. Like the bean weevil and some wheat weevils, these two characters can infest the grain before it leaves the field, which means that all those directions about storing in insect-proof cans are out the window. The insects are in the grain already. (For ways to solve the dilemma, see chapter 3, where I talk about grain storage.)
Feeding grain sorghum on garden farms that support only a small number of animals is easy. Just toss a few unthreshed seed clusters to the animals each day. With chickens, for example, serve up one seed cluster per six hens per day. Most animal nutritionists do not recommend feeding only grain sorghum unless you feed supplemental plant protein like soybean meal. But if your hens can graze outdoors, no problem. They will do their own supplementation with bugs and worms.
University of Georgia tests show that cattle on grain sorghum alone didn’t do as well as on corn because the crude proteins in the sorghum aren’t utilized well enough by the animals. When soybean meal was added, the sorghum feeding resulted in admirable gains of about 3 pounds per day, as good as from corn. Non-plant protein like urea won’t produce the same good gains, report the scientists.
Sorghum Flour
For flour for your own use, thresh out a couple of measuring cupfuls when you need them. I take one seed cluster at a time, hold it over a bucket between the palms of my hands and rub back and forth vigorously, as if I were rolling out a ball of clay. Wear gloves. The seed will thresh out fairly easily, and you will get your two cupfuls quickly. You’ll also get some hulls and stem bits, which you can winnow out in front of a fan (see chapter 3). You won’t get your grain completely clean, but no matter. That wee bit of fiber from hulls and stems won’t hurt in the flour—it might even do you good.
You can grind grain sorghum in the blender, but a regular kitchen mill is better. We mix it two-thirds sorghum flour and one-third wheat flour because, to our tastes, sorghum flour alone is too heavy, especially for bread. You be your own judge. For cookies you can use the sorghum flour alone with good results.
Today, grain sorghum recipes, like all whole-grain recipes, are easy enough to find. Arrowhead Mills, the well-known Texas organic food grower and distributor, has recipes to go with the sorghum grain and flour they sell. Check the Internet and prepare to be overwhelmed.
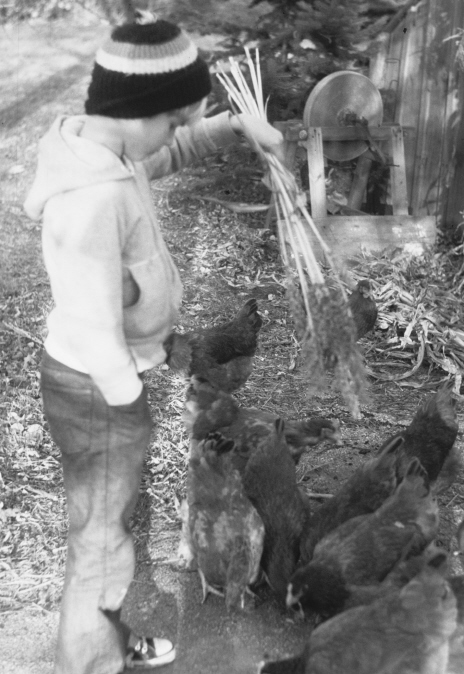
Jerry Logsdon feeding sorghum seedheads to chickens.
1½ cups of sorghum flour (We use either grain sorghum or
sweet sorghum seeds, which we grind in our blender.)
2 tablespoons brown sugar
1 teaspoon salt
3 teaspoons baking powder
2 egg yolks
3 tablespoons melted butter
1¼ cups milk
2 egg whites, beaten
Sift and mix dry ingredients well. Beat egg yolks, then add the melted butter and milk. Fold in the beaten egg whites and bake on a hot greased griddle, turning once when the pancakes are all bubbly on top. Serve with maple syrup if you have it, or any other syrup or fruit jam you like.
Sweet Sorghum
Sweet sorghum looks just about like grain sorghum at maturity except that it is about three times taller. It is grown for the juice in its stalk, from which is made sorghum syrup and sorghum molasses. I call it the four-in-one plant because it actually produces four foods. The seed clusters on top can be used just like grain sorghum, for flour and for chicken feed. The leaves, stripped off before the stalks are pressed, can be fed to livestock. Then there’s the distinctively flavored syrup. And the crushed stalks left over make good mulch for soil microorganisms to feed on.
In fact, now that scientists in the USDA’s Agricultural Research Service have discovered how to remove starch from sweet sorghum syrup, sweet sorghum can be processed into sugar in a conventional sugar-processing factory. Perhaps someday in the North where sugar cane doesn’t grow, this process might make every homestead free of dependence on stores for sugar. So far this has not happened because sugar from sugar cane is heavily subsidized and more efficient to process.
An acre of sorghum will produce about 400 gallons of syrup, which at a retail price of $8 a gallon is a nice sideline income for a small homesteader and a few weeks of work. Traditionally, that’s how most of the sorghum syrup has been produced, and still is. A small farmer can handle an acre or two mostly with hand work and then haul the stalks to the neighborhood sorghum mill, which processes the syrup for a fee.
Again I hate to talk about varieties because they change constantly. But with sweet sorghum that is not so much the truth. The old varieties are still the ones mostly used, like ‘Wiley’, ‘Brandes’, ‘Honey’, and ‘Sart’. In the North, you have to go to a shorter-season variety. ‘Dale’ and ‘Tracy’ are recommended varieties for central to northern regions. Farther north, I’ve grown an old variety, ‘Sugar Drip’, from R. H. Shumway Seeds. That’s the only variety I’ve found easily available here.
The cultivation of sweet sorghum is much like that of corn. One exception is that sorghum doesn’t require as much extra fertilization as corn to get adequate yields. That goes for grain sorghum too. Research in Texas has shown that sorghum fertilized with manure at the rate of 10 tons per acre for five years yielded just as well or better than sorghum on which chemical fertilizers were applied for maximum yield. University of Mississippi tests suggest that 40 pounds of actual nitrogen, plus 20 pounds of actual potassium, is sufficient for sweet sorghum, and a 5-ton application of manure should provide that. For the organic grower, a green-manure crop plowed under ahead of the sorghum crop and a couple of tons of finely ground rock phosphate every three or four years will provide the phosphorus and other nutrients the sorghum needs. Just remember that rock phosphate only releases nutrients very slowly. Chemical superphosphate is much more potent—one of the steroids of the agronomy sports world.
Cottonseed meal and tankage, both quite high in nitrogen and phosphorus, were once the favorite fertilizers of sweet sorghum growers. But competition for these products from the feed industry and the advent of cheaper chemicals pushed the price of these materials too high except for very small plantings. But some small growers still use these organic fertilizers, insisting that organically fertilized sorghum makes a better-tasting syrup.
You can plant sweet sorghum in rows or in hills. In hills, plant four seeds per hill with hills spaced 24 inches apart. In a continuous row, try to keep plants at least 6 inches apart. Any thicker, and the stalks might be weak and blow over.
Rows are generally spaced 42 inches apart. That was the traditional space needed by a horse or mule to get down between the rows pulling a cultivator. Some growers like to plant in a slightly raised ridge that they make with a kind of plow called a middle-buster, ahead of planting. Right before planting, they scrape the top off the ridge, which effectively kills the weeds germinating there. The raised ridge warms up a little faster in springtime, too, to enhance germination of the sorghum. Sweet sorghum, like grain sorghum, will rot rather than germinate in cold wet soil. Soil temperature at planting depth (2 inches) should be nearly 70°F on a sunny day. You need at least 100 days to mature sweet sorghum in the North, so the sooner you can get it growing, the better. The best sorghums take longer than 100 days to mature, which is why the best syrup comes from the South.
Some of the same insects that attack corn can also harm both grain sorghum and sweet sorghum, though the damage will rarely be serious: lesser cornstalk borer, corn leaf aphid, fall armyworm, corn earworm, and wireworms. In addition, the sugarcane borer will tunnel into sweet sorghum in the Deep South. The sorghum midge occurs over most of the Gulf Coast and the Southeast Atlantic states, and feeds on the heads of sweet sorghum, grain sorghum, broomcorn, and Sudan grass. But its depredations don’t seem to hurt syrup production much. Where you are saving sorghum seed for seed or for food, however, and the midge is on the prowl, you can tie paper bags over the heads of plants during the blooming season. But, says the USDA, remove the bags shortly after the blooming period because they provide conditions favorable for the corn earworm and the corn leaf aphid, which also attack the seed heads.
You can judge the proper harvesting time for the juice by the condition of the seed. When the seeds are no longer milky, but still in the doughy stage, it’s time to cut. When your thumbnail will no longer dent the hardening seed easily, the ideal harvesting time for syrup has passed.
First, strip the leaves from the stalks, and feed them to cows, rabbits or goats. Then cut the stalks off close to the ground, using a corn knife as I described when cutting a bundle of cornstalks. When I can hold no more stalks in my left arm, I drop them neatly in a bundle and proceed to cut another bundle. There’s no real need to tie the bundles, though that makes them easier to handle.
With the stalks in neat bundles, I can sever the seed clusters from the stalks with one stroke of the corn knife. Well, sometimes it takes two strokes. I usually lay the stalks on the tailgate of the pickup when it is down, with the clusters hanging over the edge so I can get a good whack down through the stems. Then I tie the clusters together and hang them in the barn for further drying.
The stalks are run through the sorghum press, which squeezes out the juice the same way the old clothes wringers squeeze water out of clothing. The juice that makes the syrup is held in the soft inner stalk and is easily pressed out once the tough outer stalk is cracked open by crushing. The rollers are powered by reduction gears running off a gasoline or electric motor, or by a horse or mule walking round and round on the end of a long sweep.
Sorghum mills press the “cane” and boil down the juice for a fee. There are still quite a few of these mills in the South, but here in the North, before we found one in a nearby Amish community, I had to improvise another way to squeeze out the juice. My method was not very practical, but maybe it will give you a better idea. On my first try, I chopped up the stalks with the corn knife into little pieces on a makeshift chopping board, sort of the way you would dice carrots. Then I squeezed the choppings in a cider press. It worked, but the chopping was slow and arduous. A wood chipper might work better, but I didn’t have one.
The liquid from the pressing is a cloudy green in color. When boiled, heat coagulates the nonsugar materials in the juice, and they float to the top. These “skimmings” as they are called, have to be dipped off or the syrup will taste too bitter.
We heated ours in a pot on the stove and skimmed off the green stuff with a ladle. The syrup reaches the proper density at a temperature of 226° to 230°F. If you are using a syrup hydrometer, syrup of good density should give a reading of 35° to 36° Baume on the hydrometer scale. Before filling small containers, let the syrup cool to at least 190°F, 180°F for larger containers.
Traditional sorghum making is a far more picturesque and romantic procedure than our stovetop venture. As the horse or mule walks round his endless circle on the sweep, the mill rollers crack the stalks and squeeze out the juice, which runs through several strainers into a barrel. From the barrel, a hose or pipe gravity-feeds the juice into the steaming evaporator pans, which rest over a long, low fireplace with a high smoke pipe at one end. The fires underneath are fed with firewood and kept at as constant and even a flame as possible.
The evaporator pan usually is separated into three or four compartments by baffles, which allow the sap to flow from one section to another very slowly. As the syrup flows from one end of the long tray to the other around the baffles, the “cook” skims off the green scum. When everything is moving as it should be, the syrup is ready by the time it reaches the last compartment. If you lift the ladle out of it, the syrup should “string,” showing that it has the proper density. It is ready then to run off into the waiting container, to be cooled and bottled.
One secret of sorghum making is to cool it as quickly as possible. That’s why, in the past, homesteaders liked to locate their sorghum mills near a good cold spring. They’d dunk the containers in cold water.
Weather can be a factor too. A clear, crisp autumn day is ideal. Rainy weather makes bitter molasses, according to folklore. Maybe that explains why one batch of our sorghum turned out delicious and the other had a taste like licking an old piece of metal siding.
The seed clusters cut from the stalks and dried in the barn can be fed to chickens as described above for grain sorghum. The seed can likewise be threshed for flour. I think it tastes about the same as grain sorghum. Sorghum pancakes and sorghum molasses—now there’s real poetry for homestead gourmets.
As to which variety of sweet sorghum makes the best flour or the most seed for flour, I don’t know. ‘Sugar Drip’ is the old tried-and- true variety for syrup, and I have not heard of anyone making flour from any other kind of sweet sorghum. From the appearance of the seed clusters of other varieties, I’d say they would all serve the purpose except maybe ‘Honey’, which doesn’t seem to have as much seed in its head.
Broomcorn
Broomcorn reached its heyday in the early 1900s, then declined as cheap synthetic materials took much of the market. But traditional brooms seem to be making something of a comeback, as decoration as well as for sweeping up dirt. (The new demand may be coming from our politicians, who always need prodigious numbers of new brooms to sweep clean the floors of preceding administrations.) Maybe the new interest in herbs has something to do with it. Botanical.org on the Internet says that a decoction of broomcorn seeds has medicinal value as a diuretic. Put 2 pounds of seeds in a quart of water, boil down to a pint, and you have a potion for urinary problems, say the directions.
Real broomstraw makes a better broom than plastic straws, but that depends on who is doing the sweeping. My grandsons could not do a good job of sweeping with the best broom ever made. But in these days not so many people care about the finer skills of housekeeping. Why pay $5 more for a good broom, when a poor one will do? The answer is that those of us who find all kinds of uses for brooms in the barn where an electric sweeper just isn’t appropriate still appreciate a real broom.
I happen to have a catalog from the 1920s advertising all the tools of broom making. The number and variety are remarkable until one realizes how big the market once was. Every household, shop, and factory had to have brooms. No telling how many people made their living in the industry. If the energy crunch gets worse, natural broomstraw and the efficiencies to be gained from local economies just might make broomcorn a big industry again. You can get a thousand brooms from an acre of broomcorn. Takes a lot of work, but so do strawberries. It’s something to think about, anyway. Need I have to say that today most of the broomcorn for brooms comes from China?
We have grown a little broomcorn, mostly for fun. The chickens don’t like the seeds as well as those of other sorghums, but wild birds do. One year we tried our hand at making brooms from our crop, the old “round” brooms, the kind you see witches riding around at Halloween time, or the kind of broom now called a fireplace broom. They make nice decorations, hanging from the mantels in fine houses where they never sweep up anything. We had no special broom-making machinery but followed Reader’s Digest’s 1981 book, Back to Basics, which has illustrated, step-by-step instructions on how to do it. We gave the brooms as Christmas presents in place of store-bought items that would no doubt have cost us $20 or so each. Or $50 today.
For handles, we selected young straight hickory or ash saplings from the woods, shaved them down, and pointed them at one end. We combed the seeds out of the broomcorn tassels with a wire brush, leaving about four to 6 inches of stem on each tassel. Then we soaked the tassels in boiling water and, while still wet, tied them very tightly around the end of the handle. A couple of nails driven through the handle will help anchor the tassels while you tie them. To make a tight tie, the trick is to hang a bit of rope with a loop in the bottom from something solid on the ceiling. The loop should hang about a foot off the floor. Twist the rope once around the broom stems to be tied, put your foot through the loop, and step downwards. The rope will constrict around the broom stems and broom handle very tightly. Then tie them. We tied two courses of tassels around the handle, one a little lower than the other, and then trimmed the straws even. As the wet stems dry, they shrink around the handle.
Broomcorn is not difficult to grow. Being a member of the sorghum family and related to corn, it will grow where corn will, and by the same cultural methods. But broomcorn is more at home in a hot, dry climate than a humid one. Follow the directions given for sweet sorghum above: about one plant every 6 inches in rows 30 to 40 inches wide. You will almost always get the seed planted too thickly because it is small, so be sure to thin after the plants are up. Cultivate as often as necessary to control weeds.
For best quality, the brushy heads should be cut when the plants are in late bloom stage (before the seeds have developed fully). Cut off the top brush, leaving 6 inches of stalk below the brush. Dry these brushes for three weeks before using them for broom making. If you let the plants mature before cutting the heads, the straws turn yellow and many seeds form. The brushy seed clusters make an attractive dried-flower arrangement.
No machine was ever contrived to harvest broomcorn heads satisfactorily. That’s why I think the crop still has potential for homesteaders. No one else is fool enough to want to work that hard. Workers go through the standing stalks and break over the heads. Later the heads are cut or jerked off, the seed threshed out, the broomstraw cured for several weeks, then baled and shipped to factories. In older times, the seed was scraped out of the heads instead of threshed, and I have found it necessary to scrape out some seeds in my little broom-making experiments too.
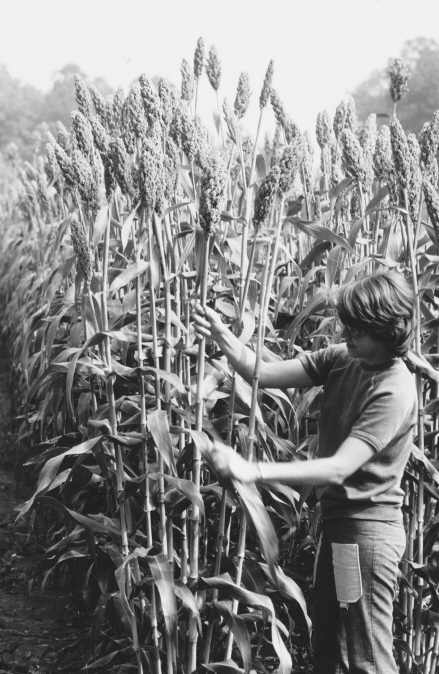
Carol Logsdon stripping leaves off sorghum stalks.
The broomstraw used to be classified “insides and covers,” “self-working,” and “hurl.” Insides and covers (short straws) were used for underwork in the broom, though a good broom has almost all long straws. Hurl was, and is, the long straw. Self-working was broomcorn that contained no waste. Self-working was what everyone hoped to get, but seldom did.
If you want more information and a source of seed, contact Seed Saver’s Exchange (3076 N. Winn Road, Decorah, Iowa, 52101). You should know about Seed Savers anyway because it is an excellent place to buy all kinds of grains and heirloom vegetables. Or there may very well be a broom maker in your community since new ones are constantly taking a try at it. You could learn something from him or her, and perhaps become part of an interesting cottage industry. Let’s see, 1,200 brooms per acre at $10 per broom is . . .