Chapter 4
Framing the Walls and Roof
With the foundation and floor complete, you can build the frame, or skeleton, of your clubhouse. All of the wall frames will have top and bottom 2×4 pieces, called plates, and vertical 2×4 pieces, called studs. Assemble the wall frames on the ground, then set up each frame one by one on the floor. Three of the walls will be 66" high and the fourth one 9" taller, or 75" high, so the roof can slope. The roof frame will consist of only two beams, a 2×4 and a 2×6, both 8 feet long.
Materials List for Walls and Roof Frame
To build your walls and roof frame, you’ll need your nine essential tools, a stepladder, and the materials listed on the following page. You’ll also need a large, flat spot near your floor on which to put the wall frames together.
Framing Materials
Wall plates
- 4 2×4s, 8 feet long
- 4 2×4s, 6 feet long
Wall studs
Upper roof beam
Lower roof beam
Bracing
- 8 1×4 furring strips or boards, 8 feet long
Nails
- 2 pounds of each 16d coated sinkers; 12d coated sinkers; 8d coated sinkers; 6d coated sinkers
- 1 pound 6d duplex nails, for the brace boards
Project
Building Wall 1
Let’s build the tall wall first. This wall will be 8 feet long, the same length as the floor, and won’t have any doors or windows.
Frame Wall 1
- Step 1. First you’ll make the plates. Set two 2×4s that are at least 8 feet long on your sawhorses. Measure the 2×4s, and if they’re not 8 feet long (or within 1⁄4" of it), cut them to length.
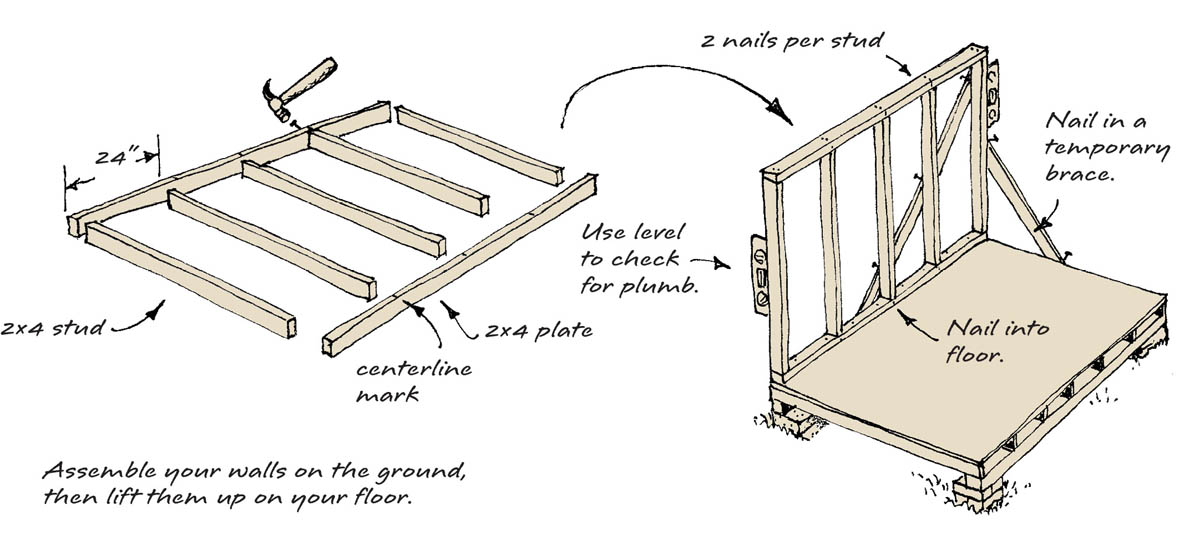
- Step 2. Put the plates together, on edge, on your sawhorses. Hook your measuring tape to one end, and make marks at 24", 48", and 72". With your pencil and square, draw a centerline across both boards at each mark. The centerline will show where the center of each stud will go. Set the plates aside.
- Step 3. For the studs, set out five 2×4s that are 6 feet or longer on your sawhorses. Since wall 1 will be 75" high and the thicknesses of the two plates together add up to 3", then the studs will be 72" long (75" – 3" = 72"), or 6 feet. Measure the 2×4s, and if they’re not 6 feet (or within 1⁄4" of it), cut them to length.
- Step 4. Lay the plates and studs on edge on the ground so that the centers of your studs meet the centerlines on the plates (see the drawing on facing page). Using 12d or 16d nails, drive two nails through the plates into the ends of each stud, as shown. As you hammer, hold down each stud with your knee, or step on it, so it will stay put. Your tall wall is now framed.
Install Wall 1
- Step 1. With a friend’s help, carry the wall frame to the floor and set it in place.
- Step 2. Nail the wall down by driving one or two 12d nails between each stud through the bottom plate and into the floor. While your friend holds the frame, use your level to check whether the wall is plumb (straight up and down). If it isn’t, ask your friend to nudge the wall frame until the bubble in your level is in the middle.
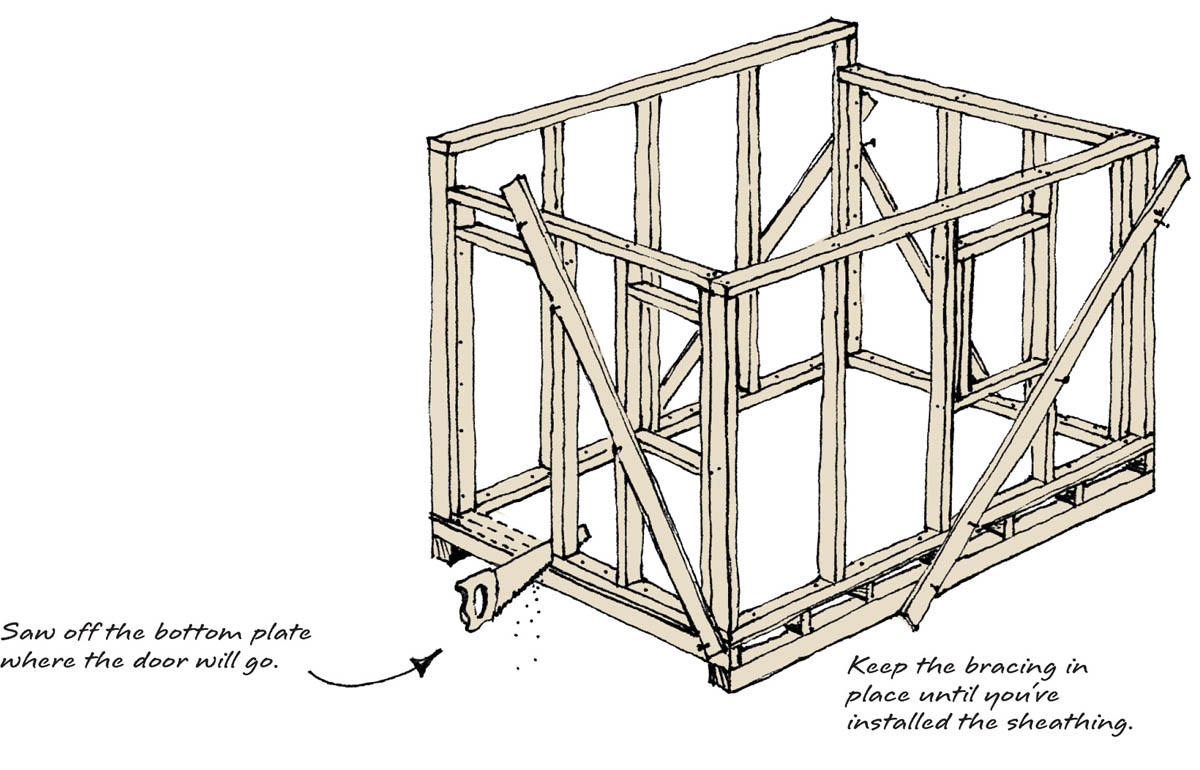
- Step 3. To keep the wall plumb, nail on temporary brace boards, as shown on the drawing below. Here it can be helpful to have three people working: one to hold and adjust the wall, one to check for level, and one to attach the bracing. You will pry off the brace boards later, so don’t nail them in too tight. Use 6d duplex nails, the two-headed nails that are easy to pull out.
The Right Nails
Always use 12d or 16d nails when nailing through 2×4s. Although 6d or 8d nails work well for toenailing 2×4s, such as when attaching the joists to the 4×4 sills, they are not strong enough to hold 2×4s together. The 6d or 8d nails also work fine for nailing in brace boards, floorboards, and sheathing.
Project
Building Wall 2
The second wall, which will be 66" tall, will be shorter than the 6-foot width of the floor because it will be set between the two longer walls. These wall frames are each 31⁄2" thick (the width of a 2×4), so they add up to a total thickness of 7". Wall 2, then, will be 72" − 7", or 65" wide.
Frame Wall 2
- Step 1. Set out two 2×4s that are at least 6 feet long on your sawhorses. These will be the top and bottom plates. Measure and cut them to 65" long.
- Step 2. Put the plates together, on edge, on your sawhorses. With your square and tape measure, measure from one end (it doesn’t matter which end), and draw centerline marks at 24" and 48" on both plates. Set them aside.
- Step 3. Set out four more 6-foot-long 2×4s on your sawhorses. These will be the studs. Measure and cut them to 63" long. (If this wall is 66" high, and the top and bottom plates together are 3" thick, then the studs will be 66" – 3", or 63" long.)
- Step 4. Lay the four studs on the ground with the plates so the center of each stud meets a centerline on the plates (see the drawing below). Nail the plates to the studs as you did with the tall wall. Wall 2 is now framed.
Install Wall 2
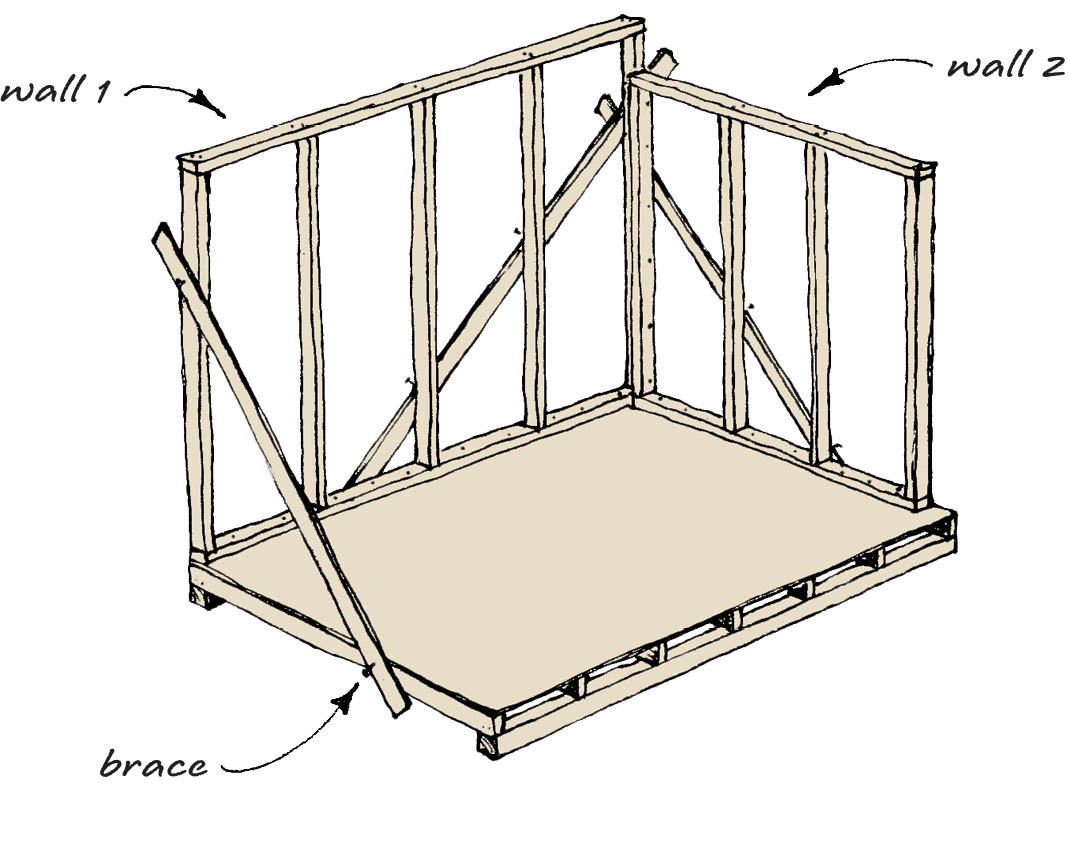
- Step 1. Get a friend to help lift up and brace this wall next to the tall wall.
- Step 2. Nail the bottom plate into the floor and the end stud into the end stud of wall 1. Use a level to get the wall plumb, having your friend nudge the wall as needed.
- Step 3. Nail in another brace to hold it in place (see the drawing at right).
Project
Building Wall 3 (with a Door and Window)
The third wall will be the same size as wall 2, and it will have the door and a window. You’ll need to know the sizes of these openings before building the wall. In this example, you will build openings to fit a door 24" wide and 60" tall and a window that is 20" wide and 25" tall. If you have different door and window sizes, simply substitute the correct measurements.
Cut and Mark the Plates
- Step 1. On your sawhorses, cut two 2×4s to 65" long, as you did for wall 2. These will be the top and bottom plates.
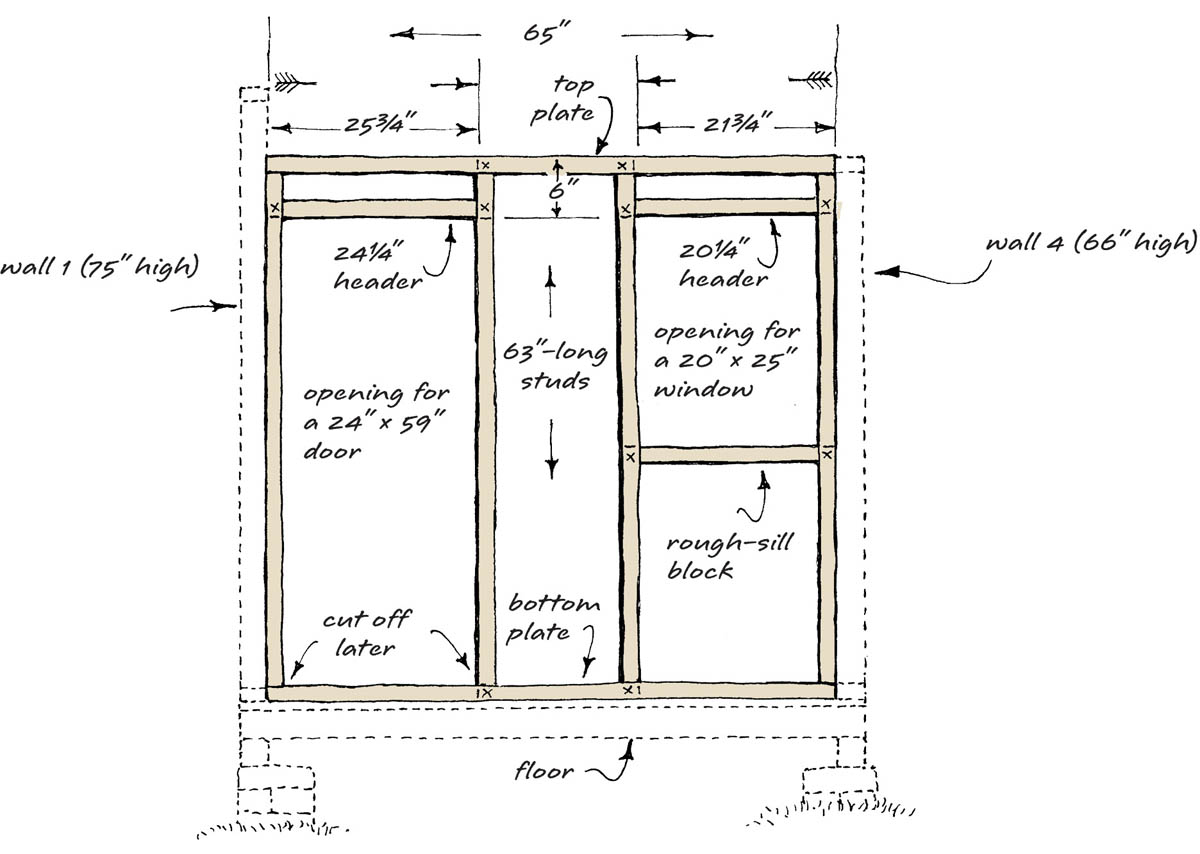
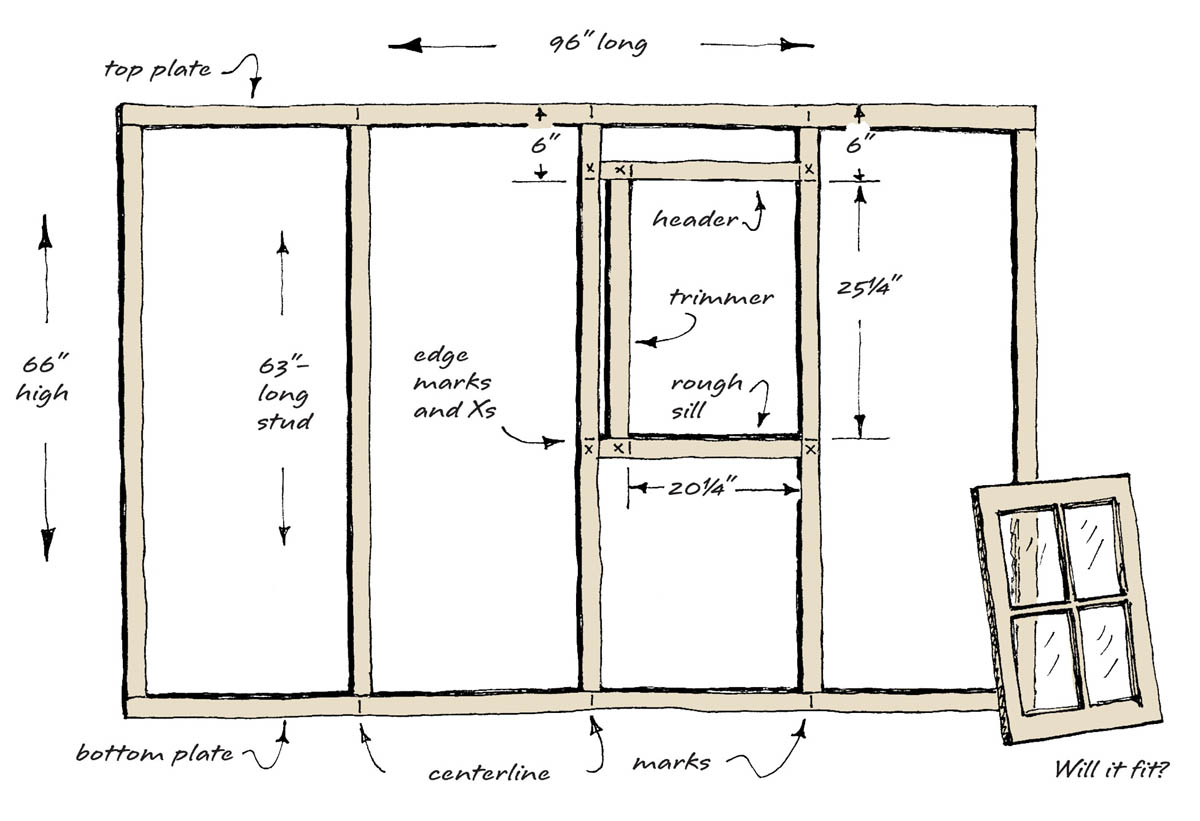
- Step 2. Set the plates together, on edge, on your sawhorses. From the left end, measure to 253⁄4", draw a line across both plates, and draw an X to the right of the line on both plates.
- Step 3. From the right end, measure to 213⁄4", draw a line across both plates, and draw an X to the left of that line on both plates.
- Step 4. Draw an X at each end of the plates. The Xs are where the studs go.
Centerlines, Edge Lines, and Xs
House builders use their own language to mark the position of studs and other pieces of wood in wall framing. The simplest mark is the centerline — a line to mark the center of the stud where it meets the plate, which we used in walls 1 and 2. Another mark is an edge line with an X. For wall 3, we are using edge lines and Xs to tell us more accurately where the pieces go to fit the door and the window.
- Step 5. Write a “T” for “top plate” on the upper 2×4, and a “B” for “bottom plate” on the lower 2×4 (see the drawing below). Once the boards are marked, there should be a 241⁄4"-wide space for the door at the left, and a 201⁄4"-wide space for the window at the right, as shown in the drawing below.
- Step 6. Set the plates aside.
Install the Studs
- Step 1. On your sawhorses, cut four 2×4 studs 63" long, as you did for wall 2.
- Step 2. Lay out the studs on the ground with the two wall plates, so the studs all meet the plates at the Xs. Nail the plates to the studs, stepping or kneeling on each stud to hold it in place.
- Step 3. For the blocks that frame the door and window openings, measure 6" down all four studs from the top of the wall plate, then draw an edge line and an X above the edge line. These four Xs show where the door and window header blocks will go.
- Step 4. Along the two right-hand studs, measure another 251⁄4" from the first line you drew, then draw another edge line and an X below that line. These two Xs show where the window rough-sill block will go (see drawing on facing page).
Install the Blocking
- Step 1. Cut two 2×4s to 201⁄4" long. These will frame the top and bottom of your window.
- Step 2. Set the blocks in place beside the studs at the Xs you just drew. You should end up with a window opening that is 251⁄4" high by 201⁄4" wide.
- Step 3. If your window is 25" by 20", drop it in gently to see if it will fit. It does? Good! Now take it out. If it doesn’t fit, push on a corner of the wall frame to make it more square, then try again. If it still doesn’t fit, you may have to adjust the blocks or move a stud.
- Step 4. Cut one more 2×4 to 241⁄4" long. This will frame the top of your doorway. If you have a door already, see if it will fit. Otherwise, you can build a door to fit later.
- Step 5. Nail these blocks to the studs by using two 12d or 16d nails through each stud into the blocks.
Install Wall 3
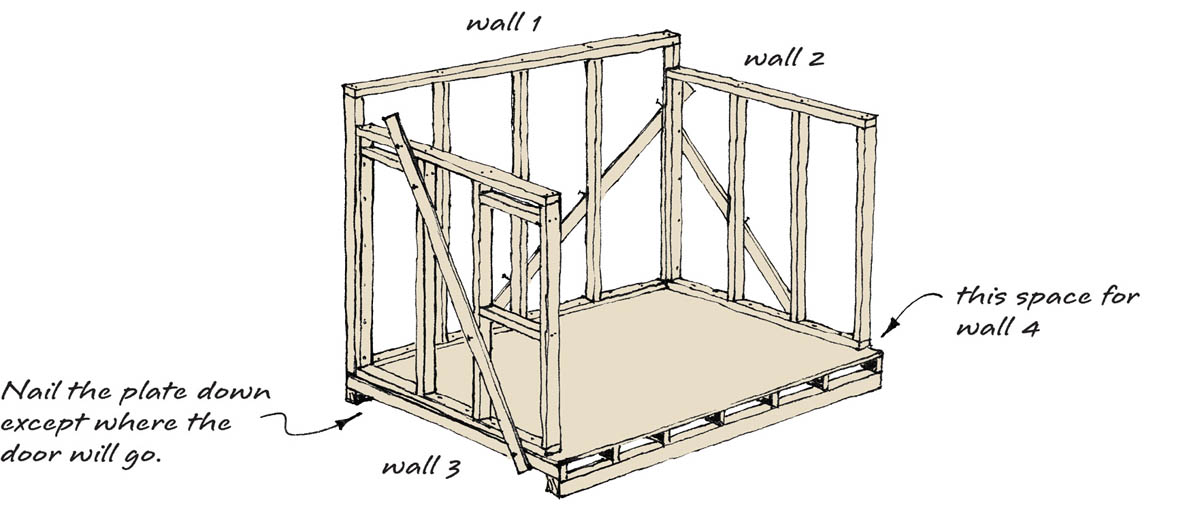
- Step 1. With a friend’s help, set this wall in place and brace it as you did the others.
- Step 2. Nail it down, first into the floor and then into the adjoining wall corners. Do not nail it to the floor in the doorway, where you’ll cut off the bottom plate. (In fact, once wall 3 is up, you can use your handsaw to cut off this bottom plate that spans the doorway at any time.)
- Step 3. Plumb the wall with your level while your friend helps nudge the frame, then brace it in place.
Project
Building Wall 4
Wall 4 is also 66" tall and 8 feet (96") long. This wall will have one window, which I will show you how to frame in three different sizes.
Frame Wall 4
- Step 1. Lay out two 2×4s on your sawhorses for your plates, and cut them to 96" long.
- Step 2. Set them on edge side by side, then measure out and mark every 24", as before. Draw the centerlines on both plates, then set the plates aside.
- Step 3. Lay out five more 2×4s for studs, then measure and cut these to 63" long.
- Step 4. Nail the plates and studs of this wall together as you did the others, and leave it on the ground. It’s getting a little easier, right?
Frame the Window
On this wall, you will frame the window in a slightly different way than in wall 3.
- Step 1. Choose the two studs that will surround your window. On each of these two studs, measure and draw an edge line 6" down from the top of the wall, then draw an X above the line.
- Step 2. Measure another 251⁄4" from the first edge line, draw another edge line, then an X below that line. These two Xs show where the window rough-sill block will go (see the drawing on facing page).
- Step 3. Measure the space between the two studs, which should be about 221⁄2". Cut two 2×4 blocks that long, set them on the Xs, and nail them into the frame. These blocks are your window header and rough sill.
- Step 4. Measure to 201⁄4" on both the header and rough sill, draw an edge line, then an X beyond the edge line.
- Step 5. Measure and cut another 2×4 block, called a trimmer, to 251⁄4" long.
- Step 6. Nail the trimmer block in place on the Xs (see the drawing on facing page).
Window Safety
For safety, use only windows in wood or metal frames, instead of sheets of glass. Also, the bottom of any window should be far enough above the floor, at least 12", so that someone doesn’t kick it or crash into it during rough play.
Install Wall 4
- Step 1. With your friend’s help, set this wall in place and brace it as you did the others.
- Step 2. Nail it down, first into the floor and then into the adjoining wall corners.
- Step 3. Plumb it with your level while your friend helps nudge the frame, then nail in another brace board.
You did it! All the walls are framed, and it’s time for another break.
Project
Framing the Roof
Now we’ll need to put up two beams, a 2×6 and a 2×4, both 8 feet long, to hold up the roof boards.
Cut and Install the Roof Beams
- Step 1. Find a stepladder and climb up to look at the top of one of your 6-foot-wide short walls. Hook your measuring tape to the outer edge of the tall wall, measure to 24" along the top of the 6-foot wall, and draw a centerline. Then pull the tape farther along and draw another centerline at 42".
- Step 2. Go around to the other short wall and draw similar centerlines the same distances from the tall-wall edge. These will mark the approximate places for the beams.
- Step 3. Set the 2×6 and 2×4 on your sawhorses. Measure them; if they’re not 8 feet long, cut them to length. These will be your roof beams.
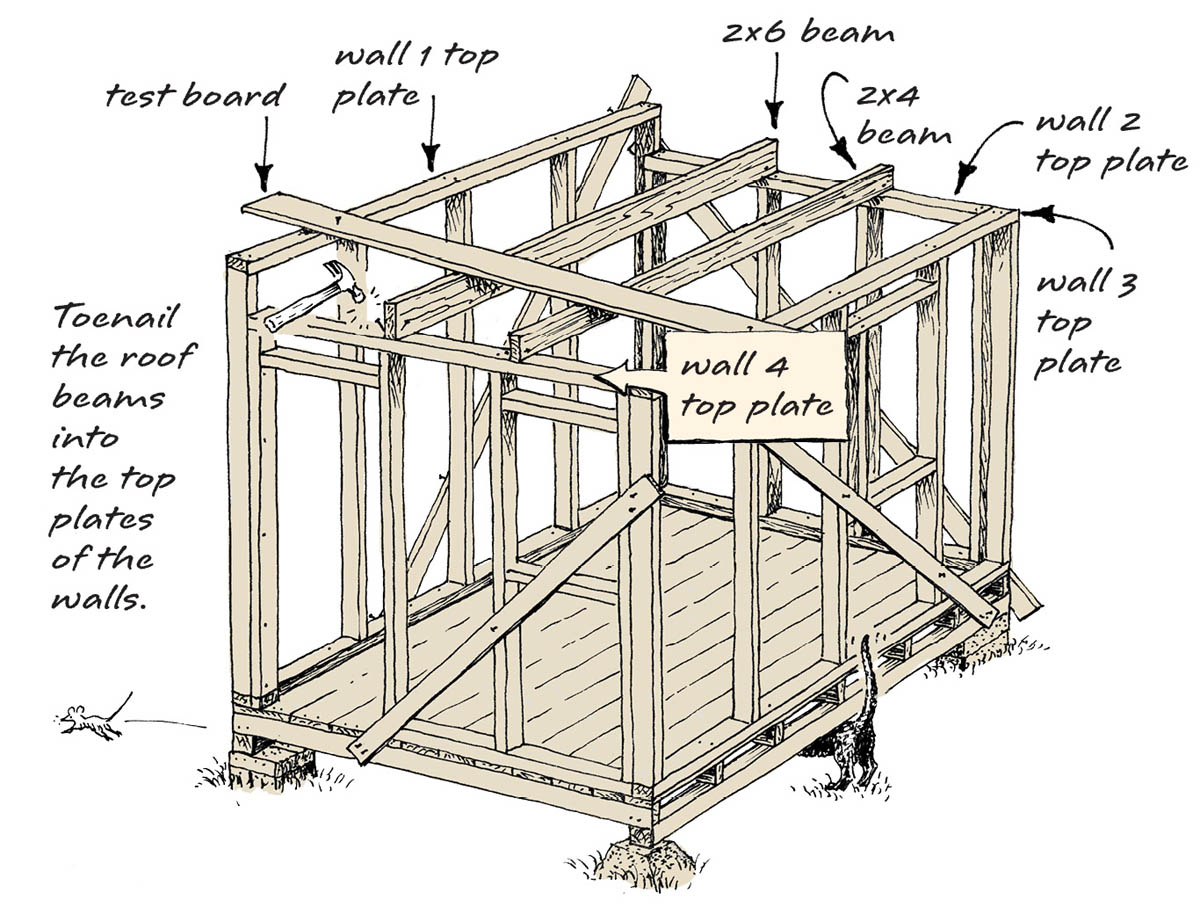
- Step 4. With a friend’s help, haul the roof beams up to the roof and stand them on edge on top of your short walls, aligned over the Xs. The 2×6 will be the upper roof beam, positioned closer to wall 1. The 2×4 will be the lower roof beam, positioned closer to wall 3. Don’t nail them in yet.
- Step 5. Lay a straight board, or your long level, across the beams and the wall tops. Adjust your two beams by nudging them until the board rests on both of them. If you move the beams off the centerlines you drew, that’s okay.
- Step 6. When you have the beams positioned so that the board just touches the wall 1 top plate, the two roof beams, and the wall 3 top plate, toenail the beams into the top plates of walls 2 and 4, as shown.
Nineteenth-Century Victorian Playhouse
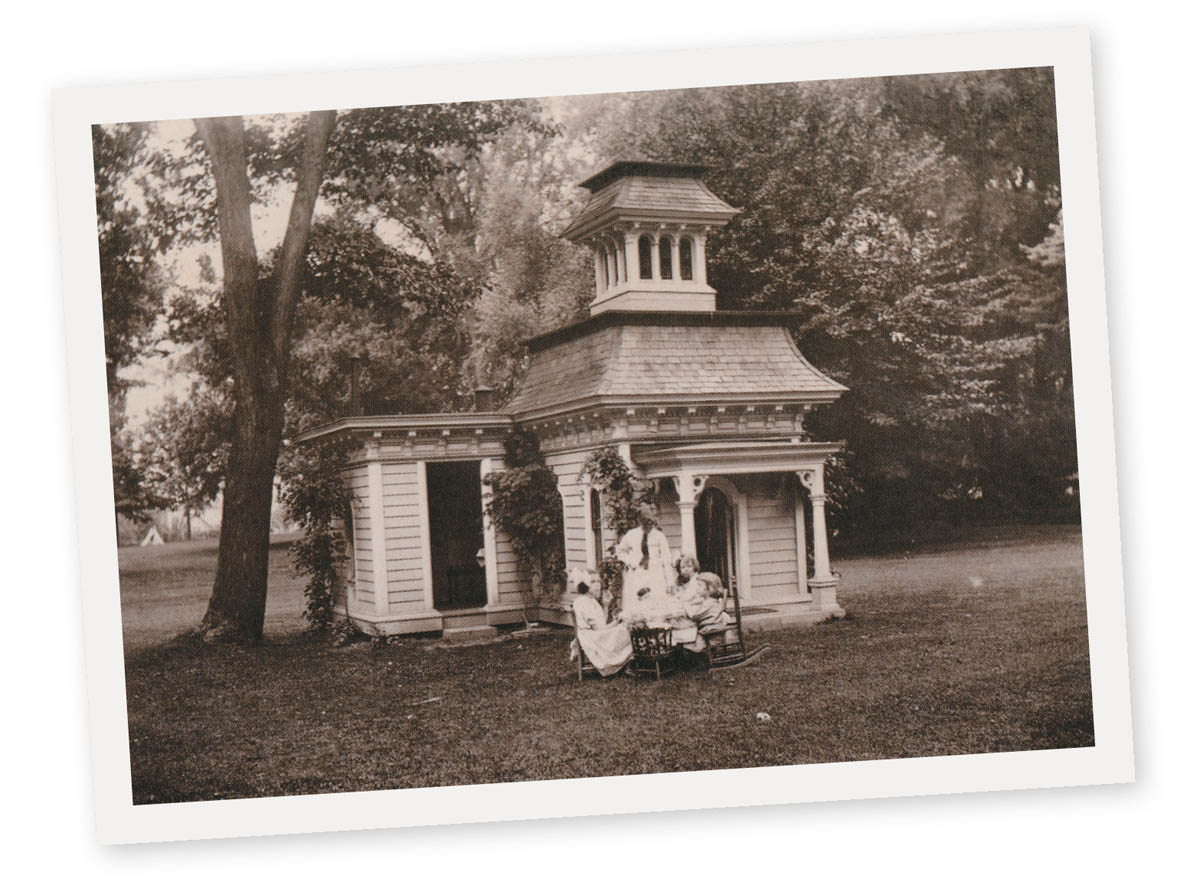
The Park-McCullough House is one of the finest and best-preserved Victorian houses in New England. The 35-room mansion is situated on a 200-acre estate in North Bennington, Vermont. Built in 1865, the house is on the National Register of Historic Places. The grounds are open to the public daily, the house by appointment only.
This playhouse is behind the Park-McCullough House in North Bennington, Vermont. The playhouse was originally built as a doghouse in 1865 and later converted for the children. It is fully furnished, complete with period wallpaper, and features a child-size cast-iron cookstove.”
— Melissa Segalla, curator of the Park-McCullough House
