18. Big Three Level I
Level I is designed for older adults who can’t stand or who have difficulty standing for at least six minutes with or without support, such as a walker, due to limitations in strength, balance, or energy.
All exercises for Level I are performed while lying on your back.
I don’t recommend performing these exercises on the floor because getting up again may be difficult or dangerous.
You’ll be ready for Level II once you can stand for six minutes without too much difficulty.
Exercise 1: Straight Leg Raise
The first exercise in Level I is the straight leg raise. This exercise primarily works the large muscles on the front of the thighs, called the quadriceps. Known as antigravity muscles, these muscles work to oppose the effects of gravity, helping you maintain an upright and balanced posture in standing. The quadriceps are important muscles that help you go from sitting to standing and maintain your body in the standing position.
Equipment
Required
To decrease challenge (optional)
To increase challenge (optional)
Performing the straight leg raise
Starting position
-
Lie on your back with one knee straight and the other knee bent with the sole of your foot flat on the surface.
-
Ensure that the toes of your straight leg are pointed straight up and not turned to either side.
-
Tighten the front thigh muscles of your straight leg.
Movement to ending position
Ending position
Return to starting position
Repetitions
Points to consider
-
Make sure you’re lying relatively flat while performing this exercise. The more your body is inclined, the less range of motion your leg gets, which means less work for your muscles, making the exercise less effective. You can have your head elevated on a pillow if you find that more comfortable.
-
Make sure the toes of the straight leg are pointed straight up throughout this exercise. We tend to have our toes turned outward an inch or more, which can create muscle imbalances.
-
Make sure the front thigh muscles of the lifting leg stay tight and the knee is straight throughout the exercise. This ensures the muscles get as much work as possible.
-
Make sure the bottom of the heel is no higher than three feet from the surface when the leg is in the ending position. We tend to lift the leg too high, which actually takes the work off the muscle and reduces the effectiveness of this exercise.
To decrease challenge
To increase challenge
-
Modify the starting position so that the heel of the straight leg is hovering a half-inch above the surface. Perform the exercise so that your heel doesn’t touch the surface at any time.
-
Add an ankle weight to your leg. Start by placing the weight above your knee, lowering it to your ankle as you get stronger. This helps to gradually increase the torque around your hip and knee to protect you from injury.
Exercise 2: Single-Leg Tuck
The second exercise in Level I is the single-leg tuck. Like the straight leg raise, this exercise primarily works the large antigravity muscles at the front of the thighs, but it also works the hip flexor muscles that lift your legs from the ground.
Weakness in the hip flexor muscles can make the legs feel heavy and is a common reason why older adults drag their feet when they walk; this altered gait results in a high risk for falls. Strengthening the hip flexor muscles will make your legs feel less heavy and help you pick up your feet to clear the ground.
Equipment
Required
To decrease challenge (optional)
To increase challenge (optional)
Performing the single-leg tuck
Starting position
-
Lie on your back with one knee straight and the other knee bent with the sole of your foot flat on the surface.
-
Ensure that the toes of your straight leg are pointed straight up and not turned to either side.
Movement to ending position
Ending position
Return to starting position
Repetitions
Points to consider
-
Make sure you’re lying relatively flat while performing this exercise. The more your body is inclined, the less range of motion your leg gets, which means less work for your muscles, making the exercise less effective. You can have your head elevated on a pillow if you find that more comfortable.
-
Make sure the toes of the straight leg are pointed straight up throughout this exercise. We tend to have our toes turned outward an inch or more, which can create muscle imbalances.
-
Make sure the knee does not bend too much during the movement portion of this exercise. The tendency is for the heel to drop toward the buttocks, which bends the knee too much and reduces the work on the muscles, making the exercise less effective. The movement should look like you’re marching in place on one leg while lying on your back.
-
In the ending position, make sure the hip and knee of the
moving leg are bent 90 degrees. The body should be in the shape of a lowercase letter h, or a chair, with your lower legs making the legs of the chair, your upper leg perpendicular making the seat, and your body making the backrest. We tend to overshoot the movement so that the hip and knee are bent too much in the ending position. This is a coordination issue that will improve with practice.
To decrease challenge
To increase challenge
-
Modify the starting position so that the heel of the straight leg is hovering a half-inch above the surface. Perform the exercise so that your heel doesn’t touch the surface at any time.
-
Add an ankle weight to your leg. Start by placing the weight above your knee, lowering it to your ankle as you get stronger. This helps to gradually increase the torque around your hip and knee to protect you from injury.
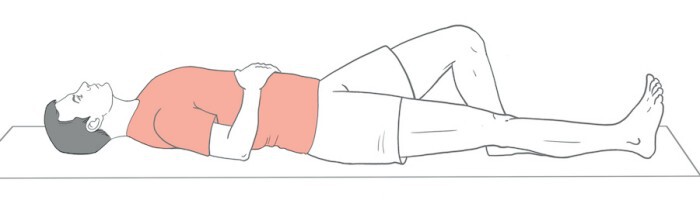
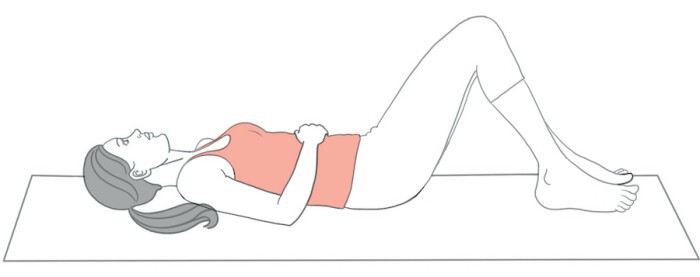
Exercise 3: Hip Raise
The third exercise in Level I is the hip raise. This exercise primarily works the powerful muscles of your buttocks, commonly referred to as the glutes. The glutes are important muscles that help you go from sitting to standing and also oppose the effects of gravity to help you maintain an upright and balanced posture when standing.
Equipment
Required
To decrease challenge (optional)
To increase challenge (optional)
Performing the hip raise
Starting position
-
Lie on your back with your hands folded together on your stomach, both knees bent at slightly less than 90 degrees, feet flat on the surface with toes pointed straight forward, and feet and knees about six inches apart.
-
Tighten your buttocks and abdominal muscles.
Movement to ending position
Ending position
Return to starting position
Repetitions
Points to consider
-
Make sure you’re lying relatively flat while performing this exercise. You can have your head elevated on a pillow if you find that more comfortable.
-
Make sure the toes of both feet are pointed straight forward and not turned outward or inward. Also, ensure your feet are aligned so the toes of one foot are not ahead or behind the toes of the other. This will avoid creating muscle imbalances.
-
Make sure that both knees are bent to slightly less than 90 degrees in the starting position. You can accomplish this by bending your knees to 90 degrees and then sliding both heels about two inches toward your buttocks. This is so that your knees will be at a 90-degree angle when your hips are fully raised in the ending position, which optimizes the work on your glute muscles while also protecting your lower back.
-
Make sure to keep the feet and knees six inches apart during this exercise. You may tend to collapse the knees inward during movement, which may place strain on your joints.
-
Your hands should be resting on your stomach so you avoid the temptation of using them to assist with the movement.
To decrease challenge
To increase challenge
In this chapter, you learned the nuts and bolts of performing Big Three Level I. The next chapter provides detailed instructions for Big Three Level II.
Key Takeaways
-
Level I is designed for older adults who can’t stand or who have difficulty standing for at least six minutes with or without support, such as a walker, due to limitations in strength, balance, or energy.
-
Level I exercises are the straight leg raise, single-leg tuck, and hip raise.
-
You’re ready for Level II once you can stand for six minutes without too much difficulty.
Action Steps
-
If this is the right level for you, spend some time going through the steps of each exercise until the movement feels
natural. Try to cultivate an experimental mindset, and slow things down to learn the movements correctly. It’s okay if your performance is less than perfect at first. Notice what “right” feels like in your body as you start to get the hang of each exercise.
-
If you haven’t done so already, get the exercise illustrations for this level, included in the free bonus resources at
www.sixminutefitness.com/bonus
. Post the illustrations on the wall in the room where you’ll be exercising so you can see them easily.
-
If you’re a family member or a caregiver for an older adult you’d like to help with exercise, assist them with the above action steps.