19. Big Three Level II
This level is designed for older adults who have no difficulty standing but who lack the strength or energy to walk at a vigorous pace for at least six minutes. Level II is also designed for those who have difficulty going up and down a flight of stairs.
You’ll be ready for Level III once you can walk at a vigorous pace for more than six minutes.
Exercise 1: Chair Squat
The first exercise in Level II is the chair squat. This exercise primarily works the large muscles on the front of the thighs (the quadriceps) and the powerful muscles of your buttocks, commonly referred to as the glutes. Known as antigravity muscles, they work to oppose the effects of gravity and help you maintain an upright and balanced posture when standing. Exercising these muscles helps with essential activities like standing up from the toilet, getting out of bed, and getting out of a chair. Additionally, strengthening these muscles will improve your ability to walk and climb stairs.
Equipment
Required
-
A sturdy chair. The back of the chair should be against something solid like a wall, couch, or heavy table to prevent the chair from moving. The seat should be at the right height so that your knees are bent at about 90 degrees when you sit with your feet flat on the ground. You can put one or two small pillows to raise the seat if needed.
To decrease challenge (optional)
To increase challenge (optional)
-
A sturdy backpack loaded with heavy items such as weights, books, canned goods, or similar items to increase resistance.
Performing the chair squat
Starting position
-
Sit on the front half of the seat with your feet back so that the front of your feet are underneath your knees, your feet are about hip-width apart (6–12 inches), your toes are pointing forward, and your arms are crossed in front of your chest.
-
Your knees should be bent to about 90 degrees in sitting with your feet touching the ground. If the seat is too low, you can adjust the height by placing pillows on the seat.
Movement to ending position
Ending position
Return to starting position
Repetitions
Points to consider
-
Make sure to perform this exercise without using your arms to push up on the chair; in this way, you will train your legs to do the work. Older adults with weaker legs tend to go from sitting to standing using their arms for help. This habit prevents the leg muscles from being worked on, which is why I teach this exercise with the arms crossed in front of the chest.
-
Make sure your feet remain about hip-width apart (6–12 inches) with your toes pointing forward during this exercise. You may tend to move one or both feet out of this position, which can create muscle imbalances.
-
Make sure the chair didn’t move out of position before you sit down, as this can result in a fall and injury.
To decrease challenge
-
Use one or two pillows to increase the seat height. You can remove them to gradually lower the seat as you get stronger.
-
If you’re still having difficulty with this exercise even with pillows on the chair, you can place your hands on your knees to help push yourself up to the standing position. Pushing off your knees is different than pushing off the chair because your legs still get all the work.
-
If you’re still having difficulty with this exercise even with pushing off your knees, ask someone to assist you by having them stand in front of you. Grab on to their hands with your hands, and use your arms to help pull yourself up to the standing position. Gradually reduce the amount of help you need from your arms as you get stronger.
To increase challenge
Exercise 2: Heel Lift
The second exercise in Level II is the heel lift. This exercise primarily works the calf muscles on the back of the lower leg. These muscles are also antigravity muscles that oppose the effects of gravity to help you maintain an upright and balanced posture in standing.
Because these muscles help return circulating blood back to the
heart, they are sometimes called your body’s “second heart.” Strong calf muscles serve better in this role to prevent or reduce swelling in the feet and to prevent blood clots from forming. Strong calf muscles are also important for daily activities, such as using the feet to push off and propel your body forward while walking, or standing on your tiptoes to reach up for something.
Equipment
Required
-
A sturdy chair. The back of the chair should be against something solid like a wall, couch, or heavy table to prevent the chair from moving. You will be performing this exercise with this chair behind you for safety in case you fall backward.
-
A walker or a second chair with a high backrest placed in front of the first chair for balance.
To decrease challenge (optional)
To increase challenge (optional)
-
A sturdy backpack loaded with heavy items, such as weights,
books, canned goods, or similar items to increase resistance.
Performing the heel lift
Starting position
Movement to ending position
Ending position
Return to starting position
Repetitions
Points to consider
-
You may tend to bend your knees when lifting the heels off the floor, which prevents your calf muscles from getting the work they need. So make sure to keep your knees straight throughout this exercise.
-
There can also be a tendency to lean forward, which also reduces the effectiveness of the exercise. Make sure that your body is moving straight up and down throughout this exercise and that your hands are only lightly placed on the walker or the backrest of the second chair for balance.
To decrease challenge
To increase challenge
-
Perform the exercise while wearing a sturdy backpack loaded with heavy items to increase the resistance.
-
Take your hands off the walker or the backrest of the second chair to work on balance. I recommend hovering the hands an inch above the support so you can quickly grab it if you lose your balance.
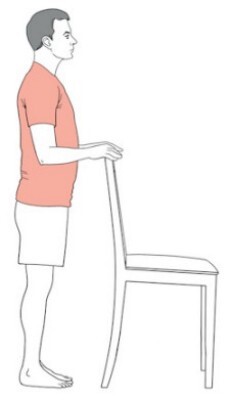
Exercise 3: High Knees Marching
The third exercise in Level II is high knees marching. This exercise works the large antigravity muscles on the front of the thigh and the hip flexor muscles on the front of the hip that lift your legs from the ground.
Since weakness in the hip flexor muscles can make the legs feel heavy, resulting in dragging your feet while you walk and increasing the risk for falls, you need to strengthen these muscles. Strengthening the hip flexor muscles will make the legs feel lighter and help with picking up the feet to clear the ground. This exercise will improve your ability to walk longer distances, walk up an incline or on uneven surfaces, and climb stairs.
Equipment
Required
-
A sturdy chair. The back of the chair should be against something solid like a wall, couch, or heavy table to prevent
the chair from moving. You will be performing this exercise with this chair behind you for safety in case you fall backward.
-
A walker or a second chair with a high backrest placed in front of the first chair for balance.
To decrease challenge
To increase challenge
Performing high knees marching
Starting position
-
Stand in front of the chair with your feet about hip-width apart (6–12 inches), your toes pointing forward, and your hands placed lightly on a walker or the backrest of a second chair for balance.
-
Your right leg is on the ground, and your left leg is lifted with hip and knee bent 90 degrees.
-
The walker or the second chair should be placed farther forward than in the heel lift, to make room for you to lift your
knees.
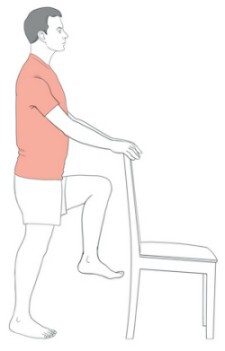
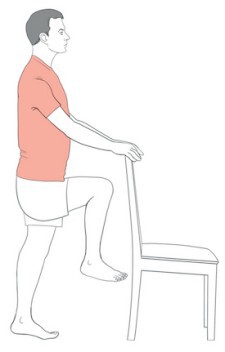
Movement to ending position
Ending position
Return to starting position
Repetitions
Points to consider
-
Make sure the lifted leg’s hip and knee are at 90 degrees in the ending position. The body should look like the letter h, or the shape of a chair, with your lower legs making the chair leg, your upper leg making the seat, and your body making the backrest. The tendency is to not lift the leg up high enough, which prevents your hip flexor muscles from working through most of their range of motion. The other tendency is to bend the knee too much when lifting, which prevents the hip flexors from getting the work they need.
-
Make sure the support in front of you is not too close. Otherwise, you may hit your knee on it when you lift your leg.
To decrease challenge
To increase challenge
-
Perform the exercise while wearing ankle weights to increase the resistance.
-
Take your hands off the walker or the second chair to work on balance. I recommend hovering the hands an inch above the support so that you can quickly grab it if you lose your balance.
In this chapter, you learned the nuts and bolts of performing Big Three Level II. The next chapter provides detailed instructions on how to perform Big Three Level III. Before proceeding, you should bear in mind that Level III is challenging; it’s best to stick with Level II if you have any back, hip, or knee issues.
Key Takeaways
-
Level II is designed for older adults who have no difficulty standing but who lack the strength or energy to walk at a vigorous pace for at least six minutes. Level II is also designed for those who have difficulty going up and down a flight of stairs.
-
Level II exercises are the chair squat, heel lift, and high knee marching.
-
You’re ready for Level III once you can walk at a vigorous pace for more than six minutes. However, Level III is challenging, and it’s best to stick with Level II if you have any back, hip, or knee issues.
Action Steps
-
If this is the right level for you, spend some time going through the steps of each exercise until the movement feels natural. Try to cultivate an experimental mindset, and slow things down to learn the movements correctly. It’s okay if your performance is less than perfect at first. Notice what “right” feels like in your body as you start to get the hang of each exercise.
-
If you haven’t done so already, get the exercise illustrations for this level, included in the free bonus resources at
www.sixminutefitness.com/bonus
. Post the illustrations on the wall in the room where you’ll be exercising so you can see them easily.
-
If you’re a family member or a caregiver for an older adult you’d like to help with exercise, assist them with the above action steps.