20. Big Three Level III
This level is designed for older adults who are high functioning. This means they can walk at a vigorous pace for more than six minutes and can go up and down several flights of stairs with no difficulty.
This level is challenging, so it’s best to stick with Level II if you have any back, hip, or knee issues.
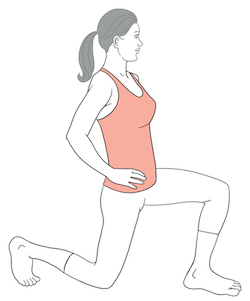
Exercise 1: Stationary Lunge
The first exercise in Level III is the stationary lunge. This exercise works the large quadriceps muscles on the front of the thighs and the powerful glute muscles of your buttocks. You will recall from previous levels that these are known as antigravity muscles because they work to oppose the effects of gravity, which helps you maintain an upright and balanced posture when standing.
The stationary lunge is a single-leg movement that works each side of your body independently. Single-leg movements are important because they help to correct the imbalances between the two sides of the body that exist in most people and activate your stabilizing muscles to develop balance, coordination, and stability.
Lunges are important for helping you get up from the ground, or
any low surface, and are a great exercise to strengthen, sculpt, and tone your body while also improving overall fitness and enhancing athletic performance.
Equipment
Required
To decrease challenge (optional)
To increase challenge (optional)
-
A sturdy backpack loaded with heavy items such as weights, books, canned goods, or similar items to increase resistance.
Performing the stationary lunge
Starting position
-
Stand with your feet about hip-width apart (6–12 inches), your toes pointing forward, and your hands resting on your waist.
-
Take a big step forward with one leg (about 2–3 feet for most people). Ensure the toes of your front foot are pointed straight forward and the heel of your back foot is lifted off the floor.
-
Keep your back and upper body straight, and ensure that most of your weight is on the heel of your front foot.
Movement to ending position
Ending position
-
Your front knee is bent at about a 90-degree angle directly above your front ankle, and your front thigh is parallel to the floor.
-
Your back heel is lifted off the floor, and your back knee is lightly touching the floor.
Return to starting position
Repetitions
Points to consider
-
To protect your front knee from injury, do not move it ahead of your front toes at any time during this exercise. If your knee does go over your toes, try lowering your body straight down during this exercise. If this doesn’t resolve the issue, you may need to take a bigger step forward with the front leg.
-
Additionally, do not move your front knee inward toward the midline of your body during this exercise. It should stay aligned with the second and third toes of your front foot throughout the movement.
To decrease challenge
To increase challenge
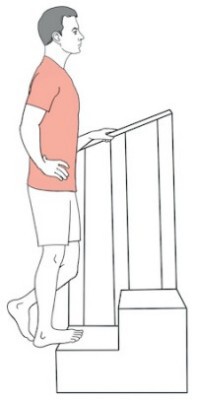
Exercise 2: Step-Up
The second exercise in Level III is the step-up. This exercise also works the antigravity muscles: the quadriceps in the thighs and the powerful glute muscles of your buttocks.
The step-up is a single-leg movement in standing that works each side of your body independently and activates your stabilizing muscles to develop balance, coordination, and stability.
The step-up works the same muscles as the stationary lunge, but at a different angle; this provides different benefits. While lunges will help you get up from the ground, or any low surface, step-ups will help you lift your body up a stair, incline, or any high surface. Step-ups are a great exercise to strengthen, sculpt, and tone your body while also improving overall fitness and enhancing athletic performance.
Equipment
Required
To decrease challenge (optional)
To increase challenge (optional)
-
A higher step (12–24 inches), like a sturdy chair.
-
A sturdy backpack loaded with heavy items such as weights, books, canned goods, or similar items to increase resistance.
Performing the step-up
Starting position
-
Stand with one foot on the step and the other foot on the ground below the step.
-
Make sure your feet are about hip-width apart (6–12 inches), your toes are pointing straight forward, and your hands are resting on your waist.
Movement to ending position
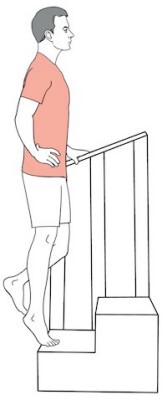
-
Lift your body up the step by pressing through the front foot until that leg is straight.
-
At the same time, lift your opposite leg up until the knee is about waist level. Make sure to breathe throughout the movement.
Ending position
Return to starting position
Repetitions
Points to consider
-
To protect your front knee from injury, do not move it ahead of your front toes at any time during this exercise. If your knee does go in front of your toes, try keeping your body straight, and avoid leaning too far forward as you lift your body during this exercise.
-
Additionally, do not move your front knee inward toward the midline of your body during this exercise. It should stay aligned with the second and third toes of your front foot throughout the movement.
To decrease challenge
-
Use a lower step (8–12 inches), like a single step in a staircase. Gradually work your way up to a higher step as you get stronger.
-
Place one hand on a wall or a rail for balance.
To increase challenge
-
Use a higher step (12–24 inches), like a sturdy chair.
-
Perform the exercise while wearing a sturdy backpack loaded with heavy items to increase the resistance.
Exercise 3: Single-Leg Heel Lift
The third exercise in Level III is the single-leg heel lift. This exercise primarily works the muscles on the back of the lower leg called the calf muscles. Like the quadriceps and glutes, these muscles are also antigravity muscles that help you maintain an upright and balanced posture when standing.
Because they help to return circulating blood back to the heart, the calf muscles are sometimes called your body’s “second heart.” Strong calf muscles serve better in this role to prevent or reduce swelling in the feet and also prevent blood clots from forming. Strong calf muscles are also important for daily activities, such as using the feet to push off and propel your body forward while walking, or standing on your tiptoes to reach for something.
Equipment
Required
To decrease challenge (optional)
To increase challenge (optional)
-
A sturdy backpack loaded with heavy items such as weights, books, canned goods, or similar items to increase resistance.
Performing the single-leg heel lift
Starting position
-
Stand with the ball of one foot on the edge of the step and your heel off the edge. Your toes are pointed straight forward, and your knee is straight.
-
The opposite leg is hanging freely off the edge of the step, and one hand is lightly placed on a wall or rail for balance.
-
Lower your body by dropping the heel of the foot that’s on the step while keeping your knee straight.
Movement to ending position
Ending position
Return to starting position
Repetitions
Points to consider
-
You may tend to bend the knee when lifting the heel up, preventing your calf muscle from getting the work it needs. Make sure to keep your knee straight throughout this exercise.
-
You may tend to lean forward when lifting the heel up, which also prevents your calf muscle from getting the work it needs. Make sure that your body is moving straight up and down throughout this exercise.
To decrease challenge
To increase challenge
In this chapter, you learned the nuts and bolts of performing Big Three Level III. The next chapter provides detailed instructions for Big Three Level IV.
Key Takeaways
-
Level III is designed for older adults who are high functioning. This means they can walk at a vigorous pace for more than six minutes and can go up and down several flights of stairs with no difficulty.
-
Level III exercises are the stationary lunge, step-up, and single-leg heel lift.
-
This level is challenging; it’s best to stick with Level II if you have any back, hip, or knee issues.
Action Steps
-
If this is the right level for you, spend some time going through the steps of each exercise until the movement feels
natural. Try to cultivate an experimental mindset, and slow things down to learn the movements correctly. It’s okay if your performance is less than perfect at first. Notice what “right” feels like in your body as you start to get the hang of each exercise.
-
If you haven’t done so already, get the exercise illustrations for this level, included in the free bonus resources at
www.sixminutefitness.com/bonus
. Post the illustrations on the wall in the room where you’ll be exercising so you can see them easily.
-
If you’re a family member or a caregiver for an older adult you’d like to help with exercise, assist them with the above action steps.