21. Big Three Level IV
Level IV consists of upper body exercises designed for older adults after they have completed eight weeks of Level II or Level III lower-body training.
I recommend exclusively working your lower body in the beginning because, as we discussed in part 1, healthy, strong hips and legs are what allow you to safely stand upright and to walk—in other words, to be self-sufficient. While having a weak upper body can be inconvenient, a weak lower body negatively impacts your overall quality of life more.
This is the only level at which you will exercise only once daily.
Exercise 1: One-Arm Bent Row
The first exercise in Level IV is the one-arm bent row. This exercise primarily works the large muscles of your upper and middle back and the biceps muscle at the front of your upper arm.
Poor posture is often due to weakness in our back muscles. This weakness can cause a rounding of our upper spine, resulting in the classic “hunched over” appearance. The one-arm row helps to strengthen and stabilize nearly all the muscles involved in maintaining an upright posture without causing much strain on
your lower back.
Equipment
Required
-
A sturdy table or countertop.
-
A weight, such as a dumbbell or ankle weight; sturdy backpack loaded with heavy items; or anything with resistance that you can hold in your hand.
To decrease challenge (optional)
To increase challenge (optional)
Performing the one-arm bent row
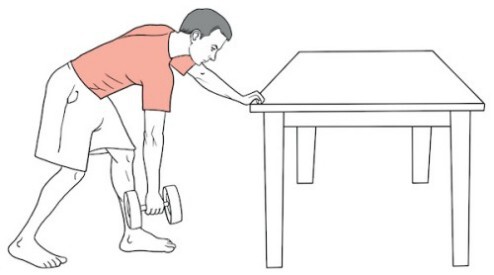
Starting position
-
Stand in front of a sturdy table or countertop, bending about 45 degrees forward at your waist with your back straight. One hand should be supporting you on the table or counter, and the elbow of that supporting arm should be straight. With your other hand, hold the weight or backpack hanging naturally down toward the ground.
-
Your feet should be in a staggered stance, with the foot on the same side as the supporting arm forward, and the foot on the same side as the arm holding the weight or backpack one to two feet backward.
-
Keep your body stable by tightening your abdominal muscles.
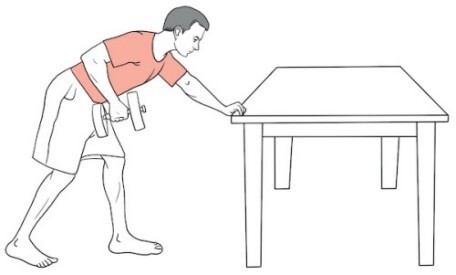
Movement to ending position
Ending position
Return to starting position
Repetitions
Points to consider
-
Make sure your back is straight while performing this exercise. The tendency is to round the back instead of bending at the waist.
-
You can place more of your body weight on the arm that is supporting you on the table or countertop if you have low back problems.
To decrease challenge
To increase challenge
Exercise 2: Floor Press
The second exercise in Level IV is the floor press. This exercise primarily works the large muscles of your chest and your triceps muscle at the back of your upper arm without causing much strain on your shoulders.
The floor press helps with daily activities, such as pushing shopping carts and heavy doors. If you happen to take a fall, you’ll have an easier time pushing yourself off the ground. This exercise is also beneficial for sports such as swimming, tennis, and golf.
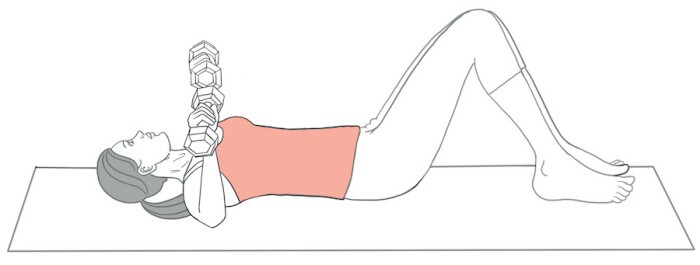
You’ll be performing the floor press while lying on your back. I recommend performing this exercise on a firm surface, but a softer bed or couch will work if that is not available. Lying on the floor is okay if you don’t have any issues getting back up.
Equipment
Required
-
A pair of weights, such as dumbbells, ankle weights, or jugs of water (with handles); sturdy backpacks loaded with heavy items; or anything with resistance that you can hold in your hands.
To decrease challenge (optional)
To increase challenge (optional)
Performing the floor press
Starting position
-
Lie flat on your back with your knees bent and the soles of your feet flat on the surface while holding a weight in each hand.
-
Your elbows should be bent at 90 degrees and resting on the surface with the weights above your chest.
-
Keep your body stable by tightening your abdominal muscles.
Movement to ending position
Ending position
Return to starting position
Repetitions
Points to consider
-
Make sure that your elbows are straight but not locked in the ending position. Locking the elbow will take the work off the muscles.
-
Also, make sure you don’t arch backward with your trunk during this exercise. You might need to lower the resistance if you’re having a difficult time avoiding this.
To decrease challenge
To increase challenge
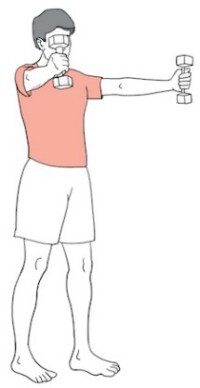
Exercise 3: Shoulder Y-Raise
The third exercise in Level IV is the shoulder Y-raise. This exercise primarily works the muscles in your shoulders, which are important for any activity that involves raising your upper arms. It also works the deep rotator cuff muscles that stabilize and protect your shoulders from injury.
This exercise improves the ability to perform daily activities, such as reaching overhead to grab something from a high cupboard or lifting heavy grandchildren, with greater ease.
Equipment
Required
-
A pair of weights, such as dumbbells, ankle weights, jugs of water (with handles); sturdy backpacks loaded with heavy items; or anything else with resistance that you can hold in your hands.
To decrease challenge
To increase challenge
Performing the shoulder Y-raise
Starting position
-
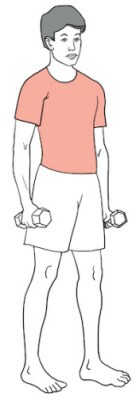
Stand with your feet shoulder-width apart with the pair of weights in your hands, arms hanging by your side, and palms facing inwards toward your body.
-
Keep your body stable by tightening your abdominal muscles.
Movement to ending position
-
Lift the weights to shoulder height with your thumbs up, elbows straight, and arms at about a 30-degree angle in front of your body such that your arms form a Y shape in front of your chest. Make sure to breathe throughout the movement.
Ending position
-
Your body should remain stable with your abdominal muscles tight. Your arms are at shoulder height with your thumbs up, elbows straight, and arms at about a 30-degree angle in front of your body, forming a Y shape in front of your chest. Hold for a half second.
Return to starting position
Repetitions
Points to consider
-
Make sure you raise the arms at about a 30-degree angle in front of your body. An easy way to understand this is by holding your arms straight out to the sides and then moving them slightly together in front of your body, like you’re giving a hug to a giant tree. This position is optimal for exercising your rotator cuff muscles.
-
Make sure you lift with your thumbs up. The thumb-up position creates more space inside the shoulder joint during this movement, which reduces the likelihood of causing painful jamming.
-
Make sure to lift your arms no higher than the level of your shoulders. When you raise your arms higher than this, other muscles you don’t want to use get involved.
-
Also, make sure you don’t hike up your shoulders or arch backward with your trunk during this exercise. You might need to lower the resistance if you’re having a difficult time avoiding this.
To decrease challenge
To increase challenge
In this chapter, you learned the nuts and bolts of performing Big Three Level IV, and that concludes part 4. In part 5, you’ll put together everything you’ve learned to execute the six-minute workout.
Key Takeaways
-
Level IV consists of upper body exercises designed for older adults after eight weeks of Level II or Level III lower-body training.
-
Level IV exercises are the one-arm bent row, floor press, and shoulder Y-raise.
Action Steps
-
Spend some time going through the steps of each exercise until the movement feels natural. Take an experimental mindset, and slow things down to learn the movements correctly. It’s okay if your performance is not perfect at first. Notice what “right” feels like in your body as you start to get the hang of each exercise.
-
If you haven’t already done so, get the exercise illustrations for this level, included in the free bonus resources at
www.sixminutefitness.com/bonus
. Post the illustrations on the wall in the room where you’ll be exercising so you can easily see them.
-
If you’re a family member or a caregiver for an older adult you’d like to help with exercise, assist them with the above action steps.