Appendix C: More Information on Canning
Canning is one of the most popular preservation methods for food. However, it can be much more labor-intensive than freezing or drying foods, and you will need special equipment to process the food correctly. The benefits to canning, in spite of the extra trouble, are that many foods taste better when they are canned rather than frozen. Some produce, such as plums, apples, and carrots, develop a richer, complex taste in the canning process. In addition, your freezer usually has a small amount of room for storage, whereas canned foods can be piled up in a pantry, basement, or closet for years. Finally, there are some foods, such as pickles, that cannot complete the fermenting process in a freezer.
A Glossary of Canning Terms
Acid foods: Foods that contain enough acid to result in a pH of 4.6 or lower. Includes all fruits except figs; most tomatoes; fermented and pickled vegetables; relishes; and jams, jellies, and marmalades. Acidic foods may be processed in boiling water.
Altitude: The vertical elevation of a location above sea level.
Ascorbic acid: The chemical name for vitamin C. Lemon juice contains large quantities of ascorbic acid and is commonly used to prevent browning of peeled, light-colored fruits and vegetables.
Bacteria: A large group of one-celled microorganisms widely distributed in nature. See microorganism.
Blancher: A 6- to 8-quart lidded pot designed with a fitted perforated basket to hold food in boiling water, or with a fitted rack to steam foods. Useful for loosening skins on fruits to be peeled, or for heating foods to be hot packed.
Boiling-water canner: A large standard-sized lidded kettle with jar rack, designed for heat-processing 7 quarts or 8 to 9 pints in boiling water.
Botulism: An illness caused by eating toxin produced by growth of Clostridium botulinum bacteria in moist, low-acid food, containing less than 2 percent oxygen, and stored between 40 and 120 degrees. Proper heat processing destroys this bacterium in canned food. Freezer temperatures inhibit its growth in frozen food. Low moisture controls its growth in dried food. High oxygen controls its growth in fresh foods.
Canning: A method of preserving food in airtight, vacuum-sealed containers and heat processing sufficiently to enable storing the food at normal home temperatures.
Canning salt: Also called pickling salt, this is regular table salt without the anticaking or iodine additives.
Citric acid: A form of acid that can be added to canned foods. It increases the acidity of low-acid foods and may improve the flavor and color.
Cold pack: Canning procedure in which jars are filled with raw food. “Raw pack” is the preferred term for describing this practice. “Cold pack” is often used incorrectly to refer to foods that are open-kettle canned or jars that are heat-processed in boiling water.
Enzymes: Proteins in food that accelerate many flavor, color, texture, and nutritional changes, especially when food is cut, sliced, crushed, bruised, and exposed to air. Proper blanching or hot-packing practices destroy enzymes and improve food quality.
Exhausting: Removing air from within and around food and from jars and canners. Blanching exhausts air from live food tissues. Exhausting or venting pressure canners is necessary to prevent a risk of botulism in low-acid canned foods.
Fermentation: Changes in food caused by intentional growth of bacteria, yeast, or mold. Native bacteria ferment natural sugars to lactic acid, a major flavoring and preservative in sauerkraut and in naturally fermented dills. Alcohol, vinegar, and some dairy products are also fermented foods.
Headspace: The unfilled space above food or liquid in jars. Allows for food expansion as jars are heated, and for forming vacuums as jars cool.
Heat processing: Treating jars with sufficient heat to enable storing food at normal home temperatures.
Hermetic seal: An absolutely airtight container seal that prevents air or microorganisms from re-entering into packaged foods.
Hot pack: Heating raw food in boiling water or steam and filling it hot into jars.
Low-acid foods: Foods that contain very little acid and have a pH above 4.6. The acidity in these foods is insufficient to prevent the growth of the bacterium Clostridium botulinum. Vegetables, some tomatoes, figs, all meats, fish, seafoods, and some dairy foods are low acid. To control all risks of botulism, jars of these foods must be (1) heat processed in a pressure canner, or (2) acidified to a pH of 4.6 or lower before processing in boiling water.
Microorganisms: Independent organisms of microscopic size, including bacteria, yeast, and mold. When alive in a suitable environment, they grow rapidly and may divide or reproduce every ten to 30 minutes, reaching high populations very quickly. Undesirable microorganisms cause disease and food spoilage. Microorganisms are sometimes intentionally added to ferment foods, make antibiotics, and for other reasons.
Mold: A fungus-type microorganism whose growth on food is usually visible and colorful. Molds may grow on many foods, including acidic foods like jams and jellies and canned fruits. It is recommended to use heat processing and sealing practices to prevent mold growth on these foods.
Mycotoxins: Toxins produced by the growth of some molds on foods.
Open-kettle canning: A non-recommended canning method. Food is supposedly adequately heat processed in a covered kettle, and then filled hot and sealed in sterile jars. Foods canned this way have low vacuums or too much air, which permits rapid loss of quality in foods. Moreover, these foods often spoil because they become recontaminated while the jars are being filled.
Pasteurization: Heating a specific food enough to destroy the most heat-resistant pathogenic or disease-causing microorganism known to be associated with that food.
pH: A measure of acidity or alkalinity. Values range from 0 to 14. A food is neutral when its pH is 7.0, lower values are increasingly more acidic; higher values are increasingly more alkaline.
Pickling: The practice of adding enough vinegar or lemon juice to a low-acid food to lower its pH to 4.6 or lower. Properly pickled foods may be safely heat processed in boiling water.
Pressure canner: A specifically designed metal kettle with a lockable lid used for heat processing low-acid food. These canners have jar racks, one or more safety devices, systems for exhausting air, and a way to measure or control pressure. Canners with 16- to 23-quart capacity are common. The minimum volume of canner that can be used is one that will contain 4-quart jars. Using pressure saucepans with smaller capacities is not recommended.
Raw pack: The practice of filling jars with raw, unheated food. Acceptable for canning low-acid foods, but allows more rapid quality losses in acidic foods heat processed in boiling water.
Spice bag: A closeable fabric bag used to extract spice flavors in pickling solution.
Style of pack: Form of canned food, such as whole, sliced, piece, juice, or sauce. The term may also be used to reveal whether food is filled raw or hot into jars.
Vacuum: The state of negative pressure. Reflects how thoroughly air is removed from within a jar of processed food — the higher the vacuum, the less air left in the jar.
Yeasts: A group of microorganisms that reproduce by budding. They are used in fermenting some foods and in leavening breads.
The Proper Techniques of Canning
The goal of proper canning is to remove oxygen, destroy enzymes, and kill harmful microorganisms such as mold, bacteria, and yeast. Proper canning will also produce jars with a strong vacuum seal that will prevent liquid from leaking out or microorganisms from getting into the food. Properly canned foods can last for several years. Proper canning practices include:
- Selecting fresh, undamaged foods
- Carefully inspecting and washing fruits and vegetables
- Peeling fresh foods, if necessary
- Using the hot packing method where appropriate
- Adding acids (lemon juice or vinegar) to foods that need acid-packing
- Following recipes and directions precisely
- Using clean jars and lids that seal properly
- Using the right processing time when canning jars in a boiling-water or pressure canner.
Collectively, these practices remove oxygen; destroy enzymes; prevent the growth of undesirable bacteria, yeasts, and molds; and help form a high vacuum in jars. Good vacuums form tight seals that keep liquid in and air and microorganisms out. Most health-related problems arise when people do not follow the canning directions properly. Today’s canning experts agree that old methods of canning and outdated cookbooks give unhealthy or inaccurate directions for food safety. However, The Center for Home Food Preservation, working with the University of Georgia, interviewed home canners and found that they often used unsafe directions or instructions solely from friends or relatives.
Different methods are now considered best for different types of foods. The USDA recommends water bath or pressure-canning methods when preserving high-acid products such as pickles, fruits, and tomatoes. In the past, people canned these products with open-kettle canning, but experts no longer considered this a safe canning method. Oven and microwave procedures are also considered unsafe.
Courtesy of the USDA — Equipment and methods not recommended
Open-kettle canning and processing freshly filled jars in conventional ovens, microwave ovens, and dishwashers are not recommended because these practices do not prevent all risks of spoilage. Steam canners are not recommended because processing times for use with current models have not been adequately researched. Because steam canners do not heat foods in the same manner as boiling-water canners, using them with boiling-water process times may result in spoilage. It is not recommended that pressure processes in excess of 15 PSI be applied when using new pressure canning equipment. So-called canning powders are useless as preservatives and do not replace the need for proper heat processing. Jars with wire bails and glass caps make attractive antiques or storage containers for dry food ingredients but are not recommended for use in canning. One-piece zinc porcelain-lined caps also are no longer recommended. Both glass and zinc caps use flat rubber rings for sealing jars, but too often fail to seal properly.
The canning process sterilizes food and then seals the foods so that no contamination can enter the jar. Sterilization happens during the hot water processing, which also creates a vacuum seal in the jar. In the past, many homemakers poured a layer of wax over foods such as jams and preserves before processing the seal. Most experts now consider this unsafe and unnecessary. In fact, modern lids produce a good vacuum seal without this additional step.
The vacuum seal is crucial and is affected by the quality of the lids as well as the proper level of food and liquid in the jar — which is known as headspace. Each type of food has a different headspace depending on the food’s shrinkage or swelling during the boiling process. Be sure to follow the directions closely, and use a ruler if you have any doubts. More information on headspace can be found later in this section.
Each food has a different processing time to allow enough heat to kill microorganisms. In addition, these times increase with your altitude above sea level because water boils at lower temperatures at higher altitudes. Foods with a lot of acid, such as citrus fruits, tomatoes, and recipes with added vinegar or lemon juice, have an additional antiseptic agent. The acid itself helps to sterilize the foods. Low-acid foods like meat and beans will need a much longer sterilization period.
Canning tools
You will need a few items to can your foods properly. The good news is that most of these items are probably already in your kitchen. Before you get started on a canning recipe, make sure you have the following accessories handy:
1. A jar lifter, which is a set of tongs specially made for canning jars with rubber-coated handles to lift hot jars out of the boiling water in the canner.
2. A small-bladed spatula — either plastic or rubber — to push out bubbles from jars before processing. Some instructions say to use a metal knife, but this may cause some fruits to change color.
3. An accurate kitchen timer, measuring cups, and spoons. Canning recipes are very exact, and proper timing and measuring are crucial to your success.
4. Saucepans to cook sauces and warm lids.
5. Colanders to drain.
6. Knives and cutting boards to cut and process fruits and vegetables.
7. Pot holders or mitts to protect hands from hot surfaces.
8. A large spoon for stirring.
9. Towels to use while cooling your canning jars.
Canning jars
Before you start canning any of the sauces or other items you may have created in bulk, you will need to purchase or borrow canning jars. There are still many old-fashioned jars in circulation — perhaps you inherited some from a relative. These could be old, cracked jars or ones with a rubber gasket and clasp; these are likely to break during processing, and the clasp-type lids are not as safe for canning as modern jars and lids. Some recycled food containers are safe for use in a water-bath process but cannot stand a pressure canner. Commercial mayonnaise jars are a particular concern due to their lack of heat-tempering and thin walls. They also have narrow rims that prevent a proper seal. Of course, many types of recycled food jars can be used for foods that you will refrigerate and use within a week or two. If you borrow or re-use canning jars, be sure to inspect them for nicks, cracks, or lid wear that could cause breakage — or even explosion in a pressure canner. Jars are safe to reuse if they can accommodate modern, flat canning lids and screw-on rings.

Courtesy of the USDA
Your best choice is to purchase new jars made especially for canning from grocery stores, hardware stores, and the like. Quart jars are best for larger produce or meat pieces; pint and half-pint sizes are ideal for sauces, condiments, chutneys, jams, and jellies. Jars come in standard and wide-mouth varieties. Many prefer wide-mouth jars that are easier to fill and wash. Regular and wide-mouth Mason-type, threaded, home-canning jars with self-sealing lids are the best choice. They are available in 1/2 pint, pint, 1 1/2 pint, quart, and 1/2 gallon sizes. The standard jar mouth opening is about 2 3/8 inches. Wide-mouth jars have openings of about 3 inches, which makes them easier to fill and empty. You can use half-gallon jars to can very acidic juices. Regular-mouth decorator jelly jars are available in 8- and 12-ounce sizes. With careful use and handling, Mason jars may be reused many times, requiring only new lids each time. When jars and lids are used properly, jar seals and vacuums are excellent, and jar breakage is rare.
Today, safe canning requires the self-sealing, two-piece vacuum lid that can be found anywhere canning jars are purchased. These flat metal lids have a rubber gasket strip molded to a crimped underside. A metal band screws onto the jar to hold the lid in place. When you process the jars in a hot water bath, the compound softens and begins to seal while still allowing air to escape from the jar. When you allow the jars to cool after processing, the lid seals itself and creates a vacuum within the jar. This is why you should never reuse lids, but the metal bands can be removed after canning and used repeatedly. Be sure to check the metal bands for any signs of rust before using, as the rust can prevent a proper seal. Buy only the quantity of lids you will use in a year. To ensure a good seal, carefully follow the manufacturer’s directions in preparing lids for use. Examine all metal lids carefully. Do not use old, dented, or deformed lids, or lids with gaps or other defects in the sealing gasket.
Jar cleaning and preparation
Before every use, wash empty jars in hot water with detergent, and rinse well by hand, or wash in a dishwasher. Unrinsed detergent residues may cause unnatural flavors and colors. Jars should be kept hot until you are ready to fill them with food. Submerge the clean empty jars in enough water to cover them in a large stockpot or boiling water canner. Bring the water to a simmer (180 degrees), and keep the jars in the simmering water until it is time to fill them with food. A dishwasher may be used to preheat jars if they are washed and dried on a complete regular cycle. Keep the jars in the closed dishwasher until you are ready to fill them.
These washing and preheating methods do not sterilize jars. Some used jars may have a white film on the exterior surface caused by mineral deposits. This scale or hard-water film on jars is easy to remove by soaking jars several hours in a solution containing 1 cup of vinegar (5 percent acidity) per gallon of water prior to washing and preheating the jars.
Another method is to put all of the jars, lids, bands, tongs, and any other items that will come into contact with the food into a large pot and boil the items for ten minutes. Keep the sterile items in the pot until you are ready to use them. Do not touch sterilized supplies with your hands or any unsterilized tools — this will contaminate your sterile supplies. If you boil the equipment while you are preparing your foods for packing, the hot-pack foods will go straight into hot jars and minimize stress on the glass.
Canning Guidelines
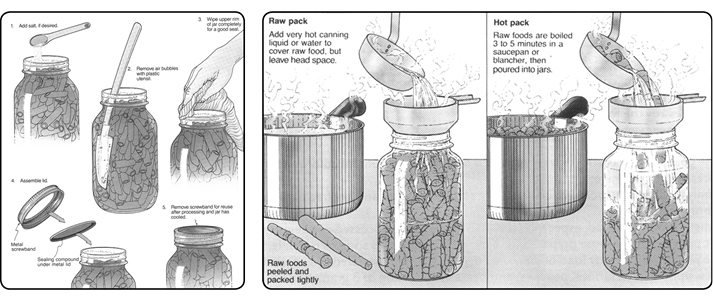
Hot pack vs. raw pack
When packing food (and any juices or spices) into canning jars, there are two ways you can do it: hot pack or raw pack. To hot pack food, you will boil some kind of liquid, juice, or broth and cook the food slightly before putting it into hot jars. The raw pack method requires you to tightly pack raw food into jars and then cover with boiling water, syrup, juice, or broth to the proper headspace. Each canning recipe will indicate which method is best, though some items can be packed either raw or hot.
The hot pack method works best for firm produce or meats that either need a cooked sauce or will taste best with a processed syrup or broth. In addition, hot-packed foods will contain less air, will inactivate enzymes, and will preserve the bright color of the produce. To hot pack foods, fold them into a boiling syrup, juice, or water. Then pack the produce into hot, sterile jars to prevent the glass from cracking, and to eliminate food-borne illnesses. Ladle the juice or broth into the jars until it reaches the required headspace. You may need to tap the jar on a counter or slide a spatula down between the jar and produce to remove any bubbles. Seal the jars, and then process them in a water-bath canner. Because these foods are partially cooked, hot packed produce requires less processing time. Recipes should indicate the proper processing time and the hot pack process.
Raw pack (or cold pack) works best for delicate foods like berries or some types of pickles. Cold packing is quicker and easier, but the processing time is longer. Make sure to pack the produce as tightly as possible into hot, sterile jars. Then pour in the hot syrup, juice, or water to fill spaces and submerge the contents. Again, you may need to tap the jar on a counter or slide a spatula down the insides of the jars to remove any bubbles. Seal the jars, and follow the recipe’s directions to process them in a hot water canner.
Illustrations courtesy of the USDA
Headspace
The space between the food and liquid and the top rim of the jar is called the headspace. Proper headspace is crucial to a good seal. This space will allow the food and air to expand and move while it is heated. The air will expand much more than the food does, and the higher the temperature, the more the air will expand. If you fill the jar too full, the food will swell and spurt out of the jar, ruining the seal. This causes a mess in your canner, too. Even if you wipe off the jar, food may be trapped under the seal and will cause the food to rot. The best remedy is to sterilize the jar and lid and reprocess that jar with the correct headspace.
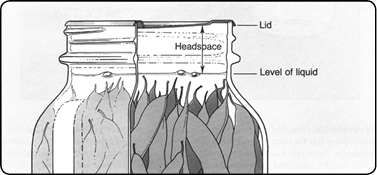
Illustration courtesy of the USDA
As the jars cool, the food, liquid, and air begins to contract; this pulls down the lid to create a vacuum seal that protects your food. You have probably noticed the characteristic hiss as you open a jar of food and the vacuum releases. However, if there is too much headspace for the specific food, the product has too much room to set a strong vacuum as the jars cool. Always make sure the lid is concave when fully cooled, as this indicates a good seal.
Canning recipes should always indicate the right amount of headspace. Make sure you follow the instructions carefully. As a general guideline, vegetables and fruits usually need 1/2 inch of headspace if processed in a boiling water canner. Produce, meat, and other recipes processed in a pressure canner should generally have 1 inch of headspace. Jams and jellies need 1/4 inch of headspace.
Altitude adjustments
The canning recipes in this book call for a specific processing time and, with pressure canners, a specific amount of pressure. These instructions are intended for people who are processing food at altitudes ranging from sea level to 1,000 feet above sea level. However, the processing times used at higher altitudes may not be sufficient and can cause the food to spoil. This is because water boils at a lower temperature at higher altitudes; the lower temperature may not be sufficient to destroy all the bacteria and mold.
If you live at a high altitude, you are probably familiar with adjusting many types of recipes to work with your area. When using a pressure canner at altitudes above 1,000 feet, add 1/2 pound more pressure for each 1,000 in altitude. If your pressure canner does not have a dial gauge that allows you to make small adjustments, increase the weighted gauge to the next mark. For example, if your recipe calls for 10 pounds of pressure at 1,000 feet, process it at 15 pounds of pressure at high altitudes. When processing high-acid foods in a water-bath canner at altitudes above 1,000 feet, add five minutes of processing time. For low-acid foods, add ten minutes for each 1,000 in altitude. These are only general guidelines; your particular area may vary. If you have questions about your altitude, proper pressures, or canning times, check with your county extension office.
Determining Your Altitude Above Sea Level, courtesy of the USDA
It is important to know your approximate elevation or altitude above sea level in order to determine a safe processing time for canned foods. Because the boiling temperature of liquid is lower at higher elevations, it is critical that additional time be given for to safely process foods at altitudes above sea level.
It is not practical to include a list of altitudes in this guide because there is wide variation within a state and even a county. For example, Kansas has areas with altitudes varying between 75 feet and 4,039 feet above sea level. Kansas is not generally thought to have high altitudes, but there are many areas of the state where adjustments for altitude must be considered. Colorado, on the other hand, has people living in areas between 3,000 and 10,000 feet above sea level. They tend to be more conscious of the need to make altitude adjustments in the various processing schedules. Listing altitudes for specific counties may actually be misleading due to the differences in geographic terrain within a county.
If you are unsure about the altitude where you will be canning foods, consult your county extension agent. An alternative source of information would be your local district conservationist with the Soil Conservation Service.
Boiling water bath canners
These types of canners are large metal or porcelain-lined pots that have a removable canning rack and a lid. These are inexpensive and easy to find in department or hardware stores. Buy a size that will be no more than 4 inches wider than your stove burners so the water will process food evenly.
During water bath processing, jars are placed on top of the canning rack, and then the pot is filled with water. Make sure you fill the canner so at least 1 inch of water covers the tops of the jars. The water is heated to boiling, and once a full rolling boil is attained, start timing the processing according to the recipe’s directions. Some boiling-water canners do not have flat bottoms. A flat bottom must be used on an electric range. Either a flat or ridged bottom can be used on a gas burner. To ensure uniform processing of all jars with an electric range, the canner should be no more than 4 inches wider in diameter than the element on which it is heated.
Boiling water bath canning is suitable only for foods containing high acid, like many fruits and pickles; the acid content helps to destroy toxins and harmful microorganisms. Lower-acid foods need a longer processing time and the heat concentration of a pressure canner to raise the temperature high enough to kill the same microorganisms.
How to use a water bath canner — instructions courtesy of the USDA
1. Before you start preparing your food, fill the canner halfway with clean water. This is approximately the level needed for a canner load of pint jars. For other sizes and numbers of jars, the amount of water in the canner will need to be adjusted so it will be 1 to 2 inches over the top of the filled jars.
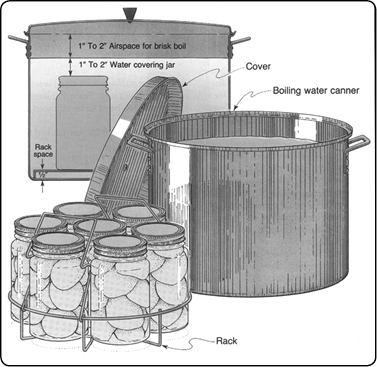
Illustration courtesy of the USDA. Example of a boiling water bath canner.
2. Preheat water to 140 degrees for raw packed foods and to 180 degrees for hot packed foods. You can start preparing the food while this water is preheating.
3. Load filled jars, fitted with lids, into the canner rack, and use the handles to lower the rack into the water; or fill the canner with the rack in the bottom, one jar at a time, using a jar lifter. When using a jar lifter, make sure it is securely positioned below the neck of the jar (below the screw band of the lid). Keep the jar upright at all times. Tilting the jar could cause food to spill into the sealing area of the lid.
4. Add more boiling water, if needed, so the water level is at least 1 inch above jar tops. For process times over 30 minutes, the water level should be at least 2 inches above the tops of the jars.
5. Turn heat to its highest position, cover the canner with its lid, and heat until the water in the canner boils vigorously.
6. Set a timer for the total minutes required for processing the food.
7. Keep the canner covered, and maintain a boil throughout the process schedule. The heat setting may be lowered a little as long as a complete boil is maintained for the entire process time. If the water stops boiling at any time during the process, bring the water back to a vigorous boil, and begin the timing of the process over from the beginning.
8. Add more boiling water, if needed, to keep the water level above the jars.
9. When jars have been boiled for the recommended time, turn off the heat and remove the canner lid. Wait five minutes before removing jars.
10. Using a jar lifter, remove the jars and place them on a towel, leaving at least 1-inch spaces between the jars during cooling. Let jars sit undisturbed to cool at room temperature for 12 to 24 hours.
Pressure canners
Pressure canners have been extensively redesigned in recent years. Models made before the 1970s were heavy walled kettles with clamp-on or turn-on lids. They were fitted with a dial gauge, a vent port in the form of a petcock or counterweight, and a safety fuse. All low-acid foods must be processed in a pressure canner. This is a different kitchen appliance than a pressure cooker — it is designed to accommodate large canning jars and produces the proper temperature for canned food processing. An average canner can hold about seven quart jars or up to nine pint jars. Smaller canners can hold four quart jars.
Pressure does not destroy microorganisms, but high temperatures applied for an adequate period of time do kill microorganisms. Whether you are able to destroy all microorganisms capable of growing in canned food is based on the temperature obtained in pure steam, free of air, at sea level. At sea level, a canner operated at a gauge pressure of 10.5 pounds provides an internal temperature of 240 degrees.
A pressure canner has a locking lid that holds in the steam and allows the pressure and heat to build up. Either a pressure canner has a pressure gauge that shows the settings — 5, 10, or 15 pounds — or a dial gauge that monitors rises in pressure from 5 to 15 pounds. If you live at a higher altitude, the dial gauge will be easier for you to use because you must increase the pressure by 1/2 pound for each 1,000 feet above sea level. If you use a dial gauge, be sure to have it checked every year at your county extension office.
Two serious errors in temperatures obtained in pressure canners occur because:
1. Internal canner temperatures are lower at higher altitudes. To correct this error, canners must be operated at the increased pressures.
2. Air trapped in a canner lowers the temperature obtained at 5, 10, or 15 pounds of pressure and results in under processing. The highest volume of air trapped in a canner occurs in processing raw packed foods in dial-gauge canners. These canners do not vent air during processing. To be safe, all types of pressure canners must be vented ten minutes before they are pressurized.
To vent a canner, leave the vent port uncovered on newer models or manually open petcocks or vent ports on some older models. Heating the filled canner with its lid locked into place boils water and generates steam that escapes through the petcock or vent port. When steam first escapes, set a timer for ten minutes. After venting ten minutes, close the petcock or place the counterweight or weighted gauge over the vent port to pressurize the canner.
Weighted gauge models exhaust tiny amounts of air and steam each time their gauge rocks or jiggles during processing. They control pressure precisely and need neither watching during processing nor checking for accuracy. The sound of the weight rocking or jiggling indicates that the canner is maintaining the recommended pressure. The single disadvantage of weighted-gauge canners is that they may be imprecise at higher altitudes. At altitudes above 1,000 feet, they must be operated at canner pressures of 10 instead of 5, or 15 instead of 10, PSI.
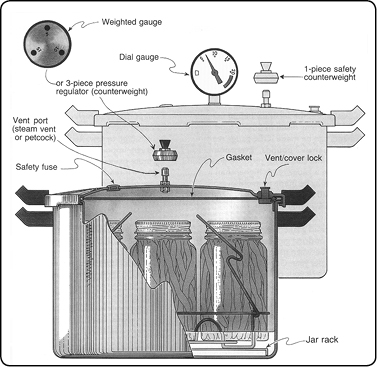
Illustration courtesy of the USDA
Check dial gauges for accuracy before use each year. Gauges that read high cause under-processing and may result in unsafe food. Low readings cause over-processing. Pressure adjustments can be made if the gauge reads up to 2 pounds high or low. Replace gauges that differ by more than 2 pounds. Every pound of pressure is very important to the temperature needed inside the canner for producing safe food, so accurate gauges and adjustments are essential when a gauge reads higher than it should. If a gauge is reading lower than it should, adjustments may be made to avoid over processing but are not essential to safety. Gauges may be checked at many county Cooperative Extension offices, or contact the pressure canner manufacturer for other options.
Handle canner lid gaskets carefully, and clean them according to the manufacturer’s directions. Nicked or dried gaskets will allow steam leaks during pressurization of canners. Keep gaskets clean between uses. Gaskets on older model canners may require a light coat of vegetable oil once per year. Gaskets on newer model canners are prelubricated and do not benefit from oiling. Check your canner’s instructions if there is doubt that the particular gasket you use has been prelubricated.
Lid safety fuses are thin metal inserts or rubber plugs designed to relieve excessive pressure from the canner. Do not pick at or scratch fuses while cleaning lids. Use only canners that have the Underwriter’s Laboratory (UL) approval to ensure their safety.
Replacement gauges and other parts for canners are often available at stores that offer canning equipment or from canner manufacturers. When ordering parts, give your canner model number, and describe the parts needed.
Using pressure canners — instructions courtesy of the USDA
Follow these steps for successful pressure canning:
1. Put 2 to 3 inches of hot water in the canner. Some specific products may require that you start with even more water in the canner. Always follow the directions for specific foods if they require more water added to the canner. Place filled jars on the rack using a jar lifter. When using a jar lifter, make sure it is securely positioned below the neck of the jar (below the screw band of the lid). Keep the jar upright at all times. Tilting the jar could cause food to spill into the sealing area of the lid. Fasten canner lid securely.
2. Leave weight off vent port or open petcock. Heat at the highest setting until steam flows freely from the open petcock or vent port.
3. While maintaining the high heat setting, let the steam flow (exhaust) continuously for ten minutes, and then place the weight on the vent port or close the petcock. The canner will pressurize during the next three to five minutes.
4. Start timing the process when the pressure reading on the dial gauge indicates that the recommended pressure has been reached, or when the weighted gauge begins to jiggle or rock as the canner manufacturer describes.
5. Regulate heat under the canner to maintain a steady pressure at or slightly above the correct gauge pressure. Quick and large pressure variations during processing may cause unnecessary liquid losses from jars. Follow the canner manufacturer’s directions for how a weighted gauge should indicate it is maintaining the desired pressure.
IMPORTANT: If at any time pressure goes below the recommended amount, bring the canner back to pressure, and begin the timing of the process over from the beginning (using the total original process time). This is important for the safety of the food.
6. When the timed process is completed, turn off the heat, remove the canner from heat if possible, and let the canner depressurize. Do not force cool the canner. Forced cooling may result in unsafe food or food spoilage. Cooling the canner with cold running water or opening the vent port before the canner is fully depressurized will cause loss of liquid from jars and seal failures. Force cooling may also warp the canner lid of older model canners, causing steam leaks. Depressurization of older models without dial gauges should be timed. Standard-size heavy-walled canners require about 30 minutes when loaded with pints and 45 minutes with quarts. Newer thin-walled canners cool more rapidly and are equipped with vent locks. These canners are depressurized when their vent lock piston drops to a normal position.
7. After the canner is depressurized, remove the weight from the vent port or open the petcock. Wait ten minutes, unfasten the lid, and remove it carefully. Lift the lid away from you so the steam does not burn your face.
8. Remove jars with a jar lifter, and place them on a towel, leaving at least 1-inch spaces between the jars during cooling. Let jars sit undisturbed to cool at room temperature for 12 to 24 hours.
Cooling jars
When you remove hot jars from a canner, do not retighten their jar lids. Retightening hot lids may cut through the gasket and cause seal failures. Cool the jars at room temperature for 12 to 24 hours. Jars may be cooled on racks or towels to minimize heat damage to counters. The food level and liquid volume of raw-packed jars will be noticeably lower after cooling. Air is exhausted during processing and food shrinks. If a jar loses excessive liquid during processing, do not open it to add more liquid.
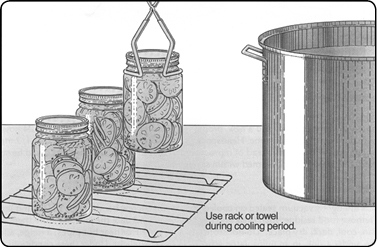
Illustration courtesy of the USDA
Testing jar seals
After cooling jars for 12 to 24 hours, remove the screw bands and test seals with one of the following options:
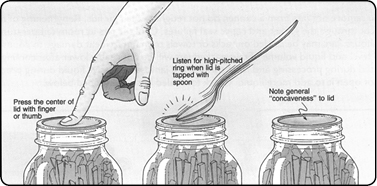
Illustration courtesy of the USDA
- Press the middle of the lid with a finger or thumb. If the lid springs up when you release your finger, the lid is unsealed.
- Tap the lid with the bottom of a teaspoon. If it makes a dull sound, the lid is not sealed. If food is in contact with the underside of the lid, it will also cause a dull sound. If the jar is sealed correctly, it will make a ringing, high-pitched sound.
- Hold the jar at eye level, and look across the lid. The lid should be concave (curved down slightly in the center). If center of the lid is either flat or bulging, it may not be sealed.
Reprocessing unsealed jars
If a lid fails to seal on a jar, remove the lid and check the jar-sealing surface for tiny nicks. If necessary, change the jar; add a new, properly prepared lid; and reprocess within 24 hours using the same processing time. Headspace in unsealed jars may be adjusted to 1 1/2 inches, and jars could be frozen instead of reprocessed. Foods in single unsealed jars could be stored in the refrigerator and consumed within several days.
Storing jars
Store your jars in a dark, dry cool place away from heat sources, and protect from freezing. You can remove the screw bands from the lids if you wish, but some prefer to use those bands to secure the lids after the first time you open the jar. Label and date the jars, and store them in a clean, cool, dark, dry place. Do not store jars above 95 degrees. Do not store in locations near hot pipes, a range, a furnace, under a sink, in an uninsulated attic, or in direct sunlight. Under these conditions, food will lose quality in a few weeks or months and may spoil. Dampness may corrode metal lids, break seals, and allow recontamination and spoilage.
Common Canning Problems
Because the canning process requires several steps and careful attention to details, many things can go wrong. In addition, before you eat food from any jar, check it again for problems. Once you complete a batch of canning and allow it to cool for 24 hours, check each jar for problems. Do not diagnose problems by tasting the food.
This guide will describe some common problems, how they occurred, and how to avoid these problems next time you can. Some of the problems are merely appearance issues, while other problems will affect the taste or texture of the food and hamper how you can enjoy your products.
However, some of the problems are health issues. These are the most important problems for you to monitor. Once you complete a batch of canning, always check your food against these health signs to be sure you do not harm anyone with the food. If you see signs that food has become contaminated, take care with your disposal method. Some bacteria are deadly even in small amounts; you could spill a tiny splash on your hand and then wipe your mouth, and then the bacterium has entered your system. It is best to dump bad products down the drain where the water treatment plants will neutralize contaminants and then scrub your sink and sterilize the jars. Make sure you always discard the self-seal lids after using them. The screw ring can be re-used once it is sterilized. Alternatively, you can boil the jars in a water bath canner for 30 minutes to neutralize the contents, and then place the unopened jars in the trash.
Spoiled food
Spoiled food usually has several indicators; just one sign may not be a problem. For example, some foods, such as juices, may be cloudy after processing because of the pulp present in the juice. However, if you open the jar and the food smells off, rather than the food’s ordinary smell, or if you see feathery mold growing on the rim or in the jar, it is clearly a spoiled product. For this reason, if you notice something odd with the food, check for anything else that may indicate a problem: the color, smell, increase in bubbles, seepage from the jar, obvious growth of bacteria or contaminants, etc. Remember, do not test food by tasting it.
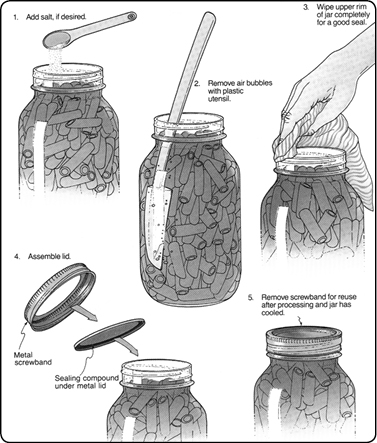
Illustration courtesy of the USDA
If you notice the following problems with your jars, carefully discard the food and lid, and sterilize the jar immediately. It is better to lose a little food than make yourself sick. To prevent these problems in the future, take these precautions to process the food properly:
- Make sure the jars are not overstuffed and that they are filled to the proper headspace. Remove air bubbles before putting the lids on the jars.
- Follow the processing method and time exactly.
- Check to be sure you have a good seal: concave, good vacuum, and no bulging at the lid.
- Make sure the pressure gauge on your pressure canner is checked and calibrated for accuracy at the beginning of each canning season.
- Check jars and lids for cracks, chips, rust, or damage. Always use new lids and sterilized equipment.
- Choose the freshest foods that have no rotten or moldy parts. Prepare the product properly.
- Carefully wipe the rim of each jar after it is filled. Make sure no food remains on the rim to hamper the seal or cause spoilage later.
|
Problem |
Possible Causes |
|
Product at the top of the jar is dark and/or thicker than normal. |
This may not be a sign of spoiled food; check the table on appearance changes to rule out other problems. If other signs of spoilage exist, this is probably the result of improper processing. |
|
The liquid in the jar is cloudy. |
This may not be a sign of spoiled food; check the table on appearance changes to rule out other problems. If other signs of spoilage exist, this is probably the result of improper processing. |
|
The liquid in the jar contains sediment. |
This may not be a sign of spoiled food; check the table on appearance changes to rule out other problems. If other signs of spoilage exist, this is probably the result of improper processing. |
|
Nonpickled or fermented food has a sour, strange, or foul smell. |
The food or jar has been contaminated — especially if bubbles also appear within the jar. |
|
Nonpickled or fermented food is bubbly. |
The food or jar has been contaminated and fermentation has occurred, especially if the food has a strange or foul smell. |
|
Food has an unusual color. |
This may not be a sign of spoiled food; check the table on appearance changes to rule out other problems. If other signs of spoilage exist, this is probably the result of improper processing. |
|
Jar lid, rim, or the surface of the food contains mold. |
While some molds are harmless and can be removed so the rest of the food can be eaten, it is best to be safe and discard the entire contents. This is the result of improper processing. |
Color or appearance changes
|
Problem |
Possible Causes |
How To Avoid |
|
Product at the top of the jar is dark and/or thicker than normal. |
Too much air in the jar has caused the top layer of food to become oxidized. |
Do not overstuff jars, but be careful that the food and liquid reach the recipe’s proper headspace. Remove bubbles from the jar before processing. |
|
The food in the jar is not completely covered with liquid. |
Do not overstuff jars, but be careful that the liquid completely covers the food and reaches the recipe’s proper headspace. |
|
|
Food is spoiled because it was not processed correctly. |
Follow preparation and processing instructions exactly. |
|
|
Food has an unusual color. |
Some substances in foods react to the canning process by changing color. For example, peaches, pears, cauliflower, or apples may turn slightly pink or blue. |
If no other signs of spoilage exist, this is a natural reaction, and no action is needed. |
|
Food that is white, blue, black, or green (unless it is naturally that color) is spoiled. If other signs of spoilage exist, the food has been contaminated. |
Follow preparation and processing instructions exactly. |
|
|
Food has pale color. |
The jars have been stored improperly. |
Store the jars in a cool, dark place, free from drafts or excess humidity. |
|
The liquid in the jar is cloudy. |
Minerals or additives in the water or salt may have clouded the liquid. |
Choose pure salt with no additives, and use soft or distilled water for canning. |
|
The starchy foods have released some starch, which has clouded the liquid. Meat products often produce cloudy liquid during processing; this is normal. |
Choose fresh, ripe products that are not overripe. If cutting up starchy foods like potatoes, rinse them in cold water before processing; then when you add liquid to the jars, use fresh water instead of the cooking water. |
|
|
If the product is juice, it is possible that extra pulp has drained into the juice. |
This is not a problem — the pulp will add extra flavor and nutrients to the finished product. However, if you prefer a clear juice, strain the juice several times before processing, and do not squeeze or press the pulp while straining. |
|
|
If other signs of spoilage exist, the food has been contaminated. |
Follow preparation and processing instructions exactly. |
|
|
The liquid in the jar contains sediment. |
Minerals or additives in the water or salt may have clouded the liquid. |
Choose pure salt with no additives, and use soft or distilled water for canning. |
|
If other signs of spoilage exist, the food has been contaminated. |
Follow preparation and processing instructions exactly. |
|
|
Food is floating in the jar. |
The syrup used in canning is heavier than the product. |
Prepare ripe, firm fruit properly, and use the hot pack method. Use thinner syrup that contains less sugar. |
|
The produce or jar contains too much air. |
Use the hot pack method to remove more air from the product. Make sure all bubbles are removed from the jar before processing. Pack the produce firmly in the jar. |
|
|
Tomato juice has separated into yellow liquid on top and thick red juice at the bottom. |
This is a natural enzymatic action that occurs when tomatoes are cut up for processing. |
If you prefer not to shake up the jar before pouring some juice, then make sure during the hot pack process that you bring the tomatoes to a boil immediately after chopping them. |
Jar is not sealed properly
If you discover any of the following problems, you can refrigerate the food and eat it within a few days. Alternatively, if you discover a bad seal within the first 12 to 24 hours and the band and lid are undamaged, you can re-process the jar using the original method and timing.
|
Problem |
Possible Causes |
How To Avoid |
|
Not enough liquid in jars. |
Uneven pressure in the pressure canner |
Make sure pressure remains constant during processing. Allow pressure canner to release the pressure and heat naturally. Wait at least ten minutes before opening the canner. |
|
Bubbles were left in the jar while packing food. |
Slide a knife or spatula inside the jar to remove air bubbles; adjust headspace if necessary. |
|
|
Liquid escaped through a bad seal. |
Use new, undamaged lids and ring bands that screw on properly. Make sure the jars do not have any chips or cracks. Make sure no food is on the rim of the jar by wiping the rims before putting on the lids. Wipe sealing surface of jar clean after filling, before applying lid. |
|
|
The water bath canner did not have sufficient water. |
Make sure the water is at least 2 inches over the tops of the jars throughout the entire processing time. |
|
|
The food absorbed too much liquid. |
Starchy foods will need a larger ratio of liquid to product. Make sure you hot pack these items. |
|
|
The food was packed too tightly. |
Allow enough headspace so the food does not boil out of the jars. |
|
|
The jar did not seal; the lid is not concave and does not have a vacuum seal. |
There was food between the rim and seal, or the rim was damaged. |
Check jars before using. Wipe the rims of jars after filling them. |
|
Ring bands were damaged or not screwed on properly. |
Check ring bands before using. Always screw bands on finger-tight. |
Special problems with jams and jellies
|
Problem |
Possible Causes |
How to Avoid |
|
The product contains crystals.
|
Too much sugar may have been added, or the sugar was not completely dissolved during processing. |
Reduce the amount of sugar; follow tested recipes exactly, and remove from heat once the product reaches the jellying point. |
|
If appearing in products made from grape juice, naturally occurring tartrate crystals may have formed. |
Settle the crystals in the juice by refrigerating overnight and then straining the juice before making the product. |
|
|
Bubbles |
Jelly set while air bubbles were still in the jar. |
Skim foam from the liquid before filling jars, and quickly slide a spatula through the product to remove air bubbles. |
|
If other signs of spoilage exist, the food has been contaminated. |
Follow preparation and processing instructions exactly. |
|
|
Jam or jelly is too soft. |
There may be several causes: The juice was overcooked. Too much water was used to make the juice. The sugar and juice proportions were not correct. The product was undercooked, so that the sugar was not concentrated enough. |
Follow tested recipes exactly. |
|
The product did not contain enough acid. |
Add a small amount of lemon juice to the juice before making the jam or jelly. |
|
|
Making too much jelly/jam at once. |
Process jams and jellies in small batches, such as 4-6 pint jars at a time. You will need approximately 8-12 cups of fruit juice to produce 4-6 pint jars; follow recipes for specific amounts. |
|
|
Not allowing enough time before moving jars. |
Wait at least 12 hours after processing before you move the jars. |
|
|
Using the product before it has had time to properly gel. |
Most jams or jellies will take about two weeks to completely gel; jellies take a little longer than jams. Some fruits, such as plums, will take longer than two weeks; fruit butters will not completely gel. Shaking the jar might help you determine if the product is ready. |
|
|
The product is darker than normal. |
The juice may have cooked too long, or the sugar may have scorched. |
Follow the instructions precisely; smaller batches of product will be easier to manage. |
|
The jam or jelly may be too old or may have been stored in a very warm environment. |
Once the product has set, store it in a cool, dark place and use within the next year. Refrigerate the jar after it has been opened. |
|
|
The product is cloudy.
|
The juice used to make the jam/jelly has too much pulp drained into the juice. |
This is not a problem – the pulp will add extra flavor and nutrients to the finished product. However, if you prefer a clear juice, strain the juice several times before processing, and do not squeeze or press the pulp while straining. |
|
The completed jelly/jam sat before it was poured into the jars or was poured too slowly. |
The product will begin to gel immediately upon removal from the heat. Pour into the jars quickly and carefully. |
|
|
The jam or jelly is stiff or too thick. |
The product has been overcooked so that too much of the liquid has boiled away. |
Follow cooking instructions precisely, and stop cooking once the product forms a sheet on the cooking spoon. |
|
Inaccurate proportion of pectin to fruit. |
Use less pectin; tested recipes should not present this problem. |