Chapter 7
Seeking Union with Yoga
In This Chapter
 Introducing the central role that yoga plays in Ayurveda
 Determining whether yoga is right for you
 Selecting the appropriate posture for your body type
 Breathing the doshic way
 Looking at specific postures for healing
 Chilling out the yogic way
According to Ayurveda, yoga is an important part of ensuring good health. Concerned with the most fundamental relationships between nature and consciousness, Ayurveda and yoga are involved with purifying the mental and bodily faculties, controlling the mind, and seeking union with the Absolute (God, the divine, a higher power – call it what you will). Put simply, physical yoga can be considered the exercise arm of Ayurveda. For my patients I always prescribe both postures and breathing exercises, without which a treatment seems incomplete.
In the first part of this chapter I point out why yoga is beneficial and how to get started. I introduce you to some very basic postures to help keep your body healthy and in balance. I acquaint you with some simple breathing practices that can help you get the most out of your session.
The great popularity of yoga is related to the fact that when used therapeutically, it has great potential to calm the mind and manage the reaction to stress.
I also look at yoga as therapy. Although yoga isn’t an alternative to conventional medicine, it can definitely support the healing process, especially in diseases that can be aggravated by stress, such as asthma, diabetes and hypertension.
Understanding Yoga
By performing yoga postures known as asanas, you free up your movement, support your digestion, balance your hormones and soothe your nervous system. Gentle stretches can not only enliven the cells but also encourage the removal of bodily wastes. This ultimately leads you to greater self-awareness and peace of mind. After my yoga class, I always feel that my nerves (known as nadis in Ayurveda) have been ironed out.
Remember that the optimum amount of exercise varies from one person to the next. In accordance with this, the Vedic texts say that the best amount of exercise is when sweat comes to your forehead, armpits and spine in small quantities. Don’t forget that too strenuous activity depletes ojas, which is the good substance that guards your immunity. (See Chapter 3 for more about ojas.)
Going with the Flow – Understanding Body Energy or Prana
In this section, I introduce the different energies of the body, known as prana in Sanskrit. Prana means, variously, ‘breath of life’, ‘vital energy’ and/or ‘the capacity to love and desire’. Prana is where Ayurveda meets yoga, because the yoga postures activate prana to work harmoniously throughout your body (see Figure 7-1).
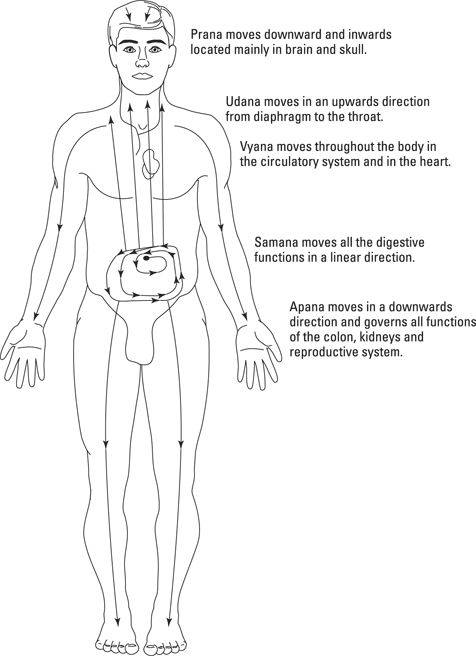
Figure 7-1: Prana animates everything in the body, both visible and invisible.
The following list explains the five major winds or energies and how they act on the body. These forces which activate your system are divided into five types:
 Apana, which literally means ‘air that moves away’, is focused at your navel. It’s the downward- and outward-moving force that moves air and fluids out of your body, including as flatulence, faeces, newborn babies, menstrual fluid and urine. At a more subtle level it aids in the elimination of negative sensory and emotional experience, and most importantly it maintains your immune system on all levels.
Along with vyana (later in this list), apana creates stability in your legs. All standing and crouching postures help strengthen and maintain this supporting energy.
 Samana, meaning ‘balancing air’, is located one step above apana, at your stomach level, and moves in a clockwise circle. Samana energy governs all movements in your abdomen and colon. It promotes digestive activity and it aids the lungs in absorbing oxygen. On a mental, sensory and emotional plane, samana works to synthesise and digest experience, so it’s very busy! All forward bends and spinal twists help to support this vital force in your body.
 Udana, which literally means ‘upward-moving air’. Its centre is located in your throat and moves in an upwards direction. Its most important function is speech.
Along with vyana, udana moves your arms and holds your head high.
Udana plays a part in your growth, both physical and spiritual. It’s said to aid in your individual evolution of consciousness, or your journey to self-realisation.
Postures that help develop this force are the ones where your hands actively reach upwards.
 Vyana, meaning ‘outward-moving air’, is located all over your body, but specifically in your lungs and heart. Vyana ensures that blood circulates to the periphery of your body.
 Vyana maintains the flow of your thoughts and emotions and confers strength and movement to them. So if you’re feeling stuck, try poses where you extend your arms out from your sides, as well as the sun-salute sequence later in this chapter.
 Prana, located in the heart, means ‘forward-moving air’. All sensory perceptions and mental impressions are possible because of this life force. Prana is the vital force which nourishes the brain, and it’s the life force or animator of all things.
Meditative postures and back bends are helpful to support this energy. All chest-opening postures, including the half fish listed later in this chapter, are also beneficial.
Introducing a Simple Yoga Posture for Each Constitution
In Chapter 4, I help you discover which type of constitution you have. Knowing your constitution type points you towards the postures most beneficial to you. If you haven’t already discovered your constitution type, I recommend turning to Chapter 4 now. So here goes: stretch your mind and flex your body!
You need to focus on your yoga poses without distractions, so before you start a yoga session, turn off your mobile phone and unplug the landline.
Regulate your breathing while performing the poses, and move slowly and with concentration and focus.
Trikonasana: A vata-pacifying posture
A brief reminder of the special qualities of vata dosha: it’s cold and its main seat is in the pelvis; vata dosha is the humour which governs all movement in the body. So the postures most beneficial for vata management are related to the pelvic area:
 Meditative postures that put pressure on the lower abdomen and help the body to be firm and grounded
 Asanas which put pressure on the colon and pelvic area, such as forward bends
 Balancing postures, which increase concentration and help prana to flow in a smooth and directed way
In the trikonasana posture, you literally form a triangle. This asana stimulates your digestive system and stretches the spine on either side:
1. Stand with your feet parallel, approximately 3 to 4 feet apart.
2. Turn your left foot slightly in towards the right, and rotate the right foot 90 degrees so that it’s in a direct line with your left inner arch.
Feel yourself rooted to the ground.
3. Extend your arms to the level of your shoulders, and then fold your body over your front leg during an exhalation, while maintaining strong contact with the ground through your back leg.
Take care that your hips are squarely forwards and that your knees aren’t bent.
4. Point your left palm upwards, keeping your arm and wrist straight, and place your right hand at the side of the ankle on a block or on the floor, on the outside of your right ankle.
Check out Figure 7-2.
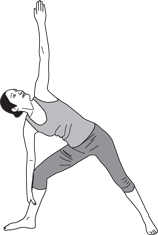
Figure 7-2: Becoming a triangle.
Your spine elongates, and you can focus on opening your chest with the hand extending to the ceiling. Allow your breath to flow smoothly.
5. Hold the posture for about 90 seconds if you can, then return to standing on an inhalation, pressing even more on your left foot and lifting through the upturned left arm.
6. Repeat on the other side.
Gaining control in this basic posture builds focus for more complex variations.
Ardha matsyendra: Posture for pitta management
The pitta dosha is heat-producing and governs all transformative processes in the body. It centres mainly in the small intestine, so the yoga postures of most benefit are those that affect the navel area to increase digestive efficiency and stimulate gastric juices.
Pitta postures to pursue include:
 All postures that involve spinal twists
 Inverted asanas (such as shoulder stand), which reverse pressure on the organs, strengthen the liver and small intestines, where excess pitta congregates in your body, and improve digestion
 Inner-directed postures that induce a meditative state of mind
Sometimes called the lords and fishes pose, the half spinal twist is named after one of the Vedic saints. This very useful posture is one of the few in which each of your vertebrae gets to turn to the side. This helps greatly with maintaining spinal flexibility, improving the circulation of your spinal nerves and ligaments. The added benefit is that the main seat of pitta, near the navel, gets a workout too.
To do a half spinal twist (see Figure 7-3), follow these steps:
1. Keeping your spine erect and shoulders level, sit on your heels and breathe calmly.
2. Shift your weight to the right buttock and lift your left leg over your right leg, so that your left heel comes to rest at your right hip.
3. Stretch out your arms at shoulder level either side of you, and turn your torso to your left while exhaling.
4. Put your right arm on the inside of your left leg and grasp your foot to aid leverage, allowing the spine to naturally twist from the base upwards.
5. When you’ve twisted your torso as far as you can, turn your head to the left, while keeping your neck relaxed. Remember not to lead with your chin, but to turn your whole head at once and place your right hand to the floor behind you.
6. Release as you exhale, and slowly untwist.
7. Repeat on the other side.
If your hips are very tight, you can modify this posture by putting several blankets or a block on your right side under your buttock, so that you don’t collapse on one side. In addition, resting your left hand on a block helps.
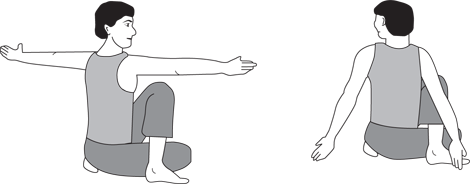
Figure 7-3: The half spinal twist.
Ardha matsyasana for the kapha constitution
The kapha dosha tends to be cold, heavy and sluggish. Kapha energy centres mainly in the upper part of the stomach and the lungs. Types of postures helpful to those with a Kapha dosha include:
 All postures that open the chest
 Postures that are stimulating to the system and increase the metabolic rate, such as the salute to the sun sequence, later in this chapter
 Inverted postures, which increase heat in the body and are helpful to stimulate the release of excess kapha dosha in the form of mucus in the body
Known as the half fish pose (see Figure 7-4), this posture is beneficial in treating asthma, because it really opens your chest and allows for the smooth flow of prana. Secondarily, it tones the thyroid and all the associated organs in the neck, while stimulating the nerves too. Your thoracic area gets a much-needed stretch, which relieves tension and opens the heart.
Follow these steps:
1. Lie on your back with your feet extended together and your arms and palms facing down, comfortably under your thighs.
2. Press your legs and elbows into the floor, arch your back and lift your chest as high as you can.
Keep your elbows as close as possible to your sides, to stabilise your body.
3. Inhale gently, lifting your chest and positioning the crown of your head on the floor.
Try to open your chest as much as you can.
 Don’t hold the pose too long, because it’s quite wearing on the neck.
4. To release the posture, gently lift the head, extend the back of the neck and rest into the ground. Release your hands and arms from under your buttocks, and relax.

Figure 7-4: The half fish pose.
Easing Disease with Yoga
For centuries in India, doctors have prescribed yoga as a therapeutic intervention to help both alleviate and treat medical conditions.
Alleviating arthritis pain with natraj asana
I always enjoy doing this lovely posture, perhaps because it’s the pose of Shiva as a cosmic dancer (see Figure 7-5); I always feel light and playful when I do it. The pose activates all the major and minor joints of the body in one single move, and has a beneficial effect on joint mobility. This makes it very useful in the treatment and prevention of arthritis. Your shoulders, hips, ankles, knees and hands are engaged, and the corresponding nerves, muscles and tissues in these areas are mobilised. This is because the synovial fluid in the joints gets a chance to circulate.
This pose has a stimulating effect along the whole spine and can help remove rigidity and pain. It also aids digestion and helps improve your eyesight as well. On the psychological level, this posture symbolises action and can help you overcome feelings of ‘stuckness’ or stagnation, which in turn improves your determination and willingness to move forwards both mentally and physically.
To achieve the natraj asana, follow these steps:
1. Stand up straight with your hands hanging loosely by your sides. Look directly ahead and breathe normally.
2. Put your weight on your left leg, while bending your right leg at the knee. Grab the top of your right foot with the palm of your right hand and push your foot backwards into your palm at the same time as you slowly raise your left hand to the front, keeping the fingers together and pointing upwards with your palm down.
Keep your left arm at about 60 degrees, pointing towards the horizon, so that the whole hand is visible. Look at your outstretched hand.
3. Bend slightly forwards at the waist, keeping your eyes on the fingers of your left hand, while your right leg is firmly rooted into the floor.
Breathe slowly and normally stay in the posture for eight seconds.
4. Return to standing by slowly bringing your left hand down and lowering your right leg first to the folded position and then down to the floor.
5. Repeat Steps 1 to 4 on the left side.
The other side may feel completely different, but just work gently as far as you feel comfortable.
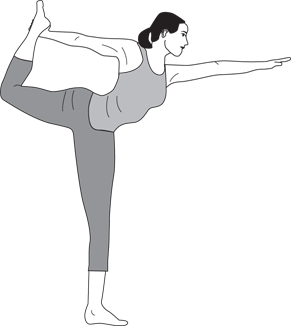
Figure 7-5: The cosmic dancer.
Dealing with digestive problems with vatayanasana
The posture is easy to perform and is known as a wind-relieving posture. It gently massages your abdomen and stomach as it expels gas from the colon, which can create some merriment in a yoga class, but you get used to it after a while. It’s also useful for stretching and toning your lower back.
1. Lie on the floor, keeping your back close to the ground, arms gently relaxed either side of your body.
2. Inhale while slowly stretching your left leg down along the floor and clasping your hands around your right knee as you bring it towards your chest. (See Figure 7-6.)

Figure 7-6: Relieving wind and stretching your spine.
3. Exhale as you use your arms to press your knee to your chest.
To work the posture a little more, raise your head to meet your knee.
 You can massage your spine and relieve stiffness by bending both knees to the chest on an inhale, raising your head to meet your knees and rocking gently side to side.
4. Release the pose, lowering your leg to the floor, then repeat Steps 1 to 3 with your other leg.
Psychologically, this posture is said to help with self-acceptance; after all, you’re literally embracing yourself.
Beating obesity with bhujangasana
According to the ancient yoga text Gheranda Samhita, when you practise the cobra pose regularly, the serpent goddess known as Kundalini awakens the spine and brings it suppleness.
This stance tones all the abdominal organs and strengthens your pancreas and liver in particular, which has a positive effect on your gut and helps combat obesity. Regarded as one of the best postures for curing constipation, it also helps ease menstrual discomfort. The cobra pose expands your chest and psychologically opens up the heart, allowing feelings to flow.
Here’s how to practise the cobra pose (see Figure 7-7):
1. Lie face down on the floor, turning your face to the side so that you rest on your cheek, and bring the palms of your hands beneath your shoulders on each side of your body.
2. Press down on your palms and raise your chest off the floor, moving your head and eyes forwards.
Point your fingers forwards in line with your shoulders, and keep your elbows close to your body. Your shoulders should be down, away from your ears, and your face relaxed. Keep your heels about hip width apart, with your toenails on the floor.
3. Breathe normally, straighten your head and tilt it slightly backwards. Inhale, and hold the breath and the pose for 6 to 8 seconds.
 Tighten the buttocks to protect your lower back. Make sure that everything below the navel stays in contact with the floor.
4. Exhale and lower your head towards the floor, turning it to rest your cheek on the floor. Relax your body for a moment then repeat the pose three more times.
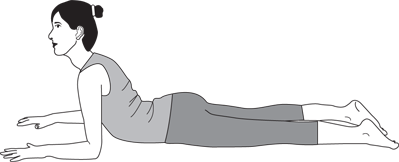
Figure 7-7: Bringing suppleness to your spine.
Looking at yoga for your eyes
Ayurveda states that disease can be caused by under-use, over-use and abuse of the senses. Because most sensory input is through the eyes, I’ve included some very simple exercises you can do at any time to help take care of these windows to your soul.
The psychological and physiological aspects of seeing are intimately entwined and ultimately affect how you feel. You may put your eyes through a lot of stress, forcing them to work at an accelerated pace instead of allowing them to work in a relaxed fashion.
 Look away from the computer – preferably into the distance – every 20 minutes for at least 2 minutes.
 Start healthy blinking habits. The average blink rate is five to ten blinks per minute. When you’re on a computer or reading, your blink rate decreases dramatically, which makes your eyes dry and irritated. (People who are scared or afraid of letting go tend to blink less.)
You can improve your visual performance by shifting your eyes consciously from one object to the next, as in this visual tracking exercise:
1. Hold one finger of your left hand about six inches in front of your eyes while you hold one finger of the other hand at a distance. Keep your eye on something also in the far distance.
2. Shift your gaze between the objects in the near, middle and far distance while breathing slowly.
 Try to pair your breathing with the shifting of your gaze. This coupling really helps to change the focal length and relieves tension in the eye muscles. Try it and see.
Focus on the lines in Figure 7-8 and monitor your breathing as you trace the lines with your relaxed eyeballs.
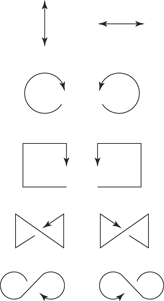
Figure 7-8: Follow the lines with your eyes to gently exercise them.
Roaring through the lion pose to destroy disease
In the lion pose, known as simha asana, which literally means ‘the powerful one’, you resemble a roaring lion. Mentioned in the Hatha Pradipika (a famed book on the practice of yoga), the lion pose is said to be the destroyer of all diseases.
The lion pose helps to release tension in the whole head area, so all the muscles of your face and jaw benefit as well as your eyes. Blood floods into the tissues of your throat, which often carry a lot of tension. Clenched jaws often go with clenched fists, and the fingers and hands benefit from a good stretch.
To accomplish the lion pose, follow these steps:
1. Sit on your heels with your feet pushed up against your buttocks and your shins flat against the floor. Put your palms on your knees, keeping your arms straight.
Keep your spine straight and your head erect.
2. Lean forwards just a bit and open your mouth as wide as possible. Push your tongue out as far as feels comfortable. Simultaneously stretch out your fingers. Focus your eyes either on a point between your eyebrows or on the tip of your nose.
You will look pretty scary – see Figure 7-9 – so make sure that you’re alone or with people who know you haven’t lost the plot!
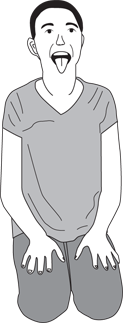
Figure 7-9: Imitating a lion relaxes your whole head.
3. Exhale and hold the posture for 30 to 60 seconds.
4. Inhale, allowing your hands to relax, and close your eyes and mouth.
5. Repeat Steps 2 to 4 three times.
This pose is brilliant for getting rid of pent-up anger, and it’s said to make you fearless – which can’t be bad. If you’re really game (so to speak), let out a roar like a lion, as loud as you can.
Practising Simple Routines for Every Constitution
You may not always have time for an extended yoga practice. But that doesn’t mean you can’t give your system a nice wake-up with a simple routine or two. The postures in this section are appropriate for any constitution.
Saluting the sun
Surya namaskar, performed as a salutation to the sun, is the equivalent of the Gayatri mantra, which is a prayer to this most life-giving force in the universe. When you perform this sequence correctly, it confers all the benefits of solar energy to your body, mind and spirit.
Work up from one to three rounds daily. Remember, to really get the best out of it, to tie the movements in with your breath. Figure 7-10 shows the poses and when to inhale and exhale.
Spoken of as the crest jewel of yoga, this series of postures benefits every Ayurvedic constitution. (Refer to Chapter 4 to discover your constitution, or dosha.) However, you perform the salutation according to your constitution:
 Pittas should perform it slowly and deliberately, and focus on overcoming the tendency to rush through everything.
 Kaphas should perform the sequence in a brisk fashion, resisting the temptation to take it slow and easy.
 Vata types need to practise this at a medium pace while maintaining complete focus and not allowing distractions.
To salute the sun, follow these steps:
1. Begin by standing up straight with your feet together and hands in the prayer position.
2. Bringing your palms apart and arms straight up over your head, arch gently backwards while inhaling.
Relax your neck and push your hips out.
3. Exhale as you bend forwards from the waist, letting your hands touch the floor or as close as they can get to it.
Try to keep your legs straight, but bend your knees if necessary.
4. Inhale, stepping your right leg back so that your bent knee is as close to the floor as is comfortable and your toes are bent. At the same time, bend your left knee, placing your hands palm down on either side of your left foot. Look forwards, lifting your chin.
5. Holding your breath, bring your left leg to join the right one, so that you’re supporting yourself on your hands and your bent toes.
Keep your body in a flat line while looking at the floor.
6. Exhale as you slowly drop your knees, chest and finally your forehead to the ground.
Your spine will be slightly arched at this point and your elbows bent.
7. Inhale and lower your hips to the ground, gently arching your back. Bend your elbows as you extend your legs, untucking your toes so that the tops of your toes are on the ground.
8. Exhale as you push up from your hands, feet and hips to form a triangle.
You can have a lovely stretch as you exhale. (This triangle is called the downward-facing dog pose.)
Try to keep your heels on the ground, but it’s okay to stand on the balls of your feet if you can’t.
9. Keeping your left leg back this time, inhale as bring your right foot forward and stretch your left leg behind you and put your hands either side of your right foot. Arch your back slightly and look up.
10. Exhaling slowly and deeply, bring both feet together, keeping your knees straight and bending forwards from the hips.
Let your head, neck and arms relax.
11. Inhale as you return to a standing position. Arching your back, stretch your arms upwards, bringing your palms together over your head.
12. Exhaling slowly, bring your arms to your sides and close your eyes.
Feel the relaxation.
13. Begin another round, bringing your left leg back first in Step 4.
I’ve seen this posture performed on the knees, which obviously isn’t as beneficial, but if you want a more relaxed approach and aren’t quite flexible enough yet to start the posture standing up, you can try it.
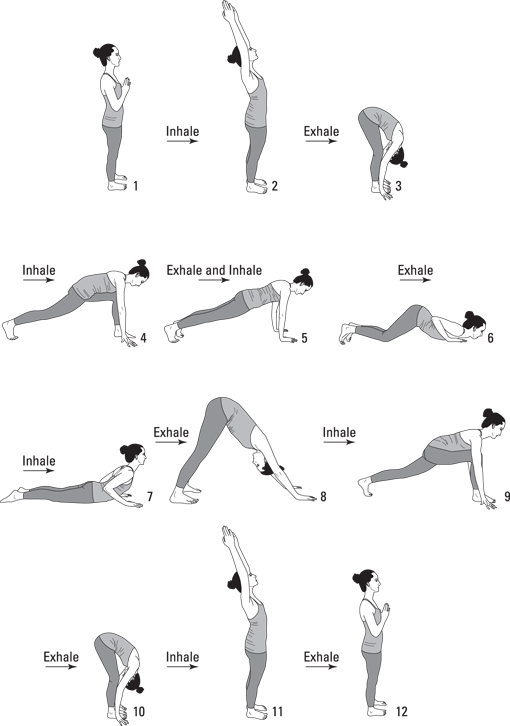
Figure 7-10: Breathing through a sun salutation.
Moving with the moon: Chandra namaskar
While the sun salutation is expansive and out there, the salute to the moon is a beautiful sequence to follow when you want to direct your energies more internally to become calm and receptive. In the Vedic teaching, the moon rules the manas, or mind.
This moon salutation can draw in scattered energies and help you to become more focused; just follow these steps and Figure 7-11:
1. Stand upright with your feet together. Place your hands, palms together, at the front of your chest. Inhale as you stretch your arms back over your head and lean backwards, remembering to keep your buttocks tight as you arch your back (shown in Step 11).
2. Exhaling, bend your knees and come to a full squat, trying to keep your feet flat to the ground and placing your hands on either side of your feet.
If you can’t keep your feet flat, stay on the balls of your feet – it’s important not to strain.
3. Inhale slowly as you extend your left leg behind you, dropping the knee to the floor.
Leave the right foot where it is and keep your hands palm down directly below your shoulders.
4. Continue to inhale while sinking downwards and arching your back, dropping your head backwards, raising your arms above your head as you look up to your hands. Exhale, placing your hands palm down under your shoulders again.
5. Gently bring your right leg forwards while extending your left leg back and dropping your left knee to the floor. Now come back to the squatting position you struck in Step 2.
6. Exhale, lowering your buttocks to your heels and resting your forehead on the floor as you stretch your arms palm down in front of you.
7. Still on your knees, stretch your arms above your head and place your palms together as you inhale with your buttocks off your heels. Let your head tilt back a little and watch your extended arms.
8. On an exhale, fold back down again so that your buttocks are on your heels.
9. Breathing in, curl your toes under, come into a full squat again, then exhale.
10. Inhaling, stand upright, raising your arms above your head and leaning backwards.
11. Bring your palms together in front of your chest in the prayer position.
12. Repeat the steps, extending your right leg behind you first this time.
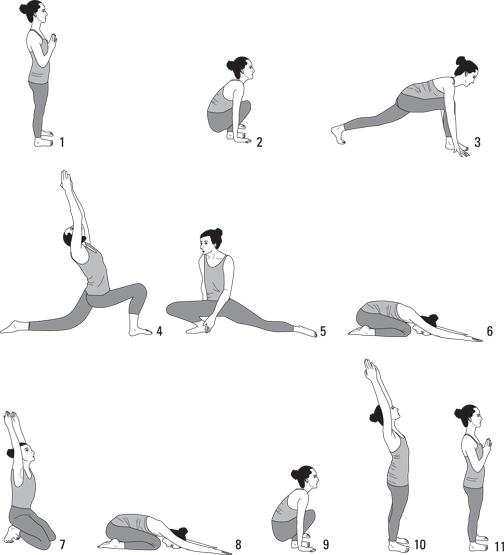
Figure 7-11: The moon salutation.
Easing into Relaxation with Corpse and Waterfall Postures
Many people never feel really relaxed, even after a night’s sleep. However, people who practise yoga regularly often testify that one of the best parts of any session is the deep relaxation at the end of the class.
The relaxation postures themselves literally iron out your energy paths (known as nadis) – the equivalent of giving your nervous system a soothing massage.
Relaxation poses are a form of conscious relaxation – not a sleep or rest period. If done mindfully, these poses actually make you feel energised and help you overcome fatigue.
Lying down for the corpse pose
Savasana, or the corpse pose, works on your super consciousness to release stress and tension where it all starts in the first place.
Generally, a yoga class ends with 10 to 15 minutes of relaxation, but I’ve attended classes where relaxation is implemented in between all the asanas – to let them soak in, so to speak.
 Lying in a horizontal position facilitates easy circulation so that your heart doesn’t have to pump so hard. All your muscle groups are relieved of strain and your breathing becomes more relaxed and rhythmic.
 When all your joints and muscles are relaxed, your mind follows suit and switches off.
 In deep relaxation, you can observe the rise and fall of your abdomen and practise conscious breathing, which facilitates a greater inflow of prana to your tissues. This has a very soothing effect on the higher centres of your brain. Then you can engage in what’s known as pranadharana, where you become a passive witness of the breath moving up through your body and out through your nostrils.
 In savasana, you progress from broad to subtle levels of awareness and become aware of the difference between relaxation and tension in the body.
Many of us are completely unaware of how much tension we carry around in our bodies. Take a moment now to press your middle fingers at the point where your jaw closes. If it’s painful, it’s a symptom of the tension you hold in your body just to get yourself through the day.
While you observe your breath getting deeper and slower during the pose, you get less input from your stressed-out brain. Eventually you reach a state known as chitta vishranthi in which you experience super-consciousness and total relaxation.
With continued practice, you become more and more aware of the fact that you’re the witness of your own thoughts, and your awareness of your body fades into the background.
The type of relaxation achieved in this practice increases over time, and the benefits are far-reaching. In savasana, you allow mental stress and strain to come to the surface and dissipate. As a result, you feel more centred.
Find a warm place and wear warm clothing. You may want to cover yourself, because you can get quite cool as your metabolic rate decreases.
This posture’s deceptively simple, but in fact it’s one of the hardest to achieve. Do it for at least ten minutes at the end of a yoga session. Here’s how:
1. Lie on your back, with your legs slightly apart and your arms away from your body, allowing the ground to support them.
Figure 7-12 shows the pose.

Figure 7-12: The corpse pose.
2. Roll your head from side to side then centre it.
3. Stretch yourself from head to toe and allow your body to sink deep into the ground.
Observe the rise and fall of your abdomen as the breath flows along your body and out through the nostrils. Let this process deepen until your pulse and respiratory rate become very relaxed.
Becoming a waterfall
The waterfall posture is a little more dynamic than the corpse pose. You elevate your legs against a wall in a modified shoulder stand.
This is a great posture if you have swollen ankles and varicose veins. It relieves the effects of stress and refreshes your heart and lungs and is quite useful in alleviating the effects of jet lag.
Locate a wall in a warm spot, and follow these steps:
1. Sit on a small cushion on the floor, with the side of one shoulder 6 to 12 inches from the wall.
2. Lower your back gently to the floor and swing your legs up the wall.
Keep the cushion beneath your buttocks, stretch your back out on the floor and place your hands palms up at the sides of your head.
 You can enhance the effects of the posture by tying a scarf around your eyes or placing an eye pillow over them. Blocking your sight quiets the mind as well as relieving fatigue.
The overall sensation has been described as feeling like a waterfall, which I can verify from my own experience.
 Don’t practice yoga if you feel ill, and consult your doctor first if you have any of the following: glaucoma (inverted postures can increase pressure on your eyes); bleeding of any kind, including heavy periods; neck injuries; previously broken bones; severe osteoporosis; or rheumatoid arthritis. Don’t practice on a full stomach; a gap of an hour is adequate after a light meal, or wait three hours after a heavy one. When doing the postures, ease into them gently, and if you start to feel discomfort or pain, stop immediately.
 The emphasis is on the regularity of practice and not on how long each session is. A short daily practice is of far more value than a regular burst of activity every few weeks. You’ll be amazed how a small amount of effort can yield great results.
 The symbol of the triangle appears in many cultures as an image of the divine. You can observe it in many