Chapter • 2
ADVANCED JOINERY
BY NICK ENGLER
In the last chapter we discussed basic joinery on the table saw, including miters, bevels, rabbets, dados and grooves. In this chapter we’re going to take those concepts a step further. Essentially we’ll be using the same techniques. These joints simply require a little more thought before you begin. We’ll be looking at compound miters, tenons, dovetails, lock joints and splines.
Each of these joints can be created using tools other than the table saw. Some might even argue that they can be made more easily on other tools. For example, compound miters can be easily created using a miter saw. Tenons, dovetails (with the help of a jig), lock joints and splines can be handily created using a router or a router table.
But why buy extra machinery, tools and jigs if you don’t have to? All of these joints can be easily achieved with your best friend, the table saw.
Compound Miters
To start we’ll take a look at compound miters on the table saw. While regular miter joints are a mainstay in picture framing, if you want to make a more complicated, three-dimensional frame you need to cut a compound miter. Useful for much more than picture framing, the compound miter joint is probably most commonly used in forming corners for crown moulding. This joint can be accurately created on the table saw with just a little help from mathematics.
To cut a compound miter on a table saw you need to both tilt the blade and angle the miter gauge for each cut. When two boards are joined by compound miters, the boards slope, rather than rest on an edge or a face. This slope and the number of sides of the frame determine the necessary blade tilt and the miter gauge angle. (See the chart at right to find the settings needed for different frames.)

PRO TIP:
1-2-3 Crown
When adding crown moulding to a cabinet, start by cutting the compound miter on one end of the front piece, then allow plenty of length and rough cut the other end a bit long. Then cut the appropriate compound angle on both short return pieces for the sides, again leaving plenty of length to the back of the cabinet. Use one return moulding to align the front moulding (forming the complete compound miter), then mark the exact location of the second miter cut on the front piece. Attach the front moulding, then simply mark the square cut on the back of each return, make the cuts and attach.
A standard crown moulding (fitting in a 90° inside or outside corner) commonly has a 45° slope. Reading our chart, for four-sided miters, we come up with a blade bevel angle of 30° and a miter gauge angle of 54.74°.
TIPS & TRICKS
PRO TIP:
Choose Your Blade
Fitting tenons into mortises can be a little tricky, but by using the right blade you can make it easier. If you know you can cut a tenon to fit perfectly, then using a ripping blade (or flat-bottomed dado) to form the cheeks makes good sense. But if you want to make your tenon oversized and sneak up on the final fit with a shoulder plane, you don’t want to have to plane too much material for fitting. Rather, use a crosscut blade to form your oversized tenon. The tooth configuration on the blade will leave a corduroy-type finish on the tenon cheeks with hills and valleys. Planing away only the hills to get a perfect fit is much easier.
SMART TIP:
Easy, Cheap Clamping
You’ll notice I used simple tape to hold together my compound miter test at right. Tape can come in handy after the test as well. When you’re assembling odd-shaped pieces such as a six-sided compound miter shape it’s nearly impossible to put clamps on the piece. Go ahead and use tape instead. Lay the pieces to assemble with the miters facing down. Butt the joints together and put tape across the joint. Repeat this for all but the last joint. Then carefully flip the taped pieces, add glue and fold the shape, taping the last joint. The pressure exerted by the tape as the joints close will be plenty adequate to hold everything together.

To make a compound miter, angle the miter gauge and tilt the blade. Compound miters are used to join boards whose faces slope, such as crown moldings.
Before committing to the compound-miter setup called out on the chart, make a sample to check your angle. Cut some small scrap pieces using the recommended angles. Cut enough to complete your test shape. To make matching left and right compound miters, flip each board face for face so that a different edge rests against the miter gauge and a different face rests against the table when cutting each end.
After cutting all the compound miters, tape the pieces together to complete the frame and inspect the joints. If the joints gap on the inside, decrease the blade tilt. If they gap on the outside, increase the blade tilt. If the slope is greater than you expect it to be, decrease the miter gauge angle. If it’s less than expected as measured from horizontal, increase the angle. Just make sure you don’t change any one setting more than ½° between tests.
Another way to calculate compound miters is with a scientific calculator (about $9 at most office supply stores) with SIN, COS, TAN and INV buttons. On some calculators, the INV button is labeled FUNC or the key is blank.

To test a compound miter setup, cut enough sample pieces to form your ultimate shape. Cut all the pieces to the same length so you can complete a small frame. Tape the parts together, then inspect the joints and measure the slope.
Compound Miter Chart

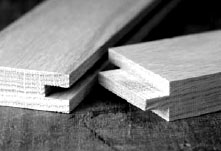
MORTISE-AND-TENON JOINT
Tenons
When it comes to reliable joinery the mortise and tenon is excellent for frames, including table bases, doors and cabinetry. The male part of the joint, the tenon, is easily made on the table saw.
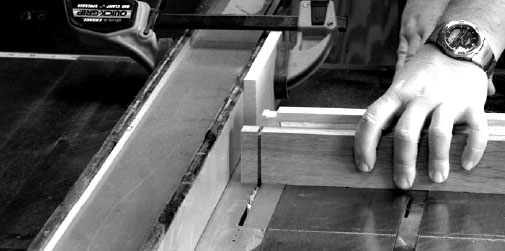
First, the shoulders of the tenon are cut using a miter gauge to guide the workpiece. Depending on the required dimensions of your tenon, you may be able to make all four shoulder cuts without changing the saw setup. Traditionally a tenon is half the thickness of the workpiece. With a ¾”-thick piece of wood that would require a ⅜”-thick tenon. This leaves a  ” shoulder on the two wide sides of the tenon and that’s usually a perfectly good size for the two narrow shoulders as well.
Defining shoulders on all four sides of a tenon is simple. The piece is run over the blade using a miter gauge. I’ve added sandpaper to the face of the miter gauge to keep the piece from slipping. I’m also using a step-off block that allows me to set my fence to align the cut, but as the miter gauge moves forward, the block stays behind to avoid kickback if the piece binds.
With the shoulders defined it’s time to cut the cheeks. There are a few ways this can be tackled on a table saw, primarily either with the piece held vertically or horizontally. To cut the cheeks horizontally, a dado cutter works well and will accurately center the tenon.
TIPS & TRICKS
PRO TIP:
No-mortiser Mortise
Large through-mortises in furniture can be time consuming and require equipment (a mortiser and appropriate chisel) that you might not own. These types of mortises often occur in table legs and there you’re in luck. You can build the mortise into the leg and use your table saw to make it. Most trestle-style legs are too large to be cut from one piece of wood, so a glue-up is required. By running matching, wide dados in the leg halves prior to glue-up, you can make almost any size through mortise with a minimum of effort.

PRO TIP:
Dedicated Dovetail Blade
If you do a lot of dovetailing on the table saw, you may find it convenient to have a blade modified specifically for the task. Have your sharpener grind the teeth of a rip or combination blade so all the teeth are angled at 10° (be sure to indicate which way your saw tilts). This will allow you to cut right to the shoulder line on the tail board, saving a lot of handwork. You’ll still be able to use the blade for most regular work. – Excerpted from Cutting Edge Table Saw Tips & Tricks, by Kenneth S. Burton (Popular Woodworking Books).
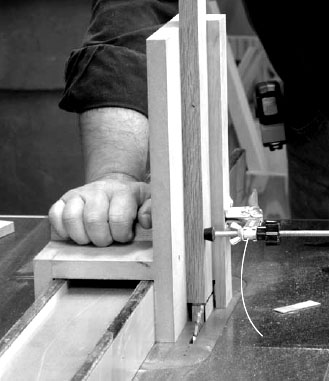
Cutting a tenon vertically on the table saw is really only safe if the piece is held tightly in place during the cut. A simple shop-made tenoning jig like the one shown here locks the piece in place quickly with the snap of the toggle clamp’s lever. My tenoning jig is designed to straddle my rip fence, adding even greater stability and control during the cut.
Another advantage to using this accessory is that you can cut both a shoulder and a cheek in one pass. If you don’t own a dado cutter, a single blade can also be used by making repeated cuts to nibble away the waste. It’s slower, but it still works.
To cut the tenon in a vertical manner I recommend using a tenoning jig that holds the piece tightly in place, as shown above. Another advantage to a tenoning jig is it also guarantees a centered tenon. The piece is flipped to cut both cheeks, but the jig remains in place, centering the tenon. You should always make a sample piece to test-fit the tenon to its mortise and adjust the setup as needed.
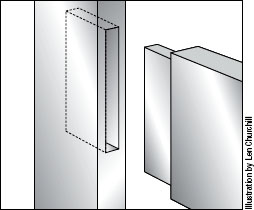
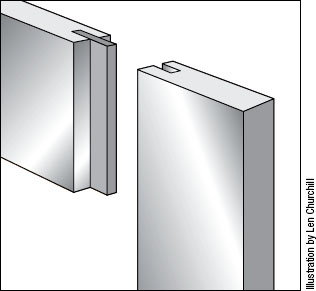
While you can’t make a mortise on a table saw, you can make a variation on the traditional mortise-and-tenon joint known as the bridle joint. This joint leaves the mortise and the tenon visible from the ends of the adjoining boards.
While not as strong as a true mortise and tenon, it greatly simplifies the mortising operation and both parts can be cut with a single setup on the table saw using a tenoning jig.
The bridle joint shown at right is designed for joining a rail to the center of another piece. If the top piece were trimmed away at the left end of the joint, you could easily form the corner of a door frame. All of this can be done on the table saw and without having to fuss with cutting a mortise.
Dovetails
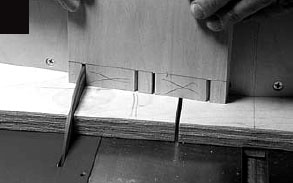
Dovetails on the table saw? Not possible! At least you might think so, but if you’re making through dovetails (dovetails that allow the joinery to be visible from both sides of the joint), it can be done.
Jim Stack, an accomplished woodworker and author, shared his method for through dovetails on the table saw. The trick is all in a special sled specifically designed to keep everything aligned during the cuts.
You still need to lay out your dovetails as your would with any dovetail jig, but with this method you’re not limited by templates and you can make the pins as thin as you’d like without the worry of fitting a router bit into the opening. The page at right shows you how to make the jig and how to put it to work. I’m afraid we’re still working on a method to cut half-blind dovetails on the table saw.
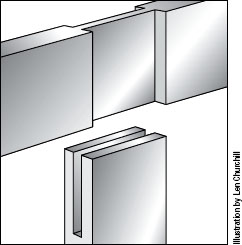
BRIDLE JOINT
Table Saw Dovetails
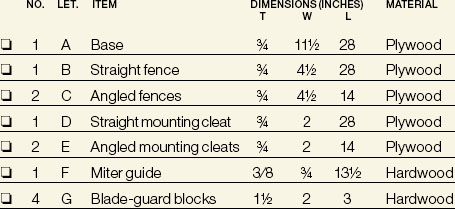
The table saw is great for cutting dovetails because it can cut straight and square. You can create the look of a hand-cut joint by using this two-sided sled and a rip blade.
1. Use three #6 × ¾ wood screws to attach the hardwood miter guide to the bottom of the base at dead center.
2. Use #8 × 1½ wood screws to attach the angled fences to their mounting cleats and cut a 10° angle on the each end.
3. Draw a line down the center of the base and screw the assemblies to the base.
4. Attach the blade-guard blocks behind the angled fences. Then put the jig in one of the miter slots on your table saw and mark where the blade meets the base. Attach a blade-guard block behind the fence at this location. Put the jig in the other miter slot and repeat the process.
5. Screw the straight fence to its mounting cleat, then screw one end of the mounting cleat to the base, allowing the fence to pivot until you square this fence to the blade. With the jig in one of the miter slots, hold a framing square against the long fence and line up the other arm of the square with the saw blade. Screw the assembly in position.
6. Attach the blade-guard blocks to the straight fence in the same manner that you did with the angled fence. Use glue and screws.
7. Set your saw blade so it’s square to the table and about 1 above the base of the jig. Cut a kerf into each angled fence. Don’t cut all the way through the blade-guard blocks.
8. Turn the jig around and bevel your saw blade to 10°. Cut this angled kerf into both sides of the straight fence.
– Jim Stack
Dovetail Fixture
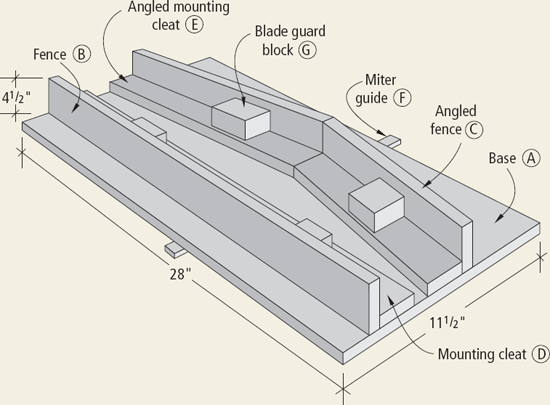
DOVETAIL FIXTURE
TO CUT YOUR DOVETAILS:
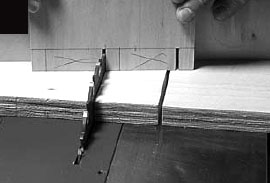
Lay out the pins on the end and both faces of the workpiece. Be sure to mark the waste material. Set the saw blade height to the thickness of the stock. Using the angled fence on the fixture, make your defining cuts for one side of the pins.

Use the pins as a template to lay out the tails.
Move the fixture to the other miter gauge slot, switch to the other angled fence and make the cuts on the other sides of the pins.

Tilt the blade to 10° and turn the fixture around so the straight fence faces the blade. Raise the blade to the material’s thickness. Make the defining cuts on one side of each tail.

Nibble away the waste between the pins with repeated passes over the blade.
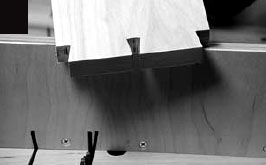
Flip the part face for face and make the defining cuts on the other side of the tails. Then clean out the waste. Clean out the corners of the tails with a chisel.
TIPS & TRICKS
PRO JIG:
Joinery Dividers
Once you’ve mastered the lock joint, put it to work for the inside of the drawers as well. The same joinery technique can be used to add fixed dividers to any drawer or box. Simply space off the locations for the dado cuts, running both sides at the same time (to make sure they’re even). Then run the tenon cuts on as many dividers as you need. This same concept can be used for curio shelving.
PRO TIP:
Spline Grain Direction
The grain in a corner spline should run across the joint for maximum strength. For a hidden spline, this means the length of the piece will be only about ¾”, while the width will be considerably more. Rather than try to cut such a short, wide piece, make the splines from fairly narrow pieces and use as many as necessary to fill the groove. – Excerpted from Cutting Edge Table Saw Tips & Tricks, by Kenneth Burton (Popular Woodworking Books).

The first cut for the lock joint is made with the inside face of the drawer part flat against the table saw. The piece is slid snug against the fence to locate the dado ¼" in from the end. The miter gauge must be set accurately at 0° and the fence exactly parallel to the blade to avoid binding.
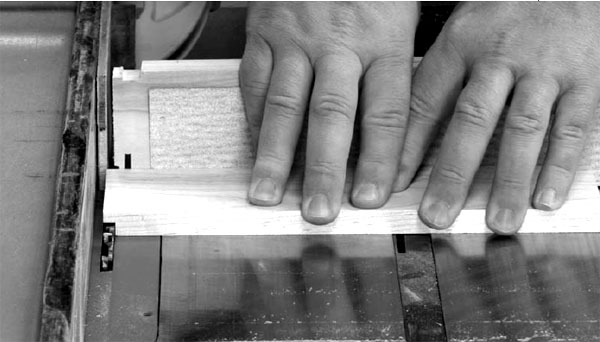
A ¼"-thick step-off piece is used to cut the tenon on the end of the drawer fronts and backs. Not only does this simple block add a bit of safety against binding, but it also allows you to make this second lock joint cut without having to reset the blade or fence.
Lock Joint
Similar to half-blind dovetail joints, lock joints (or locking tongue-and-dado joints) cannot be seen from one direction and are often used to assemble drawers. They’re much easier to make than dovetails – you can cut them with a single setup on a table saw. The trade-off is that they don’t withstand shear stress as well as dovetails (the wood in front of the dado will shear off if you pull too hard on the drawer front). However, they are still a good choice for small drawers or drawers that won’t see much use.
To make a lock joint, mount a dado cutter on your saw and adjust the depth of cut to equal half the thickness of the board. As most drawer boxes are made of ½”-thick material, make the tongue and the thickness of the dado ¼” thick. This works out fairly well for the dado stack as well, requiring only the two outer blades to make a ¼”-wide dado. And as an added benefit you can actually set the saw and fence once for both cuts.
Using the fence and your miter gauge to guide the stock, cut the ¼” × ¼” dado in the workpiece. The stock is held flat against the saw table and snug against the fence face.
To cut the mating tongue section, you essentially want to shift your dado cut to the end of the board, rather than ¼” in from the end. To do this, use a ¼”-thick spacer against the fence.
Set the tongue board flat on the saw table as before, using the miter gauge again as your guide. Slide the board against the ¼” spacer and then push the board forward toward the blade. The spacer remains behind, leaving a ¼” space between your board and the fence face. Hold the piece tightly against the miter gauge and make your cut. That’s all it takes – you have your ¼” × ¼” tongue that should fit your dado perfectly.
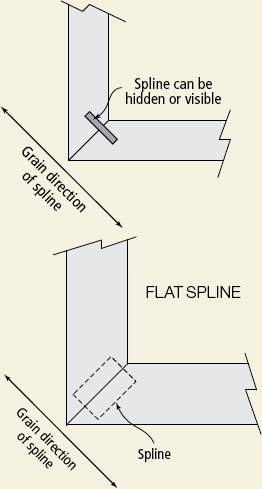
Splines
A spline is a small board, usually just ¼” to ⅛” thick, that spans the joint between two boards. The spline rests in two matching grooves – one in each board. You also can install a spline in matching rabbets or dados if needed. Splines can be made of solid wood, plywood or hardboard. Solid wood is best if the spline is decorative and the grain runs perpendicular to the joining pieces. Plywood is excellent when the top plys run with the grain of the joint making a good glue surface while the cross-grain plys add strength. Hardboard, which has no grain direction, is good for any grain direction.
Making a spline groove is no different than making an ordinary groove. Use a saw blade or dado cutter to cut a groove as wide as the spline is thick. Cut the depth about  ” more than half the spline’s width to allow excess glue space.
If centering the spline is necessary, simply run the board twice with opposing faces against the fence. Start with the blade near center on the edge, then sneak the fence over till the groove is exactly the right width.
Dry-fit your spline. Half the spline should fit in one groove and half in the other, with just a little side-to-side slop. If everything checks out, spread glue on the adjoining surfaces, the splines and in the grooves, and assemble the joint.
The advanced spline joint is one used to reinforce miter joints. Depending on how a miter joint is oriented, you can run the splines either horizontally or vertically. Also, you can choose whether to cut the spline before or after you assemble the miter joint. Splined miters in which the grooves are cut after the parts have been assembled are sometimes referred to as open spline joints, because both ends of each spline are clearly visible.

LOCK JOINT
SPLINE JOINT FOR FRAMES

For splines, make a quick carriage to help support the assembly as you move it past the blade. The blade height should be just shy of the joint’s inside corner. For flat frames, you can saw right through the carriage’s supporting pieces. Just be sure no screws are in the path of the blade. – Excerpted from Cutting Edge Table Saw Tips & Tricks, by Kenneth Burton (Popular Woodworking Books).