Chapter • 3
Router Joinery
BY NICK ENGLER
Although routers were originally designed to create moulded shapes, they can be excellent joinery tools. In fact, they’re better in some ways than table saws, professional-quality mortisers or dado cutters when it comes to cutting joints. There are several reasons routers have an advantage:
• Simplicity: Setting up hand-held or table-mounted routers is rather straightforward. Tools dedicated to joint-making such as hollow-chisel mortisers are more complex and require more time to set up. Sure, it could be worth the effort to use a mortiser if you’re planning to make dozens of duplicate joints. But if all you want to cut are a few mortises and tenons, for example, a router will save you loads of time.
• Versatility: You can make a greater variety of joints with a router than with any other joinery tool. No matter if you have a fixed-base or plunge router, you can cut more types of joints than with any other kind of tool.
• Accuracy: There isn’t a more precise joinery tool. You may find tools just as accurate, but none that surpass the router. Because routers cut quickly, they leave a smooth surface, meaning joints fit better and bonds are stronger.
There are some disadvantages to using your router for joint-making, and I’d be remiss if I didn’t mention them:
• Most routers won’t stand up to continual cutting as well as heavy-duty woodworking machinery.
• Because you can’t make deep cuts in a single pass on a router, it may take you longer to rout some joints than it would to use a mortiser or dado cutter.
• Depending on the joint you want to make, you may be limited by the sizes and configurations of available bits.
These shortcomings, however, are minor. Routers are indispensable joinery tools in any workshop.

PRO TRICK:
Dehumidifier Can Make Your Tenons Fit Tighter
Woodworkers who use mortise-and-tenon joints sometimes keep a dehumidifier in their shop to make it drier than the surrounding environment. Once in the shop, wood shrinks slightly. Then, when a completed project is returned to normal humidity, the tenons swell in the mortises, making the joints tighter.
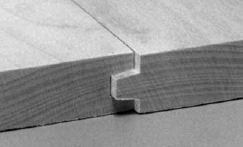
Rabbets, Dados & Grooves
You can make the most basic woodworking joints – rabbets, dados and grooves – using a simple fixed-base router and an inexpensive set of straight bits.
Rabbets (and the simple tongue for a tongue-and-groove joint) are produced easily with a router. While you may need a variety of rabbet sizes, a single rabbeting bit can accomplish them all. By purchasing a rabbeting bit with interchangeable guide bearings, the width of the rabbet can be changed quickly by selecting and installing a different diameter guide-bearing on the bit.

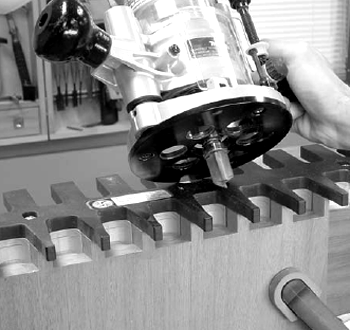
When routing dados and grooves, the joint ordinarily will be the same width as the bit. If you need to make a joint of a larger size, first make a cut that’s somewhat narrower than the joint needed (left), then move the fence or straightedge to make a second cut (below), enlarging the joint to the desired width.

Rabbeting can be accomplished safely using a router free-hand or in a table. For rabbeting smaller pieces (such as with frames or door mullions) I recommend using a router table. In a table, you can use a simple straight bit to cut the rabbet, or you can use a rabbeting bit with a bearing guide. Even though you may think the bearing guides make a fence unnecessary, you still should use one to limit the amount of bit exposed and to help guide the pieces. Align the fence with the outside edge of the bearing for a seamless process. For improved accuracy and safety, use a fingerboard to hold the material against the fence and table.
As mentioned earlier, a rabbet also can form the tongue for a tongue-and-groove joint. The tongue can be flush to one side of a board (for offset raised-panel doors) or the tongue can be centered on the board. Essentially, the tongue is just a long tenon. Run the groove first, then simply size the tongue to fit in that groove.
Many dados or grooves can be made with a straight bit that is sized to accurately make the joint with a single-width pass. To make a dado or groove that’s a non-standard size, choose a cutter that’s slightly smaller than the width of the joint and cut the joint in two passes, as shown in the photos below.
Because most basic joints are cut parallel or perpendicular to straight edges, you must guide the router or the work in a straight line. The best way to do this is to use an edge guide, straightedge, fence or miter gauge. You also can use a shop-made jig.
If the joint is blind (which means it stops before running through the board) at one or both ends, attach stops to the workpiece or the guides to automatically halt the cut. The location of these stops depends on where the joint is to be cut in the board. For example, to cut a blind groove that stops 6” from the ends of the board, clamp a stop to the outfeed side of the fence 6” from the router bit.
TIPS & TRICKS
PRO TRICK:
Tilting Pieces to Create Stopped Cuts

Stopped grooves or dados can be made safely on the router table by first marking the bit location (both sides of the bit profile) on the fence, then carefully lowering and raising the piece for the cut using the end of the board opposite the cut as a fulcrum.
PRO TIP:
No Templates Needed If You Copy an Existing Piece
To reproduce a shape quickly and
precisely without making a template, just use an existing part to make copies. Adhere the shaped part to the stock with double-faced carpet tape and, using either a pattern-cutting or flush-trim bit, cut the stock while tracing the shaped part with the bearing. However, because the bit won’t cut inside corners that are smaller than the bit diameter, you’ll have to cut this with a band saw or scroll saw.
GREAT TIP:
Mortising Bits are Worth Taking the Plunge For
Some manufacturers offer so-called mortising bits. They look like a standard straight bit with one difference: They have an additional small cutter at the end of the bit. This bit allows you to plunge directly into your work, instead of wiggling the bit as you plunge, which is typical with a straight bit.

When cutting blind joints – rabbets, dados and grooves that are closed at one or both ends – use a stop block to halt the cut at the blind ends. Note that the end of the stop block is mitered. This prevents sawdust from being trapped between it and the stock, where the dust might interfere with the accuracy of the cut.
When cutting a joint in a contoured edge, use a piloted bit to follow the contour. A piloted rabbeting bit will neatly cut a rabbet in an irregular edge, while a spline cutter will likewise make a groove in an irregular edge a simple task.
Now, if the joint is blind at both ends, you can determine the distance between the two stops by adding the length of the board to the length of the joint and subtracting the router bit diameter. (For example, if you want to cut a 4”-long double-blind groove in a 10” board with a ⅜”-diameter straight bit, position the stops 13⅝” apart.)
But what if the rabbet must follow a contour? Well, there are a couple of choices, but the only bit that makes good sense for making contoured rabbets is a bearing-piloted rabbeting bit.
For a contoured groove, a different approach will likely be necessary. The answer this time is a guide collar (also called a template guide) and a template. Because a guide collar is slightly wider than the diameter of the bit, the contour cut by the router will not be the same size as the template. For inside curves and corners, the contour will be smaller; for outside ones, it will be larger.
There always will be a small gap between the edge of the template and the nearest side of the cut because of the different diameters. To determine the width of this space, subtract the diameter of the bit from the outside diameter of the collar and divide by two. (For example, if you cut a contoured groove with a ⅝”-diameter collar and a ½”-diameter bit, the distance between the template and the groove will be  ”.)
”.)
Mortises and Tenons
To make a mortise and its matching tenon, you must combine several techniques. Although it may seem complex, a mortise-and-tenon joint is just a combination of several basic joints. After all, a mortise is simply a groove that’s blind at both ends, and a tenon is made by cutting two or more rabbets in the end of a board.
The trick to cutting precise mortises and tenons is to make the cuts in the proper order. Most experienced woodworkers agree that it’s easiest to cut the mortise first, then fit the tenon into it.
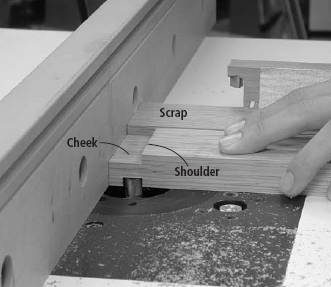
To make a tenon, cut two or more rabbets in the end of the board – these rabbets will become the cheeks and shoulders of the tenon. To fit the tenon to the mortise, cut the tenon just a bit large, then slowly raise the bit, shaving away a paper-thin layer of stock on each cheek until you get the fit you’re after. Guide the cuts with the miter gauge, using the fence as a stop.
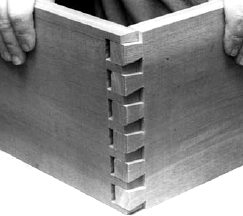
On half-blind dovetails (above), the joint is hidden from view on one side. This makes it ideal for the fronts of drawers and other applications where you don’t want to see the joinery. Through dovetails (right) are visible from both sides and are often used for decoration, as well as joining.

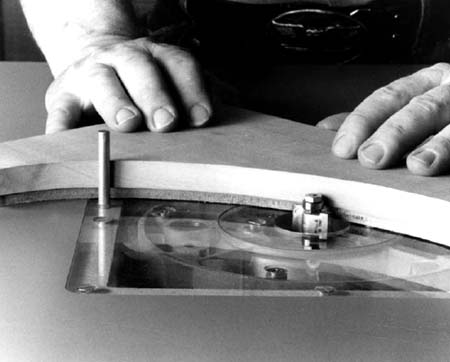
To make a mortise, you must bore a starter hole and expand it to the dimensions needed. There are several ways to do this using a fixed-base or a plunge router, either hand-held or in a table. However, when you make mortises for mortise-and-tenon joints, you usually want to make several mortises in different workpieces, all the exact same size and shape. The easiest way to accomplish this is with a simple template.
As a general rule, mortises should be about half the width of the material they’re made in. So a mortise in a ¾”-wide piece of wood should be ⅜” wide, with a  ” shoulder on either side of it. The depth of the mortise should be no less than ¾” to ensure a good joint, but 1” or slightly more usually is a good idea.
The simplest form of template is a piece of plywood that has a hole in it that is the exact size of the mortise you wish to rout. Just clamp the template directly onto your work and then form the mortise using a straight bit that has a bearing above the cutting flutes. There are a variety of ways to make the template, from making plunge cuts on a board with a table saw to edge-gluing four pieces of wood together and leaving a gap in the middle that is the size of the mortise. All work just fine.
When cutting the mortise, first plunge straight down in the area you wish to waste away. Then, with the router fully plunged, follow the template’s edge with your bearing to shape the mortise to its finished size. (See below for how to cut the tenon.)
Dovetails
There are three basic dovetail joints: half-blind dovetails, through dovetails and sliding dovetails. The router is the only power tool that can create them all, using a special dovetail bit.
Both half-blind and through dovetails are most easily made using accurate templates. These can be purchased (there are many commercially manufactured ones) or you can make your own.
Through dovetails require two passes and two matching templates. These templates are less common than half-blind dovetail templates and, because of the precision required to make them, can be much more expensive.
Sliding dovetails require no special equipment, other than your router, router table and dovetail bit.
To make a sliding dovetail, first rout a dovetail slot the same way you would rout a dado or groove. Because of the bit shape, however, you must cut the full depth in one pass. Next, cut a dovetail tenon to fit this slot – this must be cut on a router table. The slot, on the other hand, can be cut using a hand-held router. Leave the depth of cut unchanged from the setup you used when routing the slot. Then pass a board by the bit, cutting one face. Then turn the board around and cut the other face. These two cuts form the tenon.
To assemble the joint, just slide the tenon into the slot. If necessary, adjust the fit by trimming a little stock off the tenon’s cheeks, either with your router, a small plane or simply with sandpaper.
When using a fixed through-dovetail template (left) you can’t change the size and position of the tails and pins. Rout the tails first, using the tail template, a guide collar and a dovetail bit. Then you can switch to the pin template and a straight bit. Fit the pins to the tails by moving the template forward or back on its holder. This will change the size, but not the location, of the pins.
To rout a half-blind dovetail joint (right), secure both of the adjoining boards in the template. The “tail” board is held vertically, so its end is flush with the top surface of the horizontal “pin” board. Cut both the tails and the pins in one pass with a dovetail bit, using a guide collar to follow the template.
Coped Joints
Perhaps the easiest way to make a joint with a router is to cut a “coped” joint, where both adjoining surfaces are shaped. The most common example of this is on cabinet doors where the rails (the horizontal pieces) meet with the stiles (the vertical pieces). Each joint surface is a mirror image of the other, so the two surfaces mate perfectly.
This has two advantages: the shape of the joint aligns the adjoining parts so the surfaces are flush and the corners are square, and the shape increases the gluing surfaces and strengthens the joint.
Coped joints require special router bits that can be pretty expensive. There are three types of bits, and each must be used in a different manner:
• Single bit with one cutter: The male and female cutters are on the same bit, making it a long piece of tooling. You raise and lower the bit in the table to change which set of cutters are in use.


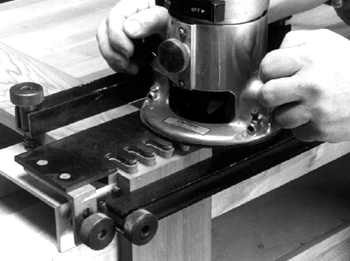
A drawer-lock joint requires only one bit and one setup. However, instead of reversing boards face for face as you cut them (like in the finger glue joint), you must cut the drawer front with the face of the workpiece against the router table, and then cut the drawer side with the face against the fence. Adjust both the depth of cut and the position of the fence so the members fit together properly.
• Single bit with interchangeable cutters: You switch from the male to the female cutter by disassembling the bit and changing the orientation of the cutters. There are small shims involved so you need to keep those in the right place as you assemble the bit each time.
• Two bits: There’s one bit for cutting the male part of the joint and a second for the female. This is usually the most expensive route.
There is another type of bit used for assembling boxes that routs the joinery on both edges. The drawer-lock joint – one example of these – is shown below.
Loose-tenon Joints
Along with all the joints we have discussed so far that require joinery parts cut on the mating pieces, there are a number that use an extra piece to form a loose-tenon joint. The three most common are the true loose-tenon joint, the spline joint and the biscuit joint.
The true loose tenon is exactly what it sounds like. Rather than making a mortise in one piece and a tenon on the other, both pieces have mortises. A third piece (often made in a long stock piece and cut to length) becomes a double-sided tenon, connecting the two mortises. The strength is essentially the same as it is in a mortise-and-tenon joint, but the process is perfect for use with a router, and it is quick and accurate.
The mortises are made as described earlier and can be left rounded on the ends, as created by the bit. The tenon is made from a piece of stock planed and ripped to fit the mortises. Next the four arises are rounded using a roundover bit in your router to make a perfect fit in the mortises. Then you simply crosscut the tenon to fit the mortises.
Spline and biscuit joints are cousins to each other. The spline joint requires a groove (usually about ¼” wide) that you run the entire length of the two pieces to join together. This can be an edge-to-edge joint or an edge-to-face joint. It doesn’t matter.
A special router bit called a spline-cutting bit is used to cut the groove. As with a rabbeting bit, the spline cutter uses interchangeable bearing guides of different diameters to adjust the depth of cut. A router table’s fence also can be used to adust the depth.
With the mating grooves cut, just glue a spline in place. The spline can be made from ¼” plywood or solid wood, depending on your preference. Again, the spline should be slightly less wide (deep) than the groove to allow some room for glue squeeze-out.
Biscuits follow the same concept, except the spline cutter is used to cut shorter grooves and commercially available biscuits are used to bridge the joint. In essence you’ve replaced the need to buy a $150 biscuit jointer with a $20 router bit – not too bad.

A tongue-and-groove joint requires two matching bits. Rout a groove in one edge of each of the workpieces, then change bits and rout a tongue in the other edge. You must carefully adjust the depth of cut for the
second cut to match the first so the faces of the adjoining boards will be flush.
A BIT OF ADVICE
A router bit consists of a cylindrical shank (¼" or ½" in diameter) and one or more flutes or cutting wings, usually comprised of a piece of carbide brazed to the metal body of the bit. Throughout this series, we will be providing a closer look at many of the common and specialized bits that can be used with your router. These three bits are great when using your router for joinery.
Rabbeting Bit
This handy bit usually comes with a set of different-sized bearings that you can simply swap out to cut rabbets of different depths.

Cope-and-stick Bit
Making decorative frame-and-panel assemblies is a snap with this bit. There are three versions that have different ways of approaching the same operation. In this version, one bit cuts both the male and female pieces.

Spline-cutting Bit
Making grooves in edges is the mainstay of this bit. Newer versions allow you to adjust the size of the groove with shims or by adjusting the cutters.
