Chapter • 4
Case Joinery
BY DAVID THIEL
In this chapter we’re going to take a look at many of the most practical joinery possibilities for building casework furniture.As you might imagine, this is a huge topic. Casework runs the gamut from jewelry boxes to kitchen cabinetry, and there are literally dozens of ways to form the cases. Some are traditional joinery methods, such as rabbets, dados and dovetails. Others involve more contemporary mechanical fasteners, such as wood screws, pocket screws and biscuits.
Because of the volume of joinery options, we’re only going to be able to briefly discuss the different types, the benefits and deficits of each joint and what casework application each joint is best suited for. What we won’t be doing is showing you how to make each joint. But plenty of woodworking books can help you with this part of the equation.
Face Frame or Frameless?
Before we dive into the joinery, let’s take a moment to review the two main types of case construction. Case pieces can be built with just the sides, top and bottom, with an optional back – this is called a frameless design. Carcases can also be built with a rigid front frame (formed of stiles and rails) added to the front of the box for extra strength (and it does offer a different look, too).
The type of casework construction you choose, face frame or frameless, will help direct you to the proper joinery. In general, a frameless cabinet requires stronger carcase joinery, while a cabinet with a frame can rely more on the frame for strength and use less stout joinery for the carcase. There are, of course, joints that work for both types of cases.
And because we’ve mentioned frames, we need to look at two distinct categories of joinery as well: Joinery for box construction (frameless), versus joinery for the construction of the frames themselves.
While a dovetail is an excellent carcase joint, it’s not a practical frame joint. Similarly, a mortise and tenon is an excellent joint for frames, but is usually impractical for box building.
Box Joinery Without Frames
Let’s take a look at some of the joints that are best used when building a case piece that is purely frameless. The chart at right offers a good/better/best comparison of some of these joints.
Some of the joints that aren’t represented on the chart are the more mechanical joints, i.e. screws. Screws all by themselves can be used to hold cabinetry together fairly successfully. The difficulty being they’re not very attractive. In a utility cabinet, that’s not a problem, but it’s not what you want in a piece of fine furniture.


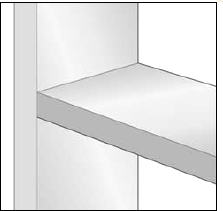
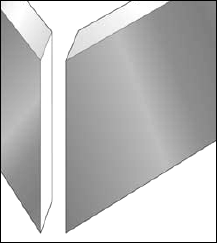
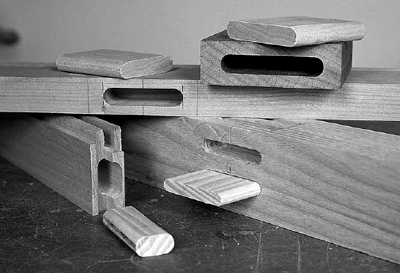
The shelf is fit into a dado, resulting in much better strength than a simple butt joint. By adding a peg or two to the joint, you add even more strength and the opportunity to add a visual element to the piece. In this case it’s the proverbial square peg in a round hole. A hole is drilled through the side and into the shelf. A piece of square stock cut to the diameter of the hole is then tapered at one end and driven into the hole. When fully seated in the hole, the peg is cut flush to the cabinet side and sanded smooth. The result is the appearance of a square peg and lots of extra strength.
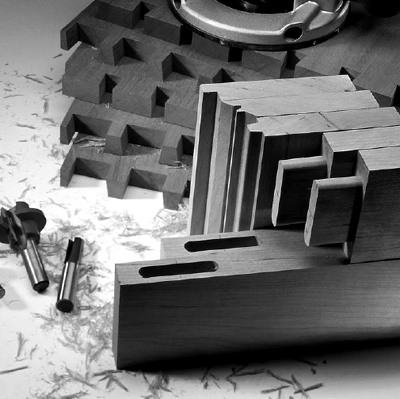
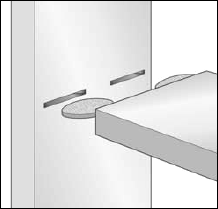
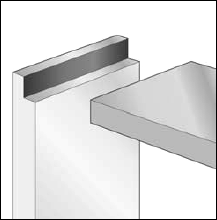
These two examples of joinery would work well for a case piece without a frame. The photo on the left shows plywood construction, reinforced and aligned with biscuits. To add an even stronger touch, a pocket screw is inserted through the bottom and used to pull the joint tight. Veneer tape will hide the plywood edge. At the right, a solid lumber piece is built using a rabbet and dado joint for the top, bottom and shelves.
You can countersink the screw and add a plug, but you’ll still see the plug. If the arrangement of the pieces allows, pocket screws (below left) are an option. By placing the screws on the underside of pieces, the screws essentially disappear. Or, these holes can also be plugged, as with a standard screw hole.
Another mechanical fastener that should be discussed is nails. Whether fired from a pneumatic nailer or knocked in with a hammer, there’s lots of commercial furniture that is held together with nails. As with screws, placement is critical for visibility. Nails will add strength to a joint, but not as much as a screw. It’s probably better to think of a nail as a fast clamp while the glue dries.
Pneumatic nails do have one benefit over wire nails: The surfaces of the brad nails are coated with an adhesive to hold the clips of nails together. One positive side benefit of the adhesive is that as the nail is driven at speed into the wood, the adhesive heats up, softens and actually serves to glue the nail into the joint.
The more traditional approach to assembling a carcase is to use a wood joint such as a rabbet, dado or dovetail. As you look at the chart, the most obvious piece of information to be gained is that the more complicated the joint, the better it holds. Why? Two reasons. First, as you “complicate” the joint what you’re really doing is adding gluing surfaces to the joint. While a butt joint has one surface meeting another, a dado joint has three surfaces in contact between the two pieces. You also gain different grain orientation in the joint, which further adds to the gluing strength.
Second, when you move into the most complicated joints you gain locking strength in the wood itself. Dovetails and locking miters are two very good examples of this strength. Even without glue, the sheer mechanics of interlocking pieces of wood adds significant strength.
Casework Box Joinery
GOOD
T-BUTT
A standard joint for cabinetry, this is a simple but weak joint that requires little investment in terms of time, machinery or tools.
CORNER BUTT
The same simple joint can be used in the middle of a case piece (top) or to form a corner as shown directly above.
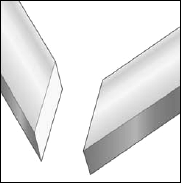
MITER
This traditional box joint hides end grain. With most casework, the joint will be short-grain-to-short-grain, which offers very little strength.
BETTER
BUTT WITH BISCUIT
Adding reinforcement (biscuits as shown, dowels or screws) to a butt joint improves the joint’s strength.
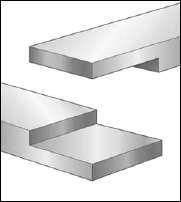
RABBET
A rabbet joint offers more gluing surface than a butt joint and also adds better support to a corner joint.
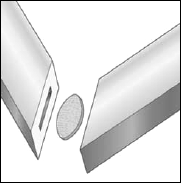
SPLINED MITER
Adding a spline to a miter joint increases strength and improves alignment. It also provides the opportunity for an artistic element.
BEST

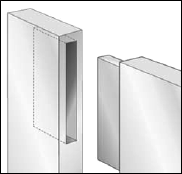
SLIDING DOVETAIL
A sliding-dovetail joint effectively locks the two pieces together for great strength. This joint can be stopped (as shown) or through.

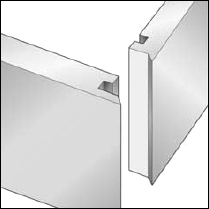
RABBET AND DADO
By locking the rabbet in a dado, the strength and protection against racking on this corner joint are greatly improved.
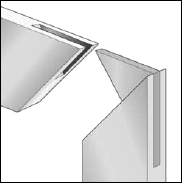
DOVETAILED MITER
This joint offers visible joinery, but shows only a miter on the edges of the box, which makes it both attractive and strong.
A STEP FURTHER
LOCKING MITER
This joint is an improvement over a miter joint, without adding a biscuit or spline. It offers greater gluing surface and strength.
HALF-BLIND DOVETAIL
No joint provides as much strength as a dovetail. This joint can be partially visible (as above), completely visible or completely hidden.
GROOVE AND PANEL
When it comes to adding a back to a case piece, this joint offers strength and convenience. For a removable back, a rabbet is preferred.
You’re doing the same thing by adding dowels or biscuits to a joint – increasing interlocking strength and increasing the gluing surfaces.
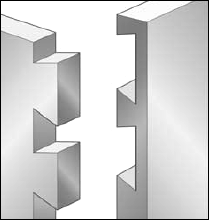
One case joint that I want to focus on for a minute is a sliding dovetail. This is a complicated joint to create, but well worth the effort. And with the proper steps most of the complication can be removed or at least minimized.
A sliding dovetail joint adds tremendous locking strength between a divider panel and case sides, or when using a web frame to complete a case. It not only provides strength to pull the two sides together, but protects against racking (corner-to-corner motion).
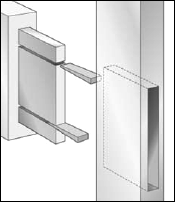
Full-depth drawer dividers aren’t always necessary in a cabinet. To decrease weight, you can use a dividing rail at the front with drawer runners along the side to guide the drawer. But because you’re taking material away, it’s more difficult to keep the strength in the cabinet. That’s where the sliding dovetail comes into play.
By cutting a dovetail-shaped socket in the cabinet sides and a matching tail on the ends of the drawer divider, a much stronger and lighter case is possible.
Box Joinery With Frames
Now that we’ve shown that frameless case pieces can be built with joinery that provides excellent strength, why would we want to add a frame to the case? Two simple reasons: strength and aesthetics.
While many case pieces are designed to sit on the floor, such as a dresser or chest of drawers, there are many examples of beautiful wall cabinets that hang suspended without any support below. If your wall cabinet is going to store books or dishes, you’re going to need all the strength you can get to counteract gravity. That’s one good reason to add a frame to an already strong case.
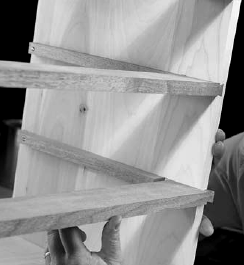

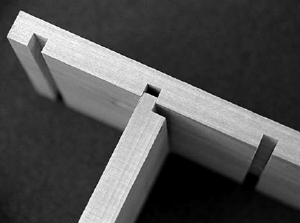
This drawer cabinet uses sliding dovetails on the drawer divider rails to reduce weight while maintaining case strength. Sliding dovetails can be tricky to execute, but with the proper setup and a little practice, they’re a handy option for a need such as this.
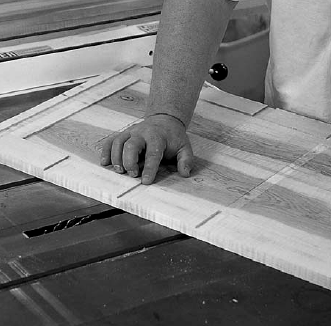
Cabinetmaker Troy Sexton understands the best of all worlds. The dresser he’s assembling is made of sections that are of frame-and-panel construction. This is a frameless cabinet, so Troy had to be certain of the strength in his joinery. He used the same cope-and-stick shaper knives to form the joints for the visible outside panels and the interior dividers. To assemble the case, he cut dados in the panels to add joint stength. At left, he’s using a brad nailer to hold everything together while letting the glue dry. Finally, he nailed on the back, held in place by rabbets.

Biscuit joints can work well in face-frame joinery, but don’t assume you can use a #20. You need a smaller biscuit so the joint won’t show.
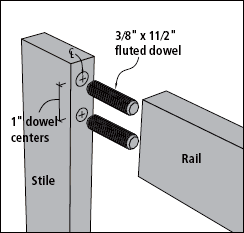
Dowels are a decent alternative for joining face frame parts, but they can be tricky to align to get the faces perfectly flush.

Pocket screws add lots of strength to a face frame joint. And unlike other types of screws, these are easily hidden on the inside face.
The second reason is aesthetics. Sometimes a traditional cabinet you’re building calls out for a face frame. Even if strength isn’t a concern, the look of a face frame can dress up what some might call a plain piece of furniture. If you’re adding a face frame for looks, then strength isn’t your first concern and so the joinery used on the frame itself can be of many different styles.
Face-frame Joints
Face frames on cabinets are close cousins to frame-and-panel doors. Many of the same joinery options are available for face frames as are used in making doors. To determine what joint is best for the application, you need to look at the strength and appearance requirements.
In some instances a butt joint is possible on a face frame. This would be one of those aesthetic situations where a case is already plenty strong on its own, but you want the look of a face frame. The frame is then simply glued or nailed to the case and the stiles (the vertical pieces) and rails (the horizontal pieces) are butted together. While this is frequently done in commercial furniture, I’m going to suggest you go a step further (as a woodworker, you owe it to yourself). The butted ends can move over time leaving a sloppy-looking joint.
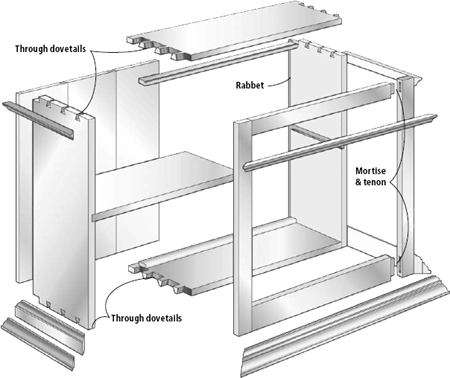
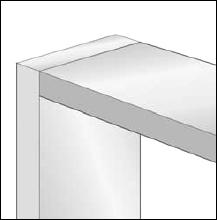
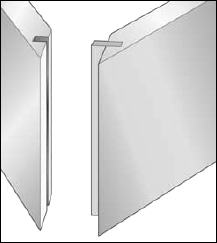
At left is a diagram of a hanging wall cabinet. When a case piece like this is hung on a wall, strength becomes an important factor. With no floor to support the weight, the joints have to be even more reliable. This piece uses strong joints in the box itself, with through-dovetails at the corners of the case. The solid wood back is rabbetted into the case, then fastened by nails. The face frame is assembled with mortise-and-tenon joints in the corners then glued to the box. The frame-to-case strength can be increased even more by pegging the frame in place. There is a lot of strength in this cabinet’s joinery.

When talking about face frames for cabinetry, it’s a good idea to know what to call all the pieces. The outer vertical parts are stiles (and always run through), while the horizontal parts are rails (and always run between stiles).Of course, there are circumstances where other terminology is necessary. When stiles and rails are within the perimeter of the frame they are intermediate stiles or rails.
Loose tenons are a simple option over the traditional mortise and tenon. While you still need to machine the mortise (two in fact), this is more easily created on a drill press or plunge router with a straight bit, tools you likely already own. The tenons themselves are easily created in bulk using the table saw and a router.
Some modern mechanical options for face-frame joinery include biscuits, dowels and pocket screws. All will add strength and even accuracy in aligning the pieces at the joint. Nails (air-powered or not) aren’t a good option with face frames as they’re likely to split the wood when you work near the ends of boards.
Beyond the mechanical options, some interlocking joints that work well include a half-lap joint or bridle joint. These joints offer a reasonable gluing surface to hold things tight over time, but are still fairly quick to create. The strength is moderate, but certainly better than a butt joint.
Because we’re speaking of aesthetics, consider using a lapped dovetail. This variation on the half-lap adds an interesting visual element and also adds some strength to the joint.
But when it comes to making a face frame for strength, the mortise and tenon is the way to go. This joint has been around for millennia – really! And it can be easily created with a router alone, a mortiser and table saw, or with simple hand tools.
To make sure your mortise-and-tenon joints are as strong as possible, here are a few rules to follow:
1. If you’re using a mortiser to create your joint, the tenon thickness should be one-half the thickness of the stock piece. So if you’re using ¾”-thick material, the tenon should be ⅜” thick. For creating the joint with a mallet and chisel, one-third the material thickness is preferable.
2. To avoid tearing out the wall of the mortise at the end of the joint, set the mortise (and the tenon) back from the end, leaving at least a ⅜” edge shoulder on the tenon.
3. In general, the tenon length in casework should be no shorter than 1”, and 1¼” is a reasonable length.
If you’d like to consider another option to the standard mortise and tenon, how about a loose tenon? The beauty of this joint is that the mortises can be made in a drill press and the loose tenon pieces can be run off in mass quantity on a table saw. Then the tenon edges can simply be rounded with a router. This joint offers the same strength as a traditional mortise and tenon without quite as much fuss.
The mortise-and-tenon joint does one other thing that a face frame is very good at: it keeps the cabinet square. A mortise-and-tenon joint (when properly constructed) is a very rigid, square frame and you can actually use it to square up a cabinet that may have joinery that allows more play than is preferable.
Casework Frame Joinery
GOOD

BUTT
This joint really doesn’t belong in the “good” category. It’s structurally weak and provides poor glue adhesion.
MITER
A corner miter offers slightly better strength than a butt joint because of the short-grain match, but it still won’t hold up to much abuse.
HALF-LAP
A good corner joint, the half-lap adds strength and more gluing surface, but requires accurate machining and is a very visible joint.
BETTER
 />
/>
BUTT WITH DOWELS
Adding a mechanical fastener (spline, biscuit or dowels as above) greatly improves the strength of this corner joint.
 />
/>
MITER WITH BISCUIT
Biscuits offer improved strength and alignment for what can be a tricky and weak corner joint. Dowels are also an option here.
 />
/>
CORNER BRIDLE
Better than a half-lap, the bridle joint offers greater strength, more gluing surface and security against racking.
BEST
 />
/>
MORTISE AND TENON
The ultimate in frame strength, the mortise and tenon guards against racking, is strong with lots of gluing surface and is invisible.
 />
/>
MITER WITH SPLINE
Another way to strengthen a corner miter is with a spline. Beyond the adding gluing surface, a spline can be used as a decorative element.
 />
/>
HAUNCHED MORTISE
A variation on the mortise and tenon, this joint allows a panel to be added into the assembly with less work than a cope-and-stick joint.
A STEP FURTHER
 />
/>
T-LAP DOVETAIL
Better than a half-lap, the dovetail lap adds locking strength for either a corner joint or mid-rail joinery, but requires even more accuracy.
 />
/>
COPE & STICK
Frames in casework needn’t always be plain. A frame-and-panel design dresses up a piece and adds strength.
 />
/>
WEDGED THROUGH-TENON
A great visual element and very strong, the wedged through-tenon takes some practice but adds amazing strength.
 />
/>
The cope-and-stick joint is a standard for most frame-and-panel doors. But the same joint can be used to create panels for casework. The profile on the cope and stick can vary greatly, but an ovolo, as shown above, is very traditional.
I mentioned cope and stick. This is a joinery technique most often reserved for doors because of the edge detailing accompanying the joinery. But this joinery technique can be used for cabinet sides as well, to excellent effect.
With the face frame complete, it needs to be attached to the cabinet. In most cases glue and clamping work fine, but a couple of brad nails can help as well. You could also use biscuits or pocket screws if you feel alignment help or quicker assembly time is a benefit.
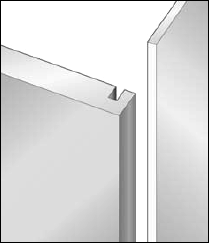
Back Joinery
Now that we’re at the back end of the article, I should say a couple of words about back joinery (sorry – couldn’t resist). One of the most common methods of adding a back to a case piece is by milling a rabbet at the back edge of the sides, top and bottom. The rabbet can be adjusted in width to accommodate ¼” plywood backs, or ½” or ¾” solid backs, depending on your requirements. One tip: if you’re making a large case piece that will be mounted to the wall, it’s a good idea to recess the back slightly (¼”). Thus, any imperfections in the wall won’t keep the cabinet from fitting tightly against it.
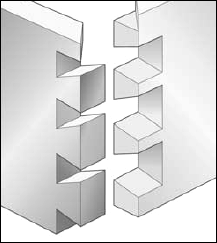
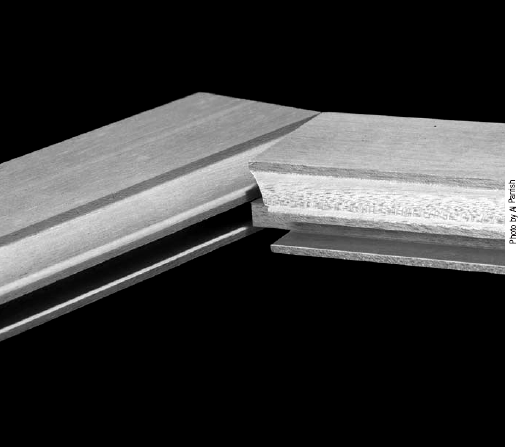
If you’re using a solid back, there’s joinery that will help span what can be a very large area, while at the same time counteracting any problems with wood contraction or expansion due to changes in humidity. A shiplap joint or tongue-and-groove joint make using solid wood safe. And these joints leave an attractive back in the case.
Those are the basics of case joinery. With this information, you’ll be able to choose the best joints for strong and attractive furniture.
 />
/>
Two joints for solid backs are the shiplap joint (top) and the tongue-and-groove joint. Both allow a solid wood back to move with seasonal humidity changes. The shiplap joint requires slightly less accuracy, but the tongue-and-groove joint offers a locking feature to counteract any warping.