Chapter • 6
4 Joints for Box Making
BY DAVID THIEL AND KARA GEBHART
A wise man once said that all furniture building is box making. He’s still correct. A chest of drawers is simply a number of open-topped boxes slipped inside a larger box. If you can make a box, you can make nearly any kind of furniture designed for storage…we’ll save chairs and tables for another time.
To help you along the way towards box (and furniture) making, we’ve come up with a couple of projects that actually are an excuse to talk about useful box-making joints. These two blanket chests use four basic and commonplace joints for corners: through-dovetails, rabbet joints, tongue-and-groove and biscuit joints.
Building a Traditional Chest
Let’s start with the pine chest. We used through-dovetails on the front corners and a rabbet joint on the rear corners. Start by gluing- up the panels for the front, back and sides. They should finish out ⅛” or so longer than the cutting list calls for to allow room for the pins and tails to extend past the joint; they will later be sanded (or planed) flush to the case sides.
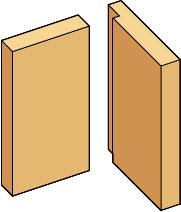
Through-dovetails
Let’s talk about the dovetail joint. Most woodworkers consider the dovetail joint a hallmark of quality craftsmanship. It truly is an amazingly strong method of joinery and adds a nice visual detail to a piece of furniture. We used a through-dovetail (meaning the joinery is visible from both sides of the corner) because it’s the more traditional dovetail joint for blanket chest construction. When using power tools, it’s actually a little harder to create than half-blind dovetails, which are seen from only the side of the case. Dovetails are not only useful in case joinery, but are used extensively for drawers and smaller decorative boxes as well.
When approaching dovetail joinery you should first decide whether you’re going to learn to cut the joint by hand, or invest in one of the many dovetail jigs that use a router to form the joint. We don’t want to make this an article debating the pros and cons of each method, but we should talk about both, briefly.
Cutting dovetails by hand can be an immensely rewarding and liberating skill. It allows you to adjust the size, location and number of pins and tails used in the joint, something less easy when using a router jig. It also allows you to work with a minimal amount of noise and dust. One drawback is the amount of time necessary to feel comfortable in cutting into your carefully prepared lumber.
One argument we’ve heard for hand-cut dovetails is the expense involved in purchasing a router and dovetail jig. Don’t fool yourself. Quality hand tools for hand-cut dovetails can quickly run up the credit-card balance.
For this article we opted for a dovetail jig for our router. Making hand-cut dovetails is a full article in its own right, and we’ll simply refer you to Ian Kirby’s “The Complete Dovetail” (Linden Publishing) for more in-depth instruction on that.
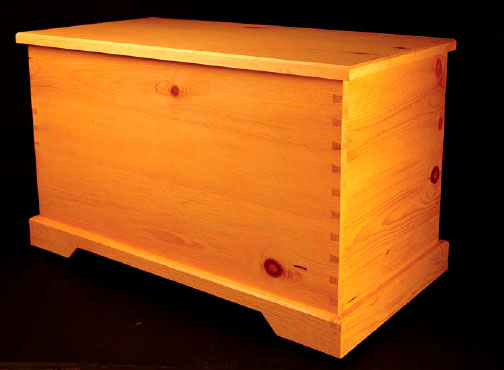
We built blanket chests in traditional and contemporary styles to show off four box-making joints.
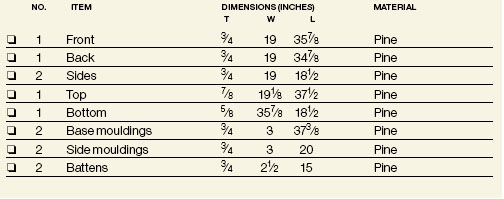
Supplies: Traditional Chest
Hardware from Lee Valley leevalley.com, 800-871-8158
2 • 10” lid supports
00T02.10 - $19.80
4 • 19⁄16” × 2” hinges
01H24.10 - $5.60 each
4 • 2”-dia. casters
00K26.50 - $8.20 each
1 • ¼ lb. cut nails
91Z40.25 - $10.50
Dovetail jig from Keller & Co.
kellerdovetail.com
800-995-2456
1 • Journeyman 22”
dovetail system model 2200 - $239.00

After laying out the dovetail locations, set up the jig and router following the manufacturer’s directions. Cut the tails first with the dovetail bit, then use the opposite side of the jig with a straight router bit to cut the pins on the mating piece. With careful setup, a smooth fit is accomplished even if it’s your first set of dovetails.

THROUGH-DOVETAILS

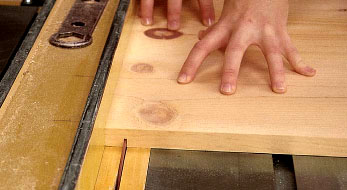
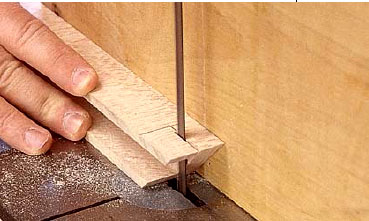
To cut the rabbet for the back corner joints on the pine chest, we used a two-step process on the table saw. First, cut the width of the rabbet, with the saw height set just shy of the rabbet width dimension (above). Next reset the fence and blade height to trim away the rabbet waste in an upright cut. Notice the waste piece will fall away from the blade, avoiding a dangerous trapped scrap piece.
When using a dovetail jig with a router, you’ll run into the aforementioned noise and dust, as well as a learning curve that is shorter than with hand-cut joints, but needs to be relearned when different thicknesses are used with the jig. Then there’s the expense.
There are a variety of dovetail jigs available, but even the least expensive will cost more than $150 and that won’t include the necessary bits or the router to make the cuts. However, the convenience of quickly cutting a row of dovetails in less than an hour is a strong argument for spending the money.
Traditional Blanket Chest
There are a number of jigs capable of making quality dovetail joints. For our particular chest we chose a Keller dovetail jig because it offered the best width capacity for making our dovetails at a reasonable price.
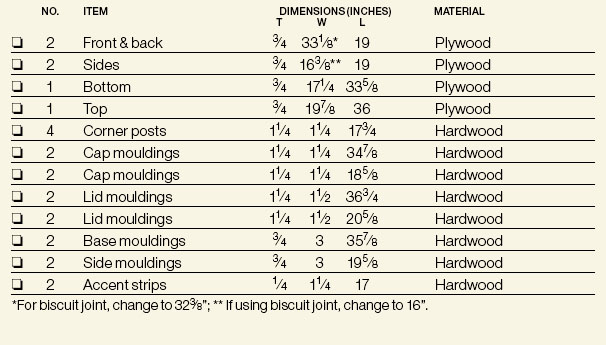
To make our through-dovetail joints (the two front joints in the pine chest), we first prepared the wood, making the panels the appropriate thickness (¾”), width (in this case the width of the wood is the height of the chest to allow for seasonal wood movement because of changes in moisture content) and length. Dovetails should always be cut on the end-grain ends of a board to provide the strongest joint. Cut your front, back and sides a  ” to ⅛” longer to allow for sanding or planing the joint flush to the sides.
With the wood panels prepared, head to the dovetail jig with a piece of scrap left over from sizing the panels. No matter what jig you’re using, the critical detail is to get the jig set up accurately. You’ll usually start by cutting the “tails” part of the joint first (though some half-blind jigs cut both simultaneously). First determine the location and layout for the dovetails. Follow the instructions for the jig to lay out and cut the tails.
Once the tails are cut, adjusting the jig to make your pins fit is the important part. Though it requires tinkering to adjust the bit in the router and the jig itself, once it’s right you’ll be able to make as many perfect dovetails as you like.
After checking the fit of your dovetails, the hard part is really over. The rear joint, the rabbet joint, is formed on the sides only by making two passes on the table saw. Here’s how to make it:
Rabbet Joint
For the rear joint on the pine chest we opted for a very simple joint, but one still reasonably strong and appropriate for the case. The rabbet joint requires cutting a rabbet in the back edge of both sides. The width of the rabbet should equal the thickness of the stock. The depth of the rabbet should be one-third to two-thirds the thickness of the stock.

Plan - lid removed
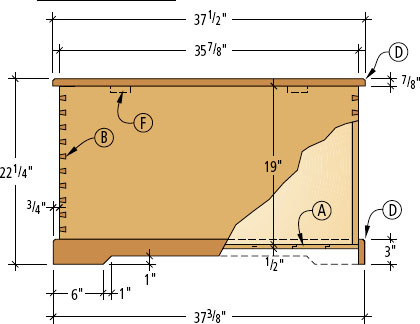
ELEVATION - SECTION
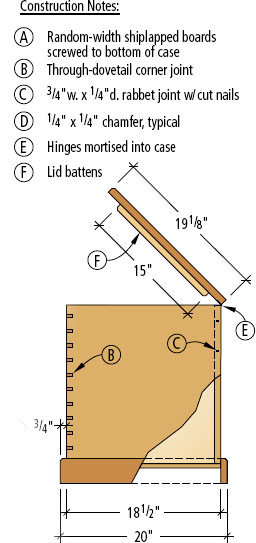
PROFILE - SECTION
RABBET JOINT

The rear rabbet joint is a better joint than a butt joint for stability, but some glue and a few nails make it an even better joint. To make the nails more attractive, we used antique-looking cut nails.
The back then nests into the rabbets in the sides and is nailed in place through the sides. We used ¼” × ¾” rabbets, cut in two passes on the table saw (see photo at left). While this isn’t the strongest joint for casework, the nails provide excellent strength, while the rabbet joint provides stability and squareness. It’s also a quick and simple joint to prepare that will provide adequate strength for most boxes.
With the rabbet joint complete, it’s almost a box. You can go ahead and glue the four sides together. Glue should be applied to all the “walls” of the dovetails in an even coat. When clamping the dovetail joint, use cauls as long as the box is high and placed directly behind the pins and tails. This allows the pins to extend beyond the tails in the joint, forming a tight joint. Put glue on the two surfaces of the rabbets and slip the back in place. Add clamps and check for square, measuring across the corners of the box.
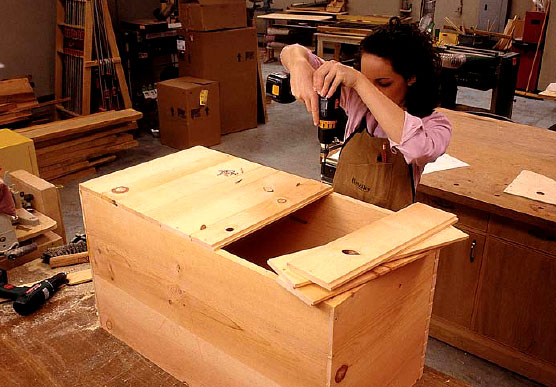
To add some extra strength and a nice look to the piece, Kara nailed the rabbet joints together with square-cut nails. Pre-drill holes for the nails to keep the ends of the sides from splitting. Once the glue on the joints has dried, sand or plane the parts of the pins and tails extending beyond the case surfaces flush, and the joint is complete.
With the box assembled, it’s time to add a bottom. Because we were already familiar with cutting rabbets on the saw, we opted for a shiplapped bottom. By cutting rabbets half the thickness of the bottom pieces on alternating long edges of each bottom piece, you’ll create a strong and gap-free bottom. Cut the bottom pieces to fit the depth of the chest, front-to-back. Start with one bottom board with only one side rabbet-cut. Attach it to the bottom of the box, screwing only through the center of the board, one screw at each end. Add the boards along the width of the chest, again, using one screw on each end of each board. When you reach the other end of the box, cut the width of the last board to fit the box.
To hide the edges of the bottom boards and dress up the blanket chest, cut the base mouldings to size. We added a ¼” chamfer to the top edges of the base mouldings to soften the look, then mitered the corners and glued and nailed the base in place. The dimensions given in the diagrams are designed to allow the specified casters to extend below the base by ¾”, leaving ample room for movement on carpet.
Next, cut the top to size, allowing 1 ” overhang on each side and 5⁄8” to the front. Screw two battens to the underside of the top, using elongated holes. The battens help keep the top flat, and the elongated holes allow the wood to move with seasonal humidity changes.
The bottom pieces are shiplapped (with opposing rabbet cuts on the long edges) except for the two outer boards that are left square cut. Screw the pieces in place with a single screw on each end, pre-drilled and centered on the board. Use dimes (as shown here) to evenly space the boards – this will allow for wood movement.
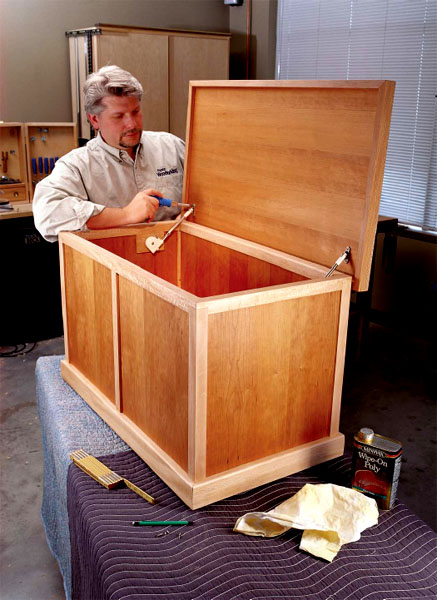
Building the Plywood Chest
Supplies: Plywood Blanket Chest
Hardware from Lee Valley
leevalley.com
800-871-8158
2 • soft-down flap stays
00T02.10 - $19.80 each
4 • 2”-dia. casters
00K26.50 - $7.40 (pkg. of 4)
1” × 3’ nickel piano hinge from local hardware store
Four butt hinges attach the top to the case, and two lid supports hold the lid open. After some sanding, we added a few coats of orange shellac for a simple finish.
Building a chest out of plywood simplifies some things and complicates others. It’s not necessary to worry about seasonal wood movement, but you do have to hide the plywood edges to make things look nice.
While we used two different corner joints for the plywood chest shown (tongue-and-groove and biscuit) it would probably make sense for you to choose one or the other joint and use it for all four corners. Whichever joint you’re using, start by cutting the four corner pieces to size. We chose quartersawn sycamore.
Biscuit Joints
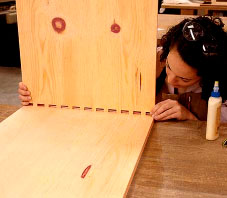
If you’re using biscuit joinery, the blocks are ready for your cuts. Lay out the biscuit locations on the blocks and cherry plywood panels. The blocks are held flush to the top of the panels, but they’ll stop short of the bottom edge of the panels. That’s OK.
The biscuit joint is a variation on the tongue-and-groove joint. Essentially what’s changed is rather than use a table saw to first cut a tongue and then cut a groove, a biscuit joiner uses the same blade and tool to cut matching “slots” or pockets. Then a flat, football-shaped manufactured biscuit is slid into the matching pockets, forming a loose tongue. This is a fast, reasonably foolproof and forgiving method of joining the panels to the posts. While not as strong as a tongue-and-groove joint, it’s adequate for many applications.
We liked the look of the ¼” recess of the panels, so it made it necessary for us to readjust the height adjustment on the biscuit joiner when cutting the panels versus the blocks. Cut all the biscuit slots (we used three #20 biscuits per joint).

Miter the base moulding pieces to fit, then cut away the front and rear pieces in the center to lighten the look of the piece. When ready, all four pieces are glued in place around the chest bottom. A brad nail or two, or a triangular shaped support block behind the mitered corners isn’t a bad idea to add some additional support.
Tongue-and-groove
The tongue-and-groove that we’ve used on the plywood chest is the simplest to cut, and it offers a side benefit as well. A tongue-and-groove is often cut so that the protruding “tongue” part on the panel is centered on the thickness of the piece and the tongue is one-third the thickness of the piece. This is fine, but it requires cutting from both sides of the panel. We chose to form our tongue by cutting a rabbet on one side of the panel, leaving the tongue flush with one face of the panel. In our opinion, this leaves a stronger tongue. When the groove is cut in the opposite piece (or in our case the corner post) it is cut off-center to locate the panel where needed. Again, for our needs, we used solid corner posts to both hide the plywood edges and form a ¼” offset between the panels and posts. With the offset tongue, the point where the tongue enters the groove in the posts helps to hide any part of the tongues’ rabbet from the outside of the case.

BISCUIT JOINT

TONGUE-AND-GROOVE JOINT

With the tongues cut (in this case using the same rabbeting cut as used in the other chest) a dry-fit is again in order. Because the tongue is positioned to the outside of the cabinet, there’s no concern of an inaccurate shoulder cut showing up on the outside.
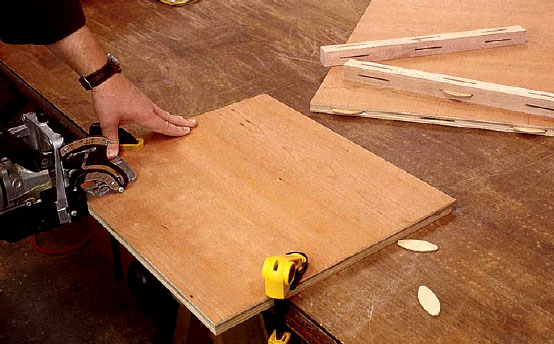
Biscuit joinery is fast, simple and almost foolproof. After marking the six locations per corner, it’s a simple matter to cut the slots in the center of the plywood edges, then reset the fence to add ¼" in height (to allow for the ¼" recess on the panels) and cut the slots in the corner pieces.

To cut the grooves for the tongue-and-groove joints, make repeat cuts on the table saw, starting with the “outside” edge to set the ¼" offset. Cut both sides, then reset the fence, working your way in until you have the appropriate tongue thickness.

With the biscuit slots cut, a dry fit is always a good idea. It also helps you to visualize how and where the clamps need to be oriented to successfully glue up the case.
To form the tongue-and-groove joinery, use the detail drawings to locate the grooves in the posts, then use the table saw to cut the grooves. To form the tongues on the plywood, cut rabbets on the panels using the same technique shown in the traditional chest.
Before gluing up the corners, head to the table saw and cut ¾” × 3⁄8” dados, ½” up from the bottom of each panel. These dados will house the plywood bottom. Now cut the bottom to size to fit into the dados, then glue the chest together, capturing the bottom in place. You’ll notice the corner blocks stop even with the top surface of the bottom.
The next step is to hide the top edges of the plywood panels. We cut “U”-shaped caps to slip over the plywood edges. To let the caps meet at the corners, we cut away part of the sides of the caps, then mitered the corners. Follow the photos to form the top corners. Then glue and nail the caps in place.

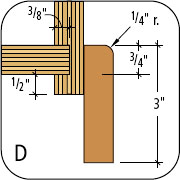
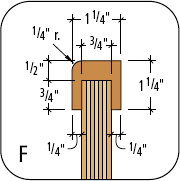
BISCUITED CORNER POST

TONGUE-AND-GROOVE CORNER POST

HINGE DETAIL
BASE MOULDING

LID MOULDING
CAP MOULDING
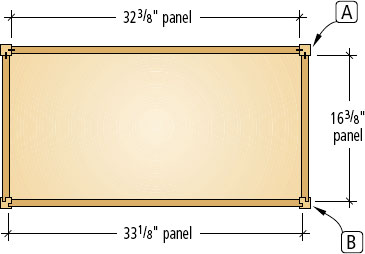
PLAN - LID REMOVED

LID ELEVATION - SECTION
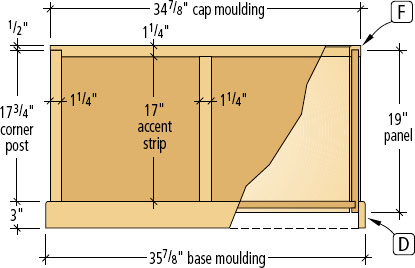
ELEVATION - SECTION
We added a ¼” roundover bit in a router on the top edge of the base moulding to soften the look of this chest. The base on the plywood chest is cut and attached by nailing through the ½” of exposed panel below. Next, glue and nail on some accent strips on the front and back of the chest to add a nice detail.
Plywood Blanket Chest
The top on the plywood chest is complicated by the need to hide the unsightly plywood edges. We took this opportunity to allow the top to lip over the case, adding another extra detail. Follow the diagrams to cut the lid moulding to size and shape, then miter, glue and nail the moulding to the plywood top piece.
Once again, the casters are attached to extend below the base. We used a continuous (or piano) hinge on this case, and had to attach it in an unusual fashion to allow the top to open smoothly. Follow the diagrams to determine the attachment location. We also used a different type of lid stop that has adjustable closing tension to keep the lid from slamming closed. Follow the directions from the manufacturer to attach the lid stops.
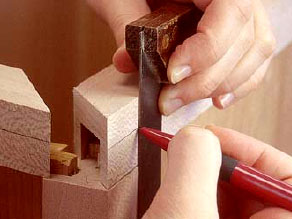
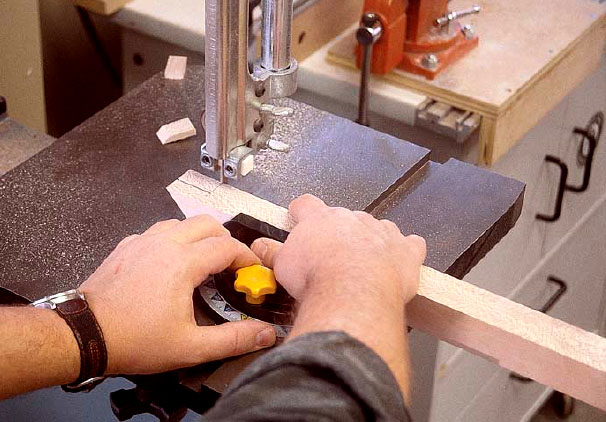
To miter the caps and allow them to successfully slip over the corner blocks, the mouldings should first be mitered to fit, then the corner block locations marked. Then it’s simply some careful band-saw work. First define the cutout height (above), then use a miter gauge on the band saw to cut away the waste block (upper right). It’s wise to cut short of the line and refine the fit a little at a time. This can be done with a flat file also, if your band saw isn’t leaving a very clean cut line.

Attach the base moulding by nailing it to the case from the inside as shown. I used spring clamps to hold the base moulding while nailing it in place.