Chapter • 8
Mastering Through Mortise & Tenon
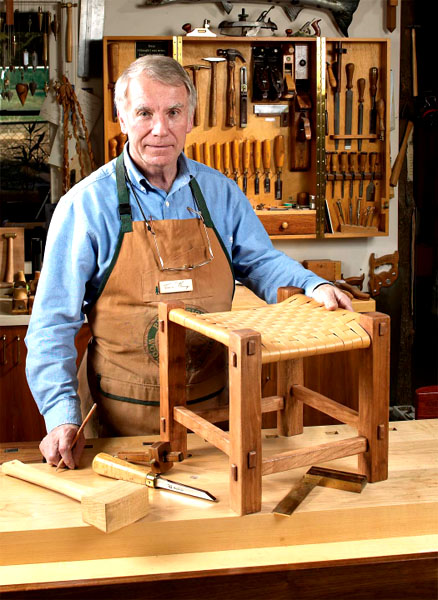
BY FRANK KLAUSZ
In furniture making, while carcases and drawers are dovetailed together, tables and chairs have mortise-and-tenon joinery. In this article, I make a through mortise and tenon three different ways. First by hand, second with a hollow-chisel mortiser and table saw, and third with a plunge router and band saw.
In 1991, I had a very nice commission to make about a dozen pieces of Egyptian furniture for the Newark Museum in New Jersey. I had the opportunity to see the real, original ancient pieces and make measured drawings to do the work. The pieces I had to make are more simple ones which are less well known than the spectacular furniture from the tomb of King Tutankhamun.
This stool at left is a copy of a New Kingdom craftsman stool. I made it 2” higher than the original. The Egyptians were squatting before they had stools and the low height of the stool was designed for sitting in this squatting position.
All the stools have through mortise-and-tenon joints with the seat rails meeting above and below one another at the legs. Some of the stretchers are the same way. Some tenons are pegged and some are wedged; the ancient stools were held together by the webbing. I glued mine.
The seats on the stools are also different. Some have a solid, curved seat carved from four planks, others are woven with reed and rush fibers, while still others have holes on the inner edge of the seat rails and are woven with simple double-braided rush webbing that looks like caning. The ends of all the strands are carefully knotted below the holes and hidden from sight. I made a bed in this manner for the museum.
Chop and Saw by Hand
To do mortise-and-tenon joints by hand, you have to do a lot of marking. After stock preparation, you mark the corner of the legs with a scribble to indicate the outside corners. With a square and a sharp pencil, mark the thickness of the seat rail ½” below the top of the leg. Flip the leg and mark first under the lower rail’s location. For a through mortise and tenon, transfer these lines to the outside of the legs. Make sure you end up with pairs. Mark the location of the stretchers at the bottom in the same way.
To locate the tenon shoulder from the rail ends, mark the seat rails and stretchers, using the width of your leg as your guide, plus ¼” (which is how much the tenon sticks out from the leg). Measure the width of your stool and mark your other shoulder.
Set the two cutters of your mortising gauge to the thickness of the chisel, as shown at left, then move your fence so the cutters are centered in the stretchers and mark them. Do the same with the seat rails. Reset your marking gauge and mark the legs. Make sure you are in the middle. Clamp the leg to your bench and start chopping. Stay away from the pencil line and take ⅛” chips. Keep going deeper and pry out your chips. When you are halfway through, do the final cut on the line. Turn it over and do the same from the other side. You can clean your hole with a rasp.
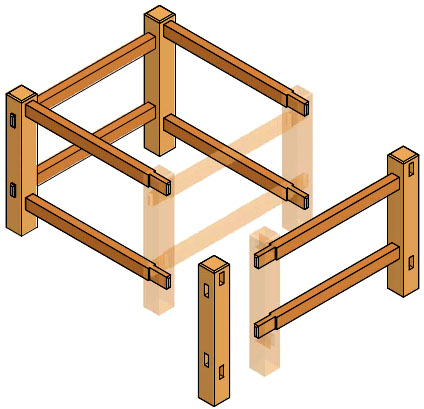
EGYPTIAN STOOL –EXPLODED VIEW
Educated in the Hungarian trade-school system, Frank is a master cabinetmaker, author and owner of Frank’s Cabinet Shop in Pluckemin, New Jersey, which specializes in fine furniture reproductions and custom architectural fixtures. He also teaches woodworking. For more information visit frankklausz.com.
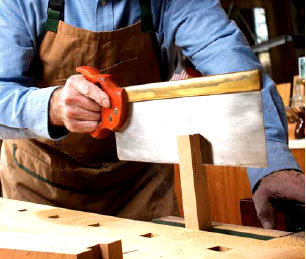
For the tenon, I use a bowsaw, as seen at left. I clamp the pieces in my bench and cut them making sure I am on the line. If you do not have a bowsaw, use your tenoning saw. I cut on the waste side, leaving the tenon snug. To cut the shoulders I use a dovetail saw, as seen in the center photo below. I bevel all four sides of the ends of the tenons with a chisel. Try the fit and adjust with the rasp and chisel until it is just right. It should be tight along the width, not from end to end.
Mortiser and Table Saw
To mortise with a hollow-chisel mortiser, mark your legs the same way. You do not need a marking gauge; the machine’s fence will set the chisel to the middle, as shown below right on the facing page. The hollow chisel should be set so that the drill bit has a credit-card thickness gap at the bottom between the chisel and the end of the drill bit to leave room for the chips to go up and not run hot. Mortise halfway, flip it and mortise from the other side. This way you have clean openings.
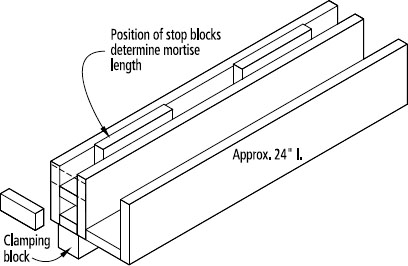
To tenon on the table saw, I use my tenoning jig, which fits on the table saw fence. Mark a scrap with small lines for the width of the tenon. Set up the saw by trial and error until it is right before you cut the real pieces. The cam clamp holds the piece in the jig for a very safe and repeatable cut. To cut the shoulders, set up your blade height and use a block of wood on the fence for extension to leave more gap to clear the scrap (see photo next page). This way your saw will not jam. Use the miter gauge with a block of wood and a piece of sticky-back sandpaper so that your wood does not slide.
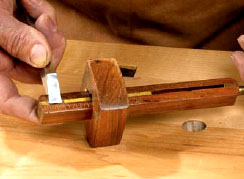
Setting your marking gauge to the tool lets you use the width of your chisel to determine the width of the mortise.

Clamp the leg securely to your bench and chop halfway through. Then flip the leg over and complete the mortise from the other side.

I use a traditional European bowsaw to cut the tenons by hand.
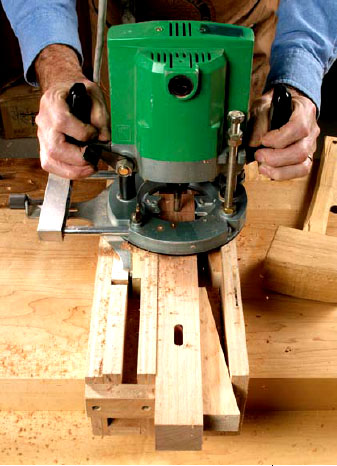
Plunge Router and Band Saw
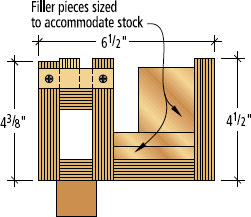
To mortise with a plunge router, you have to make a jig like the one in the drawing at right, and in the photo on the next page. Mine holds a 3” × 3” piece so a table leg will fit into it. Smaller pieces get shimmed and wedged for safe work. Use a two-flute carbide up-spiral bit. On the router fence, I use a block of wood that slides back and forth in the jig safely. Take small cuts of about ¼” down each time. Cut halfway, flip and cut from the other side. I square up the corners with a chisel. If I am making doors, I round off the tenons and wedge them, as seen in the photo at the bottom left of the page. It’s much quicker.
An alternative to the bowsaw is a tenon saw, filed for ripping.

A dovetail saw, filed for crosscutting, is used to make the shoulder cuts.
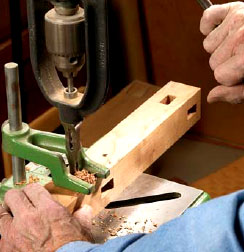
The hollow-chisel mortiser will save some time in marking because the fence on the machine will center the cut.

TENONING JIG
MORTISING JIG ELEVATION

CAM LAYOUT

MORTISING JIG WEDGE (MAKE 2)
MORTISING JIG

RAIL ELEVATION
To cut tenons on a band saw, set up the band saw fence and mark a scrap of wood, as shown at bottom right. As with the table saw, cut it by trial and error and once the scrap is right, cut the real pieces. Cut the shoulders by hand with a dovetail saw.
Remember that all of these methods can be mixed. Use the one you like best.
I antiqued the stool by rounding off the corners unevenly with a chisel, rasp, broken brick, etc. I finished it with shellac and brown wax. From a cow hide, I cut 1” strips for weaving the seat, which I learned from Brian Boggs’ DVD on hickory bark, sold by Lie-Nielsen Toolworks (lie-nielsen.com or 800-327-2520).

The stop clamped against the table saw fence registers the shoulder cut, and keeps the work from jamming between the fence and the blade. Note: There are no shoulders on the edges.
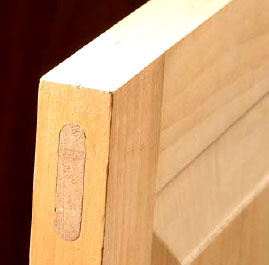
The router leaves mortises with rounded ends. Square them off with a chisel, or round the ends of the tenons to match.
With this jig and an up-spiral bit, a plunge router will make clean mortises quickly.

The fence on the band saw lets you make long straight cuts on the cheeks of the tenons.