Chapter • 9
Mortise & Tenon Basics
BY CHRISTOPHER SCHWARTZ
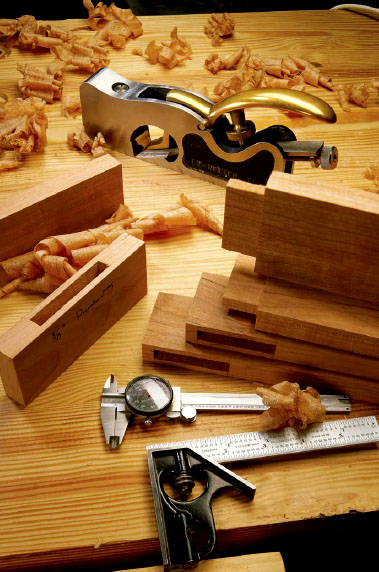
A lot of woodworkers spend a lot of time, effort and money to avoid making mortise-and-tenon joints. Biscuits, dowels, commercial loose-tenon jigs and expensive router bits are just a few of the “work-arounds” developed this century so you don’t have to learn to make a mortise and its perfectly matched tenon.
But once you learn how straightforward and simple this joint can be, you will use it in every project. Why? Well, it is remarkably strong. A few years ago we decided to pit this venerable and traditional joint against the high-tech super-simple biscuit. So we built two cubes, one using biscuits and one with mortises and tenons. Then we dropped a 50-pound anvil on each cube. The results were eye-opening.
Both cubes were destroyed. The biscuit cube exploded on impact. Some of the biscuits held on tightly to the wood, but they pulled away chunks from the mating piece as the joint failed.
The second cube survived the first hit with the anvil – the joints held together even though the wood split at the points of impact. A second hit with the anvil ruined the cube entirely, though most of the tenons stuck tenaciously to their mortises.
The lesson here is that biscuits are indeed tough, but when they fail, they fail catastrophically. The mortise-and-tenon joints fail, too, but they take their time, becoming loose at first rather than an immediate pile of splinters.
So when you’re building for future generations and you know how to make this stout joint with minimal fuss, you won’t say “Why bother?” You’ll say “Why not?”
TIPS & TRICKS
The Anvil Test
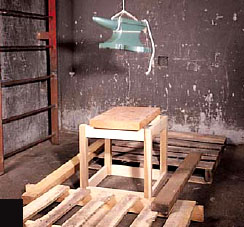
The anvil is about to hit the cube made using #20 biscuits.
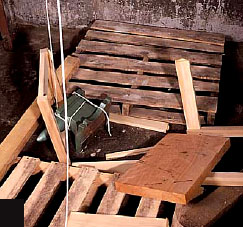
The cube made out of biscuits is destroyed on impact.
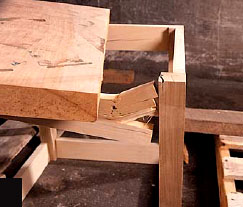
The mortise-and-tenon cube collapsed after the second hit.
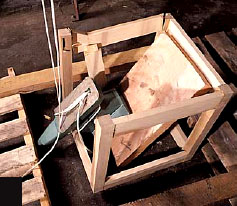
The mortise-and-tenon cube held together after the first hit.
Choosing the Right Tools
There are so many ways to cut this joint that one big obstacle to mastering it is choosing a technique. I’ve tried many ways to cut this joint – backsaws, commercial table-saw tenon jigs and even the sweet $860 Leigh Frame Mortise and Tenon Jig.
Each technique or jig has advantages in economy, speed or accuracy. The technique I’m outlining here is the one I keep coming back to year after year. It uses three tools: a hollow-chisel mortiser for the mortises, a dado stack to cut the tenons and a shoulder plane to fine-tune your joints. Yes, this is a little bit of an investment, but once you start using this technique, these tools will become the foundation for much of your joint-making.
Hollow-chisel mortisers
These machines are nothing new, but the benchtop ones are now cheaper, more powerful and more accurate than ever. For about $240, you’ll get a good machine.
Essentially, a mortiser is a marriage between a drill press and an arbor press that’s designed for metalworking. The drill press part has a spinning chuck that holds an auger bit that chews up the waste wood. The auger bit is encased in a hollow four-sided chisel that cleans up the walls of your mortise, making the auger’s round hole a square one.
The arbor press part of the machine is the gear-and-lever system that pushes the tooling into your wood. This mechanism gives you an enormous mechanical advantage compared to outfitting your drill press with a mortising attachment – an accessory I don’t recommend for all but the most occasional mortising jobs.
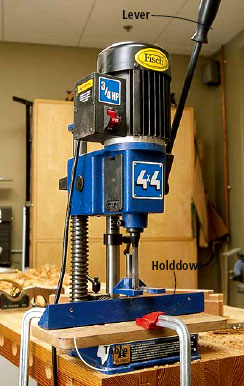
Hollow-chisel mortisers excel at boring square holes. Here you can see the holddown (which is usually inadequate with other machines), the table (which must be squared to the chisel before use) and the lever (which makes the machine plow through almost any job).
Shopping for the proper mortiser is tough. I don’t consider all the machines equal. Some are weak and stall in difficult woods such as oak, ash and maple. Many have problems holding your work down against the machine’s table. In a review of the machines on the market, we preferred the fast machines (3,450 rpm) instead of the 1,750-rpm slow machines. The fast machines were almost impossible to stall. However, the marketplace seems to prefer the slow machines.
Dado stack
A good dado stack will serve you in many ways, but I use mine mostly for cutting tenons and rabbets. When it comes to choosing one, buy a set with 8” blades instead of 6” blades, unless you own a benchtop table saw.
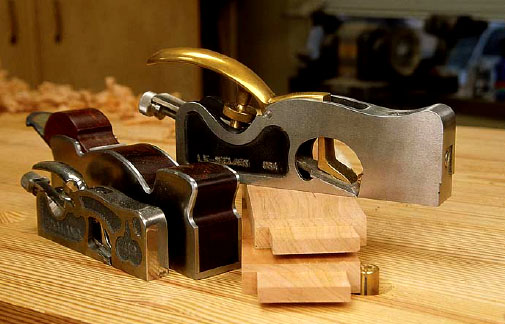
A shoulder plane tweaks tenons to fit perfectly. Avoid the modern Stanley shoulder planes (not shown). Spending a few dollars more will get you a much better tool.
Stay away from the bargain sets that cost $50 or less – I haven’t found them to be very sharp and the teeth aren’t well-ground. The expensive sets ($200 and more) are nice, but they’re probably more than you need unless you are making your living at woodworking.
Shoulder plane
No matter how accurately you set up your machines to cut mortises and tenons, some will need a little tuning up before assembly. And nothing trims a tenon as well as a shoulder plane. These hand tools really are secret weapons when it comes to joints that fit together firmly and are airtight.
Why is that? Well, shoulder planes are designed to take a controlled shaving that can be as thin as .001”. I can tweak a tenon to a perfect fit with just a few passes. Trying to tweak a tenon with a chisel or sandpaper is more difficult. You are more likely to gouge or round over the surface of your tenon and compromise its mechanical strength.
Buying a shoulder plane gets easier every year because there are now many quality tools on the market. Unless you build only small projects, you are going to want a plane that is at least 1” wide. Most casework tenons are 1” long, so a 1”-wide plane is perfect for trimming up the face cheeks and shoulders of the tenon.
My advice is to stay away from the newly made Stanley shoulder planes. I’ve had some sloppily made Stanleys go though my hands (vintage Stanley shoulder planes can be good, however).
Lie-Nielsen makes two shoulder-trimming planes worth saving your money for. The #073 is a tool of great mass and presence and does the job admirably – it’s a $225 investment. Lie-Nielsen also makes a rabbeting block plane that can be easily used as a shoulder plane; it costs $150. It’s the tool I recommend to most people because it does double-duty as a low-angle block plane.
Veritas, the tool line made by Lee Valley Tools, has a smaller shoulder plane that’s almost ¾” wide, quite comfortable to use and reasonably priced at $139. I wish the tool was wider, and officials at Lee Valley say I might get my wish soon. Other new and vintage brand names worth checking out include Shepherd Tool (made in Canada) and the British-made Clifton, Record, Preston, Spiers and Norris.
Of course, you’ll need to sharpen the tool. And that’s why we offer a free tutorial on sharpening on our web site – click on the “Magazine Extras” link to find it.
Designing a Joint
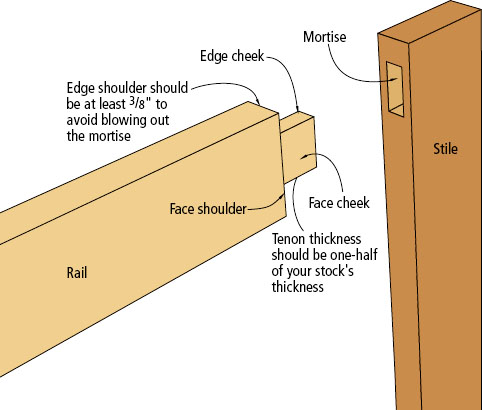
Once you have the tools you need, you can learn about the mechanics of the joint. Study the illustration below to learn what each part of the joint is called.
The first question beginners always ask is: How thick and how long should my tenons be? As far as thickness goes, the rule of thumb is that they should be one-half the thickness of your workpiece. So a tenon on a piece of ¾” material should be 3⁄8” thick.
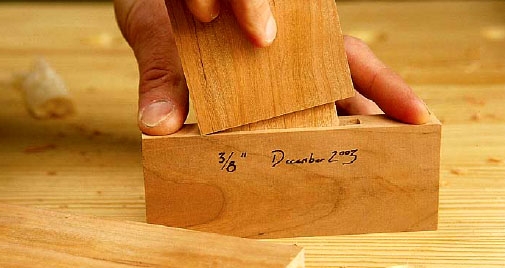
These sample mortises are useful for sizing your tenons. I usually make a new one every season or two, because they can get worn from use.
As for length, that depends on your project. Typical casework tenons that are 1” long will be plenty strong. For large glass doors, make them 1¼” long. For small lightweight frames and doors, stick with ¾”- or 5⁄8”-long tenons.
What beginners often don’t ask about is the size of the edge shoulders on their tenons. This is a critical measurement. If you make these edge shoulders too small, say  ” wide or so, you could run into huge problems at assembly time when building frames and doors.

A 6” rule will help you set the length of your tenon. Once you do this a couple of times you’ll hit this measurement right away every time.
Here’s why: If your tenoned piece forms one of the outside members of a frame, your mortise wall is going to be only  ” wide and it’s going to be weak. The hydraulic pressure from the glue or the smallest amount of racking will cause the tenon to blow out this weak mortise wall, ruining everything. It is because of this that I recommend edge shoulders that are 3⁄8” wide in most cases. Note that your edge shoulders can be too big. Once they start getting larger than ½”, you run the risk of allowing the work to twist or warp in time, ruining the alignment of the parts.
Of course, if your tenoned piece is not on the edge of a frame, you can have narrow edge shoulders without any worries.
Designing the mortise is a bit simpler. It should be the same dimensions as your tenon with one exception: Make the mortise  ” deeper than your tenon is long. This extra depth does two things: It gives your excess glue a place to go and it ensures your tenon won’t bottom out in the mortise, which would prevent you from getting a gap-free joint.
Beware of other tune-ups that some books and magazines suggest. One bit of common advice is to chamfer all the sharp edges of your tenons to improve the fit. Another bit of advice is to chamfer the entry hole of the mortise. These are unnecessary if you design your joint properly.
One thing that is important, however, is to mark the outside faces on all your parts. It’s important to keep these straight during machining and assembly.
Tenons First
Some traditional woodworkers tell you to make all your mortises first and then make your tenons fit that. This is good advice if you cut the joint by hand with a backsaw and a mortising chisel because there is more opportunity for the mortise to be irregular in size. But you will work much faster and with much less measuring if you try it my way.
Before you cut your first tenon, you should fire up the hollow-chisel mortiser and make a sample mortise with each size of bit you use. The three most common sizes are ¼”, 3⁄8” and ½”. These mortises should have perfectly square walls and be 1 ” deep and 2” long. Write the month and year on each mortise and make a new set next season.
Why make these sample mortises? Well, because the tooling to make your mortises will always produce the same width mortise, you can merely size all your tenons to one of these sample mortises as you cut them on your table saw. This will save you time down the road, as you’ll see.
With your sample mortise in hand, set up your table saw to cut your tenons. Install the dado stack blades and chippers on the saw’s arbor. The rule here is to install enough blades to almost cut the length of the tenon in one pass. For example, to cut a 1”-long tenon, set up enough blades and chippers to make a ¾”-wide cut.
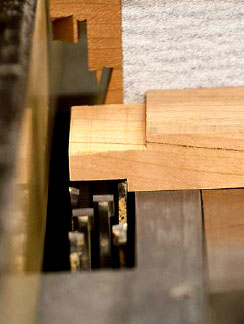
When making tenons with a dado stack in your table saw, the first pass should remove the bulk of the material. Keep firm downward pressure on your work, which will give you more accurate cuts.
Next, position your saw’s rip fence. Measure from the left-most tooth of your dado stack to the fence and shoot for the exact length of your tenon. A 1”-long tenon should measure 1” from the left-most tooth to the fence, as shown in the photo above.
Get your slot miter gauge out and square the fence or head of the gauge to the bar that travels in the table saw’s slot. Attach a wooden fence to the face of the gauge (usually this involves screws through holes already drilled in the gauge). This wooden fence stabilizes your workpiece and controls tear-out as the dado stack blades exit the cut.
Set the height of the blades to just a little shy of the shoulder cut you’re after. You want to sneak up on the perfect setting by raising the arbor of the saw instead of lowering it. This does two things: One, it produces fewer waste pieces that result from overshooting your mark. And two, because of the mechanical backlash inherent in all geared systems such as your table saw, raising the arbor eliminates any potential for it to slip downward because of backlash.
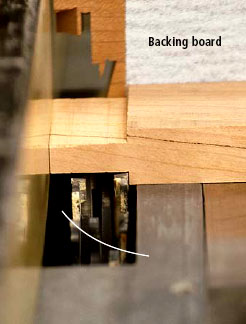
The second pass has the work against the fence and defines the face shoulder. Note there isn’t any wood between the fence and blades, so the chance of kickback is minimal. The backing board reduces the chance of tear-out at the shoulders.
You are now ready to make a test cut. First put a scrap piece up against your miter gauge, turn on the saw and make a cut on the end of the board. Use firm downward pressure on the piece. Don’t let the end of the board touch the saw’s rip fence. Then bring the scrap piece and miter gauge back and make a second pass, this time with the scrap touching the rip fence as shown below.
Flip the scrap over and repeat the process on the other face. Usually you aren’t supposed to use your rip fence and miter gauge in tandem, but this is an exception. This cut is safe because there isn’t any waste that could get trapped between the blades and the fence, producing a kickback.
Check your work with your dial calipers and see if the tenon will fit your sample mortise. The tenon is likely going to be too thick. Raise the blades just a bit and take passes on both faces of the scrap until the tenon fits firmly and snugly into the sample mortise with only hand pressure.
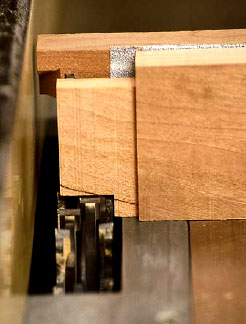
Cut the edge shoulders the same way you cut the face shoulders and cheeks.
If you can shake the sample mortise and the tenon falls out, you’ve overshot your mark and need to lower the arbor and try again. If the fit is just a wee bit tight, you can always tune that up with a shoulder plane. Let your dial calipers be your guide. Sometimes you haven’t used enough downward pressure during the cut to make a consistent tenon. If something doesn’t fit when you know it’s supposed to, try making a second pass over the dado stack and push down a little harder during the cut.
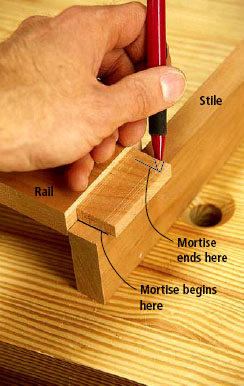
To locate the mortise, put the tenon across the edge of the stile where you want your mortise to go. Use a sharp pencil to mark the tenon’s location on the edge. Bingo. You’ve just laid out the mortise’s location.
Using this setup, mill all the face cheeks on all your tenoned pieces. When that’s complete, raise the arbor to 3⁄8” and use the same routine to cut the edge shoulders on all your boards. Your tenons are now complete.
Use Your Tenons Like a Ruler
One of the major pains in laying out the mortise is figuring out exactly where you should bore your hole. You end up adding weirdo measurements and subtracting the measurements of edge shoulders. If you lay out mortise locations using math only, you will make a mistake someday.
Troy Sexton, one of our contributing editors, showed me this trick one day and I’ve never done it any other way since. Say you are joining a door rail to a stile – quite a common operation. Simply lay the tenoned rail onto the edge of the stile and line up the edges of both pieces so they’re flush. Take a sharp pencil and – using the tenon like a ruler – mark where the tenon begins and ends on the stile. That’s it; you’ve just marked everything you need to know to make your mortise.
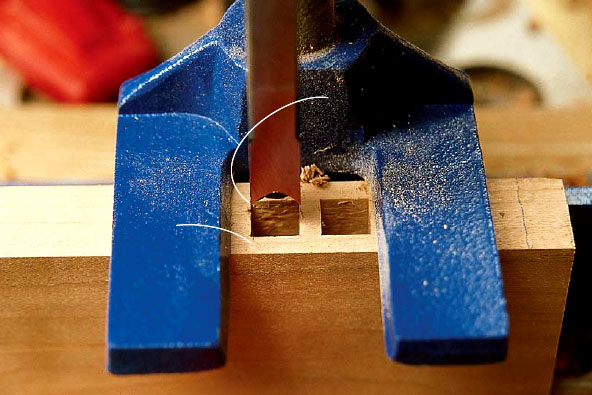
By cutting over your line slightly, you give yourself just enough forgiveness at assembly time. A little wiggle can mean a lot when you are trying to close up the gaps as you clamp up your work.
If you are placing a rail in the middle of a stile, there is one more step. You’ll need to mark on the stile where the edges of the rail should go. Then line up the edge of the rail with that mark and fire away. There’s still no addition or subtraction. With all your mortises laid out, you can then get your hollow-chisel mortiser going.
A Finicky Machine
I’ve used a lot of hollow-chisel mortisers and find them fussy to adjust. Along with our review of the machines, we published a complete tutorial on the topic in our August 2001 issue. In a nutshell, here are some of the important adjustments not covered by some manuals:
• Make sure the chisel is at a perfect 90° angle to the machine’s table. I’ve set up a dozen of these machines and only one has ever been perfect. The solution is to use masking tape to shim between the table and the machine’s base.
• Set the proper clearance between the auger bit and the hollow chisel that surrounds it. Some people use the thickness of a dime to set the distance between the tooling. Some people measure. Either way is fine. If the clearance is too little, the machine will jam and the tooling can burn. Too much distance makes a sloppy-bottomed mortise.
• Square the chisel to the fence. The square holes made by the chisel should line up perfectly. If the edges aren’t perfectly straight, your chisel isn’t square to the fence. Rotate the chisel in its bushing and make sample cuts until everything is perfect.
• Center the chisel so it’s cutting in the middle of your workpiece. There might be a clever trick to do this, but I’ve found that the most reliable method is to make a test cut and measure the thickness of the mortise’s two walls with a dial caliper. When they’re the same, your mortise is centered.
Simplify Your Mortising
As you make your mortises, here are a few tips for making things a whole lot easier.
• I like to cut a little wide of the pencil lines that define my mortise. Not much; just  ” or so. This extra wiggle room allows you to square up your assembly easier. It doesn’t weaken the joint much – most of its strength is in the tenon’s face cheeks.
• As you bore your mortises, don’t make your holes simply line up one after the other. Make a hole, skip a distance and then make another hole (see the photo below). Then come back and clean up the waste between the two holes. This will greatly reduce the chance of your chisel bending or breaking.
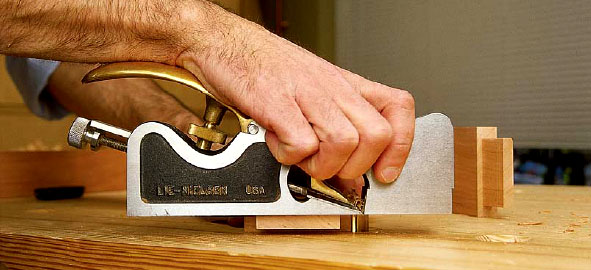
Shoulder planes are capable of extraordinarily precise work. Just try to set your table saw to remove .001”. It’s not possible. For a shoulder plane, it’s simple.
• Keep your chisel and auger lubricated as they heat up. Listen to the sounds your machine makes. As the auger heats up, it can start to rub the inside of the chisel wall and start to screech. Some dry lubricant or a little canning wax squirted or rubbed on the tooling will keep things working during long mortising sessions.
• Finally, make all your mortises with the outside face of the work against the fence. This ensures your parts will line up perfectly during assembly.
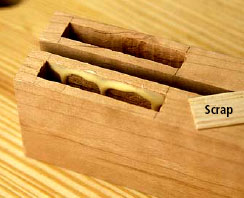
A thick bead of glue at the top of the mortise wall makes the joint strong without squeezing out a lot of glue. Use a small piece of scrap to paint the mortise wall before inserting the tenon.
Final Tweaks
No matter how careful you have been, some of your tenons might fit a little too tightly. This is where the shoulder plane shines. Make a couple of passes on both face cheeks and try fitting the joint again. Be sure to make the same number of passes on each cheek to keep the tenon centered on the rail. If your parts aren’t in the same plane when assembled (and they’re supposed to be), you can take passes on only one cheek to try to make corrections.
If the joint closes up on one face but not the other, you might have a sloppy shoulder. The shoulder plane can trim the fat shoulder to bring it in line with its twin on the other side of the tenon. If the tenon still won’t seat tightly, try chiseling out some meat at the corner where the edge shoulder meets the face cheek – but don’t trim the outside edge of the edge shoulder itself.
Finally, get a sharp chisel and clean out any gunk at the bottom of the mortise. Keep at it – a tight joint is worth the extra effort.
Assembly
You really don’t want any glue squeeze-out when you assemble your mortise-and-tenon joints. The trick to this is learning where to put the glue and how much to use. I run a thick bead of glue at the top of each mortise wall and then paint the inside of the mortise wall with glue using a little scrap piece. I try to leave the glue a little thick at the top of the mortise wall. Then, when the tenon is inserted, this paints the tenon with glue but drives the excess to the bottom of the mortise.
When clamping any frame – regardless of the joinery you used – you don’t want to use too much pressure or you will distort the frame. Tighten the clamps until the joints close and no more. You also want to alternate your clamps over and under the assembly to keep the frame flat – no matter how fancy your clamps are.
Once you do this a couple of times, I think you’ll find a whole new level of woodworking open to you. Web frames for dressers (or Chippendale secretaries) will seem like no problem. Morris chairs with 112 mortises will be within your reach. And your furniture is more likely to stand the test of time – and maybe even the occasional anvil.