Chapter • 11
Template Mortising
BY BILL HYLTON
Template mortising is an excellent technique for all sorts of special mortising challenges. It works for everyday mortising applications as well, but most of us already have an established setup for making door frames, leg-and-apron constructions, and the like. Where I use templates for mortising is any application that can’t easily or accurately be done with a hollow-chisel mortiser or my setup that uses a plunge router, edge guide and mortising block combination. For example:
• Any mortise in the face of a panel.
• A difficult-to-position mortise, such as one in a round part, one cut into the arris of a leg, one cut into an already-shaped part, or one to be cut at an angle. In these situations, the use of a template allows you to make a cradle that immobilizes the workpiece and provides a flat, sound, bearing surface for the router.
• Multiple mortises, such as those needed for spindles in a chair backrest, twin mortises that join stocky rails to posts, double mortises that join a very wide rail to a leg. A template eliminates the little variations in mortise size or spacing that can make assembly of these constructions especially trying.
• A mortise in a part, such as a chair leg, that itself is shaped using a template. You can incorporate the slot for the mortise into the template for shaping the part.
Here’s how a mortise template works: The template is a flat piece of plywood or Medium-density Fiberboard. It has a slot or a window that’s actually larger than the mortise you want. To make the cut, you use a router (preferably a plunge router) fitted with a template guide. The guide’s protruding collar is trapped in the template slot, limiting the router’s movement. The only cut the router can make is exactly the cut you want.
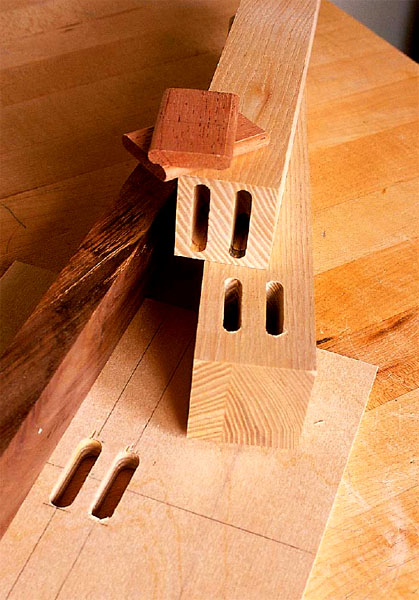
Templates are an effective way to make multiple, identical mortises. With them, you control both size and location in one step.

This template slot is ¾ wide, and the mortise is 5⁄16 wide. The big differential between bit size and guide bushing size, coupled with dust extraction on the router, helps clear the chips as you cut.

With the bit aligned for the end of the slot, set a scrap against the router base and clamp it. Note that the template blank is set on a sacrificial piece of plywood that protects the benchtop.
Guide Bushings
The pivotal gadget in the operation is a template guide, sometimes called a guide bushing or guide collar. It looks a lot like a big washer with a short tube projecting from it. The “washer” fits into the bit opening in the router base and the bit extends through the tube, which usually is called the collar.
The collar rides along the edge of the template, just the way the pilot bearing on a bit does. But unlike a pilot bearing, this guide doesn’t move when you change the extension of the bit. Consequently, you can contact the template edge with the guide, then plunge the bit into the work and make a cut. Plunge deeper and deeper to excavate the mortise, and all the while, the guide is in contact with the template, controlling the router.
Obviously, the bit has to be smaller than the inside diameter of the collar.
A number of issues come into play in pairing a guide with a bit for template mortising. One is the flow of chips out of the cut. Unless there’s a good reason for keeping the guide as small as possible, I like to provide good clearance between the bit and collar to allow the chips to clear the cut – using a 5⁄8” or ¾” guide with a ⅜” bit, for example.
Guide bushings are manufactured with collars (those projecting tubes) ranging in length from ¼” to 9⁄16” (the larger the diameter, the longer the collar). This is intended to help stabilize the router on edge cuts, when most of the router base is largely unsupported. That little extra length can be beneficial. The trade-off is that with the larger guides, you have to use templates at least 5⁄8” thick, and that extra thickness is subtracted from the depth-of-cut capacity of your plunge router.


Success with template mortising begins with a precision template. Lay out the mortising slot on a line drawn parallel to an edge of the template blank. Before routing the template slot, use a V-groove bit in the router to align the tool on the line (inset) and set the edge guide (left). Then switch to a straight bit to rout the slot.
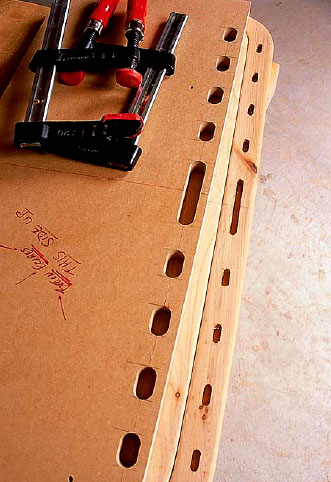
If you have a string of shallow mortises to cut in several parts, using a template to rout them can ensure the mortises are uniform across the run of parts. Invest the time to make a precision template. Typically, workpiece layout is eliminated, as are minor variations in mortise size and spacing.

In most cases, you’ll want a fence on the template so you can position the template quickly and accurately on a workpiece. Plane a gauge strip to half the working stock’s thickness. Clamp it to your fence, then align it at the centerline laid out on the template. Clamp the fence to the template. Run two or three screws through the template into the fence.
If this becomes a problem, you can easily cut down a collar. Use a hacksaw or a bench grinder. I’ve trimmed most of my guides to just less than ¼”, so I can use them with ¼”-thick templates. That adds ½” to the depth of a mortise I can rout with a template, and in a few instances, that’s been a big help.
What bit should you use? If you are routing a commonplace mortise, say ⅜” wide by 2” long and 1” deep, you’d use a ⅜”-diameter bit. In this regard, template mortising is no different than other approaches.
For mortising, I do prefer up-spirals, but I’m not doctrinaire about it. I’ve often used regular straight bits in one- and two-flute configurations. But spirals cut cleanly, reduce the stress on the router, and help pull chips out of the cut. (This can be especially helpful because the template-guide can block the escape of chips. They can only exit through the clearance gap between the collar and the bit.)
Making the Template
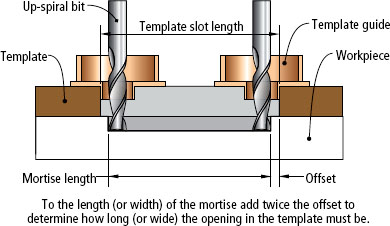
First calculate the size of the slot or window that’s necessary to produce the desired mortise. If the mortise width matches the cutter diameter, the template slot should match the diameter of the guide being used.
To determine the slot length, you have to add twice the offset to the mortise length. Offset is the difference between the radius of the guide and the radius of the bit. If you’re using a ⅜” bit in a ½” guide, the offset is  ”. Thus, if the mortise is to be 2” long, the template slot must be 2⅛” long. If you opt for a larger-diameter guide, then the slot must be both wider and longer.
Making the template is as simple as routing a blind slot. Lay out the slot, then cut it with a plunge router and edge guide. Or cut it on the router table. In most instances, the mortise length isn’t a critical dimension. By that I mean, the exact length – to the 32nd of an inch – is not as important as having all mortises be the same.
Some woodworkers are completely comfortable briskly laying out the slot, then cutting it by eye from mark to mark. I guess I’m just a little compulsive, so I use a V-groove bit in the router to set the edge guide and to set stops for the router to govern the slot length, as shown below. Hand-tighten the V-groover in the collet and plunge it to the template surface. Set the point right on your layout line and bring the edge guide against the edge of the stock. Slide the router along the stock to be sure the bit tracks on the layout line. Then position the V-groover on the end point. Set a stop block against the router base and clamp it to the stock, as shown below. Move the router and set the second stop block. (Bear in mind that the cut will be longer than this setup by the diameter of the bit. You have to account for the bit when you lay out your marks.) With the edge guide and stops set, swap bits to actually cut the slot.
A plunge router with some form of dust extraction is best for template mortising. Without it, chips can foul the template slot. The template is a solid platform that supports the router under both plunge posts.

Where a mortise is located in the face of a panel, use cross hairs to position the template. Lay them out on the template blank to guide the cuts that create the “window.” Lay them out on the panel, to delineate where the template must be placed.
If you have more than one slot to make in the template (for doing twin mortises or double mortises, for example) you cut them similarly. Making a second slot in line with the first is a simple matter of moving your stops to new locations. Making a parallel slot can be easily accomplished by switching the reference edge or adjusting the edge guide.
Locating the Template
Your next hurdle is locating the template on the workpiece and securing it. You should know exactly what you’re going to do, of course, because that was all part of your initial plan. Right?
How you do it depends, obviously, on the size and shape of the workpiece.
A template for a mortise in a panel may be positioned using the cross hairs of a center line and a midline, laid out to aid in routing the slot, as shown below. You might use carpet tape or hot-melt glue to attach the template for the cut. I’ve actually screwed the template to the part in a few cases.
For commonplace work such as stiles or legs, you can mount a fence to the template. Then you clamp the part to the fence. A stop attached to the fence can position the work so you don’t have to lay out each piece. Or that midline can be your registration mark.
Use the laid-out centerline as a reference for mounting a fence and a gauge block to position the fence in relation to the line. Plane a piece of stock to the appropriate thickness. If the mortise is to be centered across the edge of the workpiece, that thickness would of course be half that of the working stock. Align an edge with the layout line and clamp the block to the template, as shown above. Apply glue to the edge of the fence. As you press the glued edge to the template, slide the fence tight against the gauge, and clamp it to both the template and to the gauge. Then you can turn the assembly over and run a couple screws through the template into the fence. (Just don’t glue the gauge to the assembly!)
Cutting the Mortise
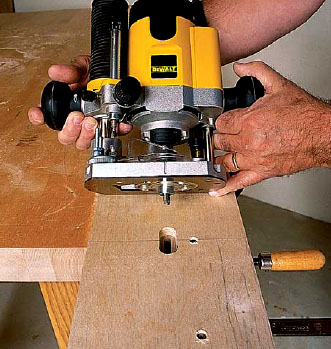
Cutting the mortise is a job for a plunge router. Install the guide bushing and chuck the bit in the collet. Set the router on the template, guide collar captured in the slot. Bottom the bit against the workpiece, zero out the adjuster, then set the depth of cut.
The routine is to move the router back and forth, cutting progressively deeper. “Proper” feed direction becomes irrelevant. The template reins in the router, allowing it to move only on a defined line and distance. Release the plunge mechanism to raise the bit before lifting the router from the template.
What’s going to happen is that chips will clog both the cut and the slot in the template. You need to interrupt the cutting periodically to vacuum out these chips. If you don’t, and you focus doggedly on getting it routed, you’ll get chips packed so tightly in the ends of the template slot that you’ll need to dig them out with a narrow chisel or an awl.
Dust extraction as you rout is a major boon. I almost always use DeWalt’s DW621 for mortising, primarily because of that router’s dust extraction system. (This isn’t a knock against built-in or add-on dust extraction available on other brands and models, few of which I have actually tried. The 621’s system works for me and that’s what I use.) In most instances, dust extraction reduces interruptions.