Chapter • 20
Sliding Dovetails
BY BILL HYLTON
Router-cut sliding dovetails link parts together, with or without glue, and they have a multitude of uses.
For the woodworker who builds furniture and cabinets, the sliding dovetail is a joint well worth mastering. It’s strong and versatile, with myriad applications, from case construction to leg-and-rail joinery.
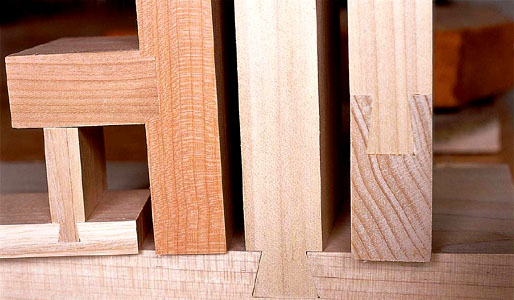
I’m sure you’ve seen drawings of the joint. It’s a hybrid of the dado and the dovetail, with a groove in one part and a tongue on the other. Naturally, the tongue fits the groove. But because both the groove walls and the tongue sides are angled like a dovetail, the joint has to be assembled by sliding the tongue into the groove from one end. There are several advantages here:
Assembling a chest with several drawer dividers is simple when the parts lock together. You don’t need five hands and a bunch of clamps. And once the chest is assembled, the joint mechanically resists tension, meaning that the sides can’t bulge outward, separating from the dividers.
If left unglued, the sliding dovetail allows wood movement. The obvious example here is a breadboard end, attached across the end of a wide, solid-wood panel such as a chest lid or a tabletop, as shown below. The end is intended to keep the panel flat, while allowing it to expand and contract. These are just two of the many suitable applications.
Because of the dovetail profile, you can’t simply lift the bit out of a stopped cut; you have to back it out. To avoid having the router drift away from your fence as you do this, use a twin-fence jig for such cuts. The jig traps the router, and with a stop attached, the router can produce only the dovetail slot you want.

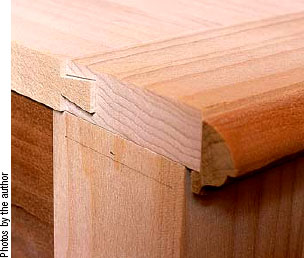
The sliding dovetail is an excellent joint for mounting a breadboard end on a chest lid. The joint is glued only at the front, so seasonal expansion and contraction of the lid panel is visible only at the back. Flush with the end of the breadboard when assembled in mid-winter, this lid panel has expanded markedly during a humid summer.

If you have two routers with the same base diameter, you can use one for the “wasting” cut with a straight bit (as shown at top), and the other with the dovetail bit (above left and right).
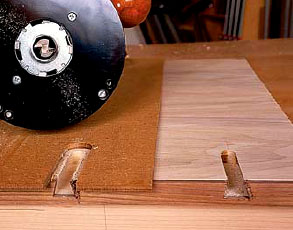
Make the template with some overhang along the front edge, so the template guide is caught in the guide slot while the bit is still clear of the work. A waste strip clamped to the front edge of the work prevents tear-out or chipping. The fuzzies on the work’s surface are common, but are easily removed with sandpaper.
Each sliding dovetail joint requires two operations – cutting the groove and cutting the tail. Both operations are done with the router, and to get a good fit, it’s imperative to use the same bit for both.
Grooves can be cut with a hand-held or table-mounted router. The location of the cut and the size of the cut itself usually will dictate which approach is optimum.
The tails likewise can be cut either way. The portable router generally requires jigging to steady it on the narrow edge being worked. As a consequence, most woodworkers cut the tails on the router table. There you need nothing beyond all-purpose accessories such as a push block and a featherboard or two.
Choosing a bit: Dovetail bits are made in a variety of diameters and angles. Most half-blind dovetail jigs require a ½”-diameter, 14° bit on a 1⁄4” shank, so I’d say that’s the most common bit. But thanks to the prevalence of through-dovetail jigs, you can buy bits with 7° tapers, as well as with 7½°, 8°, and 9° tapers. These angles yield more of a hand-cut look.
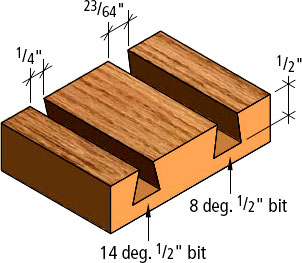
A benefit of these bits – one that’s pertinent here –is that they allow deeper cuts and stronger tails. Check out the comparison drawing below. A ½”-diameter, 14° bit can’t cut more than ½” deep because, at that point, the bit has tapered to a 1⁄4” diameter. At the same spot on an 8° bit, the girth is about 1 ”. With this bit you can go 1
 ” deep and still have a 1⁄4” width.
Scaling the joint: For casework, a shallow sliding dovetail – say ⅛” deep – is all you need. Even in a dado joint, that depth is sufficient to withstand the shear stresses applied to a cabinet and its parts. Add the dovetail angle and you reap the mechanical blessings it confers. Plus that cut depth is easy for any router to cut in a single pass.
The dovetail groove in a breadboard end, on the other hand, should be as deep as you can make it without compromising the groove-wall thickness or the thickness at the base of the tail.
Slotting a Face
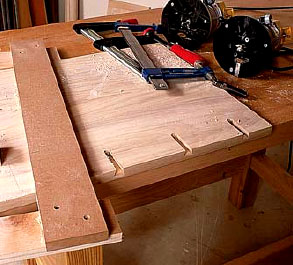
Both portable and table-mounted routers can cut the slots. For casework, I use a portable router, guiding it along a clamped-on straightedge. A shopmade T-square is perfect.
If you’re cutting a ⅛”-deep slot, as I suggested, and using an 8° bit, then cut away. If your cut is deeper, say 3⁄8”, and your bit is a 14° taper with a very narrow waist, it’s a good idea to “stage” the cut. The way to do this is to first rout a groove with a straight bit that matches the dovetail’s waist diameter, cutting about  ” shy of the final depth.
In the example situation, you’d use a 1⁄4” straight bit, cutting – perhaps in two passes – about 5⁄16” deep. This is most convenient to do if you have two routers of the same base diameter, so you can set one up with the straight bit, the other with the dovetail bit. The fence position for both cuts then ends up being the same.
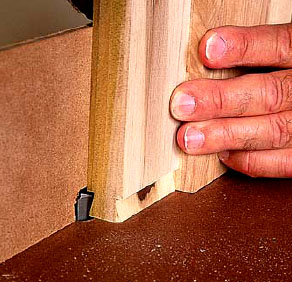
Cut a tail on a narrow piece such as a drawer divider by standing it on end, backing it up with a scrap block, and advancing it along the fence. The backup block minimizes exit splintering and helps stabilize the work, reducing its tendency to “walk” along the fence. Make a cut, spin the work 180° and cut again to form the tail.
Stopped slots: Because of the dovetail profile, a stopped slot requires you to back the bit out of the cut. There’s a slight risk of it grabbing as you back it out of the cut, because that is a climb cut. That could pull the router off the fence, and it could ruin the cut.
For a stopped slot, I prefer to trap the router, either between a pair of fences or with a template. If the router’s trapped, it can’t wander, regardless of the feed direction.
Cobbling together a twin-fence guide takes 10 minutes, 20 at most. You need four strips of plywood or MDF, and a few drywall screws. Attach a stop to one or both fences to limit the length of the cut. Position the jig, cut with the straight bit and then cut with the dovetail bit. Bang! Your slot is done.
If you want to use a template instead, it can be made from a piece of 1⁄4” hardboard. Simply rout a slot in from one edge. Make the slot the width of the template guide you’ll use. Extend it no longer than necessary to get the length of slot you want.
The template approach has several advantages. You can use any two routers because the template guide, not the router base, is the registration device, but you do need two identical template guides.
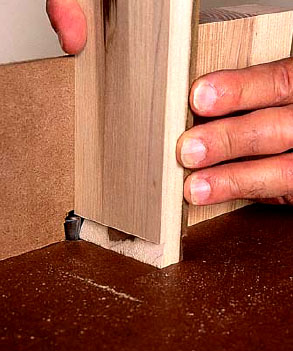
For a stopped slot, trim one edge of the tail. Simply turn the piece to register its edge against the fence. Use a backup block, and cut.
When you set up any of these jigs, be sure you clamp a strip of scrap tight to the edge of the work. This will prevent splintering on the edge, which is almost guaranteed to occur.
To aid you in sizing the tails that will fit into the slots you cut, use your setup to cut a slot in a scrap of the working stock. You avoid having to fit the test-cut tails to a slot in a case side itself, if you have this piece available.
Grooving an Edge
Doing an edge groove with a portable router is precarious. If you must do the cut this way, try using a laminate trimmer; it’s smaller and easier to perch on an edge. Or equip your router with two edge guides – if that’s possible – to trap the workpiece. Failing that, try the operation with one edge guide that has a wide facing attached to the tips of the guide.
In contrast, the setup and cuts are simple on the router table. There are two operations. First, you plow a groove with a straight bit. Then you finish the groove with a dovetail bit. The work is guided along the router table’s fence during both cuts.
The setup is straightforward. The fence is positioned to center the cut on the edge. It’s the same for both the roughing-out cut and the final dovetail cut. The workpiece is set on edge, pressed tight against the fence and fed across the cutter, right to left.
Naturally, you should make at least one test cut to ensure that you’re content with the result before cutting the real workpieces. Save the test cut for fitting the tail (or make a separate piece for the purpose).
Cutting a Tail
Tails are most commonly done on the router table. There are some alternatives, of course, but it is fast and easy on the router table, so let’s focus on that approach.
Use the same router bit for the tails as you used for the slots. This guarantees the geometry of the mating pieces will match.
Close down the bit openings in the tabletop and fence as much as possible. For the tabletop opening, use the appropriate reducer in your router mounting plate, or a ⅛” hardboard auxiliary tabletop. For the fence, either close the split fence facings in against the bit, or apply a one-piece auxiliary facing and cut a zero-clearance opening with the bit.
Set the bit height to match the slot’s depth. If you cut the slots on the router table, move directly from that to the tail cut without changing the bit setting. If you cut the slots with a portable router, use your cut sample as an aid in setting the bit height.
Bring the fence into position, housing all but the very edge of the bit in the fence. Depending upon the size and proportions of the workpiece, you may want to add a tall facing to the fence. This may be worthwhile if you’re working something like a tabletop or chest lid, although I’ve found a well-placed featherboard (and my regular fence) is all I need for even these big pieces.
The drill is this: Make a test cut on a scrap of the working stock. The scrap must be exactly the same thickness as the real work. I think it’s most effective to creep up on the fit. That is, start with a “fat” tail and check it against the grooved sample. Make a fence position adjustment, recut (on both sides of the tail), and recheck the fit. I keep trimming the initial sample until I get the right fit. My final assessment is based on a fresh sample.
Assessing the fit: How tight you make the fit depends on the application. A short joint, such as one that joins a drawer divider to a case side, should close at least halfway with hand pressure and require only a tap or two to seat. You’ll be able to assemble it with glue, and the glue line will look nice and tight.
If you have to pound the tail into the slot, it’s too tight for gluing. If it slides home with firm hand pressure, the fit isn’t ideal, but the joint will hold well when glued. Finally, if the tail piece sides into the slot easily, and especially if it wiggles from side to side, you need to start over. The tail is too small.
With the right fit, the sliding dovetail will provide years of strength and beauty.

Edge grooves are best done on the router table. Set the fence to center the bit on the edge, and make the cut. Reduce stress on the dovetail bit by preplowing the groove with a straight bit. Minimize the tabletop opening – here with a hardboard overlay held in place by the fence – to prevent the work from catching on the opening as you start the cut.

One well-placed featherboard will stabilize even a large panel on end, so you can rout a tail across it. The featherboard is aligned just ahead of the bit, and it is elevated so it’s pressing above the cut. The fence is my regular one.