Chapter • 22
Microadjustable Finger Joint Jig
BY NICK ENGLER
You find them lurking in bins in hardware stores, hanging out in plastic bags in home centers, rusting in baby food jars in garages and basements all across America: flathead machine screws with 32 threads per inch. Few of us ever suspect that these unpretentious bits of hardware could be so incredibly helpful, particularly to those of us who still use the ancient and venerable English system of measurements. These tiny bolts are a cure for many troubles that afflict our accuracy. They can eliminate the error from a trial-and-error method and turn a homemade jig into precision equipment.
Consider the traditional finger joint jig. It’s designed to make evenly spaced square notches in the ends of adjoining boards, leaving multiple tenons that interlock to form a finger joint. The standard finger joint jig has just three parts: a back that you attach to your miter gauge, a movable face that feeds the wood into a dado blade to cut the notches, and a tenon that aligns the wood for each cut. To set up this jig, you must move the face right or left, adjusting the space between the tenon and the dado blade, so the fingers will be properly spaced. If the fingers are too close together, the joint will be loose. If too far apart and they will be too tight to assemble easily.
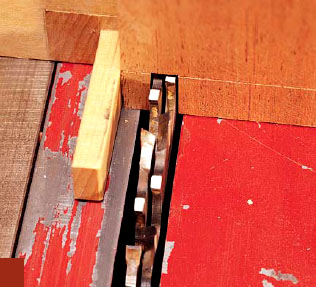
Positioning the face properly is often a frustrating loop of trials and errors. Cut a finger joint, test the fit, move the face, cut another joint, and so on. But if you add one more part to this jig — a small wooden block that mounts a #10-32 machine screw and serves as an adjustable stop — you can escape this frustration.


Because the machine screw has 32 threads per inch, one turn will move it precisely  ”, one half turn moves it
  ”; one quarter turn,
  ”. When the flat head is resting against the face, the face will move a precise amount. No guesswork!
When constructing this finger joint jig remember that the tenon must be precisely the same width as the fingers you wish to cut. I made several faces for my jig, each with different sized tenons.
Make the tenon and stop from hardwood such as oak or maple. Drill a 5⁄32”-diameter hole for the machine screw, then cut threads in the hole with a tap. (You can purchase a #10-32 tap at most hardware stores.) Oak and maple are hard enough to hold the fine threads, but soft enough that they spring back and hold the machine screw in position. To make it easier to turn the machine screw, install a knurled nut on the end and tighten a stop nut against it.
These stops have many other applications besides finger joints. I use them as fence stops on my router table and drill press. I’ve incorporated them in cut-off boxes, tenoning fixtures, and other applications where a small adjustment can make the difference between good craftsmanship and great craftsmanship.
Tip: To keep the dado blade from splintering the wood where it exits the cuts, scribe the length of the fingers on the board. Make the fingers about ” longer than the width of the board so they protrude slightly when you assemble them. Later you can sand the ends and faces flush.
Making a Finger Joint

Initially, set up the finger joint jig by making a few rough measurements with a ruler. The tenon, the dado blade, and the distance between them should all be the same width, in this case, ¼”.
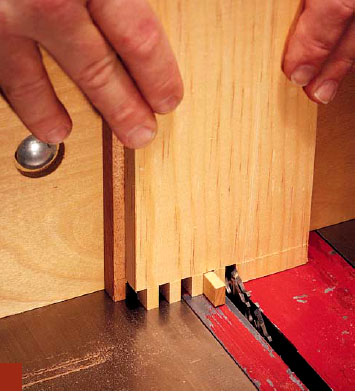
Make a test cut. Butt the edge of the board against the tenon and feed the wood forward, cutting a notch. The resulting tenon should be exactly ¼” wide.

To cut multiple fingers, move the board sideways, fit the notch over the tenon, and cut again. Continue until you have cut all the fingers. Note that the last finger on this trial board is not as thick as the others.

Since the board is 4” wide and the fingers are supposed to be ¼” wide, the fingers should have come out evenly. Checking with a micrometer, I find they are ” too narrow— the tenon needs to be ” further away from the dado blade. I loosen the face and turn the machine screw ½ turn.

When the jig is properly adjusted, it’s time to cut the good stuff. Make a single finger in one of the adjoining boards as you did in Step 2. Turn the board edge for edge and fit the notch over the tenon. Use the first board as a spacer to make the initial cut in the second board.
Place the notches in the boards over the tenon and cut more notches. Continue, cutting both adjoining boards at once. Note: If the fingers are spaced properly and the joint is still too tight or too loose, adjust the width of the dado blade. I invested in a set of thin brass dado shims just for this purpose.