Chapter • 23
Super Simple Dado and Rabbet Jig
BY NICK ENGLER
When building a bookcase, you often must make a series of repetitive dadoes in the long uprights to support the shelves. You could do this on a table saw with a dado blade, but you’ll find it’s difficult to control the long stock as you feed it over the blade. If you have a router, you could clamp a straightedge to the stock and use it to guide the router, but it’s time-consuming to measure and set up for each individual cut.
The dado-and-rabbet jig simplifies both the set-up and the operation. Lock the board between the base and clamping bar, then guide the router along the bar. The stock doesn’t move, so you don’t have to worry about controlling a large piece of wood. The straightedge is also the clamp, so the set-up is very simple.
And that’s not all it does. The jig helps create any long dado, rabbet or slot. You can make repetitive cuts in multiple parts. And you can use it to guide other hand-held tools to make straight cuts, such as a sabre saw or a circular saw.
Making the Dado-and-Rabbet Jig
The jig is just two pieces of wood (a base and a clamping bar). The sizes of both parts is determined by your own needs. My jig is about as long as my workbench is wide. This allows me to clamp the ends of the base to the bench. Not only does this keep the jig from moving around while I’m using it, it also keeps the base flat when I tighten the clamping bar against the stock to be routed.
Make the base from 3⁄4” plywood and the clamping bar from a hard, dense wood such as oak or maple. The bar should be fairly thick from top to bottom so it doesn’t bow when tightened down. If it bows, the clamping pressure won’t be even all across the stock. In fact, the bar will only press against the stock at the edges and the stock will be more likely to slip. This becomes more and more of a problem the longer you make the clamping bar. To solve it, I crowned the top and bottom surfaces of the clamping bar, making it  ” to
” to  ” thicker in the center than at the ends. Even though the bar flexes, the clamping pressure remains even. However, remember that the sides of the clamping bar (the surfaces that will guide your router) must be perfectly straight.
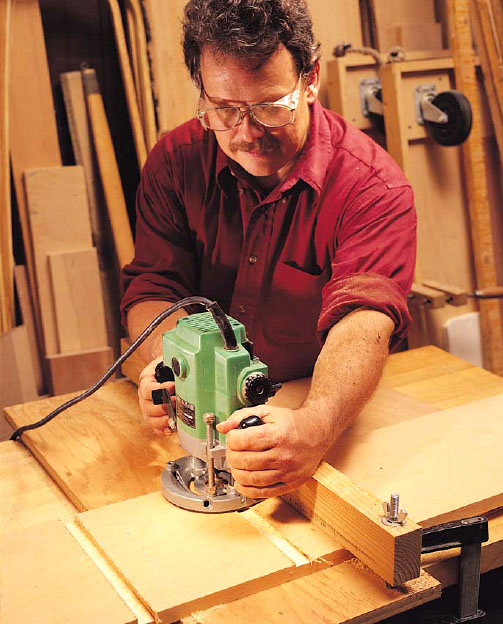
Cutting dadoes in long pieces of material is fast and easy with this simple jig.

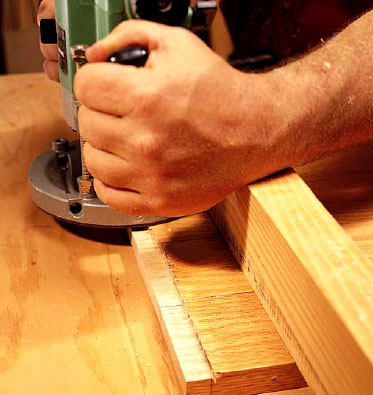
To make a positioning gauge, clamp a scrap under the clamping bar so you won’t cut into the base. Rest a scrap of ¼” plywood or hardboard against the bar and secure it to the scrap with a separate clamp. Then rout through the material, saving the strip between the router bit and the clamping bar.

Use the positioning gauge to align the stock underneath the clamping bar. The edge of the gauge indicates the inside edge of the cut.
Tip: To keep the stock from shifting in the jig, apply self-adhesive sandpaper to the underside of the clamping bar. In some cases, you may also want to apply a strip of sandpaper to the base, directly under the bar.
Drill counterbored holes for the carriage bolts in both the base and the clamping bar. The counterbores in the base recess the heads of the bolts so the base will rest flat on the workbench. The counterbores in the clamping bar provide recesses for the compressed spring, allowing you to clamp thin stock.
The purpose of these springs, of course, is to automatically raise the bar every time you need to move or remove the stock. What do you do if you’re routing thick stock and the springs don’t reach far enough into the counterbores to raise the clamping bar? Simply turn the bar over so the springs are no longer recessed in the counterbores. (This, by the way, is why I crowned both the top and bottom of the bar.)
Making Dadoes and Rabbets
To use the jig, first you must position the stock on the base under the clamping bar. To do this quickly and accurately, it helps to make a positioning gauge from a scrap of thin plywood or hardboard. Lock the bar down on the base and place the scrap so one straight edge rests against the side of the bar. (The scrap mustn’t be under the clamping bar.) Mount the bit you will use to make the cuts in your router, then rout all the way through the scrap, creating a strip about as long as the bar. This width of this strip is precisely the distance from the edge of the router to the cutting edge of the bit, and it becomes the positioning gauge for that specific router and that bit.

You can rout multiple parts by stacking them edge to edge or face to face. However, you must be very careful that all the parts are secure under the clamping bar. If there is a slight discrepancy in the thickness of the pieces, one or more parts may shift during the cut. To prevent this, you may have to use additional clamps to secure individual pieces to the base.
To make multiple identical cuts, such as cutting the cheeks and shoulder of tenons in several rails, clamp a short fence to the base to automatically position the parts. Always check with the positioning gauge, however, before you make each cut.
Lay out the cut you want to make, slide the stock beneath the bar, and turn the wing nuts so the bar is snug against the stock, but not tight. Place the positioning gauge against the clamping bar and line up your layout marks with the edge of the gauge. Then tighten the bar down and remove the gauge.
Rout the dado or the rabbet, keeping the router against the side of the clamping bar. This is like any other router operation (feed the router left to right as you face the bar so the rotation of the bit helps hold the router against the guiding edge). Make deep cuts in several passes, routing about ⅛” deeper with each pass.
If your router has a flat side to its base, keep that pressed against the fence. If the base is round, you may want to mount the router to a square sole for this operation. Router bits aren’t always perfectly concentric to the sole, and the bit may move in and out slightly from the clamping bar if the router turns as you make the cut. This will make the cut curved or wavy.
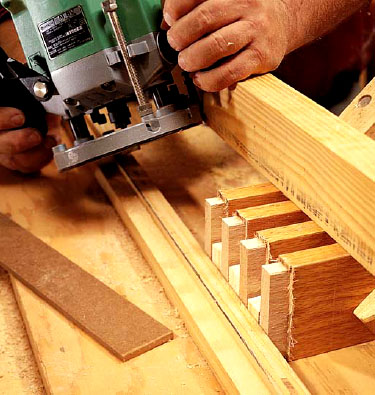
The jig is not only useful for cutting dadoes and rabbets in wide stock, it’s a timesaver for making identical cuts in multiple parts. You can line up the parts under that clamping bar and cut several at once. For example, you can makes tenons in the ends of multiple door rails by cutting four identical rabbets in the end of each piece. To do this, first position two parts under the clamping bar, one near each end. Then clamp a short fence, no taller than the stock is thick, against the ends of the parts. This will automatically position the rails for each cut you make.
Line up several rails edge to edge with the ends against the fence and lock the bar down on top of them. Check to see that each part is secure. If it shifts, you may have to add another clamp behind the clamping bar. Rout the faces of the rails, then turn them over and repeat. After routing the faces, make identical cuts in the edges. If the router seems unstable when routing the edges, either wait until you have enough parts to stack face to face to make a larger platform for the router or put spacers between the parts to spread them out.