Chapter • 27
Shop-Made Mortise Jig
BY GLEN D. HUEY
Reproduction furniture is my main focus in woodworking, so I think one of the most important construction joints is a mortise-and-tenon joint – and not simply the use of a stub tenon, but a full-blown tenon that ranges between 1” and 1¼” in length depending on the project and if there’s adequate depth in the material.
Due to the number of these joints I make, I have a dedicated mortising machine. But if you need to create a mortise and tenon and you don’t have a dedicated machine to use, whip up this simple jig from a few scraps of wood and use a plunge router, a properly sized guide bushing and an upcut-spiral router bit. (You can use a straight router bit, but an upcut bit lifts waste material out of the mortise, so it makes a cleaner cut.)
Make a Slot for a Guide Bushing
The first step in building this jig is to create a slot in a piece of ½” plywood to guide the bit’s location as you plunge into the workpiece – plywood’s stability makes it a better choice. Don’t create a slot that matches the router bit size; you need to match the slot to the guide bushing’s outside diameter.
Select a bushing with a diameter that’s larger than the router bit. For standard ¾” material, I use a ¾”-outside-diameter bushing for two reasons; this diameter is a standard drill bit size and the slot matches the thickness of the stock with which I’m working. When working with ¾” material, select a plywood scrap that’s about 3¾” wide and at least 12” long, then establish a centerline. Chuck a ¾” drill bit into a drill press.
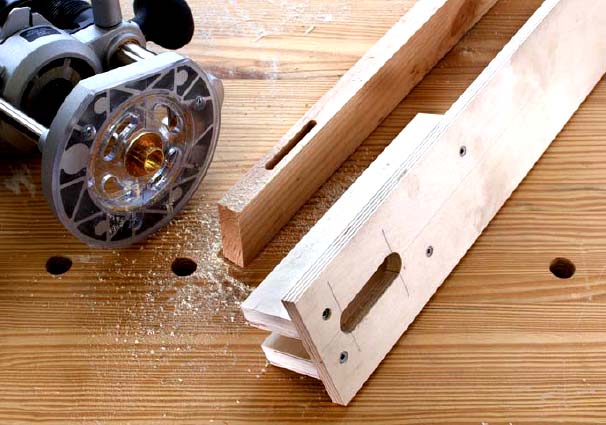
JOB-SPECIFIC TOOLING. A mortise-and-tenon joint is one of the strongest, most useful joints in woodworking. With scraps from the waste bin, you can create a jig that does the job and is simple to use.

MORTISE JIG
To determine the length needed for your specific mortise when using a ¾”-outside-diameter bushing and a ¼” router bit, add ½” to the finished length of your required mortise. The additional opening allows for the differences between the router bit and the guide bushing.
Next, lay out the final measurements on the centerline of the plywood. Position a fence so the center point of the drill bit aligns with the centerline on your plywood. Drill the two end holes first, making sure to position the outside diameter of the bit’s cut with the outside location of the layout.
Once the ends are established, remove the additional waste with your drill bit while keeping the workpiece tight to the fence. When finished, the slot has smooth sides. (You can touch up the sides with a rasp or file if you need to.)
Side Pieces Complete the Jig
For step two, position two additional scrap pieces on either face of the material to be mortised while holding one end of each piece flush with the end of the workpiece. Next, clamp the three pieces into a bench vise. These scraps or side pieces should be nearly as long as the slotted top piece of the jig.
The key to building this jig straight and centered is in the final step. Lay out the mortise on your workpiece; I find it best to do the layout work using the overall length of the slot, keeping in mind that my finished mortise will be ½” shorter. Position the plywood piece on the three pieces in your vise, align the slot with the layout lines at the top and bottom, and with the edges of the workpiece looking side to side. Once you’ve got the slotted piece properly positioned, add a couple clamps to hold everything in place.

EVERYTHING HELD SECURELY. Once the parts of the jig are positioned around the piece to be mortised, add screws through the top to complete the jig.
Attach the slotted top to the two side pieces with #8 × 1¼” screws – two screws per side. Counterbore the holes for the screws. This is not the time to split or crack the side pieces. Pull the assembly from your vise and remove the workpiece. The fit should be snug so it will take some muscle to remove the workpiece from the jig.
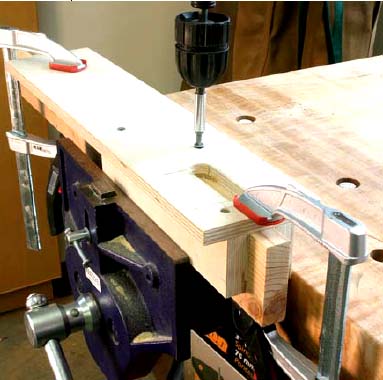
Plunge a Mortise
Set up your router with the guide bushing and a 2½”-long router bit. You’re now ready to work. A bit this long allows you to plunge a mortise just over 1¼” in depth into the workpiece after passing the jig’s ½”-plywood top.
Match the jig’s opening to the layout lines on your workpiece and clamp the two together in a vise or with other clamps. Zero out the router bit by plunging down (with the power off and the router unplugged) until the bit touches the workpiece, then lock the plunge mechanism. Use the router’s depth stop to set the plunge depth.
The base of the router sits securely on top of the jig and the bushing, which fits snugly in the slot, adds to the overall stability. To create the mortise, release the locked plunge mechanism and pull the router setup tight to one of the ends. With the bit standing above the workpiece, start the router and hold tightly against the slot’s end as you plunge to full depth.
Allow the router bit to retract from the hole, slide the router to the opposite end and plunge a second hole. To remove the material for the balance of the mortise, repeat the plunge action, each time positioning the router setup over an unexcavated area.
Once most of the waste is removed and no section remains that bridges the two sides of your mortise, return to one end of the slot, plunge to the bottom of the mortise and make a pass along the entire length to clean and straighten the sides. Make it a point to travel the length while holding the bushing firm to one side, then make a return pass holding tight to the opposite side. The result might be slightly wider than the ¼” router bit, but because you make the mortise section of the joint first then match the tenon, this won’t be an issue.
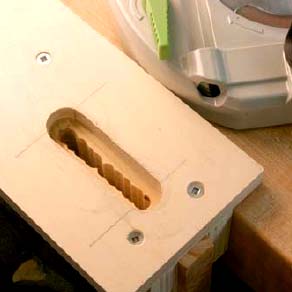
TWO FINISHING PASSES. Once the plunging cuts are completed, finish the mortise with a pass along both faces of the slot. This last step smooths and cleans the slot.
YOU CHOOSE THE LENGTH. The overall length of your mortise is determined by the slot cut into the jig’s top. Make sure to compensate for differences between the bushing and router bit.
This jig is easy to build and can be used repeatedly with consistent results. The only decision you’ll need to make is should you round your tenons to match the mortise, square the mortise ends to match the tenons or create tenons with wiggle room – not snug to the mortise’s rounded ends. I always opt for wiggle room.