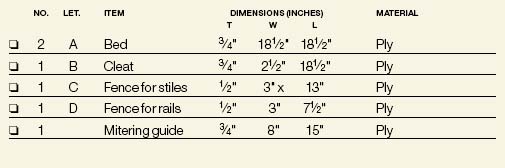
Chapter • 29
Biscuit Joinery Basics
BY CHRISTOPHER SCHWARZ
My first woodworking class years ago was all about hand-cut joints. We cut mortises, tenons, dovetails, half-laps, bridle joints, you name it. All with hand tools. It’s a lucky thing a coping saw doesn’t make much noise because while cleaning out my 114th dovetail pin I overheard a classmate talking about biscuits.
Biscuits, he told us in hushed tones, are a faster and easier way to join wood. But some people, and he looked up at that moment to see if our instructor was looking, think that biscuits are cheating. Well that was enough for me. I had to find out what all the fuss was about.
As it turns out, biscuit joinery is, in actuality, cheating — the same kind of way that nuclear weapons are cheating. Like ’em or not, they get the job done faster than anything else out there. Biscuits aren’t right for every situation (chairs come quickly to mind) but for many projects, biscuit joints are just the thing.
First, they’re strong. Lamello, the inventor of biscuit joinery, has done extensive stress tests on the joints. In one of these tests the scientists joined two pieces of beech end-grain-to-end-grain using a #20 biscuit. This is just about the weakest joint I could imagine. Then they had a machine grab each end and pull the thing apart. It took an average of 972 pounds of force to destroy the joint. Not bad for a little wafer of beech or birch.

The three most common sizes of biscuits: a #0 (the smallest), a #10 and a #20.

Biscuit joiners cut a semicircular slot that’s the perfect size for a biscuit — essentially a manufactured loose tenon. To illustrate how the machine works, we cut a slot in some Lexan,a tough polycarbonate plastic. Though this isn’t a common application for the tool, it handled the job with surprising ease.
Biscuiting a partition in the middle of a panel

The best way to biscuit a partition into the middle of a panel is to use the partition itself as a fence for your biscuit joiner. Here’s how: Mark on the panel where you want the partition to be placed.
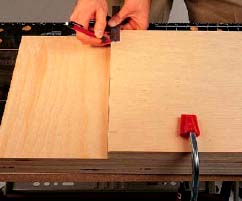
Lay the partition flat on the panel and against the line you marked. Clamp the partition and panel to your bench. Mark on the partition where you want your biscuit slots to go. There is no need to mark the panel beneath it.
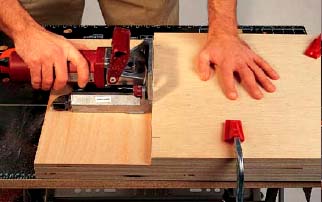
Now remove the fence from your biscuit joiner. Place it flat on the panel and cut the slots in the partition.

Now turn the biscuit joiner on its head and cut the slots in the panel. Use the layout lines on the partition and the centerline on the bottom of the tool to properly line up the biscuit joiner.
Second, they’re fast joints to make. We checked the amount of time it took to make several common joints for face frames. The winner was the pocket screw, but that’s because there’s no clamping time. Take the clamping time out and biscuits and pocket screws are a tie for the fastest method.

ATTACHING A TABLETOP TO AN APRON One of my favorite tricks with a biscuit joiner is using it to cut the slots for tabletop fasteners. Set the fence for ½” (you want the slot to start  ” down from the top of the apron) and make your cuts on the inside of the apron (you can do this after the table is assembled). The “Z”-shaped fasteners now slip into the slots and can be screwed to your tabletop.
Finally, they’re safe and easy to use. It’s difficult to hurt yourself with the machine, and injuries are rare. In fact, I know of only two ways an injury can occur. First, the tool slips or kicks out of a cut and your left hand gets chewed up before the blade retracts. Or second, you plunge the biscuit joiner before you turn it on. The tool walks into your hand that’s holding the piece and up your arm. I’ll show you how to build a simple jig that will quickly clamp narrow pieces and make it almost impossible to hurt yourself.
If you’ve never used a biscuit joiner, it probably will take you about five minutes to learn the basics. That said, there are some tricks to ensuring that all of your joints are perfectly lined up. Because the tool is so fast, it’s easy to get lazy and a little sloppy.
The Basic Basics
Biscuits can add strength to a joint, such as when you join a table apron to a leg. Or they can be used as an alignment aid, such as when you glue up a slab using several boards or you need to glue together veneered panels. The biscuits won’t add strength here, but they will keep your parts in line as you clamp. In a solid-wood panel, the biscuits reduce the amount of time you spend leveling your joints. In veneered panels, biscuits keep your parts in line so you don’t end up sanding through the veneer.
When making a biscuit joint, first put the two parts together and decide how many biscuits you need for that joint. A basic rule of thumb is to place your first biscuit 2” from the edge and then every 5” to 7” or so, though the spacing is really up to you. Draw a line across the joint at each spot where you want a biscuit. Set the fence on your biscuit joiner so the biscuit will be buried approximately in the middle of your material (for example, if you’re working with ¾”-thick wood, set your biscuit joiner for a ⅜”-deep cut. Don’t worry about being dead-on in the middle. If you cut all your joints on one side, say, the face side, everything will line up). Select the size biscuit you want to use and dial that into your tool. Use the biggest size you can.
Clamp one of your parts to your bench. Line up the line on the tool’s fence or faceplate with the line on your work. Turn on the tool and allow it to get up to full speed. Plunge the tool into the wood and then out. Repeat this process for the other side of the joint.
Now glue up your joint. There are at least two ways of doing this. You can put glue in the slots and then insert the biscuit, or you can put glue on the biscuit and insert it in the slot.
For small projects, paint half the biscuit with glue and insert it into one of the slots. Then paint the other half of the biscuit and clamp your pieces together. This method produces clean joints with minimal squeeze-out, but it’s a bit slow.
When assembling big projects, I like to put the glue in the slots first using a bottle designed for this task. Squirt a dab of glue in all your slots and use a spare biscuit, piece of scrap or brush to paint the edges. Put the biscuits in the slots and clamp up. The downside to this method is it’s easy to use too much glue, and you’re liable to get more squeeze-out.
No matter which method you use, be sure to go easy on the clamping pressure. It’s easy to distort a frame made with biscuits. If you’re using a regular yellow glue, clamp the project for at least 30 to 45 minutes before taking it out of the clamps.
Where to Use Biscuits
Making the biscuit slot is easy. The tricky part is knowing when to use biscuits and how many to use. Here are some situations when you should be careful:
Long-grain joints: Many people use biscuits to join several narrow pieces into a panel, such as a tabletop. Biscuits help align the boards so they don’t slip as much when you clamp them. However, don’t let anyone tell you that the biscuits make the joint stronger. In long-grain to long-grain joints, the glue is stronger than the wood itself. So biscuits here are only an alignment tool. Also, be careful to place the biscuits where they won’t show after you trim your part to finished size. Once I raised the panel on a door and exposed half a biscuit. That panel had to go in the trash.
Face frames: Biscuits are just right for face frames as long as your stock isn’t too narrow. A #0 biscuit will only work with stock as narrow as 2⅜”. Any narrower and the biscuit will poke out the sides. To join narrow stock you need a biscuit joiner that can use a smaller cutter (such as the Porter-Cable 557 or Lamello Top 20) or a tool that cuts slots for mini biscuits from Ryobi or Craftsman.
Continuous-stress joints: Biscuits are strong, but I wouldn’t build a kitchen chair with them. The joints in chairs, especially where the seat meets the back, are subject to enormous amounts of stress. Call me old-fashioned, but I’d use a mortise-and-tenon joint.
With polyurethane adhesives: We like poly glue quite a bit, but you must remember that biscuits swell and lock your joint in place by wicking up the water in your white or yellow glue. Poly glues have no moisture in them. In fact, these glues need moisture to cure. If you want to use poly glue with biscuits, dip your biscuits in water before inserting them into the slot. The water swells the biscuit and activates the poly glue.
Biscuiting an apron to a leg

If you’re going to use biscuits to attach a leg to a table apron, then you really should use two biscuits stacked on top of one another. This joint, according to experts and scientists, is nearly as strong as a mortise-and-tenon joint. The other challenge with this joint is you are going to want to offset the apron so it joins the middle of the leg. Here’s the best way to do this. First determine what your offset is. I wanted my aprons to sit ½” back from the legs. Now get a scrap piece of wood that is the same thickness as the offset. Put this block of wood on top of your apron and set the fence on your biscuit joiner to make the first cut. Make the cut on the apron.
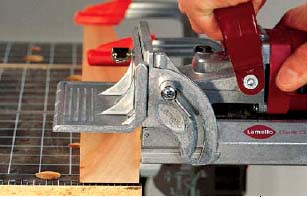
Now cut the biscuit slot on the leg without the spacer. When that’s done, go back to your apron and adjust the fence to make the second biscuit slot.

Finally, cut the second row of slots on the leg without the spacer. When you’re done, you’ve got a double helping of biscuits that’s ready for some glue.
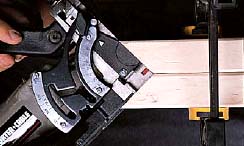
Biscuiting Miters

The fence on the Porter-Cable 557 allows you to biscuit your miters with the fence on the outside of the joint — a nice feature.
You can biscuit miters without using your fence by clamping the two joints together.
If your fence is adjustable only between 0° and 90°, you can cut the joint on the inside of the miter. Just be careful when positioning your tool.

Or, if you have a fixed 90° fence on your tool, you can clamp them together this way to cut your slots.
Biscuit Joinery Clamping Jig
Building tables: If you’re going to build a table using your biscuit joiner, use two stacked biscuits to attach the aprons and stretchers to the legs. This might mean making your aprons ⅞” thick. See the photos below for an easy way to get the apron in the right place and two biscuits into your joint. In fact, whenever you’re joining thick stock it’s a good idea to add an extra biscuit.
With ½” plywood: When using a biscuit joiner to join pieces of ½”-thick plywood, you might have trouble with the biscuits “telegraphing” their shape into the surface of your material. Use #0 or #10 biscuits with ½”-thick material and go a little easy on the glue.
Fence or no fence? Some woodworkers always rest the tool’s fence on the work to control how deep the cut is; others prefer to take the fence off and let the tool’s base ride on their bench or a table. There are advantages to each approach. When you take the fence off and use your bench as the reference surface, you have a large flat area for your tool to rest against and sniped boards won’t throw off your joiner. However, you have to watch for sawdust on your bench and work with all your parts face-down on your bench. Advocates of the fence approach say it’s easier and more accurate to work with your parts face-up on your bench. But you have to ensure your biscuit joiner is square to your work. If you lift up or press down on the tool during the cut, it could throw off your joint. Try each method and see what works best for you.
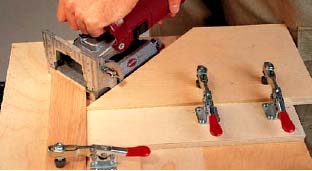
Quick Jig Speeds Your Work
There aren’t a lot of jigs and fixtures for your biscuit joiner. However, building this jig will make the tool easier and safer to use. When I first started using biscuit joiners, I held the wood with my left hand and the tool with my right. After my grip failed me a couple times, I became an advocate of clamping your work in place.
But clamping takes time. This jig makes clamping quick and easy. The quick-release clamps allow you to fix your work in place in a second or two (with almost 300 pounds of clamping pressure) and it gives your biscuit joiner a bed to ride on.
Where Do Biscuits Come From?
As important as the tool itself is the lowly biscuit. These football-shaped pieces of wood are a bit of an engineering marvel. Out of the box, biscuits are about .15" thick, and they fit into a slot that’s about .16”. When the biscuit comes in contact with the water in your glue, it swells up, locking the joint in place. To ensure the joint is strong, the grain direction on biscuits runs diagonally. This prevents your joint from splitting and gives you, in the worst case, a cross-grain joint.
But just where do these little suckers come from? Kathleen Oberleiter, the dealer sales manager for Lamello, says her company has one plant in Switzerland that produces biscuits for Europe and the United States. In addition to producing biscuits under its own name, she says Lamello also makes the same quality biscuits for Makita and Black & Decker (and Black & Decker’s sister company, DeWalt).
Lamello (800-252-6355) employs two people whose job is to find the perfect European beech trees for making biscuits. They look for trees that are at a particular stage of growth and choose those for harvesting. The trees are debarked, cut into thin panels and kiln-dried. When the panels are dry the biscuits are stamped and compressed from those panels. Lamello brags that all its biscuits are within one-tenth of a millimeter in thickness and with a moisture content between 8 and 10 percent.
Here in the United States, Porter-Cable (800-487-8665) started making its own biscuits in Jackson, Tenn., in the mid-1980s, according to company officials. Then the company concluded it would be better to have another company make the biscuits using Porter-Cable’s tooling and equipment. Now Hill Wood Products of Cook, Minnesota, makes all of Porter-Cable’s biscuits. The company also makes Ryobi’s face frame biscuits. In fact, Hill Wood’s plant is the only major producer of biscuits in this country and makes between 60 percent and 70 percent of the biscuits sold in the United States, says Hill Wood President Steve Hill.
Since his company started making biscuits for Porter-Cable, Hill says his company has upgraded the original equipment three or four times and can now easily make 1 million biscuits a day.
Instead of beech, Hill Wood makes biscuits using Northern white birch from Minnesota, most of which comes from within a 150-mile radius of the plant. The trees are sawn using special equipment and then dried to a moisture content between 6 percent and 8 percent. Then the strips of birch are transformed into biscuits by the company’s machinery.
Interestingly, Hill says Hill Wood does not compress the wood for its biscuits and relies on the moisture in the glue to swell the biscuit and lock the joint tight. The company’s equipment is capable of compressing the biscuits, but Hill says he’s found that wood can compress unevenly, resulting in biscuits of different thicknesses. Hill Wood cuts its biscuits within 5-thousandths of the optimum thickness.
So how does birch compare to the European beech? Hill says beech is actually a little harder and the grain is a bit tighter than in birch, but that it’s real close. “The glue or the wood is more likely to fail than the biscuit,” he says.
Freud (800-334-4107), a major player in the biscuit market, has its biscuits made by a Spanish firm that makes biscuits for many other firms, according to Jim Brewer, vice president of operations. Freud’s biscuits are made of beech and are compressed, he says.
Biscuits sold by Ryobi (800-323-4615) are manufactured in Minnesota from beech and are compressed, company officials say.
Kaiser biscuits, which are made in Austria from beech, have been distributed in the United States for the last five or six years by Practical Products Co. (800-847-8839) of Cincinnati, Ohio, according to Donald Baltzer, company president. Kaisers are well thought of in Europe and are compressed during manufacturing.

Hermann Steiner, inventor of the Lamello joining system.
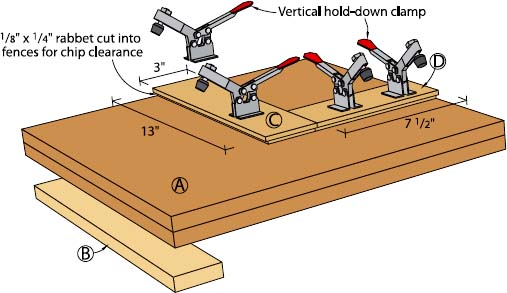
Why is that important? You see, if you retract or remove the fence on your tool, the tool is designed to cut a slot in the middle of a ¾”-thick board when resting on a flat surface. So with this jig you don’t need to set your fence. You simply clamp your wood in place, mark where you want the slot, put your tool on the bed and plunge.
This jig also makes your cuts more accurate because it ignores snipe on the ends of your stock. If you use the fence on your biscuit joiner when building face frames you can get in trouble when the end of the board is sniped. Because of the snipe, your tool won’t cut the slot in the right place and your joints won’t be flush.
With this jig, all you have to do is remember to put all your pieces face-side down on the jig and keep it free of sawdust. Because the tool rides on the jig and not the work, your slot is going to be exactly where you need it.
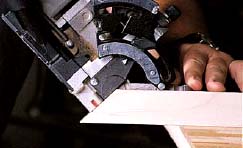
I also made an attachment for this jig that guides the biscuit joiner when cutting slots in miters. This attachment keeps your tool on target and prevents it from kicking left as you plunge.
Building the jig takes less than 30 minutes. The most important part is the bed itself. You want it to be as flat as possible. Glue two pieces of ¾”-thick plywood together and check the “sandwich” for flatness with a straightedge. Then nail another piece of plywood on the bottom of the jig’s front edge so the jig hooks over your bench.
Nail and glue two strips of ½”-thick plywood in the locations shown in the diagram. Then screw the clamps in place. Let the glue dry before you go to work; engaging the clamps at this point can tear your jig apart.
Troubleshooting
Not much goes wrong with biscuit joinery, but here are some of the troubles we’ve run into and how to remedy them.
Sometimes when you get in a hurry your biscuit slots aren’t aligned. The joint will either be whopper-jawed or impossible to clamp shut. Using a ruler, figure out which of the slots is off (it might be both). Glue a biscuit into the botched slot and let the glue dry. Then trim the biscuit flush to your material and cut your joint again.
When your biscuit joiner bogs down and burns the wood, it’s trying to tell you something. Usually your blade is gummed up with resin or it’s dull. Remove the blade and spray it with an oven cleaner. If that doesn’t help, replace the blade.
Probably the weakest feature on most biscuit joiners is the dust collection. Typically, the tool tries to shoot the chips out a small port and into a cloth bag. This usually works for about half a dozen biscuits, then the port gets clogged and dust sprays everywhere when you make a slot. Sometimes this is a sign that your bag is getting old and frayed. The frayed ends cling together and the chips back up into the port and then get clogged. If your bag is old, first try turning it inside-out. If that doesn’t help, just get an adapter to connect your tool to a shop vacuum. That will solve your problem.
Biscuit Jig

This jig is useful for two reasons. First, it will make your tool more accurate. You use the plywood base to guide your tool. That way if there’s any snipe on the end of the board, your biscuit will still end up in exactly the right spot. Second, it will make your work a whole lot faster. The quick-release clamps on this jig (which supply hundreds of pounds of clamping force) will keep you from clamping each piece to your bench, which slows you down. If you’re one of those people who holds your face frame parts down with your hand as you cut them, you’ll find this jig is just as fast as that method, and your work is a lot less prone to slipping.
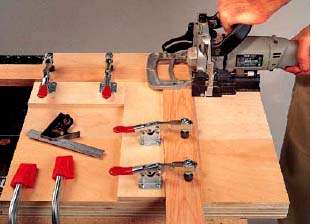
The beauty of this jig is that it holds both a rail and stile in place for cutting. You can cut one right after the other if you please, or cut them one at a time.
If you cut biscuits to join a mitered frame, this jig is quite useful when you add the 45-degree spacer shown in the photo above. The spacer helps guide the tool and prevents it from kicking to the left, something the biscuit joiners are prone to do in narrow stock