Chapter • 31
Cope & Stick Joints
BY GLEN D. HUEY
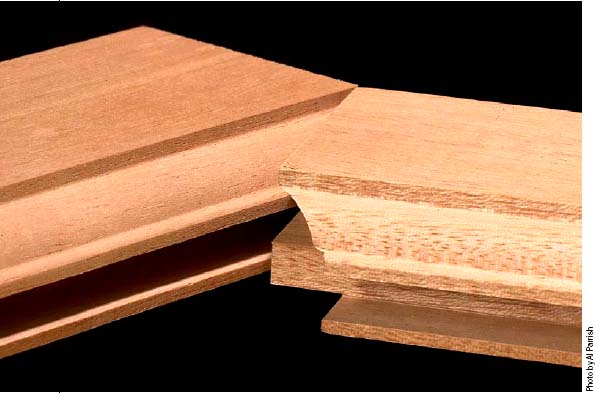
The moulding profile cut in reverse forms an integral part of the cope-and-stick joint.
The so-called cope-and-stick joint – a.k.a. the rail-and-stile joint, the rail-and-pattern joint, etc. – is an efficiency expert’s dream system. The joint is virtually synonymous with raised-panel doors. However, that’s a little parochial; you can use it for constructions other than doors, and the panels don’t have to be raised. But its utility in doormaking is more than enough to merit a place in your power-tool joinery repertoire.
Typically, two separate bits are used. One is the sticking (or stile or pattern) bit, and the other is the cope (or rail) bit. In one pass, the so-called sticking cutter forms the panel groove and the decorative edge profile. With this cutter you machine one long edge of the stiles, and the top and bottom rails, and both edges of mullions and intermediate rails. (To my understanding the term “sticking” stems from the profile being formed directly on the frame member – it’s “stuck” there – as opposed to it being a separate strip that’s attached.)
The cope cutter forms, all in one cut, a stub tenon (or tongue) that mates with the panel groove and the cope of the sticking profile. Copes are cut across the ends of all rails and mullions. Perhaps it’s a bit of stretch to say this, but a coped joint won’t peek open seasonally the way a miter will. Finish carpenters cope architectural trim at inside corners rather than mitering it for just this reason.
The joint thus is cut by milling every frame piece with one bit and selected pieces with the second. I’ve never timed it, but I’d bet that with a little experience, you can set up and cut the joinery for a door in about 10 to 15 minutes.
To fully grasp what I mean about efficiency, compare that two-step process against this routine of the traditional door maker:
• Lay out each joint.
• Excavate the mortises with chisels and a mallet, with a hollow-chisel mortiser, or maybe with a router and jig.
• Next, cut the tenons and then fit them to the mortises.
• Cut the decorative profile.
• Cut the panel groove.
• Trim the profile at the joints, an operation usually called mitering the sticking, so the joints close and the profile on the rail meets the profile on the stile in a crisp miter.
I’ve recently done this. It’s a lot of setups. It required a hollow-chisel mortiser, three router-table setups and two table saw setups. And to get an acceptable assembly, I actually had to use one of those old-time cordless tools – a chisel. With cope and stick, it’s two router-table setups and you’re done.
The trade-off (there’s always a trade-off) is strength. The joint is easy to make, but it isn’t as strong as a mortise-and-tenon joint.
Is it strong enough for the average frame-and-panel application? Personally, I think the joint is fine for doors on cabinets and cupboards, and for casework components. Provided it is machined accurately and glued well, it’s plenty strong. If the strength of a mortise and tenon is deemed essential – for heavier assemblies such as architectural doors, for example – there are good ways to reinforce the cope-and-stick joint, such as with dowels and loose tenons.
Bits are available as pairs of matched cutters or single bits. Single bits are either height adjustable or stacking with a reversible cutter.
To make a frame using this joinery, you need the proper bits and a mid-power, table-mounted router. With a few exceptions, the cope-and-stick bits can be run full-tilt in a 1½-horsepower router.
Preparing the Stock
By industry convention, cope-and-stick bits are designed for ¾-thick stock. Because this stock thickness is standard in most areas of the United States and Canada, you shouldn’t have problems if you buy dressed stock.
You do have some leeway. You can finesse the bit height setting to reduce the profile depth and increase the width of the panel-groove shoulder, or to increase the profile and reduce the shoulder. The problem when you creep below  in thickness is in fitting the sticking profile on the edge and still having enough stock to support the panel groove. As the thickness creeps above ⅞ the problem is the capacity of the cope cutter. You may find it leaves a wafer of waste attached along the stub-tenon shoulder.
For doors especially, the stock must be flat, straight and true. You can get away with using slightly bowed stock for a frame-and-panel unit so long as it isn’t a door. If the wood in a frame-and-panel unit is bowed (not crooked, not twisted, just bowed), the unit will be bowed. If the unit is a structural part of the case, it will be anchored to other elements that may pull it into line and hold it there. But if it is a door, it won’t hang flat, and that problem you won’t be able to conceal.
Dress the chosen stock to whatever thickness you’ve settled on. You also need several pieces for testing the setups, bearing in mind that these particular pieces can be a secondary wood. The important thing, to me, is to plane all the stock to a consistent thickness. I achieve consistency by planing all of it at the same time.
Now rip the stock to width, then crosscut the parts to length. When you cut the rails, you have to account for the sticking width. Usually, but not always, the width is ⅜. So if, for example, you’re making an 18-wide door and using 1¾-wide stiles, the distance between the stiles is 14½. But to account for the sticking, you need to add ¾ to the length of the rails (⅜ for each stile, or twice the width of the profile).
Cutting the Joinery
If you have just purchased a bit or set of bits to do cope-and-stick joinery, I think you should spend a little time getting familiar with it. Take as much time as you need to make both cope and stick cuts. Here’s your goal: a setup block with an edge sticked and an end coped. With that in hand, you can quickly set up the bits any time you need to.
The usual routine is to cope the rail ends first, then stick all the stiles and rails. So that’s the routine we’ll follow here.
Before doing any setup or cuts, reflect on the fact that the cope cut is cross grain. That means you need to back up the work to prevent splinters from being torn from the back edge by the cutter. Depending on the size and number of rails, I’ll gang them up and feed the lot of them past the cutter, pushing them along the fence with a square scrap. The pusher acts as a backup, preventing any splintering.
Some woodworkers prefer to use a more formal guide, such as a coping sled. There’s no shame in that at all. However a sled does impact the bit height setting so you have to accommodate the sled base’s thickness.
The first setup task, of course, is the bit. Secure the cope cutter in the router’s collet. Then establish a height setting. Knowing the industry standards, you won’t be wrong to measure  to ⅝ from the tabletop (or coping sled base) to the corner of the tenon-cutter. You’ll get an ⅛”- to
  -wide shoulder on the stub tenon.

Set the height of the cope cutter by measuring the position of the tongue.
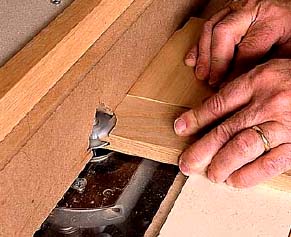
Use a block of scrap to push the end of the rail into the cutter for the cope. It will prevent tear-out and give you better control.

Use one of the coped pieces to set the height for the sticking cutter.
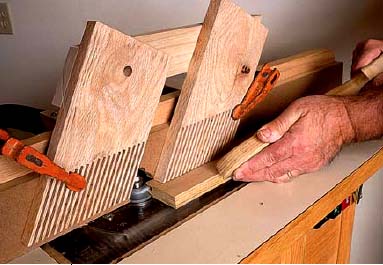
Make the sticking cuts by running the long edges along the fence. Featherboards will keep the stock flat on the surface of the router table.
If you already have a setup block – one that came with the bits or one you made – tuck it into the bit and adjust the bit up and down. If you are using a coping sled, you must, of course, set the block on the sled when gauging the bit elevation.
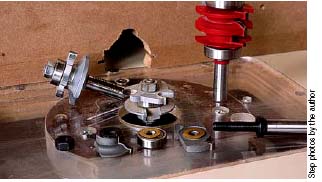
Set the fence next, positioning it with its face tangent to the pilot bearing. It helps to use a zero-clearance facing. The zero-clearance fit is most important on the infeed side of the cutter. If your fence is split, you can feed the infeed half of a sacrificial fence into the spinning bit, right up against the pilot bearing. With the solid fences on my router tables, I use an expendable strip of thin plywood or hardboard to make a zero-clearance opening as shown in the photo above.
Of course you need to make a test cut. If you have a setup block, fit your test cut to its sticked edge. If not, look at the cut and assure yourself it’s not obviously misaligned.
The cope cuts should be completed in one pass. Repeating a pass can enlarge the cut and create a loose fit. In theory, a second pass can enlarge the cut only if there’s some movement in your setup. In practice, there probably is a “skoshe” of movement possible, no matter how firmly you grip the work.
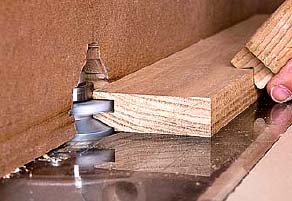
A zero clearance opening in the fence will help prevent chipping as the cuts are made.
Pay attention when you turn the rails to cope the second end. You want to turn them, not flip them over. Mark the face that’s supposed to be up as you make the cope cut. Before you cut, look for the mark.
Rout the sticking second. Chuck the sticking bit in the router collet, and adjust its height. It’s great if you can do this without moving the fence, but that’s not always the case. If you can get away without resetting the fence, you’ll save some time and effort.
If you have a setup block, use it, of course. Otherwise, set the bit against a coped workpiece. Make a test cut, and fit it to one of the coped rails. You want the surfaces flush, and running your fingers across the seam will tell you if you’ve achieved that. If some adjustment is necessary, make it and run a new test piece across the bit. Keep adjusting and testing until you have the fit you want dialed in.
Set featherboards, if you favor their use, positioning them just fore and aft of the bit, where you need the pressure.
When everything is set up properly, after you’ve adjusted and micro-adjusted the bit height, created zero-clearance support around the bit, positioned the featherboards, and done a test cut that resulted in a pleasing fit, rout on. Stick the stiles and the rails. You may find that it won’t take as long to do the work, as it did to set up for it. Taking your time with the setup will guarantee you smooth sailing when you put the parts together.
Assembly
Assembling a cope-and-stick frame is pretty straightforward. Work on a flat, true surface. Apply glue judiciously to the ends of the rails. Tighten the clamps gently, alternating back and forth, and keeping the rails flat on the clamp bars. Very little pressure is required, and over-tightening the clamps will likely distort the joints and thus the assembly. Make sure the assembly is square and flat by comparing the diagonal measurements and by checking with winding sticks.

The pieces should come together flush on their faces (left), not offset (right).

Cope-and-stick joinery is an efficient method for assembling doors and other panels.