Chapter • 34
Face Frame Face-Off
BY JIM STUARD & STEVE SHANESY
Today, many woodworkers move freely between building frameless cabinets and those with face frames, viewing one style or the other as a design consideration only. But to do so and disregard the engineering advantages and disadvantages of each method is a significant oversight.
The assembled components of any cabinet that lacks a face frame or back have an enormous propensity to shift from side to side with only a slight bit of force. Add a face frame to the cabinet and the structure has integrity. Take away the face frame but add a sturdy ½” or ¾” back, and the frameless case is structurally sound.
So now we know that face frames add structural integrity and suggest a certain style (albeit still generic) cabinet. But there’s more. The face frame also provides openings with square corners that make fitting doors and drawers a predictable task.There’s nothing more aggravating than tediously fitting a door in an opening that’s out of square.
Lastly, face frames cover the front edges of the cabinet’s sides and partitions, which are often made from plywood or particleboard.
Face-Frame Components
Face-frame parts have specific names and orientations within the frame. Stiles always run vertically; rails are always horizontal. Stiles always run through, and rails always run between stiles. Intermediate stiles (sometimes called muntins) and intermediate rails are always located within the main frame surrounding the cabinet. An intermediate stile will run between a top and bottom rail, and intermediate rails will always run between stiles.
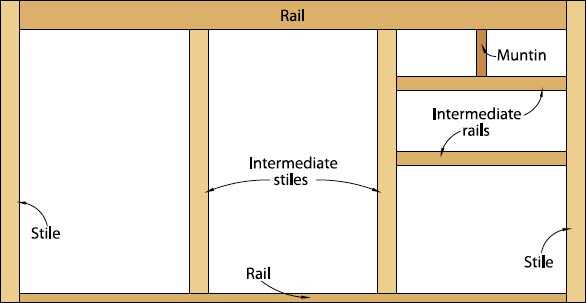
These arrangements of parts help provide a rigid structure that gives the case parts strength. To derive this structural integrity, face-frame components need to be of a certain size. You’ll find that most face-frame base cabinets (the kind you would find in kitchens) have 2”-wide stiles, 3¼”-wide top rails, ⅝”-wide bottom rails and 1½”-wide intermediate rails.
Smaller cabinets can have somewhat narrower parts, but functionality suffers, with stiles less than 1½” and rails less than 1¼”.
Face frames are attached to cases in several ways, and the method used has often been one of the important factors in determining the quality grade of the cabinet work. Face frames with mitered end stiles glued to mitered cabinet sides are a premium grade. Next, frames that overlay the sides and are only glued and clamped would be the next best grade. Lower grades would include frames glued and nailed, on and frames nailed on only.
The following pages show you four common ways to join rails and stiles and compare the ease and expense of each method. All four methods are used in commercial shops and are appropriate for face-frame construction at home.

Mortise and Tenon
A TRADITIONAL AND TOUGH JOINT THAT’S TIME-CONSUMING

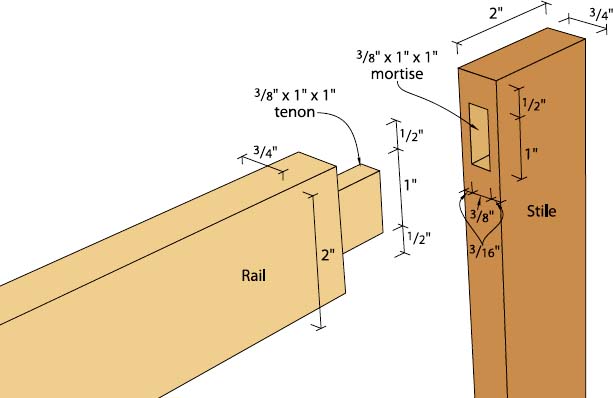
LAY OUT THE MORTISE. Take the tenon you’ve cut and lay it right on the stile that requires the mortise. Use the tenon like a ruler to mark the stopping and starting points of the mortise. Now cut your mortise in the same way you cut the practice mortise.

CUTTING A PRACTICE MORTISE. Be sure your work is clamped down well. Mortising bits are prone to stick and require serious pressure to keep the piece in place. After making the first hole, the drilling gets easier. Use a hole-skipping technique. That’s drilling one hole, then skipping over one chisel width and making another.
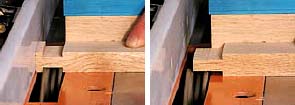
CUTTING TENON CHEEKS. Using a dado head in a table saw is easy. Set a ¾”-wide dado stack to the height of the shoulder on the mortise. Set the saw fence to the length of the tenon (in this case, 1”). Always do a test cut, using the test mortise from the mortise setup. Cut the shoulder first. This keeps tear-out on the shoulder to a minimum. Cut the rest of the tenon and check the fit with the mortise. Next, set the dado stack to ½” high for cutting the top and bottom shoulders. Cut the shoulder first, then finish the cut. Check the fit. It should be snug without being tight.
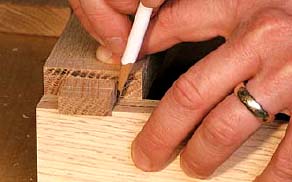
LAY OUT A PRACTICE MORTISE. First mark a centerline down the edge of the part getting mortised. Place the part into the mortiser and line up the point of the bit in the mortising chisel on the line. Always do a practice cut on scrap and use that to check the tenons you’ll make on the saw.
Pros
 More wood-to-wood contact makes it a stronger joint: If you actually measure the wood-to-wood contact that takes place in a mortise-and-tenon joint, there is a greater area of contact here than any other joinery style.
Can be made entirely with hand tools: If necessary, this joint can be made with only a layout tool, a saw and a couple chisels. That makes it one of the cheapest joints to make. However, it is also the most labor- and skill-intensive method.
Appropriate for reproduction furniture: Mortise-and-tenon joinery shows up in the coffins of Egyptian mummies that are thousands of years old. It was used extensively and almost exclusively on furniture made from the Middle Ages up to around the 1850s.
Easy glue-up: There’s no chance of your parts bowing under simple clamping pressure. The tenon provides a solid backbone to the joint.
No material size constraints: You can make any size joint that you want. The tenons on some wider materials will have to be split up to keep wood movement down.
Cons
 Highest skill level required: Cutting one of these joints by hand requires a great deal of time and talent before it can be done with any kind of regular accuracy.
Can be the most expensive method: The machine method shown is very accurate and easy to learn. It also can be the most expensive. Add up the cost of a table saw, mortiser and tooling for both and you can easily go over $1,000.
The slowest method: Either by hand or machine, the layout and setup time required to do mortise-and-tenon joinery is the longest of all the techniques.
Unnecessary amount of strength for a face-frame cabinet: Mortise-and-tenon joinery was necessary back in the days of hide glue and no screws, dowels or biscuits. These days, modern fasteners and glues make this an unnecessary joinery style for face frames. Do it if you like, but there’s a time consideration to be paid for all that historical accuracy.
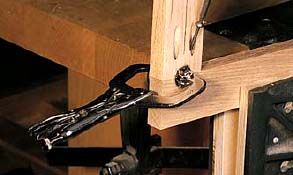
Pocket Screws
SAY FAREWELL TO YOUR CLAMPS WITH THIS HIGH-TECH METHOD

LAY OUT A JOINT. The instructions for the Kreg jig are simple and few. There just isn’t that much to learn. All you really have to do is line up the center on the back side of the part being drilled between the best spacing of the three holes on the jig. To do this, mark a centerline down the middle of the part to be machined.
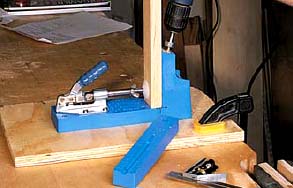
DRILLING POCKETS IN THE RAIL. Place the rail in the jig and with the bit set for the proper frame thickness, drill the angled hole. The bit makes a stepped clearance hole for the special screws used to attach the frame together. The screws drill their own pilot holes into the stile.
CLAMPING AND SCREWING. There are different types of screws. Screws with coarse threads are for softwoods such as pine. Fine thread screws are used for hardwoods. A third type of screw works for both. All three types drill their own pilot holes thanks to a milled notch in the shank that works like a drill bit.
Pros
Few width restrictions: The only width restriction you’ll possibly face is a rail that’s too small for one hole (about ¾”). If you’re using rails the same thickness as the cabinet sides, you might as well nail the parts on and call it a frameless cabinet.
No clamping required: Outside of using the supplied Vise-grip to align the joint for assembly, if the parts are cut square and the correct screws are used, there is no need for clamps.
Fastest joint from layout to finished product: I timed every operation using this jig; without a doubt, it makes a ready-to-apply frame in the shortest time. I came up with less than a minute for each joint. The learning curve is almost non-existent for this method. It’s very easy to pick up.
Self-contained system — except for the drill: The Kreg K4 Master System came with everything you need to get started, except for a corded drill. The kit’s price, about $140, put it in the mid-range for equipment costs when compared to other joinery methods.
Cons
Cost per joint is high: If you don’t want to plug your screw holes, each joint is going to cost you about 8 cents (less if you buy your screws in bulk). If you want to plug your holes, the cost goes up to about 36 cents a joint. Biscuits and dowels cost between 2 and 3 cents. If you’re in a big hurry, saving at least 30 minutes of time when clamping up your face frame can be worth it.
Visible joint on the interior of the cabinet: Requires special (and expensive) plugs if you want to conceal the screw holes.

Supplies
Woodcraft
800-225-1153
or www.woodcraft.com
Kreg K4 Master System,
item #151277, $139.99
FACE FRAME SCREWS:
Troy Sexton recommends
QuickScrews from
S & G Specialty Fasteners Inc.
800-743-6916 or www.quickscrews.com
Sexton recommends S & G’s #7 x 1¼” Hi-Lo thread all-purpose screws (part #7622). Call S & G for a distributor near you.
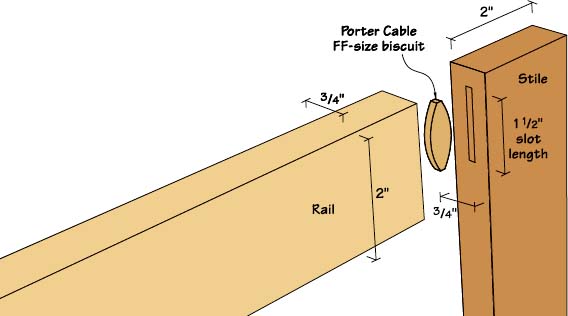
Biscuits
LIKE POCKET SCREWS, BISCUITS ARE QUICK, ACCURATE AND EASY

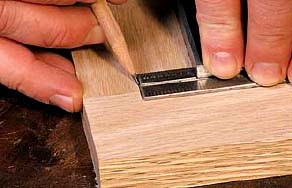
MARKING THE JOINT. When marking the joint for the biscuit slot, butt the pieces together and measure over roughly half the width of the rail and mark a line across the joint. A combination square holds everything square for an accurate mark. Mark your parts all face up or face down so your slots will align.

SETTING THE JOINER. Most biscuit joiners have a scale that shows you where the center of the blade is. Some, such as this one, even have a setting for the center of a ¾”-thick part. Set the joiner and make a test cut on some scrap to make sure you aren’t cutting past the width of the end of a rail.

MAKE THE CUT. If you use Porter Cable’s face-frame biscuit cutter in the Porter-Cable 557, be sure to use a clamp to hold the parts in place. Place gentle pressure on the fence to make sure the joiner remains square to the part.

GLUE UP. One of the many uses I’ve found for plastic lids is as small glue pans. I cut up a disposable cardboard-handled paint brush for applying the glue. Use a small brush with somewhat stiff bristles to spread the glue. This gives you more control of the glue during application. Paint glue on half of the biscuit and press it into one slot of the joint. Then paint glue on the exposed part of the biscuit and assemble the joint. Clamp up your work and measure across the corners to check for square.
Pros
Fast joint: With the exception of the pocket screw jig, biscuit joinery is the fastest method going. All you do is mark a centerline on a rail and stile. Set the joiner and you’re off to the races. This was the first time I’d used the face-frame blade in the Porter- Cable 557 joiner, and I had some problems with the parts moving around. A clamp did the trick.
Most forgiving technique: Pocket screws aside, this is the most forgiving technique. The slots are bigger than the biscuits, so you routinely get almost a ¼” of slop in the joint for alignment.
Learning curve is low: It takes little time to learn how to make one of these joints. While it’s been awhile since I learned how to use a biscuit joiner (over 15 years), I’m always amazed at how easy these tools are to use.
Cons
Biscuits can telegraph through the joint: A biscuit is like a sponge and will wick up moisture in glue. If a biscuit is installed too close to the surface of a joint, it can expand and create a bump in the surface. You see the bump and flush it up. When the biscuit dries, it takes the surface of the joint with it, creating a hollow. Avoid this problem by cutting your slots in the middle of the thickness of the parts.
Stock dimensions have limitations: There is a limit on the smallest width of rail you can use. With the Porter-Cable’s face-frame biscuits, I could only make a rail about 1⅝” wide before cutting through the sides of the rail. You can get smaller dimensions using Ryobi’s Mini Biscuit Joiner. Here are the maximum widths of the rails for common biscuit sizes.
| Biscuit# | Width |
| Ryobi R1 | 1” |
| Ryobi R2 | 1 ” ” |
| Ryobi R3 | 1⅜” |
| Porter-Cable FF | 1⅝” |
| #0 | 2 ⅜” |
| #10 | 2½” |
| #20 | 2¾” |
Biscuits are high-maintenance fasteners: Store them in a dry environment, such as a resealable jar or airtight bag. Here’s a tip for biscuits that won’t fit in their slots: try microwaving them.
Watch for bending: If you use too much clamping pressure, it’s possible to bow the parts. Ease off on the pressure and compensate by placing clamps on both the front and back sides of the frame.
Dowels
THIS JOINT REPLACED THE MORTISE AND TENON AND IS STILL A FAVORITE METHOD OF SOME
IMPROVING THE JIG. Most doweling jigs have marks that are obviously meant to be seen only under a microscope or by a test pilot with 20-15 vision. Improve the visibility of your jig by painting a contrasting paint on the increments. This self-centering jig had a black painted finish so I used white paint. Make a “brush” from a pine splinter whittled to suit the job.

MARKING THE JOINT. Use the same technique for marking dowel joints as you would use for biscuits. You have to be pretty accurate. Mark in about ½” from both sides. On a joint that’s wider than 3”, put a third dowel in the center.

DRILLING THE STILE. Use ⅜” dowels in ¾”-thick material. Clamp the stile so that enough of the edge protrudes from the clamp to attach the doweling jig. Line up the ⅜” hole on the layout mark. You want the hole depth to be  ” deeper than the dowel will go. Use a brad point drill with a stop collar. You’ll find that you get better results when you use a corded drill with its higher speed and torque than you will with a cordless drill.
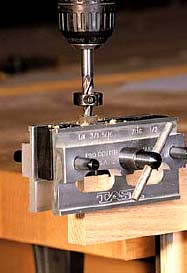
DRILLING THE RAIL. Clamp the rail so its end is sticking straight up in the air. This is when it can get dicey. You have to make sure the jig is clamped to the end of the rail and square with the part. If not, you’ll get a hole that’s out of parallel with the holes on the stile. You might have to transfer the layout marks to the other side of the part and turn the jig around to get the jig to stay put.
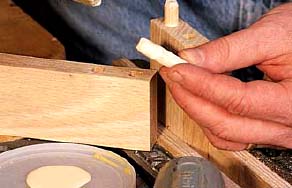
GLUING. Dowels are made with small splines that discourage the joint from “going hydraulic.” What this means is that a dowel without splines (or a spiral cut in the side), can act like a piston when clamped. The dowel effectively plugs the hole, and the resulting back pressure can actually keep a joint from clamping together (or at least make it very difficult to clamp). Put just a small amount of glue in the hole and be sure to apply glue to the dowel as well.
Pros
No material size restriction: Like the pocket hole jig, you can use almost any width of stock for your rails.
Modest equipment costs: All you need is a jig (costing $40 to $70), some dowels and a drill.
Good solid joint for face frames: With the extra gluing area (more than a biscuit but less than the mortise and tenon) this is a very strong joint that is just right for face frames.
Easier than mortise and tenon to learn: The only critical skills are the ability to lay out the joint correctly and holding the jig square with the parts.
Cons
Tricky to align: If you botch the alignment of the holes even the slightest bit, the joint will be difficult or impossible to assemble. Always double-check the jig’s position on your work.
You need good equipment:
A good jig and stop collars are paramount to getting good results. Dowel-it and Stanley both make good jigs.
Dowels must stay dry: If they get any moisture on them, they’re subject to the same problems as biscuits in getting them into a hole.
