Chapter • 36
Make Accurate Half-Lap Joints
BY BILL HYLTON
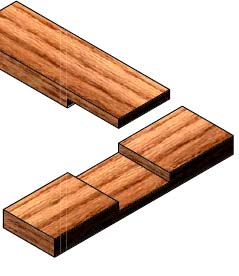
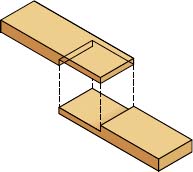
A half-lap joint is strong, versatile and easy to cut. You simply cut recesses in both mating pieces, then nest them together, forming an X, L or T.
Half-laps can be used for all sorts of flat frames. Doors, for example, but also face frames, web frames and picture frames. An intermediate rail half-lapped to the stiles “looks” right because it visually abuts the stile (the way a mortise-and-tenon joint would) rather than crossing it (the way a bridle joint would). On the other hand, a rectangle of end grain is exposed in assembled end laps and T-laps (see diagrams on page 171), which can be regarded as unsightly.
The half-lap can be used in post-and-rail constructions to join rails or aprons to legs. You usually see this joint in worktables rather than fine furniture. But even in the most traditional table construction, the half-lap is used where stretchers cross (a cross-lap).
From a practical perspective, the half-lap enjoys an advantage over the mortise-and-tenon joint in that one tool setup can suffice for both parts of the joint. (There’s more than one way to cut the joint, of course, and some do require two setups, as we’ll see.) You can join parts at angles quite easily. The joint accommodates curved parts, too. You can join curved pieces, or you can shape the half-lapped frame after it’s assembled.
The half-lap is made by cutting dados of equal width and depth on two pieces of wood so that the face surfaces are flush when assembled. Each piece is trapped between the shoulders of the other, so it’s a can’t-fail joint. The wood will break first.
Despite its simplicity, this joint is strong if properly made. The shoulder(s) resist twisting and there is plenty of gluing surface.
But be wary of using half-laps on wide boards. Wood movement can break the joint, so confine the joinery to members no more than 3” to 3½” wide.
You can cut half-laps using several different power tools. Let the job suggest the tool to use and the way to use it, too.
On the Router Table
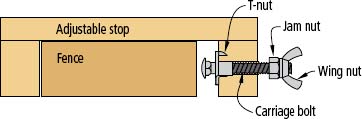
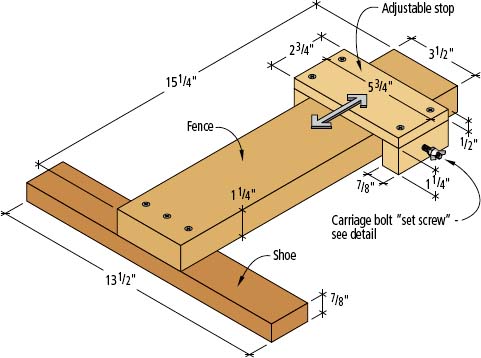
Everyone has favorite approaches, and mine involves the router. I cut end-laps on the router table using a lapping sled I originally made for tenoning. This shop-made device looks like a T-square on steroids (see the drawing at right). The stout fence is long enough to extend from the tabletop edge to well beyond the bit. The shoe rides along the edge of the tabletop. An adjustable stop clamps to the fence to control the length of the cut.
Construction is simple, but pay attention to the details. The fence must be square to the shoe. The edge of the fence must be perpendicular to the tabletop. The adjustable stop also needs to be square to the fence. If any of these is off, you won’t get consistently sized, square-shouldered laps.

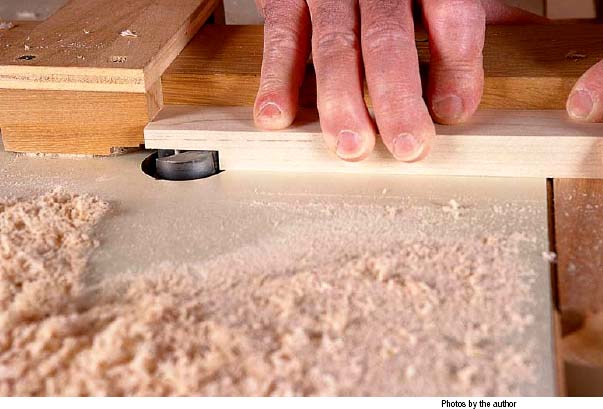
Cutting a half-lap on the router table is fast and accurate using a lapping sled to guide the work and a large-diameter mortising bit to cut it. The guide references the edge of the tabletop and a stop sets the length of the cut.
What bit to use? Well, a straight bit is the obvious choice, and it will work fine. I use what’s variously called a planer, mortising or bottom-cleaning bit. The several bits I have range in diameter from ¾” to 1½ ”, and the vertical-cutting edges range from  ” to ⅞”. The bit is designed to clear a wide, smooth recess. Perfect for laps!
The first time you use the lapping sled you’ll cut into the fence. This cut is what you use to position the stop for the length of lap you want. Measure from the shoulder of the cut (include the cut itself in the measurement, of course). The stop prevents you from making a cut that’s too long.
Be mindful of the size of the cut and of the amount of material you will remove in a pass. You don’t necessarily want to hog out a ⅜”-deep cut in a single pass, especially if you are using a 1¼”- to 1½”-diameter bit.
You probably know there are two ways to moderate the bite: Reduce the depth of the cut or the width of the cut. Here, the most expeditious approach is the latter. Form the full cut in small steps. The first pass should be about ⅛” wide, produced by holding the workpiece well clear of the stop, so only ⅛” of the workpiece extends over the bit. Make pass after pass, shifting the workpiece closer and closer to the stop. One last pass with the workpiece dead against the stop and your lap is complete.
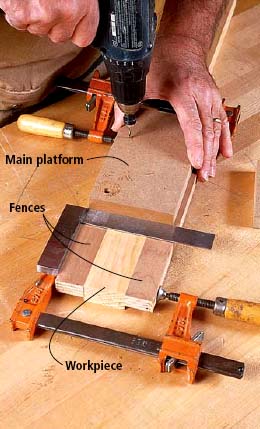
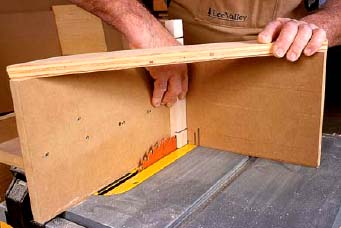
To assemble a lapping platform, capture a workpiece between the fences and align the primary platform on them. The edge of the platform must be square to the work. You can build the simple version of this jig for cross-laps as shown in the photo or add a work stop as shown in the illustration to also cut end-laps.
This approach works well for end-laps, but not for laps midway between the ends of the workpiece. For a cross- or a T-lap, the router table accessory to use is the dadoing sled shown in our April 2003 issue (# 133). You need to use a stop with this sled to keep the work from moving as the bit cuts it, and that helps you place the cut as well. Set the stop to position the final cut, and use a spacer between the stop and the work to position the first cut.
LAPPING PLATFORM
LAPPING SLED
SECTION, ADJUSTABLE STOP
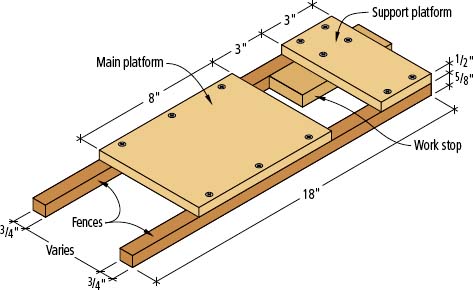
Personally, I think it’s fussy to do Ts and crosses accurately on the router table. Given my druthers, I’d do them with a hand-held router and a job-specific (and thus disposable) jig, such as the lapping platform shown in the drawing below.
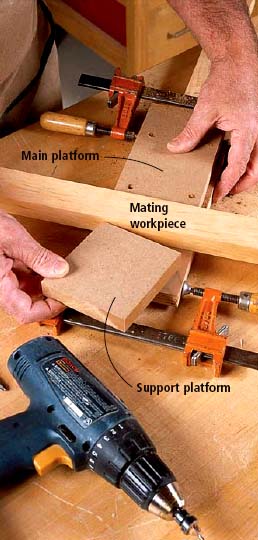
Use the mating workpiece as a spacer to position and align the support platform. Screw the support platform to the fences and you’re ready to get to work.
Hand-held Router
When cutting this joint with a hand-held router, I prefer a fixed-base router, rather than a plunge. I use the same planer-mortising bit, but I mount a pilot bearing on the shank of the bit. The lapping platform I make from four scraps and a dozen drywall screws. I use the actual workpieces to scale it.
Begin by clamping the jig’s two fences to the edges of a workpiece. These fences need to be a bit less than the thickness of the workpieces and their edges need to be straight and parallel for the jig to work well.
Next, set the main platform on the workpiece and the fences. I usually use some ¾” medium-density fiberboard for this, but plywood is OK for this application. Square it on the jig, then screw it to the fences.

Make the cut with a mortising bit with a shank-mounted pilot bearing. Trapped between the platforms, the bit produces a smooth, square-shouldered cut that perfectly matches the width of the workpiece.
Finally, lay your mating workpiece across the first, tight against the platform’s guiding edge. Set the support platform in place and clamp it tight against the second workpiece. Screw it to the fences.
The gap between the platforms is the width of the lap. It is easy to position: You just set the platform edges directly on your layout lines. The bearing rides along the edges of the two platforms while the bit just below it excavates the lap. The bit is trapped, so you won’t get a lap that’s too wide. The fences tight against the workpiece edges prevent tear-out. The platforms support the router and keep it from tipping. Assuming the workpieces are equal in width, you can use one jig on both.
END-LAP/SCARF JOINT
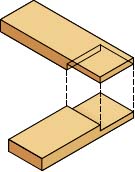
END-LAP JOINT
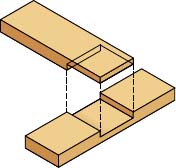
T-LAP JOINT
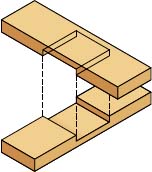
CROSS-LAP JOINT
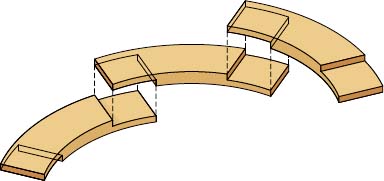
END-LAPS FOR CIRCULAR WORK
I’m touting this for T-laps and cross-laps, but you can use it as well for end-laps. For this use, add a fifth scrap as a work stop. Attach it to the underside of the support platform so the workpiece end can butt against it.
Sawing Half-laps
Not everyone is as enamored of router woodworking as I am, of course. Saws such as the band saw, the table saw, the radial arm saw, the sliding compound miter saw and, yes, even the carpenter’s workhorse – the circular saw – all can be used.
Doing the job with a circular saw or miter saw is a “wasting” process. You adjust the saw’s cut depth to half the stock thickness, carefully kerf the margin(s), then waste the material between the margins with lots and lots of kerfs. Typically, you get a ragged cheek. It has to be smoothed somehow to glue well. But if you’re using a circular saw, you are probably doing something rough, where nails or screws work as well as glue.
The band saw roughs out end-laps very quickly, but it leaves you with a rough surface that needs to be flattened and smoothed to glue well. Some woodworkers opt to rough out half-laps on the band saw, then finish them with a router. To me, that’s extra setups and extra work. Besides, you’ll be hard-pressed to effectively band saw a lap that isn’t at the end of a workpiece.
The radial-arm saw can be an effective tool for half-laps. Set up with a dado head, a well-tuned radial-arm saw will cut end- and cross-laps quickly and cleanly. You can see your layout lines, so locating the cut precisely is easy. You can do angled laps easily; just swing the arm right or left for the cut. You can set stops to expedite production jobs.
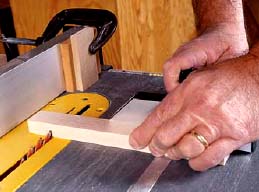
Set the height of the blade to half the stock thickness and cut the half-lap shoulders.
Cut the cheeks using a tenoning jig – this one is shopmade. For the cut, adjust the blade to match the width of the stock. Position the jig and the work so the waste falls to the outside of the blade.
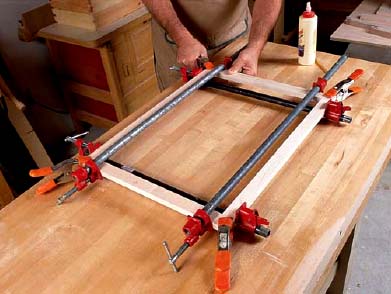
Gluing up a half-lapped frame requires the usual complement of pipe or bar clamps to pull the shoulders of the joints tight. Each joint also requires a C-clamp or spring clamp to pinch its cheeks tight together.
The table saw gives you some options. You can use your everyday saw blade or a dado head. Guide the work with the miter gauge, a cutoff box or a tenoning jig.
I’m sure you can figure out how to use the dado head with either a miter gauge or the cutoff box. This is the fast, single-setup approach on the table saw.
But if you don’t have a dado head or you don’t want to switch from blade to dado set, you can use the blade with a tenoning jig to cut the laps. The routine is to saw the shoulders using the miter gauge, then saw the cheeks using the tenoning jig.
The cut depth on the shoulder cut is critical, of course. If you cut too deeply, you will have a kerf that shows on the edges of the assembled frame. If you cut too shallow, it isn’t ideal but you can correct this with the following cheek cut.
Use whatever tenoning jig you have for the cheek cut. Delta’s block-of-iron model is great, but I don’t think it works any better than the shopmade fence-rider I use. Mount the jig on the saw and position it for the cut, adjust the blade height and saw those cheeks, one after the other.
Assembly
It’s not difficult to assemble a frame joined with half-laps. You must apply clamps to the individual joints, however, in addition to using clamps that draw the assembly together. Use bar or pipe clamps to pull the joints tight at the shoulders. Then squeeze the cheeks of individual joints tight using C-clamps or spring clamps.