Chapter • 41
Right Time for Splines
BY BILL HYLTON
If you want to increase a joint’s strength and simplify its assembly, I suggest adding a spline. It’s an enhancement that is often advocated for edge joints, but it is most appropriate in a miter joint. The process is pretty simple: You cut the grooves in the mating surfaces of the joint and as you assemble the joint you insert a spline, which bridges the seam and links the two pieces.
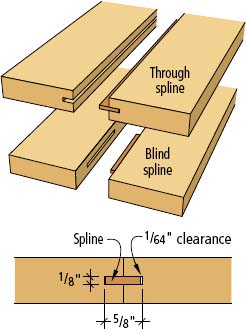
The drawings below show the most common varieties. In the through spline, the grooves are cut from edge to edge and the ends are visible in the assembled joint. In the blind spline, the grooves end short of either edge, making the spline totally concealed in the assembled joint. A stopped spline is the compromise: visible at one end, concealed at the other.
Spline Materials
Because the nature of the spline can have an impact on the method you use to cut the grooves, you should think about whether you want to use solid wood or plywood.
Plywood is strong, because of its criss-crossing plies, and it is stable, meaning you can use it without worries about grain orientation. The primary reservation I have about plywood is with its thickness. It’s surprisingly difficult to cut a closely fitted groove for ¼” plywood, which we all know ain’t ¼”.
At the table saw, two passes with the same setup and with each side against the rip fence gives you a centered groove for an edge-to-edge joint. And you can use the two cuts to customize the groove width. But when your narrowest cut is ¼”, as it is with a dado cutter, the plywood’s thickness is a concern. Even cutting with a 7⁄32” router bit doesn’t produce a good fit. A spline that’s poorly fitted can result in misalignment and a joint that’s weak.
Solid wood splines are extra work, but you can customize the thickness to suit standard, easily-cut groove widths – ⅛”,  ” or even ¼”. Moreover, if the spline is going to be visible, you can use either the working stock, so it nearly disappears, or a contrasting stock, so it’s more of an accent.
Another thing to be wary of is the grain direction in the spline. The grain in the spline should run parallel to the grain in the mating parts, unless you’re using it in a miter. Then the spline’s grain should run perpendicular to the joint seam.
Cutting the Grooves
The primary tools for cutting the grooves are the table saw and the router, either hand-held or table-mounted. Boil down all the joint variations and you discover that you have two basic cuts: 1) into square edges and 2) into beveled edges. When you cut into square edges the setup steps are pretty routine for both the table saw and the router.
• First, select a cutter. At the table saw, ask yourself if a pass with the standard blade (typically producing a ⅛” kerf) will be adequate. Do you switch to the dado cutter, with a minimum kerf-width of ¼”? Can you make successive passes with a careful setup to produce a kerf width between ⅛” and ¼”? At the router table, select either a straight bit or slot cutter, then choose the appropriate dimension of cutter.

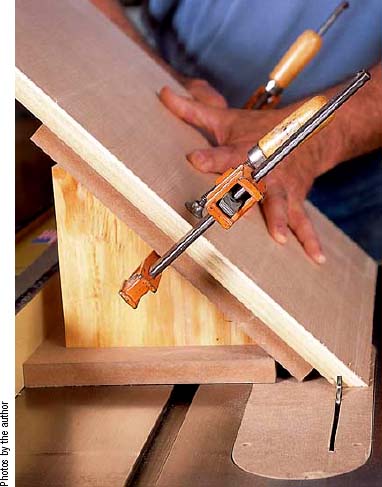
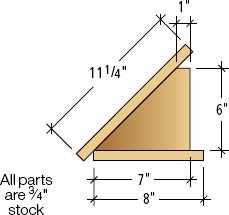
A shop-made angle sled allows you to cut bevels and spline grooves on the table saw without tilting the blade. Clamp the work to the sled’s sloping fence and guide the sled along the saw’s rip fence to make the cut.
• Set the cutter. With your cutter selected and installed, you next have to adjust its height. Raise the saw blade or the straight bit to the depth you want for the spline groove. For the slot cutter, raise it to position the groove; the depth is controlled by the fence.
Appropriate depths vary with the orientation. In a square edge, you can cut ½” or more deep. Limit a cut into a face to about one-third of the board’s thickness. Edge-miters and end-miters should be limited so that you don’t weaken the stock. In ¾” material, a ⅜”-deep slot is fine.

SPLINED EDGE-TO-EDGE JOINTS

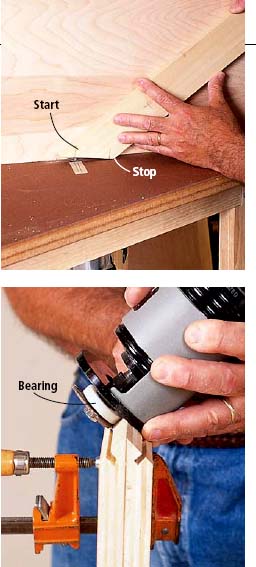
Blind slots for splines can be cut on the router table with a slot cutter. Remove the bearing from the cutter assembly so a zero-clearance facing clamped to the fence doesn’t rob you of too much cut capacity. Starting and stopping points are marked with blue tape.
• Set the fence. The fence guides the work and establishes where the cut will be. (The exception is when you use a slot cutter, as I just mentioned.) Position the fence, then check the settings with a test cut.
• Establish a reference face. Mark each workpiece to ensure you are using the same face on each piece to index the cut. Otherwise, you’ll have misaligned slots.
• Make the cuts. Through-cuts are straightforward, regardless of which tool you’re using. The table saw cuts to full depth in a single pass, as does the slot cutter. With a straight bit, limit the bite to about ⅛” per pass and plan on making two or three passes to complete a groove.
Stopped cuts and blind cuts should not be done on the table saw. They can be done much more easily on the router table with either a straight bit or a slot cutter. Mark the starting and stopping points on the fence, align the end of the workpiece with the mark on the outfeed side and plunge it onto the cutter. Feed right to left until the trailing end lines up with the mark on the infeed side, then lift or pivot the work off the cutter.
• End slots. Slotting the end of a workpiece can be very simple. A tall facing clamped to the router table’s fence can support the work for a straight-bit cut. Use a push block to keep the workpiece square as you slide it along the fence. If you’re using a slot cutter, the work rests flat on the tabletop. That’s a big benefit. On the table saw, you can use a tenoning jig to guide the cut.
Regardless of your approach, it’s a good idea to use a zero-clearance insert around the cutter. You don’t want the work to catch on the cutter opening, whether that opening is in the fence or the tabletop.
A flat miter is square-edged, though because of the angle you probably don’t think of it that way. The pitch of the piece probably will prevent you from using a tenoning jig, but you can mount a tall facing to your rip fence and use a push block, making the cut the same way you would on a router table with a straight bit.

EXPLODED VIEW

REAR VIEW

ANGLE SLED FOR TABLE SAW

Use an angled push block to back up a through-cut in a flat miter. A tall fence facing helps steady the work, and a zero-clearance auxiliary tabletop (an ⅛” hardboard covering for the tabletop) prevents catching the work on the bit opening.
With a flat miter, your push block’s leading edge needs to be angled exactly like the miter. Your piece will be leaning forward when you slot one end, leaning back when you slot the other. Use the same push block for both cuts and just roll it over between cuts.
• Stopped-end & blind-end cuts. Because an end slot is likely to be short even when it is through, making it stopped or blind presents real maneuvering challenges, regardless of the tool. This is a good place to use a biscuit.
Grooving Bevels
The starting point for a successful splined miter joint – whether an edge miter or an end miter – is making accurate 45° bevels on the stock. After cutting all these, lay out the spline groove on one piece. To avoid weakening the tips of the bevels, you want to locate the spline slot very close to the joint’s inside corner. This allows you to make a ⅜”-deep cut without weakening the stock.
Decide how wide your slot will be. The spline doesn’t need to be very thick, and in most instances a single saw kerf is satisfactory. If you want the spline thicker, you’ll have to either use your dado cutter or kerf each piece, then reset the fence to widen the kerf.
With an edge miter, place the fence so the blade tilts away. Feed the stock along it with the sharp edge of the bevel against the fence. With an end miter, use the miter gauge to guide the stock. (The rip fence can safely be used to position the work for this cut.)

DIAGONALLY SPLINED END MITER

A stopped cut in a flat miter involves tipping the workpiece back and aligning it over the bit before plunging and feeding to the stop mark. Lay out the extents of the slot on the piece’s reference face and align them with marks transferred onto the tabletop from the bit to control the length of the cut.
Router Grooving
Splined joinery isn’t the exclusive province of stationary tools. With a router and slot cutter, you can cut the grooves for most every splined joint. A few can be done with a straight bit and an edge guide.
With a slot cutter, the router sets on the face of the workpiece while the cutter works the edge. To alter the cut depth with a slotter, just switch bearings. Installed in a small router, a slot cutter can groove ends and flat miters. Even edge miters and end miters can be grooved with this setup. Clamp two workpieces face to face so the bevels angle to the outside. Rest the router on one bevel and the slotter cuts a groove in the adjacent one, as shown in the photo at right.
Assembly
Fitting the splines comes next. Plywood splines are easy – you just cut them to width and length. If the spline is stopped or blind, the ends usually must be rounded to fit.
A wood spline has to be measured for thickness, then ripped and crosscut to fit. Its ends sometimes must be shaped. For an end miter or flat miter, the spline’s grain should be perpendicular to the joint’s seam. Crosscut strips of a long blank and glue them side-by-side in the slot in one part, then assemble the joint. Assembly is usually uncomplicated. Just spread the glue, insert the spline, close the joint and apply clamps.
The real payoff comes in assembling a miter joint. Typically, miters are difficult to get into alignment and, as clamps are applied, to keep in alignment. That is seldom the case when the miter is splined. The spline prevents the faces of the bevels from slipping and sliding, and you can apply clamps without extra alignment blocks or glued-on, tacked-on, clamped-on cleats for the clamps to grip.

With the work sandwiched face-to-face, you can guide a trim router along one bevel while the slot cutter grooves the other bevel. Use an oversized bearing, positioned as shown, to limit the depth of the cut.
Ease-of-assembly is the whole point of the spline, and it really works.