Let's begin by defining the REST API. This is comprised of four activities: getting the project source code from GitHub with git; installing the necessary packages and reviewing the packages that will be needed in order to run our server; editing and creating the OpenAPI or Swagger definition file in YAML; and then finally handling a POST-ed image in that code that the REST API takes to turn an actual image file into a tensor.
First, we need to clone the repository that we've provided in order to have a REST service. I'm getting this over HTTPS and cloning it with the command line:
$ git clone https://github.com/wballard/kerasvideo-server/tree/2018.git
You can put it in any directory you like. Afterwards, we'll be able to use this source code for the rest of this section, and in the remaining chapters of this book:

Using my locally installed Python, I'm actually using pip here to install the requirements for this service:
$ pip install -r requirements.txt
Installing them into the Python that we're working with will allow us to run the service locally in debug mode. However, if you're just going to review the source code and run and build the Docker container, which we'll get to later on, there's no need to do this step.
Let's open up our models.yaml file:
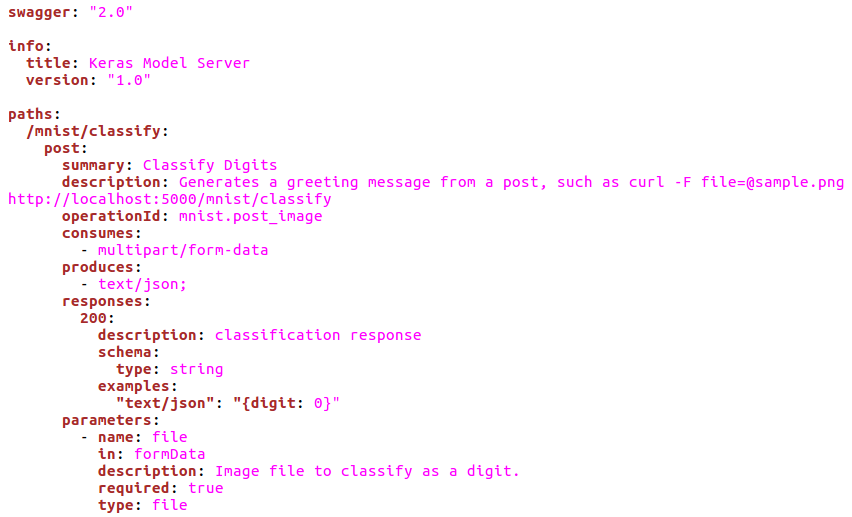
This YAML file is a Swagger API definition, also known as an OpenAPI. Inside this file, the API is defined declaratively; we specify the endpoints, the configurations, the parameters, the return codes, and additional comments that serve as runtime documentation. At the head of the file here, we specify that it's Swagger 2.0, which is the most commonly used version of OpenAPI today. Then, immediately thereafter, we have an information block, which really just describes the name of our API and serves as the version number and title; this is just descriptive metadata about our API. The bulk of the configuration is concerned with paths. You can see from the preceding screenshot that we have /mnist/classify. This is actually our main API endpoint and definition. We specify that it takes a post; we have the summary description and operation ID. The operation ID (mnist.post_image) is what ties into our code in the framework when we actually launch it. If you look at this closer, you can see that it consumes multipart/form data, meaning that we're actually going to be posting a file to this API endpoint, much like you would upload a file with an HTML form. Finally, this is going to return JSON with a 200 result code. The interesting thing about this definition is that we're almost done with our server. By declaring the API with YAML, we then marry this up with a very small amount of code, using the connection framework to provide a REST API.
Let's take a look! We're going to open up our server.py:
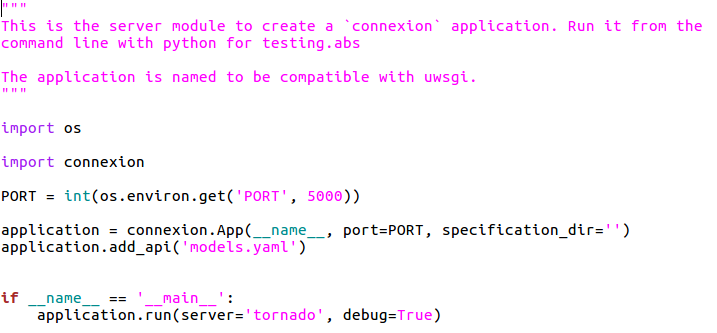
This is the actual code we're going to use to serve the YAML configuration we just made as a REST server. As you can see, there's very little to it. We specify a port, we create a connection application using that name and port, and we add an API with models.yaml. This is probably the most minimal web server or REST server you'll have ever created because the connection framework is using that YAML definition that we just created to dynamically create the REST endpoints and then map through to a final piece of code, which actually serves.
Let's take a look at that now:
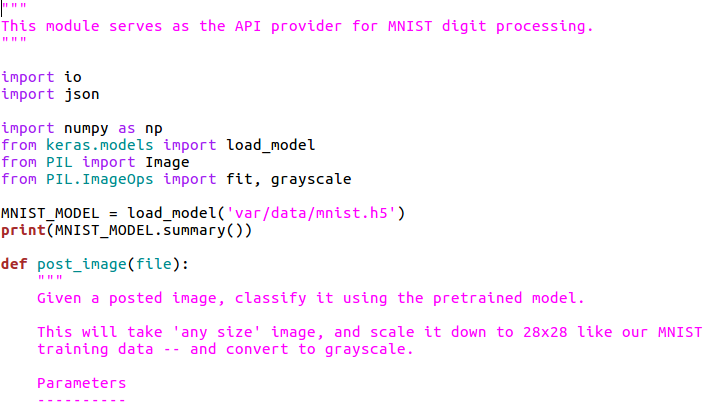
This final piece of code is our MNIST module. If you remember YAML, we had mnist.post_image, which means the module MNIST, and the function post_image. You can see in the preceding mnist.py file that we're importing a few pieces of code, namely the PIL, which is the image library we'll be using to process images. From here, we're going to be preloading the MNIST_MODEL. This is a module-level variable containing the trained machine learning model; we'll take a look at that model in the next section. Now, it's the job of this post_image method to take a file, which is a posted file via an HTML multipart form, take it as bytes (where you can see we have file.read), and turn it into an image with Image.open:

This actually takes the bytes stream of the uploaded file and turns it into an image object in memory. Because we've trained the MNIST_MODEL on the standard size images of 28 x 28, we have to resize the image (just in case you've posted one that's larger than we're used to) and then turn it grayscale (again, in case you posted a color image). So, we're normalizing the data here to match the expectations of the MNIST_MODEL. With that in hand, we're going to resize it. We are going to resize this image using the things we've learned about creating samples and batches. So, the first dimension is 1, which is the sample (again, only one image in this sample that we're posting); 28 x 28 is the size; and then we have 1, which is the number of channels (here, it's just the grayscale). We take this set of data and predict it. This is going to return an array of numbers, which are the 0 through 9 one-hot encodings. We also have to reverse the one-hot encoding, which is the role of argmax. If you recall, it's a batch of 1, so we pick off the 0 with the element of the returned array to match up with our input, and then use argmax in order to find which digit we've been classified as (again, reversing the one-hot encoding). Finally, we return this as a bit of JSON code.
Now that we understand how to make a REST service with connections and hook into the Keras model, let's take a look at turning this into a Docker container so that we can have a recreatable, deployable runtime environment.